If the weather permits, we love to barbecue outdoors with friends. However, if the weather doesn’t allow it, we also… fry it. But in any weather, barbecue without a grill is not a serious matter. If you have a private house or cottage, you can make a permanent, solid installation that combines a barbecue grill and a barbecue grill. They are usually made partly from brick or natural stone, partly from metal. If you don’t want to build something serious, you can weld a metal brazier and place it nearby - in the backyard under a canopy, in the garage, in a storage room, etc. If you are a lover of outdoor recreation in any form, you cannot do without a portable barbecue. And one that will be convenient to carry/transport. This is how to make a barbecue out of metal with your own hands and will be discussed further.
We grill kebabs both when the weather permits and when it doesn’t... that’s why we need a grill at any time of the year
Design selection criteria
Very often, when choosing a material for a barbecue, preference is given to metal. It is characterized by durability, resistance to severe temperature conditions and other factors. Some components of the structure are fastened in different ways. But the welding method is the most reliable and optimal in this matter.
Today, properly cooking a barbecue is a basic task. Many owners do not want to create any ordinary designs. And therefore they are equipped with additional elements. These include:
- A firebox in which you can heat food.
- Special compartments for drying firewood.
- Shelves for various culinary additives and spices.
If you set out to cook a barbecue with your own hands, then before the creative process itself, study photographs and diagrams of various modifications. They are easy to find on the Internet. So you will choose a specific model for yourself. It is also useful to watch video instructions. In them, the craftsmen describe in detail and practically the welding of the structure. This helps to be aware of the potential difficulties of the upcoming case in advance.
In practice, creating a metal barbecue is not so difficult.
Just decide the following questions in advance:
- Will the structure be disassembled or will it be monolithic?
- Dimensions. How many people is the device intended for? This aspect affects its parameters and the number of skewers that can be used in it at one time.
- What service life will the product have? These criteria are determined by the choice of a particular metal.
- What appearance will the structure have? To do this, you should study many photographs and options with different designs. You can choose the one that suits you in style and color. It’s best if you find video material on the construction of this particular model.
Making stationary models
There are several ways. They are not very different, but still there is a difference.
Method one: with a minimum of welds
It can be used if you have a large enough piece of metal on which the entire “reamer” will fit. In this case, mark out all the dimensions found above and cut out the “extra” corners. Then carefully trim the bend points with a grinder: it will be easier to bend.
We start everything by drawing dimensions on a sheet of metal, then cutting out the extra corners
Next, we begin to work with the welding machine. Inverter welding machines are best suited for welding 2-3 mm metal. Probably, a barbecue is the best product for a novice welder. There is no need to seal the seams here. Holes are even welcome - combustion air will flow through them. Having applied four seams, we get a finished barbecue box.
Bend the workpiece, then weld the seams
If the metal used is thin - 1.5-2 mm, the bottom and walls may bend. To prevent this from happening, they can be reinforced with a corner or profile pipe.
The bottom and walls can be strengthened so that they do not bend due to high temperatures
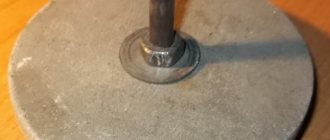
Next, all that remains is to weld the legs. They can be from corners or pipes. The options are different, but both can be used. See the photo for how to weld pipe legs to a metal grill. By the way, you can use the same principle to make legs for a collapsible barbecue - choose the diameters so that they fit tightly. Or weld nuts to the bottom and cut threads on smooth fittings of the appropriate diameter.
How to attach pipe legs to the bottom of a metal grill
Another way to make legs from corners or profile pipes. Here everything is even simpler: weld in the corners.
As legs for the barbecue, you can use an iron corner or a small-section profile pipe
Method two: a lot of welding
This case is suitable for you if you have metal, but it is available in small pieces. Then you simply cut the necessary blanks and then weld them. In this case, of course, the welds need to be applied more efficiently: their length is much greater.
The second way to make a metal grill with your own hands is to cut all the necessary parts for the box and then weld
After the box is assembled, all that remains is to weld the legs. There are no differences here. Several options are described above.
Method three: on a frame made of corners
The sequence of actions differs from the second option. Perhaps this is a more correct way: there is a frame that will prevent the metal from bending. In general, such a homemade grill turns out to be more durable. Afterwards the sequence of work is as follows:
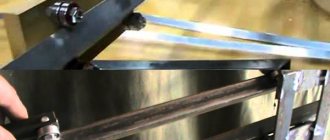
- weld a frame from corners (pictured on the left) or a profile pipe (pictured on the right)
- You weld the bottom to it, and then the walls.
These metal grills are made on a frame
Well, if you are making a barbecue for yourself, with your own hands, it may make sense to provide a tabletop and/or a frame for laying skewers for comfort, as in the photo below. The top edge of the roasting pan is reinforced with a profile pipe. The reinforcement is welded so that “add-ons” can be inserted. So both the table and the stand for the skewers can be inserted or not as desired.
Homemade metal grill with options: table and stand for skewers
And for those who like to do everything thoroughly, there is the idea of an iron barbecue under a canopy. Wonderfully done. This metal barbecue with a roof was made by a novice welder with his own hands. He used this project for training: he learned to cook using inverter welding. A very good idea, and the execution is not bad.
Homemade barbecue under a canopy with a “kitchen” corner
Dimensions calculation
The parameters of the planned barbecue are the key criteria. They determine the ease of use of the unit for its intended purpose.
If it is used by a family with a standard number of people (3-4), then a 60 x 35 cm model will do.
For a team with a large number of people, it is necessary to use a larger structure.
Photographs of standard and non-standard versions are easily found online. You may come across photographs in which the traditional version is supplemented with many components and devices. They expand its functional range and decorate its appearance. It is not difficult to create any metal modification. And the welding process can be carried out with your own efforts.
For example, you can act according to this drawing:
There are plenty of similar and other drawings on the Internet. You can easily build your work on their basis. It is important to solve the dilemma with the number of skewers simultaneously on the welded grill.
An equally important aspect is the depth of the device. Its approximate value is 15 cm. In this situation, there will be the necessary clearance between the product and the coals for cooking. The height of the grill should be as comfortable as possible for the cook.
Corrosion protection using paints and varnishes
It uses heat-resistant compounds without harmful substances that can evaporate under the influence of high temperatures. It is advisable to use silicone-based enamels, powder mixtures, and products with titanium dioxide. To apply powder variations, you should contact a car repair shop. The most practical color is considered black; paint is applied only on the outside.
To ensure strong adhesion, the surfaces are cleaned using sandpaper, a metal brush, or a grinding machine. Next, they need to be degreased with acetone and white spirit.
To apply liquid compounds, a roller is suitable; you need to make 2 layers. Spraying of substances in the form of aerosols is carried out at a distance of 20-25 cm, here you will need 3 layers, and each previous one must dry thoroughly.
As protection against corrosion, bluing in the form of a black heat-resistant film on the surface is popular; it can be used to cover the grill outside and inside. You will need:
- 5% sulfuric acid solution;
- caustic soda;
- laundry soap.
The acid solution is poured into a container and the structural parts are placed there. After 5 minutes, they are transferred to another container in which a soap solution is prepared at the rate of 50 g per liter. At this stage, a 10-minute boiling of metal parts is organized. In the third container, dilute 50 g of caustic soda for each liter of water, heat the solution to 140⁰C. After boiling in soap, the products are placed in a third container for 90 minutes, then washed with water.
Selection of materials
It is possible to independently create a metal structure using different materials. The main thing here is not to make a mistake with the metal. The chosen option should guarantee the maximum operational period of the future structure. Basically, one rule works here: the thinner the metal thickness, the shorter the operating life of the unit. For this reason, a material with good density should be used. Under no circumstances use sheets whose maximum density is 1 mm. They will make a rather weak structure.
Another example of a drawing:
To obtain high quality material with a long working period, the following materials and tools are required:
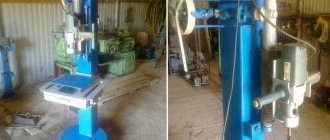
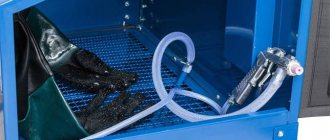
Brazier with pipe
- Metal sheets. Their parameters and thickness are optimal.
- Metal corners. These form the legs for the apparatus.
- Welding equipment for connecting metal components.
- Electric drills.
- Bulgarians. It should have discs that cut metals.
- Set of electrodes.
- Measuring tools: tape measure, level, regular ruler.
Additionally, drawings are prepared. You can borrow them from the Internet, or you can make them yourself.
Painting the barbecue
Having figured out how to cook a grill, you can paint it. Naturally, any paint will not work here, but you should use only one that can withstand moisture, sudden temperature changes, fire and can be applied to metal.
You can paint either a new grill or one that is already in use. To do this, the surface is thoroughly cleaned and rust is removed. The use of chemicals is not recommended, and only metal brushes and sandpaper should be used.
Use only heat-resistant paint, ideally heat-resistant. Only this option can withstand the burning temperature of wood. For these purposes, the following paint and varnish materials can be used:
- “Termika” (KO-811) is a heat-resistant enamel that can withstand temperatures up to 600 degrees, and additionally has anti-corrosion properties;
- KO-8101 is another heat-resistant enamel, available in twelve colors, capable of withstanding temperatures up to 650 degrees;
- “Certa” (OS-82-03T) is a special heat-resistant paint that can withstand heat of no more than 900 degrees.
“Certa” paint for fireplaces and stoves Source stroimaterials.ru
- “Rust-oleum” is also a heat-resistant enamel, available in only three colors (black, gray and white), its main advantage is that it can withstand heating up to almost 1100 degrees.
Most often, black paint is used to paint barbecues and awnings. It looks very beautiful in combination with forged elements painted in a golden shade.
An original option for decorating a stationary grill Source grilana.net
The technological process of creating a barbecue using welding
Here it is important to decide what kind of structure you are planning - stationary or portable. The first can be installed in a specific place and for a long time. The second one can be transported without problems.
Typically, the use of welding equipment is necessary when producing a stationary version. Before the work process itself, be sure to watch the video tutorials and decide how you will decorate the future device.
The work algorithm here is as follows:
Stage 1. Initially create cuttings. Lines must be marked on metal sheets. The guideline in this process is a previously made or copied drawing.
Stage 2. All the main components of the intended design need to be cut out of the working material. The work proceeds in accordance with the existing markings on the sheets. A bottom should form. This is the largest component. It is formed by four lateral parts. Two of them are short, and the other two are long.
Stage 3. Be sure to make holes in the long side components. They can simply be drilled in one line. They guarantee the penetration of oxygen into the firebox to the coals. And then the heat required for normal working process will be maintained in your device. The distance between the holes should be approximately 5.5 cm. Make sure that there is at least 2.5 cm left to the edge.
Manufacturing technology of a collapsible fryer
First of all, a drawing of the barbecue is sketched out on paper with the dimensions indicated on it. In purely constructive terms, this device is a parallelepiped. That is, all its opposite paired walls are equal to each other. The only plane that is present in a single form in the roaster is the bottom.
The development of drawings for barbecues must be approached thoroughly. Because this is the basis of the future design. This is where the proportions of the frying pan are displayed. And although this is of little importance for a portable, collapsible version, a certain aesthetic side must still be present in the design.
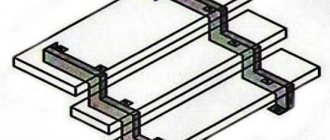
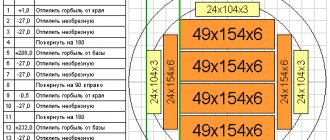
See the drawing below, which shows the full details of the structure. This is exactly how the masters sketch it out on paper. The main task is to show the dimensions of each part, because they are each manufactured separately. And precise dimensions will help you arrange the parts into a single whole without adjustments.
Drawing of the barbecue and its parts Source remontik.org
If the drawing of a metal grill with dimensions is ready, the master proceeds directly to making the brazier.
See also: Catalog of companies that specialize in the installation of fireplaces and stoves.
Materials
As mentioned above, the material you will need is a steel sheet with a thickness of 2 and 3 mm. Reinforcement with a diameter of 10 mm can be used as legs. To connect the parts of the fryer you will need eight M6 or 8 bolts.
Marking
According to the drawing, all dimensions of the grill parts are transferred to a sheet of iron. As already mentioned, there will be two side walls, end walls too, and one part of the bottom. The paired walls are identical.
You cannot scatter markings all over the sheet. Many of the dimensions of the parts are the same, so the edges of the two parts will be indicated by a single line. This way you can save money by reducing waste.
You can find cut sheets of metal on the market. If you correctly arrange (make a competent diagram of the arrangement of parts) the markings, then you can purchase not a whole sheet, but a cut one. It costs several times less.
Metal marking Source setfsb.ru
Now the important point. The parts of the barbecue are connected using bolts (as one of the options), so sides are made under the joining points, which are bent inward from the main plane of the walls by 90°. In this case, on the side walls, the bend is made at three ends with fastening to the end walls and the bottom, on the end walls only on that side - to the bottom. Bend width:
- if an M6 bolt is used for connection - 10 mm;
- if the M8 bolt is 12 mm.
This parameter must be added to the dimensions of the parts. For example, if the length of the barbecue is 50 cm, then the length of the side walls is 52 cm, because a fold of 1 cm is added to it on both sides.
Cutting, bending, drilling
The next stage is cutting out all parts of the grill exactly along the marking lines. This is usually done with a grinder with a cutting diamond blade. You can also use other tools: a plasma cutter, a jigsaw with a metal blade. Cutting must be carried out exactly according to the applied markings. Everything must be done carefully.
Cutting with a grinder Source chrome-effect.ru
In the end, you should get five parts: side walls - 2 pieces, end walls - 2, bottom - one.
The next operation is bending the connecting areas of the grill parts. On the cut out parts of the roaster, indentations for bends are applied. Again, a ruler and marker are used. There will be three lines on the side walls: two parallel (to connect to the end walls), one perpendicular to them (to connect to the bottom). There is one line on the end walls. It should coincide in location with the line for the bottom.
A shallow cut is made along the drawn lines; it is not through, but with a small indentation of up to 0.5 mm. This is done in order to bend the bends easier and more evenly. Notice on the side walls where the cuts of perpendicular lines will create squares in two corners. They are cut off completely.
Now bends are made using a hammer. The workpiece is placed on the edge of the table, it is better if it is trimmed with a steel corner, and with light blows the edge of the bend is bent along the cutting line. The bending angle is 90°.
Drilling holes Source grandado.com
Advanced version
A metal grill created independently can always be improved and supplemented with useful components. One of these is a canopy. Example:
In this design, both a table top and a frame for placing skewers will not hurt. The top of the roasting pan can be reinforced with a profile pipe. You need to cook it so that there is room for possible additions.
Example:
It is not necessary to cook a barbecue of this format. There are other design variations.
Legs made of brick and stone
This material is used in the construction of stationary frying complexes. Stone and brick supports are highly durable and reliable. When deciding on the choice of such material, the owners of the site are guided by its presentability. A stationary barbecue complex harmonizes well with a brick house, paving stone paths and platforms and alpine slides.
In order for the stone supports to maintain a vertical position, it is necessary to build a foundation for them. It is made in the form of a monolithic slab or individual blocks.
Making brick supports on a concrete foundation requires the following tools and materials:
To build a stone hearth stand, you need to follow these steps:
- Make a foundation. After marking, holes are dug 40-80 cm deep, depending on the type of soil. A cushion of sand and crushed stone is poured into the hole, and a reinforcement frame is installed. Concrete is poured, compacted and leveled.
- After laying the waterproofing, supports are erected. The optimal width is 1 brick. The height is selected based on the size of the fireplace and the height of the cook.
Grills without legs, which are made independently or purchased in specialized stores, are attached to the erected base. If necessary, the stone is finished with plaster or fire-resistant tiles. If the cladding will not be used, it is recommended to treat the brick and seams with hydrophobic impregnation to protect the material from moisture.
Other design variations
Barrel based
To create the necessary structure, a metal barrel will do. When using it, the work is done quite dynamically and simply. Since barrels usually have impressive parameters, barbecues from them are created large and massive. They provide for preparing meals for a large team.
If you use a barrel like this, be sure to make a lid for the intended apparatus. During its operation, it must be closed with a lid. This ensures uniform and perfect roasting of the food being prepared.
Balloon based
There are two ways to work here. One by one, a more complex structure is created. The second one is simpler.
In any case, you must first secure the cylinder. His tap is unscrewed. A hose with water is supplied. Water follows under gentle pressure. The cylinder is completely filled. After which metal cutting is allowed.
Usually a 50-liter container is used, the outer diameter is 96 cm. This is the optimal data for creating six large servings of kebab.
Markings are made along the longitudinal seam. All distances are calculated using it.
A distance of 24 cm is calculated from the seam on both sides. Lines are drawn. The balloon is in a horizontal position. On one line, markings are created for skewers. From the circular seams on the right and left sides, the indent is 3 cm. Then marks are placed constantly every 8 cm. Total – 6 marks. Holes are drilled in them. The approximate diameter of each is 1 cm.
You need to move 10 cm upward from the marking line. Here is the end of the device cover. Then she marks herself. This is the distance between the starting line and the last one. Between them, at a distance of 3 cm from the circular seams, lines are indicated.
Then the hinges are immediately welded. An assistant is needed here.
The door is cut off with a grinder. Water pours out of the bottle.
The lid should not fall back. Therefore, two corners 3-4 cm wide are welded between the hinges along the cut line. They should be on the right and left sides of the lid.
The degree of bending of the corners determines the opening distance of the lid.
The bottom rim is removed. A wooden handle is mounted to the lid.
To prevent the lid from falling inward, you need to weld a metal strip to the cutout. Its density: 1-3 mm, width – 3 cm.
Holes for skewers are made according to the markings. A drill is used. The same holes are also placed on the opposite side in the same positions.
The cylinder turns upside down. There is a 10 cm indent from the seam on both sides. From such lines there should be another 10-12 cm indent, lines are drawn. The seam created two stripes in the middle. Their width is 10 cm. Slots for air are made in them at a distance of 5 cm. Instead of slits, you can drill many holes.
The tap is removed. The hole is welded.
Legs are installed.
A simpler version is created like this: the cylinder is sawn lengthwise into two equal parts. Many air holes are drilled along the edges. Legs are attached.
Creating portable versions
They are great for saving in nature. You can buy them or make them yourself.
Their types: prefabricated and folding. The format of the second is a suitcase. Example:
Here the fastenings are door hinges. The legs are thin.
Another version:
Here the legs are folded at the bottom. Other components are stacked one by one. The side parts are connected by cuts.
Collapsible versions are formed by components that do not have fastenings. Assembly takes place on site. It can be bolted. Maybe with grooves and cuts. Such products are made without welding. The work is done with a grinder (it has a diamond blade) or a metal saw.
Creation:
- A cardboard mock-up is made in advance. It fits perfectly to the dimensions of the product.
- The patterns are transferred to metal.
More versions:
Here are the legs from the corners. The legs have slightly bent cuts. There are holes in the sides for them. During assembly, the side parts are threaded onto the cuts.
The bottom has no fixation. The underside of the sidewalls is bent inward by 4 mm. The sides are attached to the legs. A side is formed around the perimeter. The bottom is laid on it.
Making a barbecue
First, you need to choose the type of product and determine the dimensions. Next, the material is selected.
Collapsible grill (assembled and disassembled) Source remontdacha.ru
Metal model
Sheet steel is used, it is easy to create and has a favorable price. Often, instead of sheets, steel cylinders and barrels are used, supplemented with angles and pipes. They can be assembled without welding using bolts or grooves.
To create a future design you need:
- metal processing tools;
- the metal itself;
- drawing;
- cut the metal, bend the bottom of the side walls and the edges (adjacent to the sides) of the large ones;
- make grooves on the legs and sides;
- make holes for air and for skewers.
After this, you can assemble the structure. It is useful to make carrying handles.
Welding a barbecue Source 40bob.ru
It can also be fastened by welding. The structure will not be collapsible, the grill will be much stronger. But all the parts are welded to each other; there is no need to make bends, holes, or grooves.
See also: Catalog of gazebo projects
Barbecue from a gas cylinder
How to properly cook a barbecue from an unnecessary cylinder and what are its advantages? The cylinders are made of high-strength metal, so the grill will last a very long time. The design is as simple as possible and can be closed; the product is inexpensive, functional and mobile. However, you will have to cook in it only with the help of coals and the product turns out to be heavy, so for transportation you will additionally need to make legs with wheels.
The creation process is as follows:
- All the air is released from the cylinder and the accumulated condensate is poured out, water is poured inside and left for several days, and the water is drained.
- Unscrew the valve, cut off the neck (you need to water it a little), cut the bottle in half.
- attach the handles by welding, install the hinges using rivets and then additionally weld the hinges.
Barbecue from a cylinder Source domolist.ru
- Weld the legs to the bottom of the cylinder. Weld plates on the bottom for stability. To increase the rigidity of the grill, weld the corners inside.
- Holes are drilled on the rear lower wall (up to 18 pieces), the diameter is no more than 18 mm, and the edges are cut with a grinder.
- The chimney is welded into the valve hole. The grill is ready for use.
Additionally, you can make a removable mesh inside the structure. For uniform heating, the grill lid can be closed.
Frame made from corners
How to assemble a grill from corners? The advantages of this method are that the frame does not allow the metal to bend, the structure will be stronger. It is done very simply. Profile pipes or corners can be used for the frame. Pieces of metal are welded to them - first the bottom, and then the walls.
Painting issues and results
For a metal device, it is better to use heat- and heat-resistant paints.
Examples:
- CERTA (Certa). Maintains load up to +900°C,
- Rust-oleum. Potential – up to +1093°С, Color options: matte, white, gray, black.
- "KO-8101". Potential - +650°C, 12 default color options are provided.
- KO-8111 Thermika has anti-corrosion characteristics. Strengthens the effects of +600°C.
How much does such a product cost in terms of consumables and welding? Of course, cheaper than ready-made barbecues in a private workshop or from the manufacturer.
DIY folding barbecue
Folding grill
It is made in the form of a suitcase with handles or a carrying case is used. The walls are attached to the bottom using hinges. If you have to make such a grill yourself, you can use door hinges from cabinets. In another option, a box is installed on the bottom with folding legs, the walls of which are connected using slots on them directed in different directions. When disassembled, all parts are put into a case or suitcase. Options with grooves are more durable, but difficult to manufacture.
A simple barbecue with handles for a small family
Using metal you can make with your own hands a simple but convenient barbecue with handles according to the dimensions calculated for yourself. The scheme of this design is very simple - it is a rectangular box with a bottom without a top.
The length is determined individually, depending on personal needs. For a small family, a barbecue length of 60 cm and a width of 30 cm is sufficient.
Size variations: width, depth and length
The width of the frying pan should be 10-15 cm less than the length of the skewer (excluding the size of its handle). From the point of view of rational use of thermal energy , a width of 35-40 cm is considered optimal for a rectangular shape. Taking into account the peculiarities of the geometry of the cylindrical shape of the roaster, its width can be increased to 45 cm.
The depth of a box-shaped brazier is usually 15-25 cm. Of this, at least 5 cm is the layer of coals, which is necessary for normal cooking of one portion of meat. And for sequential frying of two portions, the layer should already be 1.5-2 times larger. In this case, the distance from the surfaces of the coals to the meat is approximately 8-10 cm. And you also need to take into account the size of the shish kebab pieces and the depth of the slots for the skewers (if they are provided for in the design).
Device Features
A modern barbecue is most often presented in the form of a low rectangular box, and the hemisphere is “attached” to another type of portable brazier - a barbecue.
An explanation for this division can be found in the particular preparation of products, or more precisely, in the accessories with which they are prepared.
In a barbecue, meat and vegetables are threaded onto skewers, and they are best placed on the sides of a rectangular broiler. In this case, several identical portions are fried on the fire at the same time, so it is important that the heat is distributed as evenly as possible along the entire length of the skewer and throughout the entire cooking zone, which is impossible to achieve in a spherical fryer.
In a barbecue, food is placed on the grill. The maximum heat from the coals is concentrated in the center, but this disadvantage, from the point of view of the barbecue, turns into an advantage for the barbecue - by changing the position of the products on the grill, you can adjust the cooking temperature, or the degree of roasting. This is especially important for steaks - one of the “signature” barbecue dishes.
There are other differences between the two most popular types of fryers:
- The grill, as a rule, does not have a lid, but the barbecue usually has one.
- In a barbecue, firewood is often used, which is burned to the state of coal, and to speed up the combustion process, holes are made in the walls. In addition, using wood of different species, you can achieve different aromas and flavors in each case.
- The barbecue is filled with charcoal, which does not require a lot of air to burn. Therefore, there are no holes in the walls of the fryer. In addition, birch firewood is used to produce charcoal, and this “standard” of fuel does not affect the taste.
But there is also a “compromise” type that combines the characteristics of a barbecue and a barbecue - its fryer is made in the shape of a hollow cylinder with an opening lid. This is the shape of a homemade grill made from an old gas cylinder or a container from a water heating boiler.
Using improvised devices
It is not always necessary to spend time making technically complex supports for the hearth. You need to be creative and just look around. We are surrounded by many interesting things from which we can make original and exotic legs with a minimum of effort.
You are offered the following options for a non-standard approach to making barbecue legs:
- Using a sewing machine stand. In the last century, in our country and in neighboring countries, sewing machines were installed on supports that were made of artistically curved metal. At the same time, the basis for the technology was distinguished by decent strength and reliability. People often simply throw away such things or recycle them. You need to come to a scrap metal collection point and thoroughly examine the contents of its warehouses. There is a high probability of finding the right thing. All that remains is to fit the stand under the hearth.
- Assembling an original support from old water pipes left over after renovation. They can be bent, cut, twisted and welded without much difficulty. A thoughtful and creative approach allows you to create the most incredible compositions from pipes, characterized by durability and uniqueness. You can revive the structure by applying fireproof paint.
- Creation of original and lightweight folding legs from aluminum. The source of raw materials for the work are old cots, tourist and country furniture made of aluminum tubes.
An excellent solution in all cases is the use of forged products. The simplest jewelry can be made yourself using sheet copper or brass, a hammer and a hammer. To decorate the legs at a higher level, you will need to visit a specialized store.