Many of those home craftsmen who manufacture and decorate products from wood and other materials in their workshop have probably thought about how to make a laser engraver with their own hands. The presence of such equipment, the serial models of which are quite expensive, makes it possible not only to apply complex designs to the surface of the workpiece with high precision and detail, but also to carry out laser cutting of various materials.
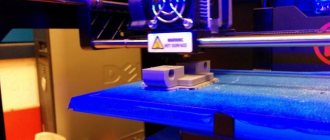
Homemade laser machine in the process of wood engraving
A homemade laser engraver, which will cost much less than a serial model, can be made even if you do not have in-depth knowledge of electronics and mechanics. The laser engraver of the proposed design is assembled on the Arduino hardware platform and has a power of 3 W, while for industrial models this parameter is at least 400 W. However, even such low power allows you to use this device for cutting products made of polystyrene foam, cork sheets, plastic and cardboard, as well as perform high-quality laser engraving.
This engraver can also handle thin plastic.
Necessary materials
In order to make your own laser engraver using Arduino, you will need the following consumables, mechanisms and tools:
- hardware platform Arduino R3;
- Proto Board equipped with a display;
- stepper motors, which can be used as electric motors from a printer or DVD player;
- laser with a power of 3 W;
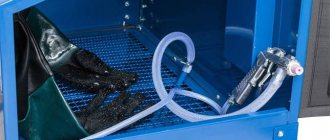
- laser cooling device;
- DC-DC voltage regulator;
- MOSFET transistor;
- electronic boards that control the laser engraver motors;
- limit switches;
- a housing in which you can place all the structural elements of a homemade engraver;
- timing belts and pulleys for their installation;
- ball bearings of various sizes;
- four wooden boards (two of them with dimensions 135x10x2 cm, and the other two - 125x10x2 cm);
- four round metal rods with a diameter of 10 mm;
- bolts, nuts and screws;
- lubricant;
- clamps;
- computer;
- drills of various diameters;
- a circular saw;
- sandpaper;
- vice;
- standard set of locksmith tools.
The electronic part of the machine will require the greatest investment
Homemade Dremel from a drill and blender
If you have an old or unnecessary blender, then it is also easy to make a mini-drill from it. This household appliance already has a comfortable handle. In addition to the blender itself, you will also need the following devices and additional parts:
- tools to disassemble the device (screwdrivers with different tips, pliers);
- caliper or ruler;
- collet;
- soldering iron with soldering kit;
- knife;
- finishing file, sandpaper;
- switch.
You can do without the last part, but then you will need to constantly press the power button with your hand while working with the straight grinder.
An engraver from a blender is created like this:
- carefully disassemble household appliances;
- they take out the internal parts: the electric motor and the printed circuit board that controls the operation of the device;
- using a caliper, measure the diameter of the spindle in order to purchase a collet chuck suitable for it;
- if the electric motor is contaminated with anything, for example, rust, then it is cleaned thoroughly, with care so as not to damage the windings;
- fix the purchased collet chuck (or one made independently) on the spindle;
- the power button already on the blender is replaced with a switch: the wire contacts are soldered;
- adapt a hole in the body of the household appliance for a new switch;
- install the electric motor with the board in its place inside the housing;
- collect the tool.
Depending on the model of the blender being converted, you may need to make additional holes in its body, or expand existing ones using a file. There will be no problem doing this
The entire described process of assembling a Dremel from a blender is demonstrated in detail in the video below.
You don’t have to remake the blender, but simply connect to it a flexible shaft for a factory-made engraver. The docking method is shown in the video below.
You can also make an engraver from a drill. The assembly of options with and without a flexible shaft is shown in the following videos.
Electrical part of a homemade laser engraver
The main element of the electrical circuit of the presented device is a laser emitter, the input of which must be supplied with a constant voltage with a value not exceeding the permissible parameters. If this requirement is not met, the laser may simply burn out. The laser emitter used in the engraving installation of the presented design is designed for a voltage of 5 V and a current not exceeding 2.4 A, therefore the DC-DC regulator must be configured for a current of 2 A and a voltage of up to 5 V.
Electrical circuit of the engraver
The MOSFET transistor, which is the most important element of the electrical part of a laser engraver, is necessary in order to turn the laser emitter on and off when receiving a signal from the Arduino controller. The electrical signal generated by the controller is very weak, so only a MOSFET transistor can sense it and then unlock and close the laser power circuit. In the electrical circuit of a laser engraver, such a transistor is installed between the positive contact of the laser and the negative contact of the DC regulator.
The laser engraver's stepper motors are connected through one electronic control board, which ensures their synchronous operation. Thanks to this connection, timing belts driven by multiple motors do not sag and maintain a stable tension during operation, which ensures the quality and accuracy of the processing performed.
It should be kept in mind that the laser diode used in a homemade engraving machine should not overheat.
To do this, it is necessary to ensure its effective cooling. This problem can be solved quite simply: a regular computer fan is installed next to the diode. To prevent overheating of stepper motor control boards, computer coolers are also placed next to them, since conventional radiators cannot cope with this task.
Photos of the electrical circuit assembly process
Photo-1
Photo-2
Photo-3
Photo-4
Photo-5
Photo-6
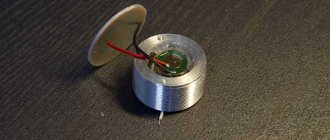
How we made a laser from a DVD-RW drive
Removing the laser module
We disassemble and get to the laser head. Remove the laser head.
Our goal is the laser module.
Before removing the module itself, we short-circuit all three of its terminals with a thin copper wire (we took one thread from a stranded one). This is necessary to protect against static.
The laser module can now be removed. It “sits” there quite well, so you need to work hard and balance the efforts between “unbreaking” and “not breaking.”
This is how it should work out somehow.
Circuit assembly
Now let's move on to the diagram. It is necessary to control the laser power. Otherwise it will simply burn out.
We didn’t bother and did a wall-mounted installation.
Nutrition
You need to power it from 3.7V. Mobile phone batteries connected in parallel are ideal for a portable laser.
We used a stabilized power supply.
Warning
You should be warned in advance about the ruthlessness of the laser to the retina.
When working with a laser, you must use special glasses. You may ask why I am writing all this, because no one will do this anyway? Well, what if! Perhaps there will be at least one reasonable person who will wear special glasses when handling a laser. And these lines will save one or even two eyes! We didn’t have such glasses and we did everything at our own peril and risk. But red glasses, unlike safety glasses, will allow you to better see the laser beam itself. For beauty, you can add smoke, as we did in the intro for the video.
Trial run
Having connected the power, we see a consumption of 200mA and a beam of bright light.
In the dark it works like a flashlight.
Focus lens
The beam turned out to be not “laser” at all. You need a lens to adjust the focal length. For starters, a lens from the same drive is quite suitable.
Through the lens it is possible to focus the beam, but without a rigid body the task is tedious.
Build process
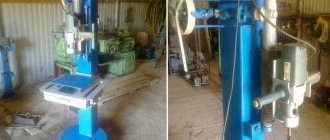
The homemade engraving machine of the proposed design is a shuttle-type device, one of the moving elements of which is responsible for movement along the Y axis, and the other two, paired, for movement along the X axis. For the Z axis, which is also specified in the parameters of such a 3D printer, the depth to which the material being processed is burned is taken. The depth of the holes into which the elements of the shuttle mechanism of the laser engraver are installed must be at least 12 mm.
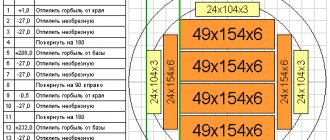
Desk frame - dimensions and tolerances
Photo-1
Photo-2
Photo-3
Photo-4
Photo-5
Photo-6
Aluminum rods with a diameter of at least 10 mm can act as guide elements along which the working head of a laser engraving device will move. If it is not possible to find aluminum rods, steel guides of the same diameter can be used for these purposes. The need to use rods of exactly this diameter is explained by the fact that in this case the working head of the laser engraving device will not sag.
Manufacturing of a movable carriage
Photo-1
Photo-2
Photo-3
The surface of the rods that will be used as guide elements for the laser engraving device must be cleaned of factory grease and carefully ground to perfect smoothness. Then they should be coated with a lubricant based on white lithium, which will improve the sliding process.
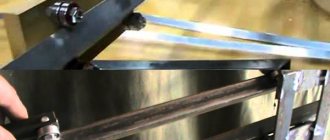
Housing assembly
Installation of stepper motors on the body of a homemade engraving device is carried out using brackets made of sheet metal. To make such a bracket, a sheet of metal whose width approximately corresponds to the width of the engine itself, and the length of which is twice the length of its base, is bent at a right angle. On the surface of such a bracket, where the base of the electric motor will be located, 6 holes are drilled, 4 of which are necessary for fixing the engine itself, and the remaining two are for attaching the bracket to the body using ordinary self-tapping screws.
To install a drive mechanism consisting of two pulleys, a washer and a bolt on the electric motor shaft, a piece of metal sheet of the appropriate size is also used. To mount such a unit, a U-shaped profile is formed from a metal sheet, in which holes are drilled for attaching it to the engraver body and for the output of the electric motor shaft. The pulleys on which the timing belts will be placed are mounted on the shaft of the drive electric motor and placed in the inner part of the U-shaped profile. Toothed belts placed on pulleys, which should drive the shuttles of the engraving device, are connected to their wooden bases using self-tapping screws.
Installation of stepper motors
Photo-1
Photo-2
Photo-3
Photo-4
Photo-5
Photo-6
Step-by-step instructions for making a laser wood engraver with your own hands
Before you get started, remember that the laser beam is quite dangerous. If it gets on the cornea of the eye, you should immediately consult a doctor. Otherwise, the consequences can be very dire, including complete loss of vision.
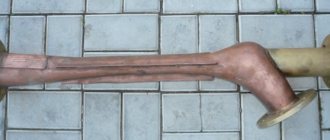
Preparing the body material
First, you need to prepare the sleeves so that they are suitable for making the body of a hand-held laser engraver. To do this, you need to take a drill whose shank fits the diameter of the neck of the cartridge case from a 7.62 mm cartridge.
By pressing with pliers and constantly increasing the diameter, you can completely straighten the sleeve, giving it the shape of an even cylinder.
Then you should check the dimensions. The straightened sleeve should fit fairly tightly into the eight-millimeter sleeve. At the same time, it should move, which is necessary later for adjustment.
Choosing a laser LED: which one is suitable?
Please note that the drive from which the LED is removed must have a write function. It is the recording laser that can be used as an engraver.
In order to determine which of the two is suitable, you need to apply power to them. If there is no glow, then this is a reading element. But you should be careful that the beam does not get into your eyes.
The next step is lens selection
The lens can be removed from the same drive. They come in two sizes, but any will fit. The larger one will fit well into the straightened sleeve, but the smaller one will find a place behind after removing the primer.
Don't miss: Marking of grinding wheels explained in a new way
When dismantling the lens, you should be especially careful. If its working surface is damaged, the lens will be unsuitable for the engraver and you will have to look for a new one.
Removing the lens is not difficult; it is simply taped around the edges. For dismantling, you can use either a knife or cutter, or a regular slotted screwdriver. True, before work it will need to be sharpened a little.
Removing primers from cases and subsequent assembly
The primers are knocked out of the cartridge case very easily. To do this, you will need a center punch and a round attachment from a meat grinder. The sleeve is installed on it with the primer down, a center punch is inserted from the inside, and a couple of blows are made with a hammer.
Now the holes from the knocked out capsules need to be drilled out. The problem is that the sleeve cannot be clamped in a vice; it will immediately become dented.
But there is a way out. The sleeve must be clamped into the chuck of a drill or screwdriver. Three jaws will compress it evenly and securely fix it. However, you shouldn’t go overboard with the tightening here either, there is a limit to everything.
You can also do the following. A drill is clamped into the chuck of a drill or screwdriver, and the sleeve itself is fixed with sandpaper.
However, this method is dangerous and injury is possible, so the Homius editors do not recommend using it.
All that remains is to place the LED in the hole where the capsule was, and fix it with hot glue, and also fix the lens in the second sleeve. The beam will be adjusted by pulling out the sleeve with the lens.
Electrical connection for power supply
You can use any power port for connection. In this case, a socket from a used printer was selected.
It needs to be disassembled and ground so that it fits tightly inside the brass tube, and then solder a 30 ohm resistance to the positive contact.
The power button also needs to be upgraded by connecting its contacts with a resistance of 50 Ohms. This will allow you to get a weak beam when the button is released to try on. When pressed, the laser will start working at full power.
What should happen in the end?
After the button is placed and fixed in the brass tube, you can assemble the structure together. In this case, the outer part of the power plug must touch the tube. This will be the negative contact.
All that remains is to check it in action. By the way, it is also suitable for soldering SMD elements, if you slightly reduce the beam power by moving the sleeve with the lens.
A more detailed master class on making such a device can be seen in this video.
Software installation
Your laser grower, which must operate in automatic mode, will require not only installation, but also configuration of special software. The most important element of such support is a program that allows you to create the contours of the desired design and convert them into an extension that is understandable to the control elements of the laser engraver. This program is freely available and can be downloaded to your computer without any problems.
The program downloaded to the computer controlling the engraving device is unpacked from the archive and installed. In addition, you will need a library of contours, as well as a program that will send data on the created drawing or inscription to the Arduino controller. Such a library (as well as a program for transferring data to the controller) can also be found in the public domain. In order for your laser homemade product to work correctly, and for the engraving performed with its help to be of high quality, you will need to configure the controller itself to the parameters of the engraving device.
Features of using contours
If you have already figured out the question of how to make a hand-held laser engraver, then it is necessary to clarify the question of the parameters of the contours that can be applied using such a device. Such contours, the inside of which is not filled even if the original drawing is painted over, must be transmitted to the engraver’s controller as files not in pixel (jpeg), but in vector format. This means that the image or inscription applied to the surface of the processed product using such an engraver will not consist of pixels, but of dots. Such images and inscriptions can be scaled as desired, focusing on the surface area on which they should be applied.
Using a laser engraver, almost any design and inscription can be applied to the surface of the workpiece, but to do this, their computer layouts must be converted into vector format. This procedure is not difficult to perform: special programs Inkscape or Adobe Illustrator are used for this. A file that has already been converted to vector format must be converted again so that it can be correctly processed by the engraving machine controller. For this conversion, the Inkscape Laserengraver program is used.