We connect the motor from an old washing machine
With the development of household appliances, modern automatic washing machines very quickly settled in apartments and houses and became good helpers for modern housewives.
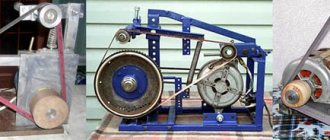
Old washing machines were moved to garages and storage rooms because they were no longer needed. If you still have the engine from an old Soviet washing machine, then you can put it to good use. Make it into a sharpening machine and you can sharpen knives, axes and other cutting tools. After rummaging a little in my closet, I found a working AEP-16UHL4 engine from an old Soviet washing machine; it had been removed from the washing machine and was quietly collecting dust on a shelf littered with all sorts of rubbish. Once upon a time I wanted to make a sharpener from it, so on the motor shaft there is an adapter sleeve for an emery wheel turned by a familiar turner. Now I will tell you how to connect it.
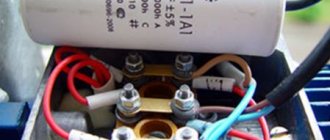
To start the engine, a special three-contact relay RTK-1-3UHL4 is used.
Before connecting anything, you need to ring the windings with a multimeter. The motor has two windings, “starting” and “running”. The starting winding resistance is 26 ohms. The resistance of the working winding is 13 ohms, that is, half the resistance of the starting winding. In short, the winding with low resistance is “Working”, and the winding with high resistance is “Starting”.
This figure shows a diagram of connecting the AEP-16UHL4 motor from a washing machine. To make the motor rotate in the other direction, you need to swap the leads of the starting winding.
In the end, I got a sharpener from an engine from an old washing machine. I hope everything works out for you too.
Friends, I wish you good luck and good mood! See you in new articles!
I recommend watching a video on how to connect a motor from an old washing machine.
Source
Concrete mixer
Renting, and even more so purchasing, factory equipment is fraught with serious expenses. For moderately complex work, it would be more practical to make a concrete mixer with your own hands. If you use the engine from a powerful washing machine, the efficiency of the equipment will increase noticeably. Assembling a concrete mixer.
- The base must be stable. The ideal option would be welded channels, but you can save money and replace them with wooden beams. We choose the height at our discretion, but not lower than 0.5 m.
- The motor and container shafts must be in the same plane. For this purpose, the design provides special shelves that secure the motor.
- We install the gearbox so that the pulley and motor are at the same level. Otherwise, the unit will very quickly fail due to severe overloads.
- An old washing machine centrifuge can serve as a container. We mount the shaft into the tank and symmetrically attach curved blades to it, which will stir the solution.
- We assemble the “Start” and “Shutdown” buttons along with the rest of the electrical wiring.
- We place the belts on the pulleys and tighten them if necessary.
When fully loaded, some of the solution may splash out, falling on the gearbox and motor. Therefore, it would be useful to organize protection for them: hard or soft casings made from scrap materials.
How to properly connect the motor from an old washing machine
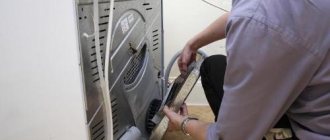
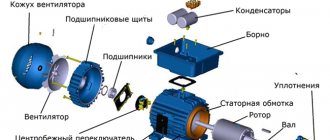
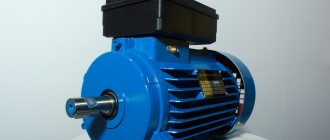
Washing machines, over time, fail or become obsolete. As a rule, the basis of any washing machine is its electric motor, which can be used even after disassembling the washing machine for spare parts.
The power of such engines, as a rule, is not less than 200 W, and sometimes much more; the shaft speed can reach up to 11,000 rpm, which may well be suitable for using such an engine for household or small industrial needs.
Here are just a few ideas for the successful use of an electric motor from a washing machine:
There can be many options for using an electric motor; the essence of the process lies in the ability to rotate various mechanisms and devices at high speeds. But no matter what mechanism you are going to design, you still need to correctly connect the motor from the washing machine.
Types of engines
Washing machines of different generations and countries of production may have different types of electric motors. Typically this is one of three options:
Inverter (brushless)
An innovative type of motor with direct drive and small dimensions with fairly low power and high efficiency. The engine design still contains a stator and a rotor, but the number of connecting elements is reduced to a minimum. The absence of elements subject to rapid wear, as well as low noise levels. Such motors are found in the latest models of washing machines and their production requires relatively more costs and effort, which of course affects the price.
Connection diagrams
Motor type with starting winding (old/cheap washing machines)
First you need a tester or multimeter. You need to find two pairs of pins corresponding to each other. Using the tester's probes, in continuity or resistance mode, you need to find two wires that are connected to each other, the remaining two wires will automatically be a pair of the second winding.
Instead of the “SB” contactor, there can be a low-capacity non-polar capacitor (about 2-4 µF) This is how it is arranged in the washing machine itself for convenience.
If the engine starts without a load, that is, does not wake up a pulley with a load on its shaft at the moment of starting, then such an engine can start itself, without a capacitor and short-term “powering” of the starting winding.
In the button, the “SB” contact must strictly not be fixed; you can simply use the doorbell button, otherwise the starting winding may burn out.
Sometimes such a motor may have not four, but three wires at the output, in which case two windings are already connected at the midpoint to each other, as shown in the diagram. In any case, when disassembling the old washing machine, you can take a closer look at how its motor was connected to it.
When there is a need to implement reverse
or change the direction of rotation of the motor with the starting winding, you can connect according to the following diagram:
Collector type motor (modern, automatic washing machines with vertical loading)
As a rule, these are commutator motors without a starting winding, which do not require a starting capacitor; such motors operate on both direct current and alternating current.
What to make from a motor?
Some parts of equipment that is broken and unsuitable for further use can be used at home. Quite often, men have the question of what can be made from a motor. In fact, there are a lot of options, the main thing is patience, the ability to work with technology and imagination.
As one option, you can make an excellent fan from a motor. People also make cars, helicopters and other interesting things from this part. All that is needed for full-fledged work (especially for beginners) is special electronic circuits and radio parts. Of course, you cannot do this without self-confidence and patience. It’s not a fact that everything will work out the first time, but if you try, the result will please the master for a long time.
How to connect a motor from an old washing machine
A working motor from an old washing machine will always come in handy around the house. If it is connected correctly, it can be used as a driving force for a grinding machine, lawn mower, or juicer. Therefore, do not rush to throw away your old equipment, it will still serve you well.
You will learn what types of motors there are and how to properly connect them to devices.
Types of SMA motors
According to the type of design, washing machine motors are divided into three types:
As part of the article, we will talk about connecting the motor from old washing machines that were equipped with asynchronous electric motors. You can also connect the motor to a new washing machine if it breaks down.
Proper connection with your own hands
Connecting an old type motor is somewhat more difficult. Since in the collector type you can navigate by the color of the wires, but in the asynchronous type you will have to ring each output.
Armed with a multimeter, ring each wire one by one to find the starting winding. You need to find paired wires that show the same resistance. Write down all the indicators, they will need to be compared in the future.
After ringing both windings and recording the indicators, compare them. The working winding (OW) will have less resistance than the starting winding (PO). It is not recommended to connect this motor through a capacitor, as it may damage the motor.
If, after starting the engine, you find that it is rotating in the wrong direction, swap the wires from the starting winding, then it will rotate in the other direction.
Recommendations for making a generator
In the first step, you should have noticed that there were four wires coming out of the electric motor. It is important to find a working winding, and then cut off the old wires. Next, the master needs to install new bearings, because the old ones can rotate quite tightly.
The rectifier is assembled using diodes, and “SOLAR” is used as a controller. In order to charge the battery, only a few revolutions of the generator will be enough. At maximum speed of the drill it will be possible to squeeze out 273 W. In this case, the sticking will be quite significant, so there is no point in installing such a device on a windmill.
We connect the motor from an old washing machine
After a certain period of operation, washing machines lose their ability to work normally and are replaced by more modern models. The basis of each such washing machine is an electric motor, which, after disassembling the device, can be used. The power rating of the dismantled motor is at least 220 V, the rotation speed reaches 11,000 rpm, which is very suitable for using such motors on the farm. Today we’ll try to figure out how to connect the motor from an old washing machine so that we can use its potential.
Connecting a motor with a starting winding
First, using a tester, we find the corresponding output pairs. By ringing the wires, we identify the pairs, after which we find out which of them is the starting one and which is the working one. A higher resistance value corresponds to the starting pair creating the initial torque.
On some washing machine engines, contactors can be replaced with small capacitors, which is very convenient for operating washing machines. And when the motor is started without load, this type of motor is able to start working independently, without a capacitor and initial power supply from the start winding.
When the engine heats up, the reasons are as follows:
To make sure the engine is working properly, you need to let it run for one minute and check the heating. In such a short time, the heat will not have time to disperse through the parts, and it is possible to accurately track the point of strong heating - a bearing, stator or something else. This is then checked three times after five minutes of operation.
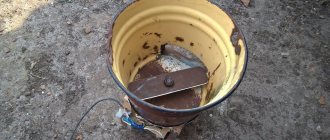
Grain crusher
Equipment of this type allows you to significantly save on the production of feed for livestock. If you have a sufficiently powerful engine at your disposal, then you can build a very smart grain crusher, which is in no way inferior in output to industrial options. Motors on large mid-budget or premium washing machines have similar characteristics. In addition to the unit, you will need a housing. The best option would be a design from an old top-loading machine. If you don’t have such a case at hand, then you can find a lot of options at almost any metal collection point for pennies.
Homemade grain crusher
Assembling a grain crusher.
- When choosing knives, you should take into account that at the time of cutting they should almost touch the edges of the body, not reaching them by 3-4 mm.
- It is necessary to make a hole on the bottom of the structure to drain the finished feed.
- We install two blades inside: one extends 40-50 cm from the top edge, and the second is located below. It is better to use two shafts rotating in different directions for better grinding.
- We fix the motor on the top of the washing machine and assemble the shafts with it.
- Loading the grain crusher will become more convenient if you make a hole in the lid rather than removing it every time.
Important! The motor will need to rest periodically during grinding.
Brushed motors
These are motors that do not have a starting winding. They can operate on both direct and alternating current and do not need to be connected via a capacitor. Motors of this type have from five to eight terminals, but such a number will not be needed for further operation of the unit. Therefore, you will have to identify and disconnect the contacts going to the tachometer, thermal protection, etc.
Connection diagram
To proceed further, you should study the electrical connection diagram, which does not cause any particular difficulties in operation even for an ordinary user.
To begin with, take the wires that supply the stator and rotor of the washing machine. The stator winding is connected to the rotor brush. For this purpose, an insulated jumper is installed. The remaining two wires are connected to the home network at 220 V.
To change the direction of rotation, you just need to move the jumper to other terminals. To make it convenient to start and stop the motor, the necessary buttons are added to the circuit.
Motor application options
After disassembling the old washing machine, the electric motor can be installed on one of the devices.
Grinder
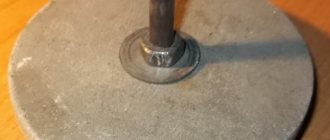
Sometimes a difficulty arises here - the hole in the stone differs from the size of the shaft of the electric motor. You will have to machine an additional part that will act as a transition element. For fixation, a nut with a thread direction that takes into account the direction of rotation of the motor is used. Otherwise, the direction of the torque is changed by switching the wiring to opposite contacts.
Having connected the winding to the mains, the starting pair is connected to the coil. The second end of the wiring is briefly applied to the winding terminal to check the direction of movement of the motor.
To design a sharpening machine, it is best to use a motor that can withstand voltage in the range of 150 - 200 V. In this case, a rotation speed of the stone of 1,000 revolutions is enough to prevent it from breaking.
Vibrating table
An excellent use for a motor from an old machine if you are making paving slabs.
Structurally, such a table does not cause any difficulties. To make it, a flat surface in the form of a plate, fastened to the base with movable elements, is sufficient. The commutator motor will provide the necessary vibration.
Concrete mixer
The motor can be used in this way as well. Such a unit will not provide industrial volumes, but it will significantly facilitate household work.
It is noteworthy that along with the motor you will have to use the washing machine tank. It is best if the container is of the activator type - instead of the standard element, a pair of steel blades is installed, externally resembling the letter “P”. They are positioned in such a way as to create a right angle. The tank drain hole is securely closed.
The power of the motor of the old car selected for connection is determined by the volume of work to be done. To prepare concrete in small quantities, it is sufficient to use a single-phase motor.
We will also have to resolve the issue with the belt drive installed in the car. It is best to replace it with a gearbox that can reduce engine speed.
Hand mixer
Using this device, you can mix mortar for plastering and adhesive for laying tiles.
Wood lathe
To firmly fix the engine on the workbench, you will need to make fasteners from special corners. To solve this problem, special holes are drilled.
To fix the wooden part, you need a flange. It will be fixed to the motor shaft. You will also need special studs, which are made from simple bolts with cut off heads. Several pieces are screwed into the base.
The motor is fixed to the table with self-tapping screws, the metal part is attached with bolts.
For a wooden part, the opposite end must be secured with a special device. It is made from a loop screw and several wooden stands that are attached to the corners.
The part for mobility is secured to a threaded pin with bolts.
Now you need to take a power supply (an old computer one will do). It is necessary to control the motor. Switches are installed to regulate the rotation speed.
To guide the tools correctly, a tool rest is made from a pair of wooden parts and a metal corner. The structure is attached to 1 bolt and thanks to this remains movable.
The lower part of the tool rest needs to be fixed on the workbench with screws and corners.
The workpiece is fixed on the machine from several sides. On the right - on a bolt with a handle, on the left - on studs. To fix everything, a hole is drilled.
To ensure the work is done correctly, you need to use special cutters.
Finally, sand the workpiece with sandpaper.