- Required materials and tools
- Which electric motor is suitable?
- How to choose a flange
- Analogue of the sharpener flange
- Direction of work
- Device protective cover
- Installation of the device
- Safety rules for working Drill sharpening technology
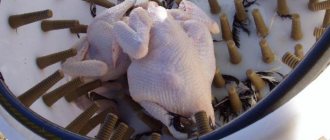
In everyday life, situations often arise when something needs to be sharpened.
A DIY electric sharpener is a solution to many everyday problems with sharpening tools. These can be household items: knives, scissors or construction tools. Most often in this case there is a need to sharpen drills, axes, and shovels. It is difficult to work with a blunt instrument, the process progresses slowly, and it takes a lot of effort. In this case, you cannot do without a special device, since not every tool can be sharpened by hand with a whetstone. You can buy an electric sharpener in a store, but you will have to pay a significant amount for it. Or you can assemble it from available materials, especially since male artisans periodically fall into the hands of all the necessary materials. Adapting them for useful purposes is also not difficult. The end result will be sandpaper that is in no way inferior to store-bought sandpaper, but practically free.
Which electric motor is suitable?
The main element without which it is impossible to assemble the device is the engine.
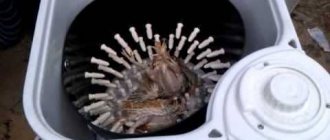
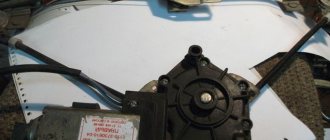
Motors from old household appliances are usually used. For example, from Soviet washing machines “Siberia” or “Volga”. Their engines are reversible and have sufficient power and speed. You can install any necessary attachments on the shaft.
The number of revolutions per minute should not exceed 3000 in industrial conditions, but for home use 1000-1500 is enough. If you rotate too quickly, the sanding wheel may break. For industrial work, high-strength sharpening stones and special flanges are used. A home craftsman is unlikely to be able to find such materials. High speed is needed not so much for sharpening as for leveling and polishing the product. Again, this is not useful for everyday use.
You shouldn't chase too much power either. When making a machine with your own hands, the top bar is 400 W. On average, motors from washing machines are used, whose power does not exceed 200 W. There is more than enough to sharpen knives, hoes, and drills. In addition, with such power there is no need to fear that the speed will develop too high. Therefore, you won’t have to worry about the safety of the disk (and your own health).
Single-phase and three-phase motors are suitable for electric sharpeners. Both of them can be connected to a single-phase network. A capacitor may be required for proper connection. Typically, asynchronous electric motors are used.
Return to contents
How to adapt a drill and grinder to an electric sharpener
You can make emery not only from a suitable electric motor available. You can use a power tool for this - it could be an electric drill or a screwdriver.
The latter is less suitable for these purposes: it has insufficient power and a short battery life.
Making a sharpener from a drill begins with purchasing an attachment.
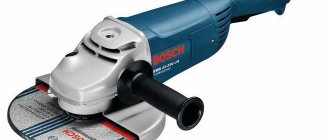
In case of emergency, a sharpener can be made from a grinder. To do this, you do not need to purchase special devices and mandrels necessary for attaching the emery. You just need to secure it in a horizontal position on a massive base, install a standard cutting or sharpening disk, and the sharpener is ready for use.
How to choose a flange
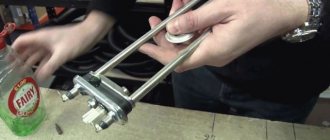
At first glance, everything is simple: take the engine, put emery paper on the shaft, plug the device into the network and start sharpening. However, at the stage of installing the whetstone, a difficulty arises: the diameter of the sharpener, as a rule, does not coincide with the diameter of the shaft. And there are no threads, that is, it is not possible to secure the emery. To eliminate this problem, you will need a flange - a special part that is machined to the size of the shaft and the internal diameter of the abrasive disk.
To turn the flange, you will have to use the services of a turner. On the drawing of the electric sharpener you need to indicate the internal diameter of the grinding wheel and the size of the shaft. You need to indicate in which direction the axis rotates. Perhaps the special flange is the only part that needs to be made to order. But it can also be replaced with improvised materials.
The finished flange is installed on the shaft and secured with a nut, washer and bolt. The nut will have to be threaded. If the shaft moves clockwise, a left-hand thread must be used. When rotated counterclockwise, it is right-handed. Compliance with this rule is strictly mandatory. With this thread cutting, the nut will gradually tighten, and the circle will be fixed more and more securely. If you do the opposite, the nut will gradually unscrew. As a result, the sharpener may fall off the shaft. This is very dangerous, since it is not known in which direction the rapidly rotating stone will fly. It may cause serious damage or injury.
Return to contents
Analogue of the sharpener flange
However, not everyone has a familiar turner or the right equipment. In this case, you can make an analogue of the flange. The matter will be more complicated, but the result will be reliable.
In this case, you will have to use a bushing system. For work, you will need pipe cuttings of the required length and suitable diameter. The gaps are eliminated using cotton insulating tape. If necessary, the bushings are inserted into each other.
When winding, the electrical tape should lie very evenly. If there are noticeable bumps, the disc will beat when rotating. The bushings are selected in such a way that the internal diameter of the sharpener and the pipe coincide. The ideal option would be one in which the stone sits very tightly on the sleeve without electrical tape. Winding will provide a tighter connection; the disk will not rotate on the pipe.
The bushing system fits very firmly and tightly onto the shaft, but fixation with bolts is necessary, since only it can provide the appropriate level of reliability and safety.
You can cut the thread yourself at home. For this you will need a tap.
Return to contents
Direction of work
Before you start making an electric sharpener, you need to see in which direction it will spin. With a device assembled from scrap materials, you can change the direction of rotation without much hassle. The engines that are most often used are taken from Soviet washing machines. And they are asynchronous. This means that when switching some windings, the direction of movement can easily change. Older motors have multiple terminals (3 or 4), which is helpful when changing direction.
The direction will change if you change the terminals of the starting winding. This technique can be useful in case of problems with threads, loosening nuts, etc.
You can do without a trigger coil. Then the work works directly: the working winding is simply turned on in the network, the sharpener needs to be pushed in the right direction, and it will begin to rotate.
To correctly determine where the working winding is and where the starting winding is, you will need a tester. The resistance level of the first is about 12 ohms, the second is all 30 ohms.
Return to contents
Device protective cover
When all the main parts have been selected, you need to take care of compliance with safety precautions.
It's no secret that sparks fly when sharpening metal products. In order not to get burned yourself, to avoid injury, and also to protect the work surface from scorching, it is necessary to make a protective casing. It can be made from scraps of tin or metal. The optimal plate thickness is at least 2 mm. The iron can be screwed directly above the grinding wheel or secured with a clamp. The shield will also reduce the amount of dust.
Additional safety during work will be provided by a folding plexiglass canopy, which is attached to the casing and can be folded down if necessary.
A handyman wouldn't hurt either. When carrying out work, it is much more convenient to rest against it than to keep the part suspended all the time.
Every owner, one way or another, is faced with a situation where she needs to sharpen knives, scissors and other sharp objects that become dull over time. You can turn to a master every time and pay a lot of money for his services or buy ready-made emery, or you can be smart and please your wallet by making emery yourself.
Mini sharpening machine
An electric sharpener is sometimes necessary if the master is engaged in modeling: during work it is often necessary to sharpen small parts. A large sharpener is not suitable for doing small work, so they often make mini-emery with their own hands. The assembly algorithm is as follows:
Often, electric motors from a faulty sewing machine are used for these purposes. The advantage of this machine is that the motor has a speed controller, and this expands the capabilities of the device. It can also be successfully used as a polishing machine.
Basic materials and tools
The principle of operation of a homemade device
In order to construct a homemade emery, you need an electric motor left over from using old household appliances.
It is the electric motor that puts the product into operation, as a result of which the attachments, pre-sharpened on lathe equipment and installed on the motor shaft, sufficiently clamp the emery wheel.
How to choose an electric motor
Most often, craftsmen choose as a motor an electrical device left over from an old-made washing machine, for example “Volga”, “Sibir” or “Vyatka”. As you know, the equipment made during the Soviet era was of high quality, so the engines were also quite powerful, with high reverse performance. From such a washing machine, you will also need a switch with a manual starter mechanism.
The main difficulty encountered is the precise placement of the whetstone directly on the engine shaft. The shaft does not always have a thread; the size of the hole in the stone may also not correspond to the size of the shaft. A specially machined part that will smooth out the dimensional discrepancy will allow you to cope with this task.
The maximum speed limit used in emery is 3000 revolutions per minute. This nuance cannot be ignored, because a high rotation frequency can cause the sharpening stone to rupture. It is preferable to use a product at home with an engine speed of 1000 to 1500 rpm.
However, if you wish, you can make a more durable emery with your own hands; to do this, it is enough to fix a high-quality flange. A powerful device may be needed not for sharpening, but for polishing various surfaces.
So, the power of a wear-resistant machine should be 400 W; at home, a device with a power of 100–200 W is sufficient.
How to make homemade emery
Materials and tools:
A home craftsman can make an electric homemade emery machine from available tools around the house. An electric motor is used to assemble the device. The necessary attachments for fixing the emery wheel are mounted on its shaft.
If you have an engine in your house from an old Vyatka, Sibir washing machine, then it can be used to make a sharpener. These electric motors have great power. You can also take a switch from the washing machine, equipped with a special starter.
Diagram of the emery device.
However, it is quite difficult to make a sharpener from such an electric motor. Problems will arise when it is necessary to put the whetstone on the motor shaft. The fact is that the engine is not always threaded. In addition, the diameter of the stone hole may differ from the diameter of the shaft.
The work will require a certain turned part, thanks to which these problems will be solved.
Before you start manufacturing the device, you need to decide on its future parameters. To make homemade emery, an electric sharpener usually uses an asynchronous motor.
An electric motor with a speed of 3000 rpm is suitable for this device. If the rotation speed is too high, the sharpening stone may break. Therefore, in a home workshop it is better to use a device with an engine with 1000-1500 rpm.
Manufacturing process
Flange undercut
As you know, the flange connects the engine and the stone. If you do not have experience working on a lathe, seek help from a specialist by providing a detailed drawing of the future device, with measurements of the diameter of the stone on the inner surface and the size of the shaft.
The made flange must be correctly placed on the shaft, the result must be secured with fasteners, for example, a bolt and a nut; it is preferable to use an additional threaded washer located on the left side.
Depending on the vector of rotation of the shaft, a thread is formed on the fasteners. Clockwise rotation requires left-hand threading, counterclockwise rotation requires right-hand threading. This is the principle of tightening the nut; if you neglect it, the part will unwind, and the stone will most likely fly off from its installed place, which is dangerous for the person who works with the emery.
However, not everyone has the opportunity to make emery with their own hands with point bushings of a certain size, as required by technology. Pieces of pipes will help to cope with this situation at home; cracks and voids formed between the bushings and the shaft can be hidden by wrapping them with textile tape. Another option is to sequentially place a smaller bushing in a larger one.
When winding the electrical tape, follow the uniformity. The sleeve is made from a pipe whose diameter is 32 mm, coinciding with the inner diameter of the emery circle. After which the circle must be placed on top of the sleeve.
Taking into account the direction of the emery work
Before you make emery with your own hands, decide on the vector of its work. For convenience, you can independently change the direction of the rotations the rotor makes. If the engine is taken from a washing machine, it can be considered asynchronous, which means there are no obstacles to changing the direction of rotation.
Find the windings intended for starting and operating, use a tester. How to distinguish the starting and working windings? The resistance indicator of the first reaches 30 Ohms, the working one - 12 Ohms. The working element is connected to a 220 W power supply, the trigger works when one end is connected to one of the terminals located on the coil, with the other end it is enough to touch the next terminal for a short time and immediately put it aside.
Description of flange manufacturing with all details
The idea of making a flange for a diamond wheel yourself using polymer clay turned out to be successful.
After publishing the video, I received questions about the production, and I decided to describe in more detail those points that were not explained.
What kind of polymer clay is this?
Wikipedia says the following:
Polymer clay is a plastic mass that resembles plasticine in appearance and feel and has a characteristic odor.
The plasticity of the material is ensured by plasticizers, which evaporate when the material is heated to a temperature of 100-130 °C (at home, the product is “baked” in the oven).
During heat treatment, an irreversible polymerization process occurs in the material with the formation of polyvinyl chloride. Cured products can be painted with acrylic and other paints, glued together and with other materials.
You can buy this clay (also called “plastic”) in stores that sell hobby materials, art stores and online stores.
The choice of plastic manufacturers and their colors is simply huge, so you can choose one to suit your taste. Personally, I chose a larger piece and a lower price