I've been into blacksmithing for a little over a year now and now that I've finally managed to make and get some good tools I can get into the actual stuff (I originally used a sledgehammer as an anvil and hit it with a small hammer). This project is a tutorial on how to make a knife out of iron with just a homemade forge, anvil, hammer and determination. I'm by no means a professional, I don't know what steel is best to use, and this is definitely not the only way to forge knives at home, but I managed to do it.
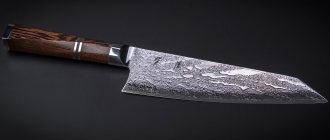
Modern Damascus steel is pressed patterned steel, which is the metal equivalent of layering different colors on top of each other to create a beautiful pattern. When a piece is placed in an etching solution, different metals will etch at different rates, creating a beautiful contrast.
The original Damascus steel was forged using a different and very specific process (albeit similar, which is why the modern definition arose), the essence of which only a few knew about, and thus Damascus gained a reputation as a metal with magical properties. The reason for this is similar to Katanas/Samurai Swords - the process produced a much more uniform and therefore workable steel than other methods that can turn fairly mediocre steel and various types of high/low carbon steel into a workable substance. This made it possible to create much more effective blades.
The main signs of edged weapons
The characteristics that influence whether a knife belongs to a bladed weapon are specified in GOST R 51500-99 “Hunting knives and daggers. General technical conditions". The criteria are valid for all knives, be it a folding tool or a katana:
- blade length not less than 90 mm;
- butt thickness from 2.7 mm to 6 mm;
- safety handle;
- blade hardness of at least 25 units on the Rockwell scale (scale mark - C);
- the blade must be sharpened.
Officially, a knife is considered a full-fledged edged weapon only if it meets all five points on the list. Which opens up a lot of room for maneuver. And such knives can well be used for self-defense. However, the harsh realities are such that a match with even one sign may be of interest to legal authorities.
Types of bladed weapons
Melee weapons have a variety of classifications, and there is no generally accepted order. In common parlance, the definitions used by law enforcement agencies in their activities are more often used:
- as intended. Divided into combat and civilian. In the first version, these weapons are used in military, combat, operational and service operations by state paramilitary organizations. In the second version, it is used by some subjects for self-defense, hunting, and while playing sports. Serves as an addition to the national costume of some nationalities of the Russian Federation;
- manufacturing method. It can be produced in several ways: at a factory - the product meets technical requirements, standards, a marking is applied to the product, by handicraft - made by gunsmiths in accordance with a certain standard, sample, the manufacturer can put his own brand, home-made - people without special professional skills are engaged in production or, they remake the weapon by adding elements to it or eliminating existing ones;
- by production location . These weapons are produced by domestic and foreign manufacturers;
- according to the established standard. There are standard and non-standard products;
- by damaging effect. There are chopping bladed weapons, piercing-cutting, piercing, piercing-cutting, impact-crushing, throwing weapons, combined action;
- according to the features of the structural device. There are non-bladed and bladed melee weapons;
- according to the design features of the blade. Weapons come with one blade or two blades.
Step-by-step instructions for making a knife with your own hands
When making knives yourself, you must act according to pre-prepared instructions. You can use the guide, which outlines the entire process step by step.
Before manufacturing, it is necessary to prepare a drawing or sketches. Using them, a template is made for the future product. You can use a photo of your favorite model as an example. After manufacturing all elements of the product, assembly, sharpening and polishing are carried out.
If the production of knives is not on stream, the craftsman has little experience, and difficulties may arise with preparing the blade. When planning to make a handicraft knife, you should pay attention to such metal products as files, scythe fragments, cutting elements of lawn mowers, drills of a suitable diameter. They are well suited for blanks.
Cutting the base profile
After preparing the material that is planned to be used to make a knife, a template is applied to it. It is better to use thick cardboard for it. After cutting, the template turns out solid, you can take it in your hand and roughly see what the product will look like when the work is completed.
The template must be transferred to a metal strip to create a blank. Then it is cut around the edges using a grinder. Before this, the workpiece must be securely secured using a clamp.
It is not difficult to trim along straight lines, but when working with curves you will have to put in more effort. To efficiently cut curved sections, you will need to make transverse slits, and then remove excess material by sector.
We cut out the profile of the future knife.
First grinding
After the workpiece is cut, its contours should be sanded. To completely remove excess fragments from the blade, you need to use a sharpening machine.
The contour is processed using a belt sander. To process bends you will need a drill. It is better to use sandpaper as a processing element.
Forming bevels
Bevel processing is necessary to form the correct angle for sharpening the blade. First you need to mark the workpiece using a caliper. It must be visually divided into halves - this facilitates the stitching procedure. When drawing a line, use a drill whose diameter matches the thickness of the blade.
Using a file, mark the boundary where the bevel of the blade ends. After this, the excess layer of metal is removed using a grinder with a sanding pad. The surface is processed with a belt sander, the bevel is cleaned with a file. Final sanding is done using sandpaper. Finally, the surface can be polished.
We prepare the knife for forming bevels.
Drilling holes
The next step is to drill holes in the handle of the workpiece intended for the pins. Their number is determined depending on the handle - the wider it is, the more holes will be needed. On average, 4-6 pieces are required.
If large holes are needed, you must first mark them using a smaller diameter drill. When working with hardened steel, carbide tools are used. To make the process easier, you can apply lubricant to the drill.
Drill holes in the knife handle.
How to properly harden a workpiece
To harden a blade, you need a forge furnace. If this is not available, you can use a powerful hair dryer to fan the coals. Hardening methods are chosen depending on the grade of steel.
A sign that the metal has been sufficiently hardened is that it cannot be processed with a file. It is also necessary to temper the material so that the knife does not become brittle. After cooling, you need to remove the oil from the blade. To do this, you need detergents that dissolve grease and running water. For polishing use fine-grained sandpaper.
Etching Features
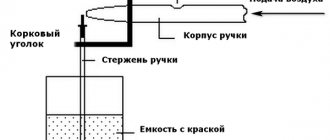
To give the knife an original appearance, a pattern can be applied to the blade using the etching method. To do this, you will need a solution prepared from copper sulfate and salt 1:1. The water for dissolution must be hot:
- The image is applied to the surface of the blade with a marker.
- Areas not to be etched must be varnished.
- The prepared product is placed in the solution for 30-40 minutes.
During etching, a reddish coating forms on the surface - it will need to be washed off from time to time under running warm water.
When the process completes:
- The workpiece is removed from the solution.
- Wash with warm water.
- Wipe with solvent.
- Treat with sandpaper.
We apply the design to the blade.
Making the handle
The handle for a knife can be of any shape; wood is often chosen for its manufacture. Other materials are also suitable, but wood is considered more convenient for processing.
For the handle, two blanks are made, which must be tightened using clamps and two holes drilled - at the beginning and at the end of the parts. They must match those drilled in the metal.
Epoxy glue is applied to the surface of the workpieces, then they are connected using clamps and clamped in a vice. Now you can insert the pins.
Wooden knife handle.
Handle grinding
After the glue has hardened, the vice is unclenched and the handle is ground on a machine. The pins are trimmed using a hacksaw or filed with a file. Then the surface is leveled by grinding with tools. The same procedure is performed for the outline of the handle.
Finishing
A polishing attachment is installed on the drill. The surface is treated until it begins to shine. Then the same is done for the outline of the product. For areas that cannot be polished, use fine-grained sandpaper.
Advantages of homemade knives
Among the models presented in stores, you can find one that suits your purposes. But there is always a chance of getting a blade of poor quality or a model that does not meet your wishes.
Sketch of a knife.
Forging a knife with your own hands has the following advantages:
- You can choose the type of product to your liking.
- Provide all the necessary properties that will allow the knife to serve for a long time.
- Select materials that can give the desired characteristics to the product.
- Select a suitable hardening mode for the metal, which will help ensure the required elasticity, ductility and hardness.
- You can create the handle of the product in accordance with your ideas about decorativeness.
- The master will be able to avoid mistakes that happen when making knives in large batches.
The nuances of making a product from a file
If a file blade is used as a blank for a knife, the craftsman will need a hammer for the work. This will help remove excess thickness from the workpiece. Using forging, you can obtain a product with high strength and elasticity, resistance to mechanical damage.
It is better to abandon the figured blade and the fancy shape of the knife. The rougher the outline, the easier the processing will be. It is worth considering that such material requires special equipment. If it is not there, you can use simple tools, but in this case they will be subject to accelerated wear.
The final stage: the scabbard
After completing the main work, you can work on the sheath. The new weapon should not be lying around anywhere. It needs to be given a decent frame. Don't forget about safety and convenience either.
Case made of planks
The simplest and most affordable material is small boards, for example, from boxes. Pine is not suitable for a hilt, but it is quite suitable for a sheath. The sequence of actions is something like this:
Two boards are selected. A place for the blade is knocked out in them. When connecting these two parts, the knife should fit as tightly as possible.- The future sheath is given the desired shape and the dimensions are adjusted. Conventional metalworking tools are used, for example, a hacksaw.
- The halves are connected using epoxy glue.
- Next you need to wait until the glue dries.
- A hole is made at the bottom to allow moisture to escape, and guides are cut in the upper part.
- The form is “brought to mind.” The last minor flaws are being eliminated. Emery works well for this.
Necessary materials
Before you start working on your future knife, you should design it.
The main part of the instrument is the blade. Various technologies are used for its production. This part of the knife can have any shape, so when choosing a handle you should carefully consider its appearance. It is recommended to prepare a drawing that will take into account the nuances of the future product.
According to manufacturing technology, all-steel and all-iron knives are considered the simplest. Welded blades can be made of steel and iron.
The raw materials for the handles are:
- Plastic.
- Tree.
- Birch bark.
- Leather.
- Various artificial materials.
The handle should be easy to use and visually attractive.
Steel selection
The type of knife determines the conditions in which it can be used. Materials must be selected that can withstand the loads during use of the knife.
When choosing iron or steel, you need to consider the following properties:
- Hardness is the ability to prevent the penetration of foreign particles into the structure of the material chosen for the blade. It can be obtained after heat treatment using the required mode.
- Impact toughness, which is responsible for resistance to fracture and minimizes chipping.
- Corrosion resistance, which is necessary for possible contact with liquids and for working in special conditions.
- Wear resistance is an important property at increased loads on the blade, increasing resistance to deformation and abrasion.
For handmade blades, damascus and damask steel are considered the best options. But their use requires professional blacksmithing skills. You can purchase a blank, but it has a high price. More often, in order to make a simple knife, alloy steels are used, which are more convenient for processing.