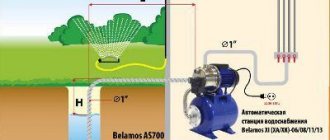
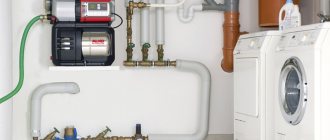
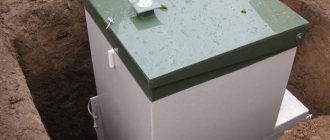
On my property I decided to organize water supply for a country house using a deep well pump. A well with a depth of 69 m was drilled in advance. A plastic pipe with a diameter of 125 mm was installed in the well. I made a caisson around the well from concrete rings with a diameter of 1.5 m. Now I need to bring water from the well to the house. For this purpose the following materials were purchased:
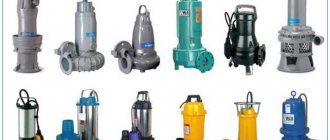
- well pump Aquarius,
- HDPE pipe with a diameter of 32 mm,
- head,
- safety rope for pump
- fittings for connecting the pipe and pump.
What should a good pump be like?
First you need to select and purchase a suitable pump, as well as a number of materials necessary for its successful installation. The pump is usually submersible, but it is highly desirable that it be centrifugal.
Unlike centrifugal models, vibrating pumps cause dangerous vibrations in the well, which can lead to destruction of the soil and casing. Such models are especially dangerous for sand wells, which are less stable than their artesian counterparts.
The pump power must correspond to the productivity of the well. In addition, the immersion depth for which a particular pump is designed should be taken into account. A model designed to operate at a depth of 50 m can supply water from a depth of 60 m, but the pump will soon break down.
A submersible centrifugal pump is the optimal choice for a well. Its performance, size and other indicators should be correlated with the characteristics of your own water source
Another risk factor is the level of quality of drilling work. If an experienced team drilled, the well will better withstand the destructive effects. And for wells created with your own hands or through the efforts of “shabashniks”, it is recommended to use not just a centrifugal pump, but special models for wells.
Such devices better withstand the loads associated with pumping water heavily contaminated with sand, silt, clay particles, etc. Another important point is the diameter of the pump. It must match the dimensions of the casing pipe. It is also important to take into account the power supply features of the pump. For wells, both single-phase and three-phase devices are used.
It is easier to find equipment for four-inch pipes than for three-inch pipes. It would be good if this point was taken into account at the well planning stage. The greater the distance from the pipe walls to the pump housing, the better. If the pump fits into the pipe with difficulty rather than freely, you need to look for a model with a smaller diameter.
Read more about choosing a pump in the article How to choose a pump for a well: recommendations for choosing pumping equipment .
Advantages and disadvantages
The advantages of using homemade hand pumps for water include:
- Low cost compared to other methods of supplying fluid from a well.
- Complete autonomy from any power source. There is no need for electricity or a diesel engine.
- The hand pump does not have any special conditions for the installation site, and there are no operational requirements.
- A simple dismountable design contains primitive parts and assemblies, which can be bought in any market for little money in case of breakdown.
- The cost of installing a hand pump will be minimal; there is no need to involve workers and equipment.
- The design is so simple that every owner can assemble and install the pump in a garage, which will save money on purchasing a ready-made unit.
There are significantly fewer disadvantages to a homemade hand pump for wells. The throughput of the mechanism is low compared to electrical analogues, as it is limited by the physical capabilities of a person. For filling containers with a volume of 200 - 300 liters, a manual drive is ineffective, as it takes too much time. Water cannot be produced without direct human participation, unlike automatic systems.
Determining the depth
A preliminary search for water on the territory of a private house is carried out using geophysical research methods, the distance of water occurrence, its quality and quantity are assessed:
- Vertical electrical sensing method. To determine the depth, a device that measures ground resistance is used.
- Method of wave reflection under seismic influence. Such reconnaissance is first carried out near the dacha plot, then in the survey area. The generating waves reach aquifers that differ from the upper clay and sand layers, are reflected and read by instruments.
- Exploration by drilling. The effectiveness of the method is high, but the cost limits its application. Used for workings serving villages.
After drilling, using the mechanical option, the exact depth of the well and the level of the aquifer are established.
A rope with a load, on which a meter marking has previously been made, is lowered into the excavation to the bottom. The depth of the shaft is determined by measuring marks on the twine above ground level. Then the cord is removed, and the size of the wet part can be used to judge the layer of liquid. For more accurate measurements, a flexible hydrogeological ruler with a weight is used.
Determining the exact depth of the aquifer will help you select the right pump with the required parameters and prepare the material for installation work.
In order to select a device of the required power and performance, and purchase the required number of components, it is important to correctly determine the depth of the aquifer.
Care and maintenance
Inexpensive ovens do not have a self-cleaning system or a special protective coating. Such models will have to be cleaned manually using cleaning products. The main thing is to use gentle sprays, powders, gels
It is important to remember that pre-soaked stains are easiest to remove.
Cleaning the oven will be faster if all dirt is pre-soaked.
Mid-price slabs are covered with enamel, which can be easily cleaned with a damp cloth. To remove dried dirt, you will need to use mild cleaning agents.
Expensive models are equipped with a self-cleaning system, without requiring any mechanical action to remove contaminants. Simply wipe the surface with a damp cloth.
Expensive models of ovens are equipped with a self-cleaning system that is very convenient for housewives.
To install you need
First of all, you need to purchase a special well pump. Its performance is selected based on future needs for the volume of water consumed during use. Additionally, you will need to pay attention to the presence of a check valve in the well pump. If it is missing, additional installation will be required.
Additionally, to install a well pump you will need a HDPE pipe. The length of the pipe should be greater than the depth of the well itself, so that later it does not turn out that there is not enough pipe and you will need to think about what to do next.
Be sure to have a safety rope of appropriate thickness. It will be needed to directly suspend the well pump itself. And also, with the help of a well pump, it will be possible to remove the pump back from the well for preventive work, for example.
And to provide the well pump with electricity, a cable is purchased separately, the length of which will be sufficient to lead out of the well itself and connect it to the electrical circuit.
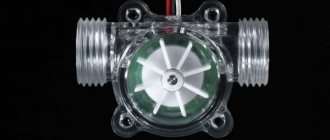
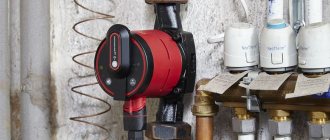
You will also need automation to provide the water supply system with the necessary operating pressure. The automation includes a built-in check valve and a flow switch. With its help, no additional actions are required from the user. All you need to do is open the tap and that’s it.
Additionally, you will need to purchase all the necessary connecting elements and adapters. So that it doesn’t turn out that because of one missing fitting you have to go to the store again.
Only having all of the above can you begin to assemble all the elements.
Installation stages
To properly install a surface pump on a water supply well, in addition to the electric pump itself, you need a hydraulic accumulator, automatic start and stop, a pressure switch and a pressure gauge, as well as a mesh filter element and a non-return valve. You can select additional elements yourself or purchase a complete installation. Fitting elements and pipe sections with a cross-section of 32 or 25 mm are also needed for input and output.
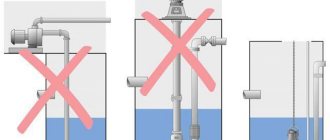
Pipes are purchased in such a way that at least 30 cm of the lower part is under the water surface. The overall size should not be larger than specified in the instructions for the unit.
At the location where the pressure equipment is installed, it is necessary to build a reliable pedestal or fittings to which the frame of the unit is rigidly attached. It should have mounting holes or legs. To reduce vibration and noise, a rubber mat is placed under the device.
Installation of a surface pump on a well is carried out using the following technology:
- A piece of polyethylene pipe of the required length is cut.
- At one end of the pipe section, a coupling made of brass or plastic with internal thread, a nipple and a non-return valve are installed.
- Additionally, the system is equipped with a mesh filter for coarse cleaning.
- On the opposite side, the pipe is equipped with a coupling and connected to the station inlet. Often the inputs have an internal thread; it is sealed with FUM tape or plumbing flax.
Preparation of materials accompanying installation
A stuck pump in a casing can be a major headache. And you need to pull it out (as well as lower it) using a special cable. If the pump is already equipped with a polymer cord, you need to make sure that it is of high quality and of sufficient length. Sometimes it makes more sense to purchase this item separately.
It is believed that a reliable cable or cord must be designed to withstand a load that is at least five times the weight of the equipment attached to it. Of course, it must withstand moisture well, since part of it will constantly be in water.
If the device is suspended relatively shallowly, less than ten meters from the surface, care must be taken to provide additional shock absorption for the equipment during operation. To do this, use a piece of flexible rubber or a medical tourniquet. Metal cable or wire is not suitable for suspension as it does not dampen vibration but may destroy the mount.
A special electrical cable is provided to power the pump. Its length should be sufficient so that the cable lies freely and is not strained.
To supply water from the pump to the house water supply, special plastic pipes are used. Designs with a diameter of 32 mm or larger are recommended. Otherwise, the water pressure in the system will be insufficient.
To install a submersible pump, a special cable is used, which is designed for long-term operation under water. Its cross-section must comply with the technical requirements specified in the product passport
Pipes can be used both metal and plastic. There is controversy regarding the connection of metal pipes. Some experts object to the threaded connection as less reliable. It is recommended to use flanges, and the bolt should be on top, this will prevent it from accidentally falling into the well.
But threaded connections in wells are used quite successfully. During installation, winding must be used. Some experts recommend using linen or “Tangit” sealing tape instead of the usual FUM tape or tow. The linen winding is additionally strengthened with silicone sealant or similar material.
The characteristics of the water supply pipe should be selected in accordance with its operating conditions. For depths up to 50 meters, HDPE pipes designed for a pressure of 10 atm are used. For a depth of 50-80 m, you will need pipes capable of operating under a pressure of 12.5 atm, and for deeper wells, pipes of 16 atm are used.
In addition to the pump, pipes and cord or cable, before installing a submersible pump in a well, it is recommended to stock up on the following materials:
- clamps for securing the electrical cable to the pipe;
- check valve;
- pressure gauge;
- shut-off valve for the water pipe;
- steel fastening unit;
- power cable, etc.
Before connecting the pipe to the pump, attach a nipple adapter to its outlet. Usually modern submersible pumps are equipped with such a device, but if it is not there, this unit must be purchased separately.
It should be remembered that to pump the well immediately after drilling, i.e. To remove large amounts of very dirty water from a well, such a pump cannot be used. It will quickly fail. Usually the well is pumped with a separate pump, which is cheaper and works better when working with dirty water.
Thermal insulation of external water supply
The location of the pipes below the freezing level of the ground allows you to avoid measures to insulate the main line. However, not all areas can boast a sufficiently low groundwater level, which completely eliminates the possibility of digging deep trenches. In this case, the solution to the problem is to lay pipes at a shallow depth and properly insulate the external water supply.
Relatively recently, the only way was to wrap external communication pipes with thermal insulation material and plastic film to protect them from water.
Modern methods, materials and technologies make the insulation process simpler and significantly increase the efficiency of heat conservation. Modern methods of insulation include enclosing pipes in a hard polystyrene foam shell at one of the production stages.
A heating cable stretched along the main and attached to the pipe is the most effective option for a water pipe with a diameter of 32 mm. However, this option has one significant drawback - the need to connect to the power supply network
This problem is not of particular importance for owners of suburban housing who constantly live off-grid. In case of a power outage, they have an alternative option - a generator running on gas, gasoline or diesel fuel.. https://www.youtube.com/embed/nnE3BYTgh70
Rules for installing the surface version
Surface pumps are not often used for this type of water supply as they are only suitable for shallow hydraulic structures, up to eight meters deep.
And yet, this option has a right to exist, and its installation is no more complicated than installing submersible equipment.
Surface pumps are easier to install and cheaper than submersible models, but they are only effective for wells up to eight meters deep
Mount the device as follows:
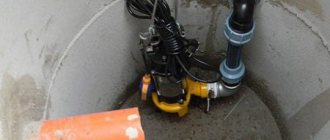
- The surface pump is installed in a special caisson or a separate room.
- A hose of suitable length is connected to the suction pipe of the pump.
- A check valve is attached to the other end of the hose (a protective measure to prevent water from draining when the pump stops running).
- A protective strainer is installed on the valve to prevent various contaminants from entering the pump housing.
- The hose is lowered into the well.
At this point, the installation can be considered complete and a test run of the pump can be done. To install such a pump in a well, a special adapter is often used. In this case, the hose is connected to the adapter, and the adapter is connected to the pump. The rest of the installation procedure is exactly the same.
It is a little more difficult to install a surface pump equipped with a remote ejector into a well. In this case, two hoses need to be lowered into the well. In addition to the suction hose, a pressure hose is also installed. It is connected to the side fitting of the ejector using a special outlet.
In addition to the check valve and filter, an ejector must also be installed at the end of the suction hose. It should be remembered that surface pumps are very sensitive to contaminants in the water supplied from the well.
Connection procedure: step-by-step instructions
Not everyone knows how to properly connect a pumping station. When installing block equipment, assembly involves combining the pressure and suction pipelines. A filter with valves is connected to the pipe immersed in the well, and it is brought out through an adapter or head.
The suction line is carefully sealed. Otherwise, air will enter the water supply system, which will damage the pump. The pressure part is equipped with a valve.
12 steps to connect a pumping station:
It is worth considering how the pumping station is connected to the well when choosing modular equipment. Connecting a well to a pumping station includes the following steps:
- Hydraulic accumulator piping. First of all, install a fitting with 5 pipes. It is connected directly. After this, the protective relay, pressure gauge and water inlet are configured and installed. The remaining outlet is used to connect the pressure pipe. Submersible pumps are installed in wells more than 10 m deep. This avoids the problems caused by the need to install an ejector and a suction part.
- Pipeline outlet. Produced through the source head. Pressure pipes are laid in a trench leading to the house. The elements must be located below the soil freezing depth.
- Connection to the electrical network. During the installation process, the station's starting block is installed, and the output is connected to it with copper wires. The pump must be powered through a separate automatic switch.
After completing the assembly process, the tightness of the connections is assessed. For the first time, the accumulator is filled slowly so as not to damage the integrity of the membrane.
The process of lowering the device into the shaft
There are several recommendations for lowering the device into the well:
- At the time of lowering, the pump should not come into contact with the walls of the well. This is due to the fact that even minor contact can cause damage to the device.
- If the lowering process cannot be controlled so as to avoid contact with the walls, then the structure is wrapped with a rubber ring.
- A megger is used to set the correct resistance of an electric motor.
An important point is the depth to which the motor should be installed. Many models are subject to increased wear when idling.
Lowering the pump into the well
In order to hermetically close the wellhead, you need to cut off the upper part of the casing, which has a thread. Since this particular section is wider in relation to the rest of the column
- And the last stage of installing a well pump on water with your own hands according to the diagram is installing a pipe into the hole in the head. In order to hermetically close the wellhead, you need to cut off the upper part of the casing, which has a thread. Since this particular section is wider in relation to the rest of the column.
- Having cut the thread, we disassemble the head into two parts and put the lower one on the pipe. At the top you need to lay a dense rubber layer.
- We thread a water intake pipe into the hole in the upper part of the head, and pass the cable and cable through special bolts located on the inside of the cover.
- We slowly and carefully lower the pump into the well and carry out its smooth start. Water should flow out of the pipe with sufficient pressure.
- We install the upper part of the head and securely fix it with bolts.
- After the well pump has been mounted and smoothly started, all that remains is to connect the water inlet pipe to the individual water supply system.
- The minimum distance from the pump to the bottom of the well should be 1 meter. And the minimum immersion depth of the unit is 0.5 meters.
Features of equipment installation
There are two options for installing the pump:
- The self-priming device is mounted next to the water source. A special submersible hose is lowered into the water at one end and attached to the pump at the other.
- The submersible device is attached to the pipe. If it is a flexible hose, then an addition to the fasteners can be a cable, which is attached with one end to the pump, and the other to any stable element with a well. A flexible installation option is preferable, as it allows you to adjust the immersion depth of the unit. The pump is completely immersed in water. Most of these devices do not tolerate dry operation well. Therefore, it is always worth monitoring the level in the well or purchasing a pump with a float switch that will protect the device in the event of no or critically low water levels.
It is recommended to install a check valve on the pipe itself, which will keep water in the system.
The algorithm for installing submersible equipment includes the following points:
- All pipes are installed. If the pump will be installed on a rigid pipe, then it is recommended to place a small piece of flexible hose between it and the main channel for moving water into the house, which will dampen engine vibrations.
- The following are connected to the device: - cable, - electrical wire, - hose.
- The pump smoothly lowers to the bottom of the well.
- When the unit touches the bottom, the entire structure should be raised to a height of half a meter to a meter from the point of contact.
- The cable must be firmly secured, the wire must be connected to the network, the hose must be connected to the rest of the system and placed in the fastening channels.
- It is recommended to provide the upper hole of the well with a cover to prevent foreign objects and dirt from entering the system.
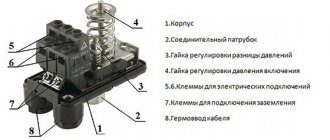
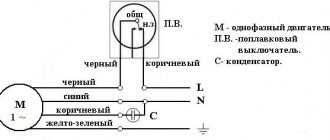
The electrical connection should only be made to a grounded source using a circuit breaker according to the following diagram:
Electrical connection diagram for a well pump
When installing the pump, you may need metal fluoroplastovie bushings; their options can be viewed here https://cema-bearing.com/metalloforoplastovie_vtulki/.
DIY borehole pump installation diagram
A mandatory point for the uninterrupted and stable functioning of the system is automatic control. The structure consists of the following parts:
- Hydraulic accumulator. The membrane tank is important for maintaining the optimal pressure, which should not go beyond 3.5 atmospheres. If the hydraulic tank is completely filled, the water consumption is 3-4 hours. It is important to limit frequent activation of the pump, otherwise water hammer may develop, which can rupture pipe systems. Its body contains rubber compartments for liquid with a pressure valve, and the rest is represented by air space involved in creating pressure. A line from a submersible pump is connected to the tank (important for flowing into the water compartment).
- A cabinet with electronic and relay control and structural protection mechanisms used to control the operation of an autonomous station. The pump contains small blocks to control the pumping system. When the load increases, low level of water supply to the horizon and heating of the engine, the equipment is turned off by means of a relay. High-precision sensors are located inside the pipe, which allows you to monitor changes in water pressure. As soon as it begins to fall, the electronic system activates the device, filling the compartment with liquid. If normalization does not occur, then you need to configure the relay.
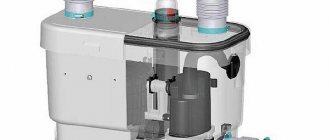
Pumping station for a well: design overview
A typical pumping station used to generate pressure in a domestic water supply system consists of the following parts and assemblies:
Hydraulic accumulator pumping station
- A hydraulic accumulator is a barrel-shaped container used to level out the pressure drop in the system during frequent turning on and off of taps or any other sources of consumption. That is, consumers draw water from this container, which, in turn, “unloads” the pump, eliminating the need to turn on after each opening/closing of the taps in the house.
- A pump is a device that ensures the flow of fluid into the accumulator. Moreover, water is pumped out of the well through a vacuum branch of the pipeline, in which the vacuum is created by the same pump.
In addition, the pumping station cannot function without additional equipment, which includes:
- Pipeline fittings are pipes of different diameters and lengths from which a vacuum section is formed (internal - from the intake unit to the adapter, and external - from the adapter to the inlet into the pump) and a discharge section (from the accumulator pump to the consumption sources). Moreover, the pumping station for the Abyssinian well is equipped only with an “external” pipeline, since the “internal” section consists of the casing pipes of the source itself.
- Connecting elements - couplings, bends, tees, manifolds and other fittings used in assembling a water supply system from pipe fittings.
- Shut-off, regulating and monitoring elements - valves, pressure gauges, pressure switches, check valves and so on.
- Filter elements for coarse cleaning (mounted at the inlet to the pump) and fine filtering elements (mounted at the outlet of the battery).
Scheme of work
The operating principle of the pumping station is quite simple and is implemented as follows:
Hydraulic accumulator automatic pumping station
- The pump pumps water from the source and fills the accumulator. Moreover, a submersible pumping station for a well or borehole involves installing a pump in the source shaft, and the option with a surface pump involves placing the device near a storage tank.
- A pressure switch controls this process by turning off the pump from power after pumping a certain volume of liquid into the battery.
- The hydraulic accumulator feeds the consumer, creating pressure in the water supply. That is, when you open the tap, you consume water not from the well, but from the battery.
When the storage tank is empty, the relay turns on the pump and everything starts all over again.
Proper installation of a pump in a well - we do it ourselves
The issue of the need for water on a plot of land has not been considered in recent years; everyone understands that without life-giving moisture nothing living can exist. That is why own wells are an integral attribute of a modern landowner. All that remains is to decide who and how the work process will be carried out.
It is necessary to understand that an incorrectly installed pump will not only have a short service life, but can also damage the integrity of the foundation of a nearby building.
Some useful and important tips
The installation of a well will affect the operation of the water supply in the house. Before installation begins, a number of conditions must be met:
- Work should begin by studying the instructions for installing the equipment.
- Before installing a submersible central pump, it is necessary to check whether the well flow rate corresponds to the flow characteristics of the unit.
- To seal the well, you need to install a cap. This will prevent foreign objects from entering the barrel.
If you are not sure that the work on installing the pump will be done efficiently, it is better to entrust the installation to specialists.
Some important recommendations
A special brass fitting is used to connect the check valve to the water supply pipe. The connection must also have a special drive sleeve. This measure will prevent the pipe from shrinking in diameter and will compensate for the excess stress created by the compression fitting.
The fitting, like all connecting elements, must be of high quality, designed for increased tensile loads. Otherwise, the pipe may simply jump out of the fitting. To connect the opposite end of the HDPE pipe with the outlet at the head, use the same compression drive-in fitting made of brass.
A special electrical cable for submersible pumps is available for sale. It is this that must be used to connect to the pump. Substitutions with lower quality materials are not acceptable.
The power cable is connected to the pump cable by soldering; it is better not to use twisting in such an important place. The connection point is covered with a heat-shrink sleeve
To secure the cable and cable to the water supply pipe, you need plastic clamps. They are installed every 2-3 meters. This measure helps to avoid accidental tangling of the cable while lowering the structure down. Instead of clamps, you can use electrical tape.
To attach the cable and cable to the water supply pipe, you can use plastic clamps. A special adapter will allow you to reliably connect the pump to the pipe
For the sake of economy, a special cable is used only in the area where it will be immersed in water. The remaining distance is covered by a regular PVS cable.
In any case, the cable cross-section must comply with the manufacturer’s recommendations specified in the pump data sheet.
Soldering is performed at the junction of the power cable and the pump cable. After this, the cable is closed with a special heat-shrink sleeve. To install it you will need a hair dryer
The pump can only be suspended from a stainless steel cable. Neither regular black steel nor its galvanized version are designed to withstand continuous use in water.
When lowering the pump in narrow areas, you can supplement the rotation of the pump with a small amount of pressure. But in any case, the pump must maintain a vertical position.
During installation of the pump, the well head may move slightly. You should make sure that the weight of the pump rests on the cable and is not supported by the pipe. Only after this the position of the head can be fixed with screws.
Connection to the system
It is also performed in strict order of each subsequent element:
- The end of the cable can now be secured to the well head, where there is a special loop.
- If necessary, connect the heating cable. It will prevent the water supply system from freezing during operation in the cold season.
- The cable is connected to the automation.
- There is a connection to the hydraulic accumulator.
- The filter element is installed and after it the shut-off valve is installed.
When the well is located directly in the house, the basement of the house will be a caisson, which will always have a positive temperature at any time of the year.
If the caisson is located outside the premises, then the pipeline from the well itself must be laid at a depth below freezing using a sealed well adapter. Depending on the region of Russia, the freezing depth ranges from 1.5 to 2 meters in the Far North.
The entrance to the caisson located outside the room must be waterproofed, just like the caisson. This is necessary so that during the spring flood, groundwater does not get into the well itself. Otherwise, the water from it may become unusable.
How to properly lower a submersible pump
Do-it-yourself installation of a pump in a well is carried out after studying the instructions with drawings for installing the pump and gaining practical experience using the videos below.
In accordance with the passport data for the excavation and the immersion depth, the downhole unit and materials are selected. When assembling the structure and installation work, two or three people are involved, sequentially, step by step, performing the following operations:
- We check the project package and lay out the submersible pump, pressure hose, control cable, cable and fasteners for assembly.
- We begin assembly by installing the check valve into the outlet on the pump using an adapter fitting. In this case, we take into account the direction of movement of the liquid, indicated by the arrow on the body.
- We cut the end of the pressure pipe at an angle of 90 degrees to the axis, put a plastic coupling with an O-ring on the hose and insert it into the body of the adapter fitting screwed into the valve. Tighten the coupling nut to secure the connection.
- Using a heat-shrinkable sleeve, we connect the control cable to the engine, and fill the entry point of the wires into the unit body with waterproofing glue.
- We insert a safety rope into the eyes on the device body, bend the threaded end into a loop and, using a special lock and a pressure washer, connect it to the main part of the rope.
- To prevent the cable and cable from touching the column when lowered into the shaft, we connect it together with the hose into a single strand using plastic clamps. A meter from the pump, we fix the ties every 20 cm, and then every meter to the top of the casing.
- Using a grinder, we cut off the casing pipe to the bottom of the caisson and install the head on the end. The cover serves to protect the well from debris, and it has holes for a pressure hose, cable and safety rope.
- We thread the hose, cable and cable into the holes on the head. We cut off the pressure pipe at the level of the lid and insert an angle fitting into it to connect to the water main laid in the trench to the house. We attach the safety cable to the casing carabiner. We lay the cable in a trench and lead it into the technical room.
- If the well is drilled no further than 5–7 meters from the house, the connection is simplified and a caisson is not installed. The pressure pipe is cut off at ground level and, together with the cable, is led through the head into the technical room in an insulated tray. To prevent the water from freezing in winter, a heating wire is inserted into the main hose, and a check valve is not installed on the pump. After injection, the liquid flows back, and the HDPE pipe remains dry.
When installing a water pipeline into a house below the freezing point of the ground, a trench is dug to this level. A hole is drilled in the casing pipe, at the bottom of the ditch, into which the adapter is fixed. Through an adapter, a pressure hose and control cable are inserted into the house through the trench.
Determining the pump operating point
Correct installation of a deep-well pump requires clarification of its characteristics during operation in standard mode. To do this, you will need to determine the water consumption for a single period of time.
After measurements are taken, the indicators are compared with information from the technical documentation. If the actual data exceeds those recommended by the manufacturer, the unit valve should be slightly moved. Due to additional resistance, the parameters are normalized.
Useful video on the topic
Providing a plot of land with a stable and uninterrupted flow of water is one of the main tasks facing owners of dachas and private houses where people live on a temporary or permanent basis. Today there are several effective ways to solve this problem, but the most popular and effective is to mount a pump in a well. To implement this idea with your own hands, you do not need to have professional knowledge, skills or equipment. It is enough to carefully study this article, which will answer the main and most pressing questions.
Selection of equipment according to technical characteristics and water intake flow rate ↑
How to choose a submersible pump that needs to be installed in a well, while saving money and not making a mistake? It is enough to calculate only 4 parameters:
- Source flow rate: the actual amount of water arriving at the wellbore per unit of time (hour, day).
Scheme: how to calculate the flow rate of the source and the required pump power
- Pressure: the height of the water column from the point of intake to the extreme point of water intake in the house. To this value you must add the value that is calculated from the total length of the horizontal wiring. On average, 10 m of pipe is equal to 1 m of water column.
- The amount of water consumed per hour is the maximum value. The volume that flows out in 1 hour from all water points in the house is summed up.
- Well string diameter: the minimum diameter must be taken into account. The pipe may narrow at the joints.
For a family of 3 - 4 people, it is enough to buy equipment capable of providing up to 3 cubic meters per hour, and with a maximum pressure of up to 60 m. You should not buy more powerful models: if a hydraulic accumulator is installed, the required volume of liquid accumulates in the tank. There is no need to save money by buying a weak, low-power pump: the equipment will constantly operate at maximum speed, which will shorten its service life.
Connection procedure: step-by-step instructions
Pumping stations are suitable for equipping relatively deep water intake workings. If the depth of the groundwater table exceeds the maximum value specified by the equipment manufacturer, remote ejectors are used.
To install, perform the following steps:
- A trench is laid connecting the well and housing.
- Pipes are laid in it.
- Install a water supply system (if it is missing).
- Install the unit in the selected location.
- The supply pipe is equipped with a filter and a check valve.
- Connect the line to the receiving pipe.
- Connect the unit to the water supply.
- Connect the equipment to the power supply.
- Fill the hydraulic tank with water.
- Perform a test run of the station.
- Check the joints.
- Set up the pressure switch.
The pipes of the external pipeline of the water supply system must be laid below the level to which the ground freezes. It is recommended to make a slight slope from the house to the well so that the water returns to the pump if it stops working. This will protect the device from overheating and damage due to dry running, i.e. work in the absence of water.
The same protective function is performed by a check valve, which does not allow liquid to leave the pipe and go into the well. When connecting a surface pump equipped with an ejector, it is necessary to connect another one to the suction pipe, which is connected to the ejector.
This unit directs part of the incoming liquid to the base of the pipe through which the liquid flows, which significantly increases the productivity of the equipment. If a submersible pump is used, the work is performed differently. It is connected to the suction pipe and suspended on a durable stainless steel cable.
The lower end of the supply pipe should be equipped with a strainer to prevent sand and other impurities from contaminating the water and damaging the equipment.
Submersible pumps are conveniently attached to a finished head. Such a device is mounted on the top of the casing pipe. It is believed that sealing a well with a cap allows it to slightly increase its flow rate. To prevent the cable and cable from getting tangled, they are fixed to the pipe using plastic ties.
If the filter is already in the pump, you are limited to installing a check valve. The edge of the surface pump supply line should be located at a height of more than a meter. This minimum distance is half a meter for a submersible pump.
Connections between the unit and pipes must be made using American taps; valves are used to shut off any section and disconnect it for repairs without damaging the remaining elements of the system.
It is recommended to install an additional coarse filter in front of the station, and after it, install a filter that will ensure the purity of drinking water by removing unwanted impurities
The well filter installed in the excavation wears out over time, and sand begins to seep through it. It is recommended to install an additional coarse filter at the pump inlet.
Power supply is provided by connecting a separate line to the equipment, equipped with an automatic shutdown device; care must be taken to ground it. Before starting, the device is filled with water through the hole provided for this purpose.
There should be pressure in the hydraulic tank:
- about 1.5 bar for containers less than 30 l;
- about 1.8 bar for 30-50 l;
- 2 bar or a little less for a 50-100 l tank.
Then the hole for filling the water is closed and the device is connected to the electrical network. You need to open the valve slightly to bleed the air. In a few minutes, water will flow from here. Otherwise, turn off the device and add a little more liquid.
To adjust the pressure switch, it is necessary to remove the housing from it in order to gain access to the screws with which the device is adjusted
Turn on again so that the device starts working normally. Now you need to configure the relay. To do this, the HA will have to be emptied and then filled again. Indicators are set by rotating the corresponding screws.