The ability to unscrew a drill without a key can save you in a difficult situation. If you have started repairs and discovered that the key to the chuck is lost, traditional methods will help you change the drill. Of course, dealing with the problem with a pair of screwdrivers or a vice is much more difficult. But this method will allow you to finish the job without running around the shops looking for a new key.
Types and causes of drill jamming in an electric drill
There are several reasons why an electric drill may jam.
- Marriage
The most obvious reason for the breakdown is a manufacturing defect; this problem most often occurs in very cheap and low-quality drills. That is, tools from Bosch, Makita, Metabo, Interskol companies will be less likely to be defective. That is why such equipment is popular.
- Violations of the rules for using the tool
Even the most reliable tool can fail if used incorrectly. And here it doesn’t matter who the manufacturer is - the same Bosch or Makita are even more susceptible to breakdowns if operating rules are violated.
This reason is not tied to a specific brand or tool parameter, but some brands provide for this point and provide protection from an inexperienced user.
- Chuck malfunction
If the tool is used or stored incorrectly, the main part of the drill can easily break. This is a very common problem, but it cannot be called a marriage.
Attention! Most often, the device breaks down due to user negligence.
In the first two cases, it is most likely impossible to repair the instrument at home. In the case of the third problem, you can do everything yourself. But first you need to determine the type of cartridge.
Reasons why it is difficult to remove the drill
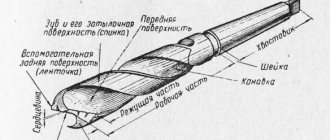
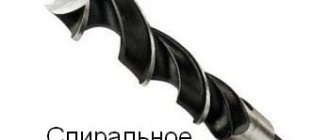
Types of drills: a - spiral centerless; b - spiral with a center and cutters; c - spiral with a screw center; g – feather center; d - center; e - gimlet; g – countersinking; z - groove; and - cork.
When working with a drill, sometimes difficulties arise when replacing a drill due to the removal of a previously used drill from the chuck. This problem can vary in severity, depending on the cause. The simplest and most common reason is the application of excessive force when clamping the drill, if there are no limiting mechanisms in the design of the chuck. This phenomenon most often occurs when the impact method is used to tighten the drill at the final stage, for example, using a mallet. Drill jamming can also occur if it is forcefully tightened when it is incorrectly placed in the space between the cams. This is typical when using a small diameter drill.
A more complex tool jamming mechanism can occur when using a low-quality drill. So, if it is made of a soft material, then when it rotates, metal shavings may appear, removed from the surface, which clog the gap between the cams and the drill, as well as between the cams. This can make it difficult to open the jaws when trying to loosen the drill. Difficulties in removal may arise if the drill sinks too deeply into the chuck during operation. The task becomes more complicated if the drill, in addition to such jamming, also breaks at the level of the upper end of the cartridge.
The cause of breakage of the drill in the drill chuck may be a violation of the drilling mode.
The cause of destruction, in addition to the use of low-quality material, can be a violation of the drilling mode: unexpected tilt of the drill, excessive vertical load, an attempt to drill heavy-duty material, etc.
Finally, the reason that it is not possible to remove the drill may be the jamming of the cartridge itself. Several possible reasons should be highlighted. The first reason, not related to the failure of the cartridge, is explained by the ingress of foreign particles that impede movement into the area of the threaded connection of the control element and the housing. Such particles can be dirt, metal dust or small shavings, etc. In this case, it is not possible to ensure rotation of the adjusting sleeve or key.
The reason that you cannot get the drill out may be a failure of the chuck. This can be caused by either a manufacturing defect or temporary wear of the cams or the control element. The reason may also be the failure of the spring locking mechanism, which does not release the control element when the button is pressed.
Types of drill heads
Before you figure out how to remove a drill from a drill, you should understand what fastening mechanisms manufacturers use.
There are only two main types:
- Key or toothed
The key type is very reliable, but as the name suggests, a special key is needed to tighten it. It activates special cams that firmly fix the drill. This type is the most reliable, but the drill fastening time leaves much to be desired.
Gear chuck
- Quick-clamping
Quick-release sockets are keyless and are tightened by the user's manual efforts.
Keyless chucks are divided into two more types:
- Double coupling
It consists of two couplings, which means you need two free hands to fix it. One of the advantages is that such couplings are more reliable and require less effort for fastening.
Double coupling quick-release
- Single coupling
Single-coupling ones are much more convenient, since only one hand is used for fastening. This type of chuck ensures no backlash, but more force must be applied to tighten it.
Single coupling quick-release
Attaching the drill to the drill
Drill device diagram.
To install the chuck on the drill shaft, a hole is made in its lower part along the diameter of the shaft. Fastening can be due to a threaded connection or holes with a taper and a tight fit of the cartridge on a shaft with a reverse taper.
The drill is inserted in the center into the space between the cams. When the cams converge (rotation of the adjusting element clockwise), the drill is secured in the chuck, and when the cams diverge, on the contrary, it is released. To ensure reliable fastening, it is necessary to apply considerable force when rotating the adjusting element.
Based on the method of securing the drill, chucks are divided into conventional (key) and quick-release chucks. In keys, the adjusting ring is moved and tightened using a special wrench. When the key is rotated clockwise, the drill is secured in the chuck. The quick-clamp has an adjusting sleeve, the surface of which is corrugated for ease of rotation by hand. By manually rotating the sleeve clockwise, the drill is secured in the chuck.
Keyless chucks come in two types: single-sleeve and double-sleeve. If the design provides only one sleeve, then it rotates relative to the drill body, which must be fixed motionless during installation. When using two sleeves, one of them is movable, adjustable, and the other is stationary. The adjustment sleeve is rotated relative to the second sleeve, which must be fixed when installing the drill. In the design of the chuck, to limit the tightening force, additional elements can be used in the form of a ratchet (located inside) or a locking spring mechanism with a button (the button fits into a special socket on the outside).
How to release the keyless chuck
To release the double-clutch chuck, you need to turn the clutch so as not to break the ratchet. To do this, you need to use various plumbing products. keys, otherwise you will have to completely disassemble the drill and unscrew the head. This means that you need to unscrew the screws on the body and, remembering the location of the parts, go through the drill.
With a single-coupling structural element, the procedure does not change, that is, try to first unscrew it with the help of a plumber. key, and then simply disassemble the drill and remove the chuck, disassembling it.
If the drill is expensive, you need to make several cuts. Dirt that gets inside and causes the mechanisms to get stuck can also be a problem. It could be sand, soil with water or rust. In this case, you need to remove the insides of the drill and thoroughly clean it, and then start removing various pebbles and pieces of grass.
Note! It is better to film or record a video of all stages of disassembling the tool on your phone, as there is a chance of forgetting something or starting to pull out the wrong parts.
Rotating the double-sleeve chuck
Drilling
You can try to drill out the fragment with a harder product - carbide, diamond or a drill with a special coating. This method will require extreme care, caution and patience from you, as it can lead to deformation and bending, which, in turn, will cause the fragment to move into the soft body of the part. In addition, if there is a high probability of metal shavings getting inside important components, parts and assemblies, it is better to abandon this method. However, on the contrary, if the part is not of great value and you don’t mind it, then you can drill out the space around it and then remove the fragment from this hole by picking it up with a suitable tool.
How to release the key chuck
The key cartridge is much easier to release. First, you should try to free the drill in the usual way, simply by increasing the handle of the key and asking for help.
If the part is jammed tightly, you need to sort out the drill, then remove the head and replace it with a new one. If the drill is expensive and you need to get it anyway, you should disassemble or saw the chuck itself.
You can also find dirt that has gotten into the drill and is preventing it from spinning. Then you need to remove all components and remove dirt from the cartridge.
How to remove a drill with a working chuck
If everything is in order, then in theory there should be no problems with getting it out. Therefore, this section is rather dedicated to users who are completely ignorant of power tools, since the operation itself is elementary. But there are still a lot of people, so maybe someone will need this information.
In this situation, you will need a special key to unlock the key chuck, or straight hands to loosen its quick-clamping counterpart.
Huge selection of power tools and gas-powered equipment at low prices. Free delivery to your region. Payment upon receipt or online.
In the first case, you need to insert the key into one of the recesses on the cartridge and start rotating it counterclockwise. Unwinding occurs due to the existing teeth on both objects.
In the second, the drill should be turned on in reverse mode (reverse rotation). With one hand we hold the outer body of the cartridge, and with the other we press the start button. If your machine is not equipped with reverse, then this is not very good - in fact, this should not happen, since only key cartridges are installed on such devices. But still, if this happens, then you need to somehow fix the drill axis (for example, with an open-end wrench) and rotate the outer body of the chuck counterclockwise. In general, it would be better to remove such a cartridge here and install a key one.
How to spin a drill without a key
How to unscrew a drill without a key? Many people ask this question, especially when the key is lost, which happens quite often.
You need to get two screwdrivers: a Phillips and a flathead. The first step is to insert a Phillips screwdriver into the key hole and a flat-head screwdriver into the groove for the teeth. Then they pull the screwdriver in the direction of unwinding, and the Phillips acts as a lever. In this case, with a minimum of effort, you can unscrew the head and solve the problem of how to unscrew the drill without a key.
Unscrewing the key chuck
Subtleties of operation
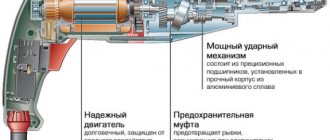
Electric drills began to appear at the end of the 19th century almost immediately after the invention of electric motors. The main task of the tool introduced into production, which had an impact mechanism, was to drill various holes in materials using electricity and drills rotating at high speed.
It is already clear from the description: in order to use such a tool, you need to follow certain safety rules.
- Before starting work, be sure to inspect: the drill so that there are no exposed electronic (current-carrying) parts; wire going to the network so that it is not damaged; a fork so that it is solid and working; socket so that it is in good working order and fits snugly in the wall. In this case, the plug must be tightly inserted into the socket and there should be no sparks.
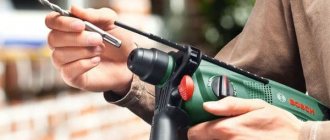
- Insert the drill into the drill as tightly as possible.
- Select the required mode: drilling (twisting the drill at high speed) or drilling (drilling using an impact mechanism).
- Select the maximum torsional speed of the drill.
- After making a hole of the required diameter and length, you should press the off button and then remove the plug from the socket so as not to accidentally start the tool when not required.
Using a vice
Coupling or quick-release elements can be unscrewed using a vice. To do this, firmly secure the vice, then tighten the coupling(s) into it.
If the drill is switchable and it is possible to turn it in the other direction, then start turning it slowly, increasing the power, and with a small probability the chuck may become wedged.
When the drill turns only in one direction, you need to wedge it manually, with your hands or a plumber. keys.
Note! You cannot immediately accelerate the drill to maximum speed, because there is a chance of breaking the vice or breaking the chuck.
How to correctly insert a drill into a drill and how to remove it?
In any living space, sooner or later a situation arises when something needs to be altered: hanging a picture, screwing on shelves or doing wiring. But you can’t just pierce most concrete and brick walls with a nail and you can’t screw a screw into them. Therefore, you have to resort to using an electric drill. This is a convenient device that allows you to make a hole of the required diameter in the wall thanks to a variety of drills: for concrete, metal, glass, plastic, tiles or wood. But to successfully use an electric drill, you should know the basic rules for using this tool.
Using Spring Wire
The opposite problem can also happen when the drill bit gets stuck in the workpiece. In this case, unscrewing the drill is not too difficult, but problems may arise with the available tools. There are several steps you need to take:
- Use a welding machine to heat the stuck part.
- Make grooves at opposite ends.
- Place the spring wire into the spiral groove.
- Start twisting the stuck drill until it starts to unscrew itself.
- Start removing the drill.
It is worth noting that you need to take out the drill slowly and slowly, since the work requires precision.
In order to avoid getting into such situations and not wondering how to remove a drill from a stuck drill chuck, you need to use the tool according to the instructions and follow all the rules. Well, if such a situation happens, you can re-read the article again and no longer wonder: the drill is stuck in the drill, how to get it out.
how to unscrew a hex without a key
Another way to unscrew a bolt without a hexagon is as follows:
- If the bolts are not too small, you can use a chisel or a regular hammer: they are punched at an angle in the direction of unscrewing the fasteners.
- Method using a ring or gas key .
- If you have a problem how to unscrew the "beveled" hexagon, you can use a nut with a socket. The bolt connection is unscrewed using an impact mechanism.
- Welding: A small amount of metal is welded to the fastener using a nut or any piece of reinforcement from which it is then screwed.
- Extreme measures for twisting hexagonal hardware with an internal axis. This is a complete removal of the fastener where the cuts are made with a hammer and the fasteners are removed.
How to remove a drill bit from a drill?
If you need to change a drill that has become unusable, or because of a change in the nature of the work you need to install another one, then the process is even simpler than when installing a drill.
There are also step-by-step instructions for this case.
- Turn off and unplug the electric drill.
- Depending on the chuck, use a wrench or turn the clutch by hand, turning it counterclockwise, thereby loosening the chuck. Try not to handle the drill, as it may remain hot for some time after use.
- Having removed the previous drill from the chuck, exchange it for another and continue working or put the tool away for storage.
If you can’t turn the chuck the first time, don’t rush to the workshop; most often it’s enough just to put in more effort.
How to avoid losing your key?
To avoid being left empty-handed with unfinished work, it is important to properly organize your workspace. This organization will allow you not to lose sight of the key every time you change the tool.
It is better to provide the key with a large bright keychain. This way it won’t get lost in the clutter on the workbench or be forgotten in the pocket of your work clothes.
The easiest way to protect against loss is in your own workshop. Here you need to create a permanent place to store the turntable and always put it there. In this case, the storage location should be quite convenient and at hand:
- Many manufacturers provide their instruments with an eyelet for attaching a turntable. It is placed either under the handle or close to the fork. By inserting the key into this hole, you can rest assured that it will not get lost. The only drawback is that over time the fastening wears out and breaks.
- The eyelet for the key is made from insulating tape. It is attached to the power cord. The attachment point is usually located 50–60 cm from the handle. This way the turntable will not interfere with your work and will always remain at hand.
- Having attached a ring to the key, you can hang it on a hook next to the workbench.
If possible, you should stock up on another key. It is stored in a box in the workshop, away from the place of work. If the main key is lost, the backup key will be at hand and save the day.
If during the work it turns out that the pinwheel from the clamping mechanism has been lost, the main thing is not to panic. Using traditional methods, it is quite possible to release the chuck, remove or change the drill, and finish the job.