Do you want to repair or replace communications made of polymer pipes? Agree that it’s not a bad idea to save on calling a technician by assembling a new pipeline yourself. But you don’t know how you can connect the individual elements of the system to each other and what you will need for this.
The article we presented describes in detail the technology of welding polypropylene pipes - any novice plumber can connect them with his own hands. We will tell you what you need to consider, how to use a soldering iron to join plastic elements. We will tell you in what cases other methods are used.
To help the novice master, we have selected detailed videos demonstrating the step-by-step process of welding polypropylene, and photo illustrations.
By the way, you can do not only plumbing or heating, but also a lot of necessary and useful things
Types and purpose
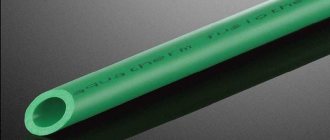
Polypropylene pipes can be of four colors - green, gray, white and black. Only black ones differ in their characteristics - they have increased resistance to ultraviolet radiation and are used when laying an irrigation system on the ground. All others have similar characteristics and are laid indoors or buried in the ground.
According to their intended purpose, polypropylene pipes are of the following types:
- For cold water (temperature up to +45°C). They can be easily distinguished by their longitudinal blue stripe.
- For hot water supply (heating up to +85°C). A distinctive feature is a red stripe.
- Universal (maximum heating up to +65-75°C depending on the manufacturer). Two stripes are applied side by side - blue and red.
Colors do not affect the characteristics.
For both cold and hot water there are pipes with different characteristics. This is displayed in the markings:
- PN10 are used exclusively in cold water supply systems (up to +45°C) with low pressure (up to 1 MPa). They have small wall thickness. Not suitable for high-rise buildings.
- PN16. They are often labeled as universal, but are more often used for cold water - they can withstand heating of the environment up to +65°C and pressure up to 1.6 MPa.
- PN20. Thick-walled pipes, which can transport media with temperatures up to +80°C, can withstand pressures of up to 2 MPa. Used for distributing hot water and heating systems.
- PN25. These are reinforced polypropylene pipes (with foil or fiberglass). Due to the presence of a reinforcing layer, they often have a smaller wall thickness than PN20. The heating temperature of the medium is up to +95°C, pressure is up to 2.5 MPa. Used for hot water supply and heating.
All of them are produced in different diameters - up to 600 mm, but in apartments and private houses they are used mainly in sizes from 16 mm to 110 mm. Please note that the internal diameter is indicated, as wall thickness may vary.
What is welding of polypropylene pipes
Polypropylene is characterized by increased rigidity, and to create systems of the required configuration, fittings from the same material are used. These are various angles, tees, bypasses, adapters, couplings, etc. They are connected to pipes by soldering. This process is also called welding, but its essence does not change: two elements are heated to the melting point and, when hot, are connected to each other. When done correctly, the connection turns out to be monolithic and serves no less than the pipes themselves.
Fittings for polypropylene pipes allow you to create a system of any configuration
To connect polypropylene with metals, there are combined fittings, in which one part is made of metal and is connected using a threaded connection, and the second - polypropylene - is welded.
What to solder with
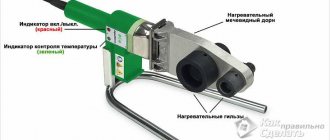
Welding of polypropylene pipes occurs using a special device called a soldering iron or welding machine. This is a small metal platform, inside of which there is an electric coil that heats the surface. Because of this design, this unit is also called an iron.
Two device designs for welding PP pipes
To connect two elements, the spliced surfaces are heated to the melting temperature (+260°). To heat the element to the desired depth, two different Teflon-coated metal nozzles are installed on the welding platform:
- a mandrel (smaller diameter) is used to heat the inner surface;
- To heat the outer surface, a sleeve is placed.
Nozzles for soldering polypropylene pipes
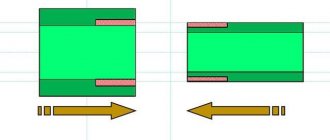
The two elements to be connected are simultaneously put on the corresponding attachments, held for a certain period of time (several seconds), then connected. This is how polypropylene pipes are welded.
How to weld
The designs of soldering irons for polypropylene pipes are slightly different, but the principles of working with them are common. There are two main models - with a flat platform or a cylindrical heater. With normal quality, both work, there is practically no difference. Whoever is more comfortable chooses it.
This is what a well-made connection looks like in cross-section - as a single whole
Preparatory work
Before starting work, you need to warm up the soldering iron, but it’s not that simple. The procedure for its preparation is as follows:
- First, nozzles of suitable diameter are installed on the platform. A pin is threaded into the hole in the platform, a mandrel and sleeve are put on it on both sides, and tightened with nuts on both sides.
- If the heating element is in the form of a tube, the nozzles for it are sold attached to the plate. The plate is placed on the heating element and the fastening bolt is tightened.
The soldering iron is ready for use. But we still need to prepare the pipes and fittings. The first condition for high-quality welding is an even cut. The cut must be strictly vertical, without burrs or tears. This cut can be obtained using special scissors. They have two wide jaws on the bottom that hold the pipe in place, and the cutting part is on top.
If you cut like this, the cut will be even and smooth.
The second condition for good soldering of PP pipes is clean, dry, grease-free parts. If you want your plumbing or heating to last a long time and not leak, you should not skip this procedure. Clean the pipe section and fitting using alcohol or water and dishwashing detergent. Then they wait until everything is dry, and only after that they begin the soldering process.
How long to heat
When welding, polypropylene must be heated strictly to the required temperature. Overheating and underheating significantly reduce the quality of the seam. An overheated and softened pipe simply will not be inserted into the fitting, and an insufficiently heated material will not fuse.
The heating time depends on the diameter of the pipes, air temperature and is indicated in the table.
| Diameter of polypropylene pipe | Welding depth | Heating time | Welding time | Cooling time |
| 16 | 12-14 mm | 5 s | 6 s | 2 minutes |
| 20 | 14-17 mm | 6 s | 6 s | 2 minutes |
| 25 | 15-19 mm | 7 s | 10 s | 2 minutes |
| 32 | 16-22 mm | 8 s | 10 s | 4 min |
| 40 | 18-24 mm | 12 s | 20 s | 4 min |
| 50 | 20-27 mm | 18 s | 20 s | 4 min |
| 63 | 24-30 mm | 24 s | 30 s | 6 min |
| 75 | 26-32 mm | 30 s | 30 s | 6 min |
In general, you can solder at +5°C, but the data is given for +20°C. In hotter weather, the holding time of the elements on the soldering iron is reduced by 30-60 seconds, in colder weather it is increased.
Pay attention to the welding depth column in the table. This mark is placed on the pipe. Before that, you will need to press it into the fitting. This creates a small bead of molten plastic in front of the edge of the fitting. This will mean that the seam is made correctly.
Mistakes that may occur when welding polypropylene pipes
One more column requires explanation - “welding time”. This is the time for which it is necessary to compress and fix the elements to be welded.
In general, if you try to insert a cold pipe into a fitting, it should go in with great difficulty - the outer diameter of the pipe is slightly larger than the inner diameter of the fitting. This is done intentionally to provide some excess material from which the bead on the seam is formed. To ensure reliable welding of polypropylene pipes, it is better to take all components from the same company. This ensures that the sizes match. Otherwise, you need to try it on so that the fitting does not “slip”, but is difficult to tighten.
Technology
As already mentioned, when welding polypropylene pipes, they and the fittings must be cleaned, degreased and dried. And only after that you can start soldering.
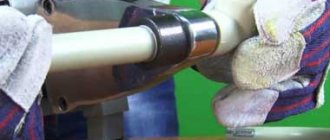
This preparation is suitable for all types of pipes, except those reinforced with foil. In this case, after the required piece has been cut, the cut is cleaned down to the foil with a special device - a shaver. A pipe is inserted into it and turned several times. In this case, the top layer of plastic is removed, after which it can be degreased and soldered.
For foil-reinforced pipes, polypropylene is cut down to the foil
After the surface has dried, a mark is drawn on the pipe, noting the distance to which it must be pressed into the fitting (the easiest way is with a thin marker or a sharpened simple pencil).
Marking the welding depth
Soldering polypropylene step by step
Further, the technology for welding pp pipes is as follows:
- We put the cut section of the pipe on the mandrel and insert the fitting into the sleeve. This must be done at the same time; in extreme cases, the fitting is put on earlier, since it has a large wall thickness. The delay should be very small. We put it on the nozzles
- We hold the elements for the required amount of time.
- We remove it from the nozzles and connect it by pressing the pipe into the fitting up to the mark. The connection is exclusively linear; you cannot rotate the elements relative to the horizontal axis (do not twist, although you really want to). You can straighten the horizontal position immediately after connection if a discrepancy is noticed. We fix it so that the welding of polypropylene pipes is reliable
- When connecting, you have to make quite a lot of effort. The same force is maintained for several seconds (in the table in the “welding time” column).
- After the specified time has elapsed, we stop pressing, and the connection cannot be disturbed for several minutes (in the table there is a column “cooling time”). After this, we can assume that the soldering of the polypropylene pipe is completed. You can proceed to the next seam.
One note: immediately after finishing welding, inspect the attachments on the soldering iron. If there are material residues, they are removed with a soft, lint-free, non-fading (white) cloth. You cannot leave plastic on the soldering iron - the next fragment will stick and it will be difficult to remove. Do not clean the attachments using abrasives - they have a Teflon coating and are easily scratched. And even microscopic scratches will lead to the fragment on the soldering iron (iron) sticking.
By the way, it is better to work with cotton gloves - there will be fewer burns.
Before putting the system into operation, it must be checked. This is done using crimping. What it is and how to do it, read here.
How to properly solder polypropylene pipes - general concepts
At first glance, this process seems very simple. They heat up the elements, connect them, and fasten them. But practice has proven that there are many nuances in such actions, neglect of which will lead to a poor-quality result, that is, a poorly functioning highway, and novice craftsmen need to pay close attention to certain points.
The main problem is that poorly done work can only be determined after a certain time of operation of the highway. Therefore, it is so important to follow certain rules when doing soldering yourself.
Welding of polypropylene pipes and fittings is based on the thermopolyfusion method. Its essence lies in heating the elements to be welded and quickly joining them. To make the connection we need a special device called a soldering iron.
Layout of polypropylene pipes
Polypropylene pipes are used for installation of cold or hot water combs and heating. The choice of diameter in each case is individual - it depends on the volume of liquid that needs to be pumped per unit of time, the required speed of its movement (formula in the photo).
Formula for calculating the diameter of polypropylene
Calculating the diameters of pipes for heating systems is a separate topic (the diameter must be determined after each branch), for water supply systems everything is simpler. In apartments and houses, pipes with a diameter of 16 mm to 30 mm are used for these purposes, with the most common ones being 20 mm and 25 mm.
Counting fittings
After determining the diameter, the total length of the pipeline is calculated, and fittings are purchased depending on its structure. With the length of pipes, everything is relatively simple - measure the length, add about 20% for errors and possible defects in the work. A piping diagram is required to determine which fittings are needed. Draw it, indicating all the outlets and devices to which you need to connect.
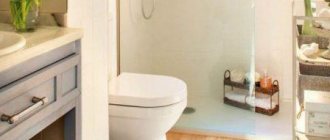
An example of the layout of polypropylene pipes in the bathroom
To connect to many devices, a transition to metal is required. There are also such polypropylene fittings. They have a brass thread on one side and a regular solder fitting on the other. You should immediately look at the diameter of the pipe of the device being connected and the type of thread that should be on the fitting (internal or external). To avoid mistakes, it is better to write everything down on the diagram - above the outlet where this fitting will be installed.
Next, according to the diagram, the number of “T” and “G” shaped connections is calculated. Tees and angles are purchased for them. There are also crosses, but they are rarely used. By the way, there are corners not only at 90°. There are 45°, 120°. Don't forget about couplings - these are fittings for joining two pieces of pipe. Do not forget that polypropylene pipes are not at all elastic and do not bend, so each turn is made using fittings.
When purchasing materials, agree with the seller about the possibility of replacing or returning some of the fittings. Problems usually do not arise, since even professionals cannot always immediately determine exactly the required assortment. In addition, during the installation process, sometimes it is necessary to change the structure of the pipeline, which means the set of fittings changes.
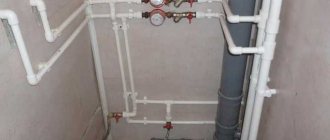
Compensator for hot water supply and heating made of polypropylene pipes
Polypropylene has a fairly significant coefficient of thermal expansion. If a polypropylene hot water supply or heating system is being installed, it is necessary to make a compensator, with the help of which the lengthening or shortening of the pipeline will be leveled. This can be a factory-made compensator loop, or a compensator assembled according to the diagram from fins and pieces of pipes (pictured above).
Laying methods
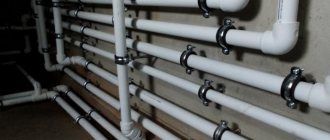
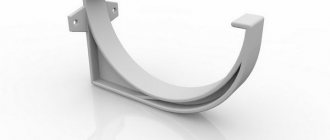
There are two ways to install polypropylene pipes - open (along the wall) and closed - in grooves in the wall or in a screed. Along the wall or in the groove, polypropylene pipes are attached to clip holders. There are single ones - for laying one pipe, there are double ones - when two branches run parallel. They are attached at a distance of 50-70 cm. The pipe is simply inserted into the clip and held in place thanks to the elastic force.
Fastening polypropylene pipes to walls
When laying in a screed, if it is a warm floor, the pipes are attached to the reinforcing mesh; no other additional fastening is required. If the lines to the radiators will be sealed in, the pipes do not need to be fastened. They are rigid and do not change their position even when filled with coolant.
Option for hidden and external wiring in one pipeline (the wiring behind the bathroom was made open - less work)
What to avoid when welding
At the time of connecting the fitting and parts of the plastic structure, they must fit tightly to avoid a gap exceeding 1 mm, otherwise there will be a gap between the internal stops and the end, which will negatively affect the further operation of the entire system.
Do not perform unnecessary forceful actions when connecting parts, because this will lead to the formation of a burr on the internal stop of the pipe and its end, which will create an obstacle to the conductivity of liquids inside it.
Laying methods
The issue of wiring PP systems becomes the first issue during installation work. In this case, you have to decide whether to hide the pipe system in the walls, or pull it openly. This is especially critical for small apartments, because communications take up a lot of space.
Open installation is the installation of a pipeline over a wall or floor.
If possible, the structure is hidden under a decorative building. The advantages in this situation are the following:
- Possibility to lay pipes from any material.
- Simple installation steps.
- Simple layout.
- Low cost.
- Possibility to constantly monitor the pipe system.
The disadvantages of such designs are:
- Unpresentable appearance.
- Significant loss of usable area. This is very painful for a small room, where a couple of extra centimeters is an additional place for plumbing. Concealed installation is a structure that is distinguished by its aesthetic appearance, as the main line runs through the wall or floor.
This option allows you to avoid wasting useful space. But it is not without its drawbacks, such as:
- the ability to take rolled pipes only from certain materials;
- labor-intensive preparatory work. More complex installation;
- the impossibility of carrying out repairs without dismantling and destroying the structure.
How to wire PP networks
Once the method of laying the pipeline has been determined and we know the dimensions of the plumbing fixtures, we can develop the layout of the system that will need to be laid in the apartment or house.
Evgeniy Filimonov
Ask a Question
The plan determines the exact locations for installing equipment. All measurements must be carried out with maximum accuracy. Before you start welding, you need to familiarize yourself with the following recommendations.
These rules are simple:
- Pipe products must not intersect.
- Sewage and water supply lines are laid out as close as possible.
- The whole system should be simple.
- Vertical outlets are equipped with flexible hoses.
- Professional craftsmen call the PP assortment the most suitable option for arranging the wiring of any highway. The main characteristics of these products is simple installation, namely soldering, which you can do yourself.
How to choose a welding machine for soldering polypropylene pipes
Choosing a welding machine is not difficult if you carefully study the recommendations of specialists. If a pipeline with a diameter of up to 63 mm is welded, then such actions involve the use of couplings and sockets. If the parts to be joined are larger than the volume of 63 mm, then it is better to use the butt method for welding polypropylene pipes.
Pipe assortment not exceeding 40 mm is welded using a machine for socket welding of polypropylene pipes. When the cross-section of the line is larger than 49 mm, a device with a centric device helps to fasten the elements.
Equipment performing welding work with polypropylene pipelines is conventionally divided into the following types:
- Mechanical. These devices are used for large-volume highways.
- Manual. This type of unit is excellent for independent use. They can connect highways with a volume of up to 125 mm.
Which welder to choose should be decided based on the characteristics of the system being constructed. It is also important that the kit includes a set of attachments. This will allow you to work with highways of various sizes.
In addition to what has been said, a novice master will need to know that he should not buy cheap tools. As a rule, the nozzles on them are equipped with low-quality coating. Accordingly, it is impossible to solder a high-quality structure with such a unit.
The home craftsman should choose a special unit for small-sized welding. This is quite enough for the needs of a household highway.
Welding polypropylene pipes with your own hands is not a difficult task if all the techniques have been studied and the novice master has the desire to do this work. Any electric welding machine will be a great helper. And by purchasing a complete set of necessary attachments for it, you can significantly save money and time.