Analogs
Due to the fact that the average price for potato planters can reach 30 thousand rubles, not every owner of a plot of land is ready to spend that amount on a simple device.
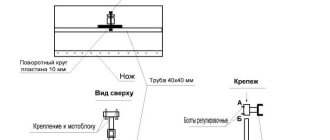
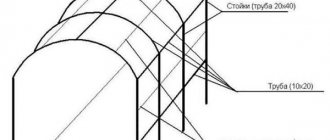
Making this device yourself is quite simple. How to do this correctly? The most common method of assembling this equipment is carried out according to the following algorithm: 1. A metal frame is used as the base of the potato planter. It is made from pipe sections with a cross section of 40x40 mm. Steel blanks are welded together to form a frame with longitudinal side members. 2. The frame is equipped with fastening elements for installing working equipment. Components such as the locking fork, the bracket for the closing discs and the wheel attachment are welded to the front. A strong round pipe with bearings welded along its edges is used as the axis of the bridge. 3. The tuber-conducting element is being installed. For this, a pipe of decent diameter, at least 10 centimeters, is used. The chain conveyor, which moves the tubers, is not welded to the top, and the coulters, which are responsible for the formation of the furrow, are not welded to the bottom. 4. A container for seed material is made from tin or thin metal. You should not choose thick-walled steel, as this will greatly burden the structure. 5. The closing discs are welded to the frame and the wheelset is installed. The resulting mechanism is ready for testing and subsequent use. A homemade potato planter is one of the most popular types of equipment designed for successful farming. Most current land owners prefer to use units made with their own resources and resources. The manufacture of this device does not require professional engineering skills and is within the capabilities of every mini-tractor user. A homemade device helps to cope with decent amounts of work and is practically not inferior in performance to industrially produced models.
To study the issue in more detail, you need to watch a video of creating a potato planter for a mini tractor with your own hands:
How to assemble a two-row potato planter yourself
Assembling a potato planter for a mini-tractor must begin with installing the frame. It is made from channel No. 8. Two spars are attached to the frame for welding subsequent parts and they are reinforced with three cross members.
Detailed drawing of a potato planter for a mini tractor
In the front part of the side members, fastenings are welded to them, with the help of which the planter will cling to the tractor. Then the spars are reinforced with two inclined metal beams, to which a hopper for planting material will subsequently be welded. A plow or coulter and an axle for one wheel must be attached to the bottom of the frame.
Drawing of a potato planter for a mini tractor and walk-behind tractor
The potato container is made from pieces of plywood at least 1.5 cm thick. First, parts of the desired shape and size are cut out, then connected to each other with metal corners. Plywood is impregnated with drying oil and painted with water-based paint. The inside can be lined with softening material, such as rubber, to prevent damage to the tubers.
Purchased potato planter for a mini tractor in the photo
A washing machine tank is perfect for containers for potatoes. It is better to make the wheels for the planter wide so as not to trample loose soil. The role of the seeder will be performed by a metal pipe with a hole of at least 10 cm. You also need to provide a workplace for an assistant who will monitor the process.
Photo of a homemade two-row potato planter
Also read:
Now you know how to make a homemade potato planter for a mini tractor with your own hands. The video and drawings from this article will help you maintain the exact dimensions, taking into account the model of your mini-tractor. Most often, potato planters are made for the T-25 or MTZ-82 tractor, so take into account the model of the main equipment.
How to make a potato planter for a walk-behind tractor with your own hands
Dear visitors to the “ Samadekin Friend ” website, today we will look at the step-by-step process of assembling a homemade potato planter for a walk-behind tractor, and we will also watch a video of testing the planter when planting potatoes in the ground. Planting potatoes, as you know, is a rather labor-intensive activity, but recently this process is becoming more and more rationalized due to the ability of craftsmen to use mechanisms in the gardening field) Thus, from ordinary scrap metal, the author assembled a homemade potato planter and aggregates it together with a walk-behind tractor. Now it has become much easier to plant potatoes; I poured the potatoes into a hopper made from a tank from a Volga-8 washing machine and in first gear the walk-behind tractor pulls the unit. The sowing apparatus is driven by the movement of the planter wheels, on the shaft of which a shaft with an asterisk is installed, and on the chain there are bowls that capture the tubers and feed them into the guide pipe, from where they fall into the ground and are covered with rotary discs creating a furrow.
The frame of the potato planter is welded from a professional pipe 40x40x2 mm, 40x20x2 mm, wheels with homemade lugs, the drive shaft is a regular 18-inch stud, the bunker is a tank from an old Soviet machine, the bottom of which has a conical base.
Materials
- chain
- star 2 pcs
- steel wire 6-8 mm
- wheels with lugs 2 pcs.
- professional pipe 40x40x2 and 40x20x2 mm
- washing machine tank
- disk 2 pcs
Tools
- welding inverter
- Angle grinder (grinder)
- drill
- wrench set
- skillful hands)
Step-by-step instructions for assembling a potato planter for a walk-behind tractor with your own hands.
The first step is to familiarize yourself with the diagrams of the device and operation of the potato planter.
Calculations of stars and wheels.
The frame is welded from professional pipe, bearings are installed on it with a shaft on which the sprocket is mounted.
Drawing of bowls for lifting potato tubers and feeding them into the guide socket.
The distance between the bowls is about 27 cm - this will also be the distance between the planted potatoes.
The hopper is made from a regular washing machine tank.
Additionally, a hiller is installed in the back to cover the planted potatoes with soil.
Schematic diagram of the operation of the sowing apparatus.
Scheme of connecting the planter to the walk-behind tractor.
Video of planting potatoes with a planter.
Engine characteristics
The potato planter itself is semi-mounted equipment and does not have an engine. However, the power unit is present in the vehicle that moves the device. For the middle class of mechanisms for planting tubers, a number of requirements for the motor have been established. This should include
- engine power, which should be in the range from 10 to 14 hp;
- the working volume of the cylinders should be -0.45 l;
- crankshaft rotation speed - 3000 rpm.
The level of fuel consumed should be about 255-265 g/kWh. It is this consumption rate that will allow the farmer to most efficiently carry out work on a plot of up to 30 acres.
Necessary materials
A potato planter can be made at home, because it does not require any rare components or special tools. Homemade potato planters, drawings of which can be freely found on the Internet, are made from the following materials:
Frame
- a frame consisting of steel pipes and angles for attaching other structural parts to it;
- reservoir (hopper) for potato tubers;
- gears that will power the entire landing mechanism;
- steel parts that form the holes in which the potatoes will be planted, as well as burying them after that;
- wheelbase.
These are all the components of the design of a homemade potato planter that need to be made or taken from old agricultural equipment. Naturally, the work cannot be done without a welding machine, an angle grinder, as well as the presence of various channels, spars and other related materials.
You can also make a fertilizer dispenser for a potato planter with your own hands, with the help of which you will simultaneously plant and fertilize the holes. This is a fairly common phenomenon, because when planting by hand, they often use a mixture of ash and chicken droppings, or manure, with the addition of phosphate fertilizers.
This, of course, is not necessary, but additional fertilizer will contribute to the rapid ripening of the crop, which is important in our regions where the summer is quite short.
You can find out why you need a snow blower at your summer cottage in this article.
For example, read the article about the Honda snow blower - a description of the model range, main characteristics, advantages and disadvantages of the models.
A - detailed instructions on how to make a snow blower for a walk-behind tractor yourself.
How to make a potato planter with your own hands.
The figure shows a diagram of a potato planter.
As can be seen from the figure, the planter consists of the following parts:
- Trolley handle.
- Bunker.
- Metal discs with lugs.
- Wheel guard.
- Bracket.
- Wheel with grooves.
- Axle for installing a wheel.
The planter's hopper can be made of plywood or any cone-shaped container; at the bottom of the hopper you need to make a hole slightly larger than the size of the tubers. The hopper is attached to the planter frame.
The dispenser wheel can be made from two pieces of thick plywood; along the circumference of the wheel, at an even distance, you need to make recesses for the tubers.
Metal discs with lugs are attached to both sides of the dispenser wheel.
To prevent the tubers from falling out of the wheel prematurely, we install a protective shield in the front part of the wheel.
A homemade potato planter has a fairly simple design, but at the same time, this design has its drawbacks; for planting, it is advisable to use tubers of the same size; tubers that are too large can get stuck in the hole in the hopper, and too small ones will fall through several at a time. Therefore, this planter is more suitable for medium-sized tubers, in which case the potatoes will evenly fall from the hopper into the dispenser wheel and will not get stuck in the outlet of the hopper.
Popular articles from this section
How to make a washbasin from a canister
How to make an incubator with your own hands at home
How to make an incubator from a refrigerator
How to make a chicken feeder
Washstand made from a plastic bottle
User manual
Recommendations for using potato planters are quite similar to each other, differing only in minor points. You cannot put more fruits into the tuber hopper than stated in the technical specifications of the unit. The potato planter cannot be transported when it is fully loaded.
Before starting work, you need to make sure that the wheel tracks of the mini tractor and the potato planter completely coincide.
- It is necessary to carry out preliminary preparation of the soil before using a potato planter on it. This means that the land should be plowed and have a loose structure.
- After passing the first row, you need to adjust the degree of immersion of the coulters, the depth of laying potato tubers, as well as the distance between them.
- It is necessary to inspect the working components of the unit every 8 hours of continuous operation.
- After completion of the work, the unit must be returned to normal condition, i.e. clean it from dirt, remnants of vegetation, etc.
- In addition, you need to inspect the fastening connections. If necessary, you need to tighten the bolts and also check the condition of the wheels.
- If you will not use the potato planter for some time, you need to reduce the tire pressure and also remove the roller chains that are located on the planting devices.
As we can see, the operation of the unit is quite simple to implement, no different from the recommendations for other technical means.
Purpose and potato planters
A modern potato planter for a mini tractor is a mounted device that is attached to the tractor.
Today, the market for these products offers a large range of these devices. The main difference between this technique is labor productivity. The price of these models is also different and directly depends on the performance. Today's models of potato planters can be divided into types:
- Small planters. They are mainly used with a walk-behind tractor.
- Potato planters for mini tractors. These devices are used with a tractor, and they come in single and double rows.
- Potato planter for medium power tractors. They come in three and four rows.
- Potato planter for heavy tractors. These devices come in six rows or more.
You should choose which one you need based on the scale of the work ahead, as well as the type of your tractor (its power, model). For a small agricultural farm, a potato planter for a mini tractor may be quite suitable, but for large farms with huge areas of land, more powerful models are used.
Potato planter for mini tractors 2MBS-1
The manufacturer of this potato planter is Xingtai.
The maximum power of this equipment is 4.8 km/h. It is single-row and the depth of planting tubers using this technique is 80-120 mm. Has two containers, one for seed potatoes, the second for fertilizers. Fertilizers are applied to the soil at the same time as planting. A box for potatoes is 40 kg, for fertilizers 25 kg. The planting pitch between tubers will be 250-270 mm. The efficiency of labor productivity is 0.1-0.3 hectares per hour. A mini tractor for such a planter needs 12-18 hp. This potato planter weighs 105 kg. The price for such equipment ranges from 17,000 to 19,000 in Russia. If you buy directly from the manufacturer, the price will be lower. Companies that deal with specialized equipment make their own markup, which includes additional shipping costs and other expenses.
Potato planter for walk-behind tractor
Automated potato planters use different types of designs. They are:
- Spoon-shaped Peculiar spoons are attached to a conveyor-type belt or belt, which forms a wide row spacing and, simultaneously with planting potatoes, can be used to treat the soil with fertilizers or other means. Thanks to spoons, there are practically no gaps in planting tubers.
- Belt. Tubers are planted using belts with indentations. The main advantage of the flat-belt design is the careful handling of club plants, which, even when sprouted, are practically not damaged.
- Spinning structures are used for sowing chopped potatoes.
Manufacturing process
The principle of operation of the mechanism is simple. The device consists of the following parts:
1 – conveyor for feeding potatoes. In this situation, it is a chain with spoon-like grips placed at an equal distance from each other. This distance determines the landing interval. The tubers come from the hopper (5) and fall into the furrow. The furrow is made with a bipod plow (4). The entire structure is mounted on a frame (3), on which an additional hopper (2), suitable for applying fertilizers, can be installed. The frame is connected to the walk-behind tractor using a special device. The conveyor itself rotates by drive wheels (6), equipped with special devices for coupling with the ground. The tubers are covered with soil and hilled using a pair of discs (7).
To make a two-row device, you need a channel (square pipe) number 8. To connect the structural elements, you will need a steel angle and bolts.
Rubber wheels for potato planters are not the best option due to possible slipping. It is advisable to use metal wheels made of bent metal profiles with a width of at least 15 mm, onto which special transverse strips are welded for grip on the ground. Knitting needles can be made from any steel strips or pipes. The bushing is connected to the drive axle by welding.
Sprockets and chains from a conveyor or combine are required (a chain from a bicycle or motorcycle will not work - it will break). Spoon-shaped grips can be welded from a steel rod and secured to the chain links by welding.
Bipod-ploughs are made from a corner and a steel strip, and it is better to take ready-made discs for hilling - from decommissioned agricultural machinery. In the entire design of the potato planter, it is the discs that are a very important element: it is thanks to them that the potato bed turns out neat, and the tubers are not buried more than necessary.
Additional Tips and Warnings
In general, the process of planting potatoes using a homemade potato planter is as follows:
- Potatoes are poured into the tuber tank. You need to put a couple of bags of potatoes on top so as not to waste time when the tubers in the bunker run out.
- One person sits on a seat located on the potato planter, and the second person sits on either a mini tractor or a walk-behind tractor (see).
- Movement should be carried out at a speed of no more than 1 km/h.
- A person sitting on a potato planter alternately throws tubers into tuber pipes located on both sides.
- After the tubers fall into the holes, they need to be covered with earth. It is for this purpose that discs were designed, which cover the holes with earth while rotating.
You can change the depth of removal of the top layer of soil that these discs produce. To do this you need:
- Adjust the stepladders that press the support to the posts by loosening them.
- You can slightly change the angle at which these disks are located. To do this, you need to turn them a little in the right direction.
After completing the planting process, all that remains is to remove the traces left by the walk-behind tractor and potato planter. In this case, baking powder will help us, i.e. cultivator blades located on stands. By the way, the degree of their immersion in the ground can also be adjusted.
A homemade potato planter with detailed dimensions can be a great way to save money that would inevitably be incurred if you purchased a potato planter from a specialty store.
Considering that the average cost of this unit is about 15 thousand rubles, this saving looks especially justified. At the same time, there are no special costs for the necessary materials during production, because the components are used from old, worn-out units.
Tips and tricks
- Since harvesting is carried out at low speeds, walk-behind tractors with gasoline engines do not always have the necessary power for this process. To dig up potatoes using a mechanized method, you need to have a machine with a power of at least 6 hp. or with a diesel engine, which provides the necessary torque at low speeds.
- To increase the adhesion weight, a load weighing at least 50 kg is hung on the bar in front of the walk-behind tractor.
- To facilitate the operation of the unit, potatoes are planted in the longest rows possible.
- Before harvesting using a mechanized method, it is necessary to mow and remove vegetable tops from the area.
- In vibrating potato diggers, the digging depth is changed by the support wheel stands. When shortening the racks, the depth of the rafter increases, and when lengthening it decreases. The speed of cleaning vegetables is regulated by changing the speed of the drive motor.
- When using mechanized harvesting of vegetables, the maximum percentage of the harvest (up to 95%) is carried out in areas where planting was also carried out using a mechanized method.
How the device works
Not a complicated operating principle
A do-it-yourself potato planter for a mini tractor will not be inferior to purchased options if all the features are taken into account, from the choice of materials to the operating principle of all mechanisms. The operation of such a device is based on the simple interaction of two stars and a chain with blades:
- While the device is moving, the wheel axle rotates.
- A star is installed on the wheel axle (as on old domestic combines), which also rotates.
- Vertically, above one star there is another. Between them there is a chain with blades, which during movement captures and scatters the tubers.
You can also make discs that will dig ditches along a certain track width. In addition, the container itself where potatoes are transported can be made in any volume that its owner wants. Limitations are present only in the availability of material and human desires.
Design Rules
Robust design
It is best to design the device using ready-made drawings, which already have all the necessary dimensions and a sketch of the device itself. The fact is that most of the devices that can be seen in the video taken by the farmers are suitable for any vehicle. Potato planter for tractor T 40, T80 (82), Neva, Salyut and other brands and models, assembled taking into account the same features
Most often, the device is assembled like this (single-row or double-row type of device does not matter):
- 2 spars are welded to the frame of the device, which is channel No. 8. The structure is strengthened with transverse ribs.
- Fastenings are welded to the front part of the side members, with the help of which the device will be connected to the T 40, T 80, MTZ tractor, etc. (despite the multifunctionality of the device, it is better to review/modify the possibility of connecting it to the tractor).
- 2 metal strips 25-30 mm wide are welded to the side members. The length is taken from the dimensions in the drawing. Place them at an angle.
- A hopper for planting material is welded to the other end of the metal strips.
- A plow or discs are welded to the bottom of the frame.
Potato containers can be made from either metal sheets or plywood.
The main thing is that the structure is strong, but not heavy. It is easier to work with wood whose thickness is no more than 1.2 cm. According to the available drawings and the dimensions indicated in them, it is necessary to cut out the walls of the tank and connect them into one structure, securing them at the corners with a metal corner. To avoid damage to the potatoes, foam rubber or other softening material can be placed on the inside of the tank.
The wheels of the device can be taken from a gas cylinder by cutting off 2 transverse rings from it. The main problem is the stars. A two-row machine must have a certain number of teeth. On the stars, their number should be 40 and 15. It is better to find ready-made parts from old combines. So, installing the chain will not be difficult. The blades are attached directly to the chain. They can be made from thin sheet metal or wire. The second option is simpler. The landing pitch is adjusted by the distance of the blades from each other. It is most advisable to install them at a distance of 25-27 cm.
How to make your own potato planter for a mini tractor
It is enough to draw a drawing of the planter or find a ready-made one and select the necessary materials and tools.
Materials and tools
To make a potato planter, the following tools are required:
- welding machine;
- Bulgarian;
- hammer and chisel;
- spanners;
- drill;
- spray gun with compressor;
- measuring tool, square, clamps.
Materials needed:
- corner or channel for the frame;
- support metal wheels;
- bearings for wheels and disks;
- sheet steel for the rear wall of the bunker with a thickness of 1.5-2.0 mm;
- galvanized sheet;
- two sprockets with 19-21 teeth;
- timing chain;
- axle for drive wheels;
- steel wire 3-4 mm thick.
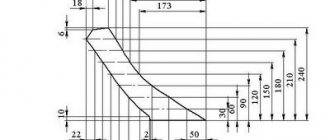
Drawings and dimensions
This is a drawing of the most common potato planter.
Approximate dimensions:
- frame – 580 x 300 mm;
- drive wheel diameter – 300 mm;
- distance between wheels (track) – 580-600 mm;
- distance between sprocket axes – 570 mm;
- upper sprocket – 19 teeth, lower – 21;
- bearings – standard size 205;
- bunker – 370 x 400 x 400 mm.
Step-by-step instruction
Work order:
- We start by making the frame. It must provide rigidity during processing.
- We attach the first sprocket in the center on the axis of the support wheels.
- On both sides of the sprocket we attach bearings in cages and support wheels on the axle.
- First, we weld lugs in the form of metal plates onto the wheels.
- We weld the bearing races to the frame.
- We wind the wire onto a pipe with a diameter of 50-60 mm, cut it and get rings.
- By welding another half ring, we get a cup for serving the tuber.
- We weld the resulting cups to the timing chain at a distance of 8-10 cm.
- To supply potatoes to the planting area, we use a pipe with a diameter of 100-110 mm so that the tuber does not get stuck.
- We weld the U-shaped arch, followed by fastening the hopper and the upper axle with the upper sprocket.
- We will weld a bunker from corners, sheet metal in the lower part and tin in the top and sides.
- Be sure to roll the edges of the tin sheet so that there are no sharp corners.
- We attach the hopper, the upper axle with a sprocket (on two bearings) and the upper part of the elevator pipe to the frame.
- Having unfastened the lock, we put the chain on the sprockets.
- We attach reflectors in front of the elevator pipe to prevent potatoes from falling past.
- In the front part we install a coulter - a ripper to create a groove.
- At the rear of the frame we attach two disks with adjustable tilt and angles of attack, with the help of which the seeds are buried in the ground and a furrow is formed.
Instructions
Many people ask the question - how to make a potato planter with your own hands, the drawings of which are on the Internet? Indeed, there are enough recommendations on the Internet with detailed descriptions and dimensions, following which you can make a fairly efficient unit.
Algorithm of actions
The algorithm of actions, in this case, will be approximately as follows:
- You need to start, of course, with the manufacture of a frame structure on which the remaining components will be attached. To do this, we will need channels number 8, from which two longitudinal spars are welded, connected to each other by three transverse strips of steel.
- In front of the structure, you need to weld an arch with mounting forks going to the central rod.
- The frame can be strengthened with two inclined steel beams, which must be secured with the other side to the middle of the arch. Next, you need to secure the seatpost support, made from a 5x5x0.5 cm corner. We attach it to the spar with our own hands.
- A plastic type bracket must be welded to the inclined beams. It is to these beams that the potato tank will be attached.
- For the tank we will need ordinary plywood, the thickness of which will be approximately 12 mm.
We cut out all the sides of the bunker, and then fasten them together with steel corners. By the way, it wouldn’t hurt to treat the box with drying oil to protect it from moisture. - Rubber sheets can be installed inside the tank so that the potatoes are not damaged by its walls during movement. Next, we attach the hopper to the bracket using two bolts.
- Next, you need to attach the wheel axle and ripper to the bottom of the frame. In principle, you can look at the drawings of a potato planter made by yourself for greater clarity.
- The wheel axle is a structure made from various parts. As a basis, you can take an ordinary steel pipe, at the ends of which you need to install trunnions. It is difficult to give exact dimensions here, depending on what diameter of pipe you are using.
- Therefore, the trunnions need to be adjusted to these dimensions on a lathe.
- You need to drill holes in the steel pipe into which special pins with spikes will be installed. At the end they must be brewed.
- The wheel axle must be secured using steel clamps, using 4 M16 bolts.
Wheels from old equipment
- As a wheelbase, you can use wheels from old agricultural machinery. If there are none, then you need to work a little in this regard.
- You need to weld hubs onto the wheels, on which you then need to install a pair of bearings. Next, we place the bearings on the studs and protect them with a felt pad so that they do not become excessively dirty.
- The part holding the rippers is presented in the form of a square of steel rods welded together. At the ends of the square you need to weld clamps made of 6 mm sheet steel. The racks of the cultivator blades will be located inside them.
- The seeder for this unit is made of a steel pipe with a diameter of 100 mm. At the same time, the thickness of the pipe wall must be at least 3 mm so that the structure does not bend during operation.
- A furrow cutter made of 6 mm thick sheet steel is welded to the bottom of the pipe.
- Be sure to attach a seat for a person to the frame, as well as a footrest.
The frame structure of the seat itself is made of corners welded together. The seat can be made from ordinary boards, which are covered with something soft - foam rubber, for example.
In principle, the dimensions of a homemade potato planter are indicated approximately, based on a specific case. In any case, this scheme is working, so you can safely design the unit based on these parameters.
Find out in more detail how to do it
Potato planter for T-25
A homemade potato planter for the T 25 is made in a similar way, because there is no definite meaning on what will act as the main traction machine - a walk-behind tractor or a mini tractor. Of course, the power indicators will be different, but the design of the potato planter itself is almost identical.
How to make a potato digger for a mini tractor with your own hands
Let's consider making a potato digger for a mini tractor with your own hands. The conveyor potato digger can be assembled by hand. To do this, you need to have drawings on hand on which all parts of the unit will be outlined in detail.
How much more expedient it is to make such equipment yourself is up to everyone to decide, but it should be taken into account that a homemade potato digger is suitable for plowing a small area. Large areas are best treated with industrial equipment purchased from the manufacturer. When harvesting potatoes, a digger, made by hand for a tractor, passes through the area, digs up and collects the tubers.
In order to assemble a passive type weapon, you will need materials. First of all, a sheet of iron made of durable steel, which will serve as a shovel. It is advisable that its width be at least 3-5 mm, otherwise the iron will quickly become dull. Many people use circular disks, from which two sectors are cut out and welded together. This steel is much more durable and lasts longer.
Rebar rods are suitable for sifting out soil. They are welded on the back of the shovel.
You can use a metal channel as a suspension, having previously calculated the depth of immersion in the ground.
The blade part should be shaped like a triangle for better immersion into the soil. The device is attached to the walk-behind tractor using fasteners and requires normal movement along the rows planted with potatoes.
You can make a potato grinder for a tractor with your own hands. The assembly of this design is more complicated than the previous one, so you will need a pre-thought-out diagram. To avoid rapid breakdown, a homemade potato digger must be made of high-quality materials. To create an efficient structure, it makes sense to spend a little more time on it, and it will pay off in savings on the time spent on plowing and harvesting.
A homemade potato digger for a tractor is made from the following materials:
- metal profile pipe for the frame;
- iron layer (3-4 mm) for the ladle;
- iron fittings;
- metal channel for vertical traction;
- hub from the front of any car;
- gearbox;
- a driveshaft may come in handy;
- splined connection from the gearbox;
- one or two wheels (depending on the type of device);
- fastening elements;
- tools: drill, grinder, welding machine.
The height of the device above the ground will depend on the size of the wheel. The frame rests on two support points. The gearbox is activated either by the wheels or by the power take-off shaft of the cultivator. The spline connection is necessary for the mobility of the share and the oscillatory movements of the lattice.
The harvesting method will depend on the angle of inclination of the lattice part. If the screening part is tilted downwards too much, the potatoes will fall to the ground. When you change the angle of inclination and lift the lattice part up, the tubers will linger on the mesh, and then they can be collected directly into the bag, but for this you will need to constantly stop the machine.
A do-it-yourself potato digger can have any shape and size, it all depends on the choice of the designer
It is important to maintain the principle of operation, which involves raking the soil with potato tubers into a grid in which they will be sifted. Homemade potato diggers for mini tractors can be made from old machine parts and any available materials
The most important thing is that the potato digger meets all safety standards and does not cause injury during operation.
Fan potato digger
The design of such a potato digger is quite simple; it can be made from available materials. The main thing is that the metal is durable, for example, steel.
Another name - lancet digger - reflects the appearance of this device: steel teeth, similar to a fan or arrows, are attached to the plowshare.
The design consists of only three elements:
- ploughshare
- teeth
- bracket
The ploughshare requires sheet steel (thickness 3-4 mm). Rectangular steel profile for the bracket, round bars or reinforcement no thicker than 10 mm for the teeth.
The principle of operation of this design: the ploughshare lifts the layer of soil along with the tubers and directs it onto inclined teeth, on which the potatoes are cleared of soil, after which they fall to the surface of the soil.
This design is considered one of the most reliable and is also easy to implement. Detailed drawings can be found on the Internet.
Some tips
You can use a homemade device for planting potatoes even if you install a washing machine tank instead of a plywood or metal tank. Although its capacity will not be large, you can save effort and time for the manufacture of this part of the device.
It is also important to pay attention to the wheels. They should be wide
Thus, the device will not “trample” loose soil. The seeder can be made of a simple pipe, the diameter of which is 10-25 cm. All fastenings must be calculated according to the brand of the tractor (MTZ, Salyut, etc.). Although most of these home-made devices, single-row or double-row, can be attached to any type of vehicle, a device designed for a separate tractor is still better.
The single-row machine is easier to use. The device makes 1 furrow in the soil, and with a certain step (which is set by the width of the blades), throws out the tubers. It is necessary to collect potatoes of the same size so that the planting material does not get stuck in the seeder or any other part. Another option is to install additional space for an assistant who will supervise the boarding process. You can make it from a simple car seat by attaching it to the frame of the device. If you have a two-row seeder in your design plans, you won’t be able to do without additional space.
Kinds
The potato planters themselves can differ from each other in a number of distinctive features and criteria. Let's consider each gradation separately.
DIY potato planter
So, potato planters may differ in the type of technological process:
- Units that plant sprouted tubers. Such fruits have developed sprouts that can sprout within 20 days from the moment they are planted in the soil.
- Potato planters that plant unsprouted tubers. Of course, not everyone has the opportunity to store potatoes in the right conditions when sprouts form normally. For such cases, similar units are used.
- Mixed potato planters.
Potato planters may differ in the number of rows:
- Single-row potato planters. Such a device is connected to a mini tractor (see here), having one potato tank. The capacity of such a bunker for tubers will reach, on average, 140 kg.
For more information about the single-row potato planter, watch the video:
- units. It has the same design as the single-row potato planter.
- Both types of units are used for planting potatoes in relatively small areas of the territory, developing a fairly high speed - up to 15 km/h. Due to the fact that they have more compact dimensions, they are much more mobile than their 4-row counterparts.
- 4-row potato planters. Such units are capable of planting potatoes on an area of 2 hectares in about one hour of work. They have a bunker that can hold about 550 kg of tubers, and also have four planting elements.
In addition, potato planters can differ in the type of connection they have to the driving unit:
- trailed;
- semi-mounted;
- mounted
Homemade potato planter for a walk-behind tractor with your own hands - dimensions and drawing
The process of planting potatoes seems to be quite labor-intensive work, especially if the garden area is quite large.
You can’t do this without outside help, because doing this alone is not only difficult, but also takes a long time. What should those who do not have the opportunity to involve their friends or relatives in planting do? The answer is simple - you need to use those automated units that specialize in such purposes.
Recently, walk-behind tractors have become widespread, being real “helpers” for farmers in running their farms. Using this unit, you can not only plow land, but also plant potato tubers.
However, in this case, you cannot do without additional equipment. For this purpose, specialized stores offer a fairly wide range of potato planters designed for aggregation with a walk-behind tractor (such as the KSM 4 potato planter).
But not everyone has extra funds to purchase such equipment, so a reasonable question arises - how to make a potato planter for a walk-behind tractor with your own hands? Let's try to answer this question in this article.
Device
Most potato planters have the same design. It includes the following components:
- Container for potato tubers. It is made of galvanized metal, 0.6 mm thick. The capacity of the hopper must accommodate at least 20 kg of seeds.
- Frame with wheelset. It acts as a supporting frame on which all structural elements are located.
- Support wheels. These devices are used for moving and turning.
- Openers. These devices are used to form furrows.
- Landing system drive. The device is designed for moving and planting seeds. It operates due to the movement of the wheels, transmitting torque to the chain. Planting brackets can be equipped with spoons or cups.
- Closing discs. These are devices for covering furrows with soil. You can buy this equipment at any specialized store, but many farmers prefer to use devices made with their own hands; fortunately, today it is not difficult to find drawings of a homemade potato planter.
Advantages and disadvantages
The potato planter has the following advantages:
- it allows you to refuse to use physical force and tools such as a shovel;
- helps reduce time spent sowing;
- makes it possible to lay potatoes at the same depth with uniform distances;
- allows use as a device for planting other agronomic crops.
Like any other technique, a potato planter has disadvantages. These include: sensitivity to rocky soils, inability to load seeds on the go, constant maintenance in the form of adjusting mechanisms and lubricating them. User reviews left on thematic forums and Internet resources allow you to evaluate the technical characteristics and quality of equipment. Here are some of them:
- The mechanism has a good speed range. It allows you to fine-tune the seeding width and depth. The cost of the device is reasonable; the cost of its purchase is recouped within one season. For heavy soils, you will have to additionally buy forged wheels.
- If you have an engineering mindset and have all the necessary tools, then the best option is a homemade potato planter for a mini tractor. You will spend a minimum of effort and money, and the quality will be almost in no way inferior to industrial options.
How to do it yourself
If you do not have the necessary funds to purchase a new potato planter, then it makes sense to think about making this unit on your own.
Do it yourself
Indeed, a do-it-yourself potato planter for a mini tractor, the drawings of which are widely presented on the Internet, is the way out of a crisis situation when there is a constant lack of money.
In addition, the purchase of a mini tractor itself is a rather expensive undertaking, after which there is virtually no free funds left. Why then think about buying a potato planter in a store, you have to try to recoup the previously made investments. Therefore, the construction of a homemade unit is completely justified.
At the same time, the procedure is virtually the same, regardless of the type of mini tractor:
- A homemade potato planter for a minitractor, the sizes of which can be very different, is made from whatever tools you have on hand. The whole point is minimal cost, so it's natural.
Frame
- At the first stage, the frame structure will be manufactured, to which other components will be welded. To do this, we will need channels No. 8, from which two longitudinal spars are welded, connected to each other by three transverse steel strips.
- In front of the structure, you need to weld an arch with mounting forks directed to the central rod of the unit.
- The frame is strengthened by two steel inclined beams, which must be secured to the middle of the arch located in front. Next, you need to secure the support on which the seat will be located, made from a 50x50x5 mm corner.
- It is attached to the spar with your own hands. A plastic type bracket must be welded to the inclined beams. It is to these beams that the potato bin will be attached.
- The bunker will be made of four sheets of plywood, 12 mm thick. You need to cut out equal parts, and then fasten them together with steel corners. You also need to apply drying oil, and when it dries, paint it with waterproof paint.
- You can lay a rubber coating inside the bunker so that the tubers are not damaged by the walls of the tank. Using a pair of bolts, secure the hopper to the bracket.
- The ripper and wheel axle will be located at the bottom of the frame.
- You will have to make the wheel axle yourself.
- The base will be an ordinary steel pipe, along the edges of which trunnions are installed. Their dimensions will have to be adjusted to the diameter of the pipe used, but there is nothing difficult about it.
- You need to make holes in the steel pipe into which special pins will be installed, where the spikes will be inserted. At the end of the assembly process, they need to be brewed.
- The wheel axle must be secured using steel clamps using four M16 bolts.
- You need to weld hubs onto the wheels, which will have two bearings on each wheel. Next, we place the bearings on the spikes and protect them with a felt gasket, which will prevent excess dirt from getting in.
Thus, we get a semi-automatic potato planter for a mini tractor, made by ourselves. It is semi-automatic because a person will sit on the potato planter itself and throw the tubers into the corresponding seed tubes.
Therefore, this design needs to be supplemented with a seat on which you can sit comfortably. It is made from ordinary boards, which are then covered with foam rubber and covered with leatherette.
A homemade two-row potato planter for a mini tractor will be a slightly more complex design, because you will have to design more components and parts of the unit. But there are quite a lot of detailed drawings on the Internet indicating exact dimensions, which will greatly simplify this task.
How to make your own potato planter
Many vegetable growers and farmers prefer not to spend money, but to make potato planters with their own hands.
Required materials and tools
For production you will need:
- Corners and metal pipes from which the frame will be created. They are also needed for the installation of other structural elements.
- Gears are elements that ensure the operation of the landing mechanism.
- Bunker for storing potatoes. Take a ready-made container or make it from sheet steel.
- Parts designed to create holes and bury them after planting.
- Wheelbase.
The listed elements are mandatory for a home potato planter. They are made independently or removed from old agricultural equipment.
To work you will need:
- Bulgarian;
- welding machine;
- spars;
- channels;
- pair of axes;
- bearings;
- chain from a car engine;
- two sprockets for the chain;
- wire with a cross section of 6 mm;
- sheet metal 2 mm thick;
- profile steel pipe;
- any cone-shaped container for a bunker.
Drawings, dimensions and main elements
Externally, a homemade potato planter looks like a cart on wheels attached to a walk-behind tractor or mini tractor. Let's look at what the simplest design consists of.
The “trolley” is placed on a frame made of channels. A steel arch and fork are mounted to its front part. On the sides of the frame, stands of closing discs and supports for the tuber feeding system are installed.
Important! Closing discs are an important element. Thanks to them, the furrows are even, and the potatoes are not buried more than necessary.
The frame, in turn, is installed on an axle with two wheels with a width of at least 15 mm, equipped with lugs. Simple rubber wheels will not work as they will slip.
Using ready-made drawings with dimensions, you can make a cool potato planter with your own hands, practically from scrap metal (see photos 1, 2, 3, 4).
Step-by-step instruction
Many craftsmen supplement the “basic assembly,” for example, with a fertilizer dispenser. This device allows fertilizing to be carried out simultaneously with planting.
Let's take a closer look at the process of assembling a planter for a walk-behind tractor and a mini tractor.
For walk-behind tractor
First, the frame is made. To do this, use a channel (steel size 8). Longitudinal spars with three cross members are attached to the frame.
Sheet steel is usually used for the bunker, but 10 mm thick plywood is also suitable for small equipment. This will be enough for 20 kg of potatoes.
An elevator is installed in the bunker, which is secured in a vertical position. Bowls with a diameter of 5-8 cm are placed on it. For everything to work, the mechanism is connected through a chain drive to the drive wheel. To remove the tubers, the seed tube is fixed under the elevator.
A sprocket (8 cm) is connected via a chain to the walk-behind tractor to transmit force. This element transmits the movement to the digging discs.
This design allows you to use a regular bicycle chain. The distance between tubers will be 35 cm.
Important! After the main installation, the frame must be strengthened with steel strips. The arch also needs reinforcement. For this purpose, sheet steel plates are used.
For mini tractor
The diagram of such a unit is shown in the photo:
Algorithm of actions:
- Manufacturing begins with a frame on which the remaining elements will be placed. To do this, longitudinal spars are welded from channels. They are connected to each other by steel strips.
- An arch with forks directed to the central rod is welded at the front.
- The frame is reinforced with steel beams. They are fixed on the other side and to the middle of the arch.
- A seatpost support is made from the corner and mounted on the spar.
- A bracket on which the bunker will be placed is welded to the inclined beams.
- The potato tank is welded from sheet steel 2 mm thick.
- The hopper is secured to the bracket with bolts.
- Now the ripper and wheel axle are mounted to the bottom of the frame. For the axle, an ordinary steel pipe is used as a base, at the ends of which axles are placed. For the wheelbase, you can take wheels from old equipment.
- Ripper holders are made in the form of squares made from rods. Clips with a steel thickness of 6 mm are welded at the ends. They will house cultivator stands.
- The seeder is made from a steel pipe with a cross-section of 100 mm. The minimum wall thickness should be 3 mm.
- A furrow cutter is welded to the bottom of this pipe. The thickness of the steel is at least 6 mm.
Design and operating principle
The design of a planter of any model always looks the same:
- Bucket for loading planting tubers.
- Drive frame with wheels.
- Openers for creating furrows.
- Special brackets with cups.
- Groove closures.
If necessary, you can add a little functionality to the planter, for example, install a separate container to add special fertilizer to the soil.
The principle of operation of the potato planter comes down to the following: the tubers are poured into a special hopper-bucket, and from there they are picked up by a special bracket and laid out on the soil. Furrows for planting are created by special openers. When the tuber fits into the grooves, it immediately falls asleep. During the planting process, special parameters are set for planting markings. For example, the distance between seedlings will vary from 15 to 35 cm, and the rows should be spaced at a distance of 50-60 cm.
For mini-tractors with low-power engines, lightweight planter options are most often suitable. If, for example, we have to choose a planter for a specific model of the MTZ 320 mini-tractor, then it is better to opt for a power of 0.6.
How to make it yourself
It is not always possible to purchase equipment on sale, but any device can be made with your own hands. Any work on making various models of nozzles can be done by visiting a forum or website on a specific topic. And, if there is a special video that contains, for example, a drawing of a potato planter for a mini tractor or a photo with diagrams, then any manufacturing assembly will be easy and high-quality.
To design such additional equipment, it is better to select a specific diagram or drawing based on a photo from the Internet.
The manufacture of the planter begins with installing the frame, you need to select channel No. 8, pieces of such metal will do. Special spars are attached to the frame. They will need to be welded to each other using specially selected pipe crossbars.
We select metal arches where they should be located on a special rod. The seatpost supports can be made using special metal corners, and they will need to be secured to the spar. The entire manufactured structure is attached to a special bracket by welding.
All that remains is to make a bunker for potatoes. Plywood, which will need to be covered with drying oil, is suitable for this purpose. On one side, the ripper attachment will be attached to the main frame, and the wheel axle will be attached to the main axle.
A homemade potato planter for a mini tractor, if you follow our recommendations correctly, will not differ from the factory model, and it will take very little effort and money.
Today, the most popular potato planter models for mini-tractors are manufactured by Xingtai. In terms of design features, this model is often single-row with a planting depth of 80-120 mm. Seed potatoes are placed in two containers, which are used differently. One is for potatoes, the other is for fertilizer. If you need a two-row option, it will fit on a mini tractor with more power.
You can use these planter options for the MTZ-132N tractor. Before you buy a potato planter, you need to know the power of your mini-tractor and decide on the level of your potato planting tasks.
TOP 3 factory models of potato planters
Among the factory models of potato planters for walk-behind tractors, the following are the most popular:
Important! The name of these models stands for single-row potato planter (PT), the number “1” after the hyphen. The additional letters “M” and “A” indicate modifications (improvements) of previously released models.
- Type – single-row, trailed;
- Weight –25 kg;
- Track – 700 mm;
- Hopper capacity – 40 l;
- Productivity – 0.15-0.2 g/hour;
- The required power of the walk-behind tractor is from 6 hp;
- Price – 12000-14500 rub.
Potato planting unit KS-1A
- Type – single-row, trailed;
- Weight –33 kg;
- Track – 600 mm;
- Hopper capacity – 34 l;
- Productivity – 0.25 g/hour;
- The required power of the walk-behind tractor is from 6 hp;
- Price – 15,000-16,000 rubles.
KSM-1A – productive and convenient potato planter
- Type – single-row, trailed;
- Weight – 44 kg;
- Track – 600 mm;
- Hopper capacity – 41 l;
- Productivity –0.25 g/hour;
- The required power of the walk-behind tractor is from 6 hp;
- Price – 15500-16000 rub.
All these models work well with walk-behind tractors, both domestic (MTZ, Neva, Salyut) and foreign-made (Viking, CAIMAN, Daewoo).
Important! You can buy one of the models listed above in almost any large and medium-sized Russian city. But the most favorable prices are in such large cities as Moscow, St. Petersburg, Yekaterinburg, Novosibirsk. This is explained by high competition among a large number of sellers: firms, private entrepreneurs, which causes a wide variety of prices, seasonal discounts, and the possibility of purchasing equipment in installments or on credit.