Common faults
Despite the fact that a screwdriver is a very convenient and functional device that is in the arsenal of many craftsmen (both home and professional), it can still break. No equipment is immune from such problems. Often the source of a screwdriver problem is a faulty battery. Let's take a look at the list of the most common problems associated with the battery of this tool.
- In many cases, there is a loss of capacity of the screwdriver battery. Moreover, we can talk not only about one, but also about several batteries.
- There may be mechanical defects in the chain of the battery pack itself. Such troubles are usually caused by the detachment of the plates that connect the jars to each other, or connect them to the terminals.
- Battery failure can be caused by oxidation of the electrolyte - this is another common problem that many owners of screwdrivers encounter.
- Lithium can degrade into lithium-ion components.
If you choose the most common defect in a screwdriver battery, then it can be attributed to the problem of loss of capacity. The point here lies in the fact that the loss of capacity of at least one element simply does not allow the remaining jars to be charged normally and completely. As a result of receiving an inadequate charge, the battery begins to discharge quite quickly and inevitably (does not hold a charge). Such a malfunction may be a consequence of the memory effect or drying out of the electrolyte in the banks due to the fact that they were very hot during charging or worked under heavy loads.
Replacement of defective elements
A decrease in the characteristics of long-term power supplies indicates irreversible chemical changes in structural parts. Capacity restoration methods extend battery life by 10-15 cycles. Then you will need to install new cans. Replacing batteries in a screwdriver is carried out in several stages.
- Elements that need to be replaced are identified. New devices must correspond in size and technical parameters to the ones they are replacing. This is especially important for lithium-ion or lithium-polymer cells, since the controller is programmed to work with batteries with strictly defined technical characteristics. Otherwise, operation of the product will be unsafe.
- If all elements change, the bundle is disassembled. The metal plates connecting the poles of the cans are removed. They will be needed to connect new elements. If there are a large number of elements, it is better to sketch their configuration indicating the polarity, location of the temperature sensor, etc.
- The sources are connected in series to each other by metal plates. In industrial production, spot welding is used for this. It does not heat the case and does not harm the battery.
At home, a soldering method is used that eliminates prolonged heating of the battery:
- metal plates are tinned using F-38N active flux at a soldering iron temperature of 250-300 ºC;
- the connection point on the can is treated with flux;
- Molten solder is applied to the contact area of the plate, the soldering iron is held on the plastic;
- the heated plate with solder is pressed to the contact point on the can, the soldering iron remains on the plate at the moment of contact;
- The soldering iron is quickly removed.
When soldering, the battery heats up in less than a second, which does not harm it. The method is suitable for connecting Ni-Cd and Ni-MH sources, which are less sensitive to heat. To connect lithium batteries, it is better to use spot welding.
All these recommendations will help you repair your screwdriver battery in different ways so as not to spend money on a new one. Don’t forget about safety precautions, take your time and you will definitely succeed.
What additional methods for restoring batteries for screwdrivers exist? + (Video)
It’s worth noting right away that not all batteries are susceptible to restoration. In particular, with the best success it is possible to revive “banks” with a typical insignia ni cd. Most typical screwdriver models are now equipped with such batteries. Of course, on the tool market you can find screwdrivers from the Makita or Hitachi or Bosch brand, the battery of which is built on a lithium base, but there are not many of these models yet.
In general, if we talk about the serviceability of the battery pack and methods for restoring it, in any case, you need to pay attention not only to the batteries themselves inside the case, but also to make sure that the charger is working properly. It is likely that the functionality of the power supply has lost the ability to provide the required current when charging
Many craftsmen, faced with the repair of nickel-cadmium power cells in practice, restore them by adding an electrolyte. During operation, the battery begins to lose electrolyte as it evaporates.
Physical impact on the battery “can” using a drill helps to correct the situation. It is necessary to make a small hole in the body of the battery (diameter 0.8-1mm). Armed with a medical syringe with a needle, inject a couple of drops of distilled water into the battery. The hole is then securely filled with epoxy resin. This cycle of measures will allow you to extend the operation of the power element for several more charge/discharge operations.
Of course, the simplest and most obvious way to resuscitate a battery pack for a screwdriver is to physically replace the faulty unit with a functional one. Here, even the help of a specialist may be inappropriate, since the operation can be easily performed even by a person who has at least once used a soldering iron and held a screwdriver in his hands. The main thing here is to show a little skill to prevent the cans from overheating at the time of soldering/desoldering.
Of course, there are quite a few ways to reanimate batteries, but not all of them are available to the average user. If you are unable to extend the life of your screwdriver with a standard battery on your own, then seek help from qualified specialists. They will make an error-free diagnosis and figure out how to restore the tool’s battery with minimal labor costs.
Screwdriver battery repair
Repair work includes restoring power supplies or replacing the cans in the screwdriver battery with your own hands.
Before disassembly and repair, the battery is fully charged with a standard charger. Restoration is performed in the following sequence:
Disassembling the case
The battery case consists of two parts. There is a connection with screws - in such cases, disassembly is not difficult. When making an adhesive joint, it is necessary to carefully tap the gluing areas with a mallet. As the adhesive layer deteriorates, efforts must be made to separate the parts. A sharp, thin knife inserted into the gap between the parts can help.
Determination of defective cans
Procedure for identifying defective cans:
- elements are carefully inspected;
- swollen ones are detected, with traces of leaked electrolyte on the body, etc., which cannot be repaired, for replacement;
- The tester checks the output voltage on each bank. In nickel-cadmium and nickel-metal hydride cells there should be 1.2 V, in lithium-ion cells - from 3.6 to 4 V, depending on the model. If the battery is used for a long time, the indicators will be lower, but the decrease should not exceed 10-20%. The purpose of the test is to identify batteries that have a charge of less than half of their nominal value.
The electrical capacity decreases due to uneven charging of the elements by standard charging. The device turns off when the temperature of the barrel on which the temperature sensor is installed reaches a full charge value. Some elements may be undercharged. This is detrimental to nickel-cadmium batteries, since due to the memory effect, after several cycles with an incomplete charge, their performance deteriorates significantly.
Recovering items
Algorithm for restoring cans:
- the discharged element is connected, observing polarity, to a universal charger, for example Imax B6. The device charges and discharges the main types of batteries with currents of varying strengths in automatic mode with constant monitoring of the condition of the batteries;
- 2-3 cycles of full charge/full discharge are carried out with a current corresponding to the type of battery. This is usually enough to get a high battery charge. The process is repeated with other discharged elements. It must be remembered that to eliminate the memory effect, a Ni-Cd battery needs 5-6 deep discharge/maximum charge cycles.
There are other ways to restore battery functionality:
- short-term exposure to currents significantly exceeding the strength of charging currents. It is claimed that in this way you can quickly restore any “dead” battery. Indeed, when pulsed with a current 10 or more times higher than the charging current, Ni-Cd and Ni-MH batteries quickly reach their rated capacity. However, the effect of such exposure lasts 2-3 cycles, then the battery usually cannot be restored.
- adding distilled water inside the housing of the element: a small hole is drilled in the housing, 1 cubic meter is introduced through it. see distillate, the element is fully charged. After a few days, the charge level is checked: if it is low, another 1 cubic meter is introduced inside. see water and the battery is charged again.
When normal capacity and voltage levels are reached, the case is sealed and the battery is ready for use. This method is more efficient than the high pulse current charging method.
Battery assembly
After the repair of the screwdriver battery is completed, the battery can be assembled:
- the elements are inserted into the base of the battery case without much effort - soldered connections are not as reliable as welded ones and can be damaged;
- the wires going to the battery terminals are laid without strong kinks. They are not allowed to come into contact with each other or with the poles of the cans;
- when assembling lithium batteries, the controller board is isolated from the elements with a gasket made of cardboard, polyethylene, etc., to avoid a short circuit in the circuit;
- parts of the body are connected to each other with screws, if provided for by the design, or with glue. An adhesive-sealant is recommended - the connection is reliable and airtight, and if necessary, quick-release.
Restoring various elements
It is possible to restore the lost capacity of different batteries only in those types of batteries where a special memory effect occurs. These varieties include nickel-cadmium or nickel-metal hydride options. To repair and restore them, you will have to stock up on a more powerful charging unit, which has a function for adjusting voltage and current. Having set the voltage level to 4 V, as well as the current to 200 mA, you will need to apply this current to the power components in which the maximum voltage drop was detected.
Faulty batteries can be repaired and restored using compression or compaction. Such an event is a kind of “dilution” of the electrolyte, which has become less in the battery bank. Now let's restore the device. To carry out such procedures, you will need to perform a certain sequence of actions.
- First you need to make a thin hole in the damaged battery, in which boiling electrolyte was detected. This must be done at the end part of this part on the side of the “negative” contact. It is advisable to use a punch or thin drill for this purpose.
- Now you need to pump out the air from the jar. A syringe (up to 1 cc) is ideal for this.
- Using a syringe, inject 0.5-1 cc into the battery. see distilled water.
- The next step is to seal the jar using epoxy resin.
- It is necessary to equalize the potential, and also discharge all the jars in the battery by connecting an extraneous load (this could be a 12-volt lamp). After this, you will need to fully charge the battery. Repeat the discharge and recharge cycles approximately 5-6 times.
Replacing cans in the battery
How to repair a battery for a screwdriver? The easiest way to revive the battery is to replace one of the cans.
You need to find a defective element with low voltage. To do this you need to use a tester.
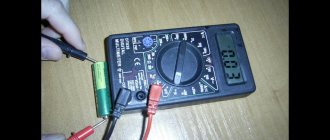
Instructions on how to check a screwdriver battery with a multimeter:
- A regular multimeter has two probes - red and black. There are two contacts at the opposite ends of the can (plus and minus).
- The tester selection lever is set to the “constant voltage” mode. If the multimeter has automatic selection of values, this is enough. If it is not there, you need to put the lever in position “20”.
- The probes are applied to the contact pads and the voltage is measured. The screen shows the actual voltage. If there is a “-” sign in front of the numbers, then the probes need to be swapped with each other.
- Each bank is checked using this algorithm.
When a broken element is found, it is simply unsoldered and replaced. You need to use a powerful soldering iron so as not to overheat the jar.
Determining the cause of the malfunction
All batteries in a screwdriver cannot be damaged at the same time. Moreover, we should not forget that as a result of the series connection of the cans, if one of them malfunctions, the entire electrical circuit of the battery stops working normally. Therefore, it is necessary to find faulty links in it.
To do this, you will need a multimeter, and for the second method of determining a weak battery, a 12 V lamp, if the battery produces such a voltage.
The sequence of actions is as follows:
- We fully charge the battery.
- Carefully disassemble the power source and measure the voltage on the elements. On NiCd banks there should be at least 1.2 - 1.4V, on lithium 3.6 - 3.8V.
- We mark jars with a voltage less than the nominal one with a marker or paint. For example, many NiCd banks have 1.3 V, and one or more 1 banks have 1.2 V.
- We assemble the power source and use it in a screwdriver until the power drops significantly.
- Once again we disassemble it and measure the voltage drop on the banks. On the previously marked batteries, the “drawdown” will be more significant, unlike the others. In accordance with the example considered earlier, they will not have 1.2V, but less than 1V. The difference on the banks of 0.5 - 0.7V is critical, so the element with the lower voltage is changed.
Critical voltage for a can
If the electric motor of the tool runs on 12V or 13V, then you can identify the problem can in a different way. A fully charged battery needs to be disassembled, then connected to the plus and minus of a 12V light bulb for gradual discharge. The voltage is measured on the batteries, which have the least voltage and are faulty.
Failures in the form of loss of contact on the block or damage to the thermistor occur very rarely. These problems are typical for counterfeit products, so we will not discuss them. Identified defective banks are replaced to restore the functionality of the faulty power source.
Types of batteries for screwdrivers
Before starting repairs, it is necessary to carry out diagnostics, and for this, find out what types of batteries are used in screwdrivers. Such knowledge will help you quickly determine the type of power source and, accordingly, choose the right approach.
Nickel-cadmium batteries
Nickel-cadmium battery is a popular power source for screwdrivers of various powers. Its main advantage is its low price, which is why such batteries are widely used: from hand tools to electric cars carrying large loads. An interesting fact is that even trolleybuses have nickel-cadmium power supplies.
Advantages:
When used correctly, they have a long service life and a large number of charge/discharge cycles. Can be stored for a long time
It is important to know that nickel-cadmium batteries can only be stored when discharged. Low ambient temperature does not affect durability. Available according to your own pricing policy. Disadvantages:
Flaws:
- If used incorrectly, the self-discharge current increases.
- It is not recommended to open batteries - nickel and cadmium are toxic elements and very harmful to the human body.
You can repair a nickel-cadmium screwdriver battery yourself.
Nickel metal hydride batteries
Repairing the battery of a screwdriver with nickel-metal hydride cells is not possible.
Advantages:
- Large capacity. Such power supplies can last 20% longer in one cycle than nickel-cadmium batteries.
- Long service life. With proper handling - at least 300 charge/discharge cycles.
- Does not require complete discharge.
Flaws:
- Nickel-metal hydride power supplies cannot be refurbished, only replaced.
- High pricing policy.
- Insensitive to low ambient temperatures.
The Nickel Metal Hydride cell, which may be very important for some users, is environmentally friendly. But we still shouldn’t forget about the proper disposal of used power supplies.
Lithium-ion batteries
Replacing batteries in a screwdriver, if they are lithium-ion, takes place within a few minutes. But such power supplies, like nickel-metal hydride batteries, cannot be repaired.
Advantages:
- The largest number of charge/discharge cycles among other batteries.
- High capacity.
- Less weight means greater convenience when handling power tools.
Flaws:
- High pricing policy. It is not always relevant to buy a new lithium-ion battery - it is more profitable to purchase a complete power tool.
- If stored incorrectly and without recharging, they quickly become unusable.
Lithium-ion has become the most popular power source for electric cars.
Solder the batteries
It can be done in different ways, for example with thick wires. I decided to solder some torn metal strip taken from old cans. First, I tinned the tapes in the places of future contacts on both sides. Then, using a well-heated soldering iron with a drop of solder, I tinned the battery contacts. But so that they do not heat up too much - let them cool. Then I pressed the tape to the contacts of the cans and soldered the tape, again without severe overheating.
The most difficult thing to solder is the negative terminals, but it goes very quickly. True, it is better to wash the flux later to clean the insides of the battery.
Now the most important thing. What batteries were used when repairing the battery of the Interskol DA-10/10.8 ER screwdriver, you ask? Well, I won’t hide it. These were the most Chinese of the cheap cans that the owner of the device honestly bought in the store. from Bailong with a fictitious capacity of 8800 mAh. This is of course a laugh and God forbid they have 2200 mAh. Judging by how long the screwdriver worked after the repair on a full charge. I would reduce this figure by half. But nevertheless, the screwdriver was urgently repaired and it makes the owner happy.
When assembling, do not forget to return the cardboard spacer between the cans and the board. This is so that fresh soldering does not short-circuit anything on the board.
This completes the repair and restoration of the lithium-ion battery of the Interskol DA-10/10.8 ER screwdriver. Almost all batteries from popular screwdriver manufacturers are repaired in approximately the same way :. This concludes my story about repairing a screwdriver battery. Ask questions in the comments. Better yet, in the corresponding thread on our forum or write to the Soldering Master personally by email.
Sincerely, Master Pike. Happy renovations!
Adviсe
If you decide to repair a failed battery yourself, be sure to pay attention to the following points!
The batteries are connected in series, that is, the minus battery to the plus of the next one, etc.
On batteries, the polarity is sometimes not indicated; in such cases, it is advisable to find out with a multimeter (usually the convex and smaller diameter plus end).
If there is no device, then you need to look at how the other cans are connected to each other and solder them in the same sequence.
Ni-Cad, Ni-MH and similar batteries are very sensitive to high temperatures, so contact of the soldering iron with the battery should be minimized! In this case, it is better to take the soldering iron itself more powerful (60 watts or more), so that with a short touch it will have time to heat and solder the soldering area, but without having time to heat up the battery body itself.
At home, it is better to use flux or rosin for tinning and soldering.
General recommendations for repairs
Regarding nickel-cadmium batteries, the following features are distinguished:
- Such elements have an element of memory. According to the classical scheme, they need to be charged three times and discharged the same number of times. For a new part the rules are exactly the same.
- An absolutely similar one is chosen as a replacement so as not to disrupt the operation of the entire device.
You need to prepare the necessary tools.
Regarding lithium batteries, there are also certain rules that need to be taken into account:
- Soldering must not be used. Such parts cannot withstand high temperatures and quickly fail. It is permissible to use only a very powerful soldering iron, but at the same time you need to work very quickly.
- It is easier to select such elements, because there are both foreign and domestic products on the market, the batteries of which are the same.
Useful tips
To ensure that a new battery from a screwdriver (any company) does not lose its capacity, it will need to be charged for 10-12 hours the first few times. During operation of the screwdriver, it is advisable to use the battery until it is completely discharged. After this, rush to immediately connect it to the charger and leave it like that until it is fully charged.
None of the firmware options will be effective if we are talking about a nickel-cadmium battery in which the electrolyte has boiled. Capacity is inevitably lost in these parts
When purchasing a new battery component, it is very important to ensure that its capacity level and dimensions correspond to the original elements of the screwdriver. Otherwise, installing them will be very problematic, and maybe even impossible.
If, when repairing a screwdriver battery, you resort to using a soldering iron, then you should keep in mind that you need to work with it as quickly as possible. This rule is due to the fact that holding this device for a long time can lead to fatal overheating of battery parts. Act quickly but carefully.
If you decide to repair the tool battery yourself, then you should act carefully and precisely. try not to make mistakes so as not to damage the device even more. Remove and install individual components carefully to avoid damaging other important parts. If you doubt your skills and abilities, then it is better to entrust the battery repair to experienced specialists or buy a new battery and simply install it in a screwdriver. Changing this part in this case will be very simple.
To learn how to properly repair a battery for a screwdriver with your own hands, see the following video.
Technology for replacing Ni-Cd with Li-ion in a screwdriver
Lithium elements are durable, so many screwdriver owners are thinking about replacing nickel-cadmium products with them.
The replacement technology includes several steps that must be followed.
Determining the number of Li-ion batteries
Basically, the battery parameters are marked on the battery itself or on a screwdriver. To determine the number of required elements, you need to divide the voltage indicated on the tool by 1.2V (this is the nominal voltage of one nickel can).
To find out how many lithium parts will be required for replacement, the division is carried out by 3.7 V - this is a normal indicator for this type of cans.
It is recommended to round up the result obtained; this will not have a negative effect on the instrument, but will simply increase its power a little.
It is necessary to correctly select all the necessary elements for replacement
Selecting a Li-ion battery
Manufacturers offer lithium-ion and lithium-polymer cells. The latter are smaller and safer, but they are more expensive. However, they are not capable of delivering large currents. Therefore, experts recommend using regular lithium-ion banks.
It is better if the element has welded flexible bends, because such parts do not like elevated temperatures and unnecessary soldering. It is recommended to look at several options in stores to choose the most suitable model.
How does the battery voltage affect the operating time of a screwdriver?
The question of how the battery voltage affects the operating time of the product is of interest to many. To understand how much power a product has, you need to multiply the voltage by the battery capacity.
For reference! For example, a screwdriver with a 14.4 V battery with a capacity of 1.5 Ah will have a power of 21.6 W.
Ready-made 18650 battery assemblies
As a replacement, it is better to purchase ready-made 18650 battery assemblies. You can do this on Chinese online trading platforms or in other online stores.
BMS Protection Board Selection
Lithium-ion batteries require careful handling and compliance with certain requirements. The role of protection is performed by the BMS board. It is this element that does not allow the voltage to exceed more than 4.2 V and decrease below 2.55 V per battery during charging. In addition, the element keeps the maximum permissible current under control and maintains the necessary balance between the batteries.
The main parameters when choosing are the number of elements connected in series. On the Internet you can look at a table that shows all the necessary parameters and use it to select a suitable board.
You can make a replacement even at home, the main thing is to follow the sequence
Power supply for charging
For lithium-ion batteries, chargers are selected based on the number of batteries connected in series in the battery. The more there are, the higher the output voltage should be.
Charging batteries with a standard charger from a screwdriver
If desired, you can purchase a special universal board for a lithium battery. It is installed in the original charger. However, experts recommend using suitable chargers for this type of battery rather than modifications.
Lithium battery capacity indicator
Indicators are LED and digital. The latter are cheaper, but not convenient to use. It is better to choose LED options based on the number of batteries connected in series.
18650 battery holder
It is also better to purchase ready-made holders for 18650 batteries. If you wish, you can find good options at reasonable prices in online stores.
Replacement
If it is not possible to repair the component power components in the battery, then they must be replaced. You can also do this yourself. There's nothing complicated about it
The main thing is to act carefully, carefully and according to the instructions. Try not to damage anything in the process
Of course, you can buy a new battery and install it in a screwdriver (they are characterized by interchangeability). You can replace a damaged can in the battery itself.
- First, remove the battery that has stopped functioning correctly from the device circuit. If we take into account the fact that they are connected to each other with special plates built in using spot welding, then it is better to use side cutters for this. Remember to leave a normal length shank (not too short) on the normally functioning jar during the process so that you can attach it to the new power part.
- Attach the new part using a soldering iron to the area where the old defective jar was. Remember to pay attention to the polarity of the elements. The positive (+) terminal must be soldered to the negative (-) terminal and vice versa. To do this, you will need to use a soldering iron with a power of at least 40 W, as well as acid for it. If you were unable to leave the required length of the plate, then it is permissible to connect all the jars using a copper conductor.
- Now we need to return the battery back to the housing part according to the same plan according to which it was there before the repair work.
- Next, you need to equalize the charge on all jars separately. This must be done through several cycles of discharging and recharging the device. Next, you need to check the voltage potentials on each of the existing elements using a multimeter. They should all stay at the same level of 1.3V.
If we are talking about repairing battery packs with lithium-ion banks, then you should proceed according to a similar scheme. However, there is one nuance that can make the task a little more difficult - disconnecting the battery from the board. There is only one way to help here - replacing the damaged can.
Preface and diagnostics
Repairing laptop batteries: the reason for rapid failure is frequent recharging
The fact is that the resource of any rechargeable battery is limited (about 5 years), and this element can deteriorate even if not used. In laptops, in general, users often plug the device into the network and work in this mode for a long time, which, as you understand, is also not good for the battery.
Advice! The author of this material also has a laptop, the battery of which initially began to hold a charge poorly (normal behavior), and then became the reason why the laptop refused to start, which put your humble servant at a dead end. Suspicions fell on the motherboard, the RAM, and the processor, but only accidentally removing the battery and starting it in this mode showed that the battery was faulty.
- Such a silent failure of the battery is the most likely development of events, however, there are cases when the capacity of the battery drops almost instantly, serious overheating, explosions and even fires occur.
The revolt of the machines was unsuccessful
- This is why it is important to monitor your batteries, because most signs of future problems can be identified using diagnostic methods.
Made in China
- If the battery fails, it must be replaced with a new one. However, not everyone wants to buy branded batteries, since the price for them is sometimes simply crazy.
- Alternatively, you can order goods from China for just 25 dollars, but practice has shown that it is not for nothing that there is such a difference in cost. Batteries from the Middle Kingdom do not have the declared capacity (they last several times less), and their service life is a real roulette, usually leading to loss.
- We also do not forget that you need to wait about a month for an order from China, which will not suit everyone.
Laptop battery repair: disassembled case
As an option, a way out of the situation would be to repair the laptop batteries that the device was originally equipped with. Let's see what can be done in this case.
Battery diagnostics
Any repair of equipment must begin with diagnostics, which, like therapy in medicine, will show the causes of the malfunction and the current condition of the element.
BatteryMon battery testing software
- You can check your battery without disassembling your computer - for this you can find many programs on the Internet, including free ones, such as BatteryMon, the interface of which is shown in the photo above.
- When running, the program produces graphs that display the discharge and discharge cycles of the battery.
- This product is in English, however, understanding it will not be difficult. If you go to the “Info” menu and click on the “Battery Information” tab, you can find out a lot of useful information about your battery. For example: battery type (Chemistry); the initial capacity of the element, which it had from the factory (Design capacity); voltage and so on.
Laptop battery repair: diagnostics
- But we will be interested in another item - Full charge capacity, or in Russian - the current capacity of the element. The more this parameter differs (naturally, to a lesser extent) from the design one, the closer the battery’s demise.
Tools required for work
Before you undertake any repairs, you should stock up on the following tools and equipment:
Slotted screwdriver
- A thin flat-head screwdriver, a mounting knife, a scalpel and other similar tools that can be used to open the battery case;
Soldering iron
- Complete soldering kit, including the soldering iron itself, tin and soldering acid;
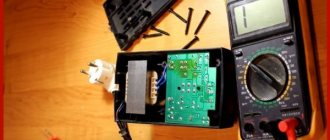
Multimeter
- Multimeter - even an inexpensive Chinese instrument will do, the main thing is that it has a diode testing function;
Multifunction charger
- In some cases, you may need a multifunctional charger like IMAX B6 , or otherwise a balancer, which we will talk about later.
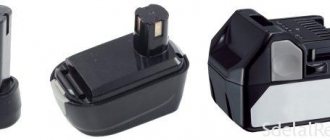
New batteries
- The new batteries are lithium ion batteries, which look like regular AA batteries.
We will determine the number of replacement batteries after disassembling the battery and testing its elements with a multimeter.
What malfunctions can occur in a laptop battery?
Concluding the chapter with preparation for repairs, let's list the main reasons for battery failure, highlighting those that we can try to eliminate ourselves.
- The most common malfunction is the wear of the batteries. Their service life is approximately 500 charge-discharge cycles, after which they are physically unable to hold a charge. To repair, it is necessary to replace used parts with new ones.
- The second reason is the deep self-discharge of the cells (the battery has not been used for a long time). The charge level of such cells drops below the threshold level, after which the controller blocks the charging process. Only balancing with a special charger, which we mentioned when listing the tools, can restore life to such batteries. If you don't have one, you may have to contact a service center.
Advice! If you want to remove the battery to save battery life, be sure to fully charge it first. During storage, the battery must also be periodically returned to the device to be recharged, since any battery has a self-discharge effect.
Repair and restoration of laptop batteries must begin with determining the causes of the malfunction
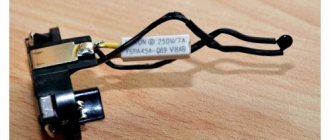
- The last thing that can happen to the battery is the failure of the charge controller. In the photo above you can see the circuit board attached to the barrels - that's it. If you are not strong in radio engineering, then the maximum that can be done in such a situation is to replace the part with a new one, or go to a service center. Therefore, we will exclude this procedure from the list suitable for self-recovery.
Restoring a screwdriver battery after freezing
Most likely, your power tool is equipped with a nickel-cadmium battery. Because this type of battery (in the context of the presented article) is the most common. That is why our material is dedicated specifically to this type of battery. However, the recommendations below are also effective regarding the use of metal hydride energy sources. So, the procedure is:
- Place the battery packed in a plastic bag (completely discharged!) in the freezer.
- After 10-12 hours, remove the battery from the refrigeration unit.
- Charge the battery for several hours.
- After which you need to drain the battery. Let it work until the energy in the containers runs out.
- Repeat the described procedure 2-3 times.
But what to do if such restoration of the screwdriver battery is not fully successful? In this case, you should resort to a comprehensive solution to the problem, which you will learn about in the sections below.
Restoring a faulty battery
Lithium screwdriver batteries cannot be restored. They do not have a memory effect, so the problem is probably related to the decomposition of lithium and this cannot be stopped. In such batteries, it is important to determine exactly what is causing the malfunction: any bank or control circuit.
This is done in two ways:
- Replacing the control circuit, which can be temporarily taken from another similar power source. If it is not working properly, it is replaced.
- By supplying a current of 200 mA with a voltage of 4 V to the defective battery. If the voltage on the bank increases to 3.6 V, then it is working, respectively, the problem is with another or with the control circuit.
Disassembling Li-ion
To restore Ni-Cd batteries in a modern do-it-yourself screwdriver, two methods are used:
- Compaction or compression (suitable in cases where there is electrolyte and only volume is lost).
- Exposure to high voltage (more than rated). Thanks to this method, it is possible to remove the memory effect, as a result of which the capacity lost by the can is partially restored. Nickel-cadmium cells mainly lose capacity as a result of boiling off of the electrolyte, so no amount of “firmware” with high current will allow the battery to be revived. This method will allow you to temporarily restore the battery, so you will soon have to change the power source.
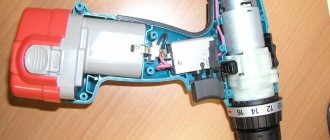
Repair
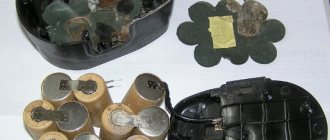
The battery compartment cover was secured with four screws. Having unscrewed them, I saw that the jumpers (plates) between the batteries were simply torn.
The jumpers to the batteries are usually spot welded. Since I don’t have such welding, I always solder the jumpers using a soldering iron with regular solder.
For the repair I needed:
- soldering iron;
- sandpaper;
- flux;
- solder.
When replacing or repairing torn cans, I first clean the soldering areas with sandpaper. In order for the tinning to be of high quality, it must be cleaned as thoroughly as possible; the quality of the soldering itself will depend on this, which, in turn, will also affect the throughput of the current passing through it.
Next, I apply soldering flux and a puddle of the soldering area of the batteries and plates.
Instead of flux, you can also use rosin (in this case it is not very convenient), soldering acid (some destroy soldering over time, toxic fumes), an aspirin tablet (strong smell when melting). I do not recommend using the last two methods at home.
Finally, observing the polarity, I solder the torn batteries back into place and assemble the battery.
It seems that nothing is easier than picking up a soldering iron and using simple manipulations to solder the batteries into place, but not everything is so simple when soldering nickel-cadmium (Ni-Cad), nickel-metal hydride (Ni-MH) and similar batteries; there are some nuances. Failure to comply with the subtleties can lead to both the unusability of the battery (a sharp drop in capacity) and its charger.
Features of battery types + (Video)
The battery is the most important part in a screwdriver. If the tool begins to work poorly, then one of the reasons is the failure of the batteries. A new battery pack costs slightly less than the screwdriver itself. And you have to make a serious choice - buy a new block or a new tool. Not a cheap pleasure.
But, if a person created it, then a person can repair it. The main thing is that the head works and the hands have the right source. You can repair batteries with your own hands, which will then work for many more years.
Rechargeable batteries consist of several elements. They are very similar to regular batteries, but can be recharged. The number of charge cycles determines the basic price of the cells. By type of material, battery cells are divided into:
- nickel-cadmium;
- lithium - ion;
- nickel - metal - hydride.
They are arranged in the list by frequency of use. Nickel - cadmium elements (Ni-Cd) are most often found in screwdrivers of different brands. This is due to its comparative cheapness. But they have a low output voltage and the number of charge-discharge cycles is also low. The voltage on one such battery is about 1.2 V. If a screwdriver requires 12 V to operate, then the battery must consist of at least 12 such elements.
They are stored for a long time in an uncharged state and are not afraid of temperatures. But the level of self-discharge forces the battery to be charged frequently, which is the reason for failure. The environmental friendliness of the production of such batteries is not acceptable in every country in the world, but perhaps that is why they are cheaper.
Lithium – ion (Li – Ion) batteries have the best performance. The voltage on a separate copy reaches 3.6 V. High charge capacity. Four pieces are enough to operate the tool. This is very pleasing to the hands, because the instrument must be carried and held in the hands at any height. The number of charge cycles is high, but the price is also not low. But the battery has no “memory” of its charge level. And the self-discharge is small. In a word, everything is good except the price.
Nickel-metal-hydride (Ni-MH) batteries have almost all the disadvantages of previous brands. Given the quality of nickel-cadmium elements, their price is equal to the cost of lithium-ion ones. Application in practice is very low where there are low temperatures. Low temperatures damage the entire battery at once.
You can repair a battery yourself, but this does not mean that you can repair one element. You can try to restore one element, and if restoration does not help, then you just need to replace it. All battery elements can be replaced. This is the best option - buy new elements and make replacements. But this is not always fast, and the tool is needed now.
Types of screwdriver battery batteries
Batteries for screwdrivers are made from the following elements:
Nickel - cadmium (NiCd)
They are characterized by a nominal voltage of 1.2 V.
Pros:
- Low price;
- They are not afraid of the cold;
- They preserve the resource during storage in a discharged state.
Minuses:
- Memory effect;
- Self-discharge;
- Low capacity;
- There are few charge/discharge cycles, so if you work intensively with power tools, they will not last long.
Ni-Cd cans
Nickel metal hydride (NiMH)
A typical nominal voltage is 1.2V.
Pros:
- Minor memory effect;
- Insignificant self-discharge;
- Capacity is larger than NiCd;
- More charge/discharge cycles.
Minuses:
- High price;
- The resource is partially lost during long-term storage in a discharged state;
- In cold weather, the working life is reduced.
Ni MH cans
Lithium-ion (Li-ion)
They differ in a nominal voltage of 3.6V.
Pros:
- No memory effect;
- Minimal self-discharge;
- Large capacity;
- Significantly more charge/discharge cycles compared to the batteries listed above;
- Fewer cells are required to set the required battery voltage, which makes it possible to significantly reduce the weight and size of the battery.
Minuses:
- High price, almost 3 times higher than Ni-Cd;
- After 3 years of operation, the capacity decreases significantly due to lithium decomposition.
Type of Li-ion cans