Converting a Hitachi twelve V screwdriver to 18640 lithium batteries
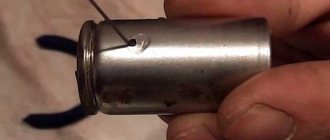
Features of converting a Hitachi twelve V screwdriver to lithium batteries. A very small socket for battery cells is designed for finger parts. Therefore, you should prepare a place for eighteen thousand 600 50 elements. It is necessary to cut out one side of the partition in order to tightly position one element.
You need to get flux, flat iron connecting tape, and hot melt adhesive. When remodeling, lithium batteries must be installed in a screwdriver through a protective controller. It should handle three 18650 cells, 3.7V and rated at 20-30 amps.
Remove the old battery from the socket, carefully disconnect the contacts in the assembly with the temperature sensor and power indicator. Clear and sign contacts. They should be brought out in one direction, connected with solder to the leads from thick wires, and the assembly should be filled with hot glue.
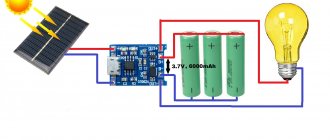
Assemble an energy source with one of the controllers designed for three elements. Assemble an alternate circuit of 3 Li-ion parts. Connect the controller. The conversion of a 12-volt lithium battery is completed when the structure is installed in the block, secured, and the charging indicator lights up.
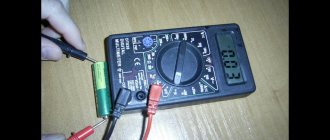
After full charging, measurements show 12.17 volts in the external network. But this is enough for trouble-free long-term operation of the device.
Converting a screwdriver to lithium batteries eighteen thousand six hundred fifty 14 V
When converting screwdrivers of different power and flashlights from Ni-Cd to Li-ion, 18650 form factor batteries are often used. They simply fit into a container or socket, because instead of 2-3 original ones they install one lithium one. The modification of the screwdriver battery should be carried out taking into account the characteristics of 18650 lithium batteries.
This type of energy source does not tolerate the deepest discharge and excess charge. This means you need to use voltage control boards. Because any battery has its own character, their charge is adjusted by a balancer. The point of converting a screwdriver with a voltage of 14.4 V is to develop a device using lithium batteries to make hand tools lighter and increase their performance. 18650 lithium batteries are most suitable for these purposes.
When selecting devices, it should be taken into account that the starting current of the screwdriver is high, you need to choose the appropriate BMS for the required number of cans and more than 30 A. To convert the charging of the screwdriver to a lithium battery , you need to stock up on a good soldering iron, non-acid flux and thick wires for making jumpers.
- Four lithium-ion cans.
- Li-ion battery controller for four banks, CF-4S30A-A fits perfectly. It has a built-in balancer that controls the charge of each element.
- Hot melt adhesive, TAGS soldering flux, solder.
- Heat-resistant tape;
- Connecting jumpers or thick insulated wire with a cross-section of more than 0.75 square, cut for bridges.
The procedure for converting a screwdriver for 18650:
- Disassemble the case and remove a bundle of twelve Ni-Cd parts from the container.
- Remove the garland, leaving the connector with leads and. Instead of a temperature sensor, a thermocouple from the controller will be installed.
- Solder the assembly, taking into account that you cannot use acid, only neutral flux and clean solder. During the connection period, the lids must not be heated. Work precisely.
- Connect balancing points to the controller according to the diagram. There are connectors on the board.
- Connect the assembly to the plus and minus terminals.
- Check the functionality of the circuit. If everything works, place the assembled battery and controller in the socket, secure it with sealant.
READ How to Change Brushes on Makita 2470
If the memory is not universal, additional rework . Twelve V screwdrivers with a universal charger are assembled in the same way, but a protective circuit for connecting 3x18650 3.7 V to lithium batteries is used. In the same way, a screwdriver is remade with the introduction of a battery kit of eighteen thousand 600 50 in the amount of two parts.
Replacement highlights
Knowing the most critical moments will help you avoid mistakes when remaking batteries:
- Using exclusively high-quality and original components.
- Replacement with lithium substitutes is made by calculating the number of batteries.
- The quantity is based on 3.7 V per element.
- The dimensions of the cans are different compared to Ni-Cd, which requires the additional installation of charge and discharge controller cans.
- There is no need to rush to dispose of your original battery; diagnostics will determine whether it can be repaired.
Screwdriver batteries
Converting a screwdriver to 18650 lithium batteries
Each master encounters the problem of a decrease in the performance of the tool, or complete failure due to the battery. Manufacturers use nickel-cadmium batteries in 12, 14, 18-volt screwdrivers. The circuit of alternate assembly of several parts creates the necessary voltage. Replacing nickel-cadmium batteries with lithium ones increases the service life of the battery, making the design lighter. The permanent installation of the BMS board adds reliability. Therefore, converting the screwdriver to lithium batteries, mainly to the 18650 form factor, is justified.
How to find the highest current indicator in a screwdriver?
Converting a 12V screwdriver
for lithium batteries involves connecting the device to a laboratory power source with a maximum current of 30 A. The limiter regulator is set to the highest value. Having created the voltage level of the power source close to the nominal value of the future battery, we begin to smoothly pull the trigger. The current consumed by the screwdriver will rise to 5 A. Now you should sharply press the trigger. This will short out the power circuit. The current will reach a power of 20-30 A. You, its indicator would be even higher, but the power of the power source will not allow this to be recorded. This will be a short-term load current when you sharply press the screwdriver trigger. It doesn’t matter which model of such a device will react similarly.
Next, you should clamp the tip of the screwdriver with a vice and observe to what value the current consumption will increase during the operating mode when the ratchet in the screwdriver is activated. The current indicator in this case increases to 10-12 A.
This way you can determine the value of the load current. Under such circumstances, it will be equal to 5 A at idle and 30 A at a sharp start, and at a critical load it will be 12 A. The manufacturer must choose lithium cells whose nominal load current will be 10-20 A, and the pulse current - 25-30 A.
The meaning and procedure for converting screwdrivers to lithium batteries
Why do nickel-cadmium batteries fail so quickly? There is any person in the garland of alternately connected cans. The chemical process is individual, the charge in closed systems is different. If there is a fault in one bank, the design does not provide the required voltage. A charge control and balancing system is not provided in individual components.
- Any Ni-Cd bank gives 1.2 V, and li-ion eighteen thousand 600 50 3.6 V.
- The capacity of a lithium battery is twice that of a nickel-cadmium battery, which is similar in size.
- An overheated li-ion battery threatens to explode and catch fire, so installing charge uniformity control in the banks is imperative. The manufacturer is not interested in installing BMS in nickel-cadmium batteries.
- Lithium parts do not have a memory effect, unlike Ni-Cd, they can be charged at any time and within an hour.
- The screwdriver becomes significantly lighter after converting the battery to li-ion, with the introduction of 18650 cans.
There are only two obstacles to converting a screwdriver for lithium batteries; it is impossible to work with it at minus temperatures. The capacity of the cans decreases, starting with a decrease already from 10 0 C. Lithium batteries are expensive.
Knowing what input voltage is required for the screwdriver, the charger is modified, taking into account the placement of lithium battery cans and control parts in the factory container. You can also do the same with the flashlight by upgrading the socket for a block of 18650 parts.
Let's say we need a rework
twelve V
screwdriver using Ni-Cd cans on li-ion. If you use three banks, the output voltage is not enough: 3.6 x three = 10.8 V. With 4 components, the power of the device will be higher: 3.6 x four = 14.4 V. With all this, the tool will become 100 lighter eighty-two g, its power will increase slightly, the capacity is a solid plus. But when dismantling you need to throw away the terminals and the original temperature sensor.
How to convert a cordless screwdriver to work on a 220 Volt network
Craftsmen have come up with several ways to convert a screwdriver to work from an electrical network. They all involve providing the motor with the required supply voltage using an intermediate source or converter.
Table: power supply options for a corded screwdriver
| Power supply | Advantages | Flaws |
| Complete screwdriver charger. |
| The charger takes up space on the desk. |
| A ready-made power supply placed in the housing of an old battery. |
|
|
| A homemade power supply placed in the housing of an old battery. |
|
|
| External power supply | An easy modification. |
|
| Computer power supply |
|
|
Converting a Makita screwdriver to a lithium battery
There is a Makita screwdriver with a battery capacity of 1.3 A/h and a voltage of 9.6 V. To change the power source on it to lithium-ion, you will need three 18650 components. Conversion
will provide an old tool with new abilities: it will increase the duration of operation on one charge, add power, because the operating voltage will rise to 10.8 V.
For the design, it will be necessary to use a BMS, a control controller that maintains the operating mode of the lithium parts within operating boundaries. With this breaker, the charging of each bank will be uniform without exceeding 4.2 V, the lower voltage is 2.7 V. An integrated balancer is used here.
The characteristics of the controller should accompany the operation of the tool when the operating current increases to 10-20 A. A 30 A Sony VTC4 board, designed for a capacity of two thousand 100 A/h, will be able to ensure operation without shutdown. Of the 20 amperes, the Sanyo UR18650NSX is suitable, receiving energy 2600A/h. The board is needed for three parts, which is marked in the 3S systematization. With all this, the board must have two contacts, plus and minus. If the terminals are marked with the signs P-, P, C-, they were created for later models of screwdrivers.
READ How to cut plastic at home
A step-by-step summary of converting screwdriver to lithium batteries looks like this.
- disassemble the battery using glue if you tap the joint while holding it with a soft-headed hammer. The direction of the blow is downward, into the joint along the lower part of the body.
- Take only the contact plates from the old assembly, carefully disconnecting them from the battery. The sensor and breaker must be thrown.
- Solder three elements one by one using TAGS flux and insulated jumpers. The wire cross-section must be greater than 0.75 mm2.
- Assemble the circuit with the controller, and connect the power supply to the contact connectors with 1.5 square wires.
- Check the functionality of the circuit and assemble the body, again placing it on glue.
In a screwdriver with an old DC9710 charger, after the lithium battery has finished charging eighteen thousand 600 50, the reddish LED on the panel will turn off. The charge level is monitored by an integrated controller.
The Makita DC1414 T charger is used to charge 7.2-14.4 V power supplies. While charging is in progress, a reddish light glows. But when charging a lithium battery, its voltage does not fit into the standards of salt products, and after twelve V the charger will begin to blink reddish and greenish. But there is already a suitable charger. The screwdriver is ready for use.
How to charge a screwdriver battery without a charger
It often happens that the original charger breaks down and they cannot recharge the screwdriver. In such situations, you have to use other methods of recharging the battery at home.
Via USB
Some types of screwdrivers are initially equipped with a USB input for charging.
If you urgently need to replenish the battery capacity, you can use an external charger that connects via a USB port. It is necessary to use devices that are designed for a current of 5-7 A. However, before doing this, you must independently equip the screwdriver with a USB connector. This is done as follows:
- Remove the battery and separate the housing sections.
- Cut a special hole in the case to install a USB port.
- Insert a 10 A fuse into the circuit that connects the USB connector and the standard charging controller. It is attached with hot-melt adhesive.
- Carry out test charging.
To get a full charge from the installed USB port, you will need to wait at least 12 hours.
Important! You only need to install USB in a screwdriver yourself if you have good knowledge in the field of electronics.
Using a car charger
A car charger is a device that can be used to charge tools.
Some people try to use car chargers and connect a screwdriver to them. However, you shouldn’t do this right away. The fact is that such chargers are designed to service car batteries with a voltage of 12 Volts. If you connect them to a screwdriver, the tool may break. Therefore, it is necessary to ensure that the charging parameters meet all requirements in advance.
If the device has a stepless current regulator, it must be used to set parameters that correspond to the standard unit. To reduce the load, you can use ballast resistance.
There are situations when it is not possible to find out accurate information about the optimal parameters. In this case, it is necessary to set the current to 50% of the nominal values. The voltage level is kept to a minimum. It is also necessary to determine the polarity of the battery. This can be done using a test device.
Additional Information! On average, charging a Li Ion battery takes about 3-4 hours.
Universal chargers
The universal charger is ideal for recharging screwdrivers and other frequently used tools.
The most common way to quickly recharge a screwdriver is to use a universal charger. Such devices are equipped with special step regulators, with which you can adjust the current and voltage at the output.
Also, many such memory devices are equipped with indicators to monitor the process. With their help, it is possible to understand how much the battery has been charged.
Additional Information! If the universal charger model you are using allows you to change the type of battery, you must select the appropriate type. This will greatly speed up the process of recharging a dead screwdriver.
Using an external power source
Fuses are elements that are installed in each charger.
Using this method implies that the tool will be connected to the charger or machine battery using cables. In this case, the connected power source must fully comply with the optimal characteristics of the screwdriver motor. This will prevent the blog from overheating while charging.
There must be a fuse in the power circuit, the rating of which depends on the operating voltage. For example, if the power is about two hundred watts, an 11 A fuse is installed in a circuit with a voltage of 18 V. A higher rating should not be used, as this may lead to damage to the tool.
Converting an Interskol screwdriver to 18650 lithium batteries
At some point, the nickel-cadmium assembly of fifteen cans fails. One or two elements have become lazy, and it is no longer possible to obtain voltage at the output. Modern Interskol DS with lithium batteries serve even better. converting a screwdriver to eighteen-volt lithium batteries.
You need to purchase a protection board for 5S, 3.7 V and 40-50 A. You will need a balancing board and the energy sources themselves: 5 lithium 18650 batteries, you can throw them in with factory thermistors by lengthening the wires. During installation, make a contact pad, insert the assembly, check the functionality, and secure it. Assembly features and expert advice are carefully given in. Here is complete information about converting an 18-volt lithium screwdriver
How to convert a screwdriver to mains power
Almost every home craftsman has a screwdriver . With its help, you can do a lot of homework. Many models are autonomous, as they are powered by batteries. However, over time, you have to convert the cordless screwdriver into a mains-powered one, so as not to depend on the charge level of the power supply.
READ How to unscrew a small screw without a screwdriver
Using a car charger for a 220V screwdriver
The basic principle of working with the device is the correct supply of cables and proper configuration of the power supply equipment. The emerging compact pulse chargers have forced the old linear devices with an analog operating principle out of the market and brought down the price. Moreover, the latter have convenient manual adjustment of voltage and charge current.
You can purchase such a device on the market or online for a low cost. It is enough to connect extended cables from the instrument to it. Instead of the battery, you will have to remove the contacts with alligator clips. A minimum of work will be required from the user.
Preparatory operations
Before you turn a cordless screwdriver into a device that operates from an outlet, you should choose the optimal power supply for its dimensions. The most acceptable option is to choose an attachment that can easily fit inside the case instead of old cans. It will look aesthetically pleasing and safe.
The external and internal parameters of the housing for the battery may differ due to stiffening ribs, mounting bosses and other structural parts made of plastic. If necessary, excess space delimiters can be removed as unnecessary.
We study the markings indicated on the tool body to determine the required electrical parameters. Most often, you need to power the screwdriver from a 12 V source. If higher voltage is needed, the search and assembly of suitable sources may take a long time.
It is quite simple to calculate the required amperage for a device if it is not indicated on the labeling. The formula used for this is:
The product of voltage and current gives power.
How to convert a screwdriver to be powered by charging a laptop
This option is the most acceptable, since it requires minimal knowledge of electrical engineering from the user. You can find a similar power supply on the radio market or through advertisements on the Internet. The main thing is that it provides the necessary parameters. They can be read on the back of the device. An interval of 12-19 Volts would be suitable.
We remove all the cans from the battery case. We make sure not to break the contacts on the case. Cut off the output plug from the computer charger. We clean the wiring and solder in accordance with “” and “-”.
Charger laptop power supply
In a more labor-intensive version, converting a cordless screwdriver to a mains-powered one involves removing the board from the charger and transferring it to a case freed from the battery. We recommend soldering the ends rather than tying and insulating them, as this type of connection will be more durable and will not create problems in the future.
READ How to Disassemble a Screwdriver Chuck Video
If the network experiences power surges, there can be large losses. It is better to choose a cable with a cross-section of 2.5 mm and a length of no more than a meter.
Homemade charger for lithium-ion batteries of a screwdriver
In a previous article, I considered the issue of replacing nickel-cadmium (nickel-manganese) NiCd (NiMn) screwdriver batteries with lithium ones. You need to consider several rules for charging batteries.
Lithium ion batteries of size eighteen thousand 600 50 can generally be charged to a voltage of 4.20V per cell with a permissible deviation of no more than 50 mV, since an increase in voltage can damage the battery structure. The battery charge current can be 0.1xC to 1xC (here C-capacity). It is better to select these values according to the datasheet. I used Samsung batteries INR18650-30Q 3000mAh 15A in remaking the screwdriver. We look at the datasheet - the charging current is 1.5A.
It would be more correct to charge lithium batteries in two steps using the CCCV method (constant current, constant voltage).
Stage 1 - must provide a constant charge current. The current value is 0.2-0.5C. I used a battery with a capacity of three thousand mAh, which means the nominal charge current will be 600-1500 mA. After the can is charged at a constant voltage, the current is constantly miniaturized.
The battery voltage is maintained within the range of 4.15-4.25V. Battery
charged if the current decreases to 0.05-0.01C. Taking into account the above, we use electrical boards from Aliexpress. Step-down CC/CV board with current limitation on the XL4015E1 chip or LM2596. The XL4015E1 board is preferable because it is more convenient to configure.
Properties of XL4015E1. The highest output current is up to 5 A. Output voltage: 0.8 V-30 V. Input voltage 5 V-32 V. The LM2596 board has similar characteristics, only a current of up to three A.
List of tools and materials.
-adapter 220\12 V, three A.1pcs; - standard screwdriver charger (or power supply); -CC/CV charge board for XL4015E1 or LM2596.1pcs; - connecting wires. soldering iron; -tester; - plastic box for charge board. 1 piece; -minivoltmeter 1 piece; -variable resistor (potentiometer) 10-20 kOhm. 1 piece; -power connector for the battery compartment of the screwdriver .1 pc.
READ How to Cut a Countertop for a Sink
Step one
.
Assembling a screwdriver battery charger on an adapter.
We have already chosen the cccv board above. As a power source, you can use any one with the following parameters - output voltage not lower than eighteen V (for a 4S circuit), current three A. In the first example of making a charger for lithium-ion batteries of a screwdriver, I used a twelve V, three A adapter.
First, I checked what current it can produce at the rated load. I connected a car lamp to the output and waited half an hour. It produces 1.9 A freely without overload. I also measured the temperature on the radiator of the transistor - 40C. Quite normal mode.
But in this case there is not enough tension. This can be easily fixed using just one cheap radio component - a variable resistor (potentiometer) of 10-20 kOhm. Let's look at a typical adapter circuit.
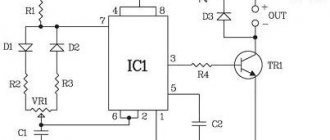
There is a controlled zener diode TL431 in the diagram; it is located in the feedback circuit. Its task is to maintain a stable output voltage in accordance with the load. Through a divider of two resistors, it is connected to the positive output of the adapter. We need to solder to the resistor (or unsolder it completely and solder it in its place, then the voltage will be regulated downwards) which is connected to pin one of the TL431 zener diode and a variable resistor to the negative bus. Rotate the potentiometer axis and set the desired voltage. In my case, I set it to eighteen V (small margin from 16.8 V for drop on the CC/CV board). If the voltage indicated on the housings of the electrolytic capacitors located at the output of the circuit is greater than the new voltage, they may explode. Then you need to replace them with a 30% voltage reserve.
Next, we connect the charge control board to the adapter. We set the voltage on the board with a trimmer resistor to 16.8 V. With another trimmer resistor we set the current to 1.5 A, and first connect the tester in ammeter mode to the output of the board. Now you can connect the lithium-ion screwdriver assembly. Charging went well, the current dropped to a minimum at the end of the charge, and the battery was charged. The temperature on the adapter was between 40-43C, which is quite normal. In the future, you can drill holes in the adapter body to improve ventilation (especially in the summer).
The end of the battery charge can be seen by the LED on the board on the XL4015E1 turning on. In this example, I used another LM2596 board in the same way that I accidentally burned the XL4015E1 during experiments. I advise you to do better charging on the XL4015E1 board.
Step two
.
screwdriver battery charger circuit using a standard charger.
I had a standard charger from another screwdriver. It is designed to charge nickel-manganese batteries. The task was to charge both nickel-manganese and lithium-ion batteries.
This was solved simply - I soldered the wires to the CC/CV board to the output wires (red plus, black minus). The no-load voltage at the output of the standard charger was twenty-seven V, this is quite suitable for our charging board. Further everything is the same as in the version with the adapter.
We can see the end of charging here by the change in the color of the LED (switched from red to green).
I placed the CC/CV board itself in a suitable plastic box, bringing the wires out.
If you have a standard charger on a transformer, then you can connect the CC/CV board after the diode bridge of the rectifier.
The method of converting the adapter can be done by beginners and can be useful for other purposes; as a result, we get a budget unit for powering various devices.
Sources:
https://usamodelkina.ru/12191-samodelnoe-zarjadnoe-ustrojstvo-dlja-litij-ionnyh-akkumuljatorov-shurupoverta.html
Converting an 18 V Screwdriver to Mains Power
How to convert a cordless screwdriver into a corded one - options for craftsmen
When the batteries stop working, some people wonder how to convert a cordless screwdriver into a corded one. It is impossible to repair batteries with damaged elements.
The price of new power supplies is almost equal to the cost of a screwdriver. It is rarely possible to find suitable elements; models are often discontinued.
But for caring and experienced owners, of course, the solution is to power the screwdriver from the network.
The converted instrument has one drawback: it is tied to an outlet. However, for indoor work this is not so significant. But there are more than just advantages. Now there will be no hassle about recharging the battery, there will be no downtime in the work. The current strength always remains measured and does not depend on the discharge of the battery, this means that the torque is always constant.
While you go looking for a power supply unit (hereinafter referred to as PSU), study the characteristics of the screwdriver, which are indicated on the case or in the passport. Look at the tension. A 12-volt tool is more common; finding a power supply for it will not be difficult.
If the tension is not easy, the search will certainly drag on. You need to know the current consumption, which is not indicated in the technical specifications. The purchased unit must produce an average current value (between the battery capacity and the standard charger). The data is obtained from the markings.
There are two main options for converting a 220-volt cordless screwdriver. The first is the process of using an external power supply.
Any rectifier capable of delivering the required constant voltage will do. Even if it is big and massive, there is no obstacle. After all, you don’t need to carry it around the room.
The block is installed near the outlet, and the cord to the instrument is made to the required length.
Remember that as the voltage decreases, the current increases if the power remains constant. This means that the cross-section of the low-voltage cord must be made more simple than from a 220 V network.
The second option is that the power supply is mounted in a housing from the battery. The only obstacle in the process of choosing such a method is usually the size of the transformer.
Mobility is maintained, the radius of use depends on the length of the power cord.
It is important to remember that the instrument is supplied with power , so the cord is reliable, and the input itself is made neatly and painstakingly insulated.
For an external source, available power supplies are used:
- charger
for car batteries; - PSU from an old computer;
- laptop charging;
- homemade power supply.
Converting a screwdriver to a network one
In the trade, of course, it’s cheap to buy an old charger. Nowadays, pulse chargers are mainly used, and old devices are often sold as unnecessary.
This particular charger, with the ability to manually adjust voltage and current, is perfectly suitable for any screwdriver, regardless of its operating voltage.
The whole modification consists of connecting a low-voltage cord to the output contacts of the charger.
The computer power supply is purchased from older models; it may have a shutdown button. It will not be useful, but this is exactly the version of the AT format that is needed.
On the radio market, a unit with a power of 300–350 watts is selected, which will ensure reliable operation of low- and medium-power screwdrivers. What remains for our client to do is the technical properties are indicated on the sticker on the case. The unit has a cooling fan and overload protection.
To convert a computer power supply at home into an external one for a screwdriver, we perform simple operations:
- disassemble the body;
- on the large square connector we find a greenish wire and at least some dark one;
- we connect both wires to each other and insulate them;
- on the other smallest connector we remove the wires to our client, leaving yellowish and dark;
- We solder a low voltage cable cord into the apartment.
To maintain polarity, you need to know: the yellowish wire is positive, the dark wire is negative. The tool operates with a voltage of up to 14 Volts from a computer power supply.
We power the screwdriver 18V from an ATX power supply
We power the screwdriver 18V
from an ATX
power supply
. I offer it to all owners of screwdrivers, usually those that have come out.
Converting a cordless screwdriver to a 220V network in homemade conditions
power unit
for
alteration
. AUTO ELECTRONICS-HERE-KITS.
Most laptop chargers have properties that allow them to be used as a power source for a screwdriver
. Chargers with an output voltage of 12–19 Volts are suitable. The only configurations that will need to be made are related to the output plug. It should be cut off, the wires should be stripped, and a cable of suitable length should be soldered into this list.
Persons who have an understanding of electrical engineering can make a homemade power supply. Its circuit is quite ordinary and includes a step-down transformer, a diode rectifier and two capacitors.
Our client is left with the parts they buy, as they call it, taken from old radio equipment. A transformer from a tube TV with an output of 24–30 V is suitable. The presence of a rectifying diode bridge is a must.
The capacitors used are not in short supply, from old equipment: one is 0.1 µF and the other is electrolytic at 4700 µF.
Attention! The structure must be enclosed in a housing. To protect against short circuits, it is imperative to install fuses at the input and output.
The mains power supply for the screwdriver is, of course, placed in the battery housing, as it is also called in the handle. Possible options:
- any PSU suitable in terms of features and size;
- Chinese 24 V power supply;
- homemade.
A power supply with suitable parameters is selected on the radio market. At home, you should carefully remove it from the case and place it in your own screwdriver, firmly securing it; all that remains for our client to do is to make the components.
If the wires are short, lengthen them so that they do not touch the iron parts. Place the transformer and the board separately. For better cooling, install additional radiators on the microcircuits.
It would also be a good idea to have holes in the housing to allow air to circulate and heat to be removed during operation.
Converting a cordless screwdriver to a corded one
In a radio parts store we buy a 24 V power supply, current 9 A. Screwdrivers operate on 12 or 18 Volts, so the task is to reduce the voltage to the required level.
To perform such work, little knowledge of radio engineering is required. The output voltage is maintained by resistor R10 with a nominal value of 2320 Ohms. Instead, you should install a 10 kOhm trimmer resistor.
How to configure the power supply is described below:
- remove the permanent resistor;
- set the resistance of the trimming resistor to 2300 Ohms for the device;
- solder the tuning resistor to the unchanged area;
- With the power supply turned on, adjust the voltage.
The design of a homemade power supply will be based on a 60 W Feron or Taschibra electrical transformer. You can buy them at an electrical goods store; they are designed for halogen lamps.
They do not require any modification. The removal of the secondary winding from the middle point made it possible to use two Schottky diodes instead of the usual 4. The operation of the power supply is controlled by the HL1 LED.
The diagram shows our client the necessary details.
Transformer T1 is wound independently. A non-scarce ferrite ring NM2000 with dimensions 28×16×9 is used. Before winding, the corners are cleaned with a file, and the ring is wrapped with FUM tape. The manufactured block is installed on a 3 mm wide duralumin plate and not simply placed in the battery housing. It also performs the common wire function.
Operational reliability and safety depend on the reliability of the installation of the electronic part. A soft multi-core cable is used as a network and low-voltage cable. If the device is outdoor, the ends of the cable should be connected to its terminals.
We treat copper wiring and brass contacts with soldering acid, then they are simply soldered. Almost often special clips are used - alligator clips.
In the screwdriver itself, there is no way to do without soldering; the crocodiles do not hold so well that the contacts do not become disconnected during operation.
Making battery-based power supply
The best option is to use an old battery case. It is disassembled and the entire interior is removed. In this case, harmful substances are released, take care to protect the respiratory tract and skin. The body is washed with soda, running water and dried. On the inside of the contacts, solder the ends of the cable, observing polarity.
So as not to guess, we temporarily connect the cable, turn on the screwdriver and see in which direction the spindle turns, mark the wires. We make a hole in the bottom of the case and pass the wires through. Inside the case, the cord should be firmly fixed by wrapping insulating tape there. This thickening will prevent the wiring from stretching and breaking.
Then we solder the ends to the contacts.
We place a counterweight inside the body. The best material would be compressed rubber. It has the necessary features: the highest density, insulating qualities. So that the rubber does not dangle inside, we cut it out with a small overlap. To place the counterweight in the body, we bend the material a little and place it so that it will not oscillate and will serve as additional insulation.
To some of you, the counterweight may seem unnecessary, but not to that extent. The design of the screwdriver provides that the center of mass is in the handle. This loads the arm, but relieves the hand. When batteries are removed from the body, the center of mass shifts, increasing the load on the hand. Work becomes awkward and difficult. A homemade counterweight restores the center of mass close to the factory one.
Have you seen how easy it is to recycle a cordless screwdriver
online. The practice of craftsmen gave a hint of ordinary and useful tips for operation:
- after 20 minutes of work, you should give the screwdriver a five-minute rest;
- Fix the electronic cable on your hand so that it does not interfere with work;
- The power supply should be frequently cleaned of dust;
- do not use extension cords to connect the power supply to the network;
- The power supply must be grounded;
- It is prohibited to use corded screwdrivers when working at heights.
Compliance with these rules will extend the life of the refreshed instrument. Mobility has been lost a little, but the unit does not require recharging and works smoothly and confidently.
Source: https://vdiweb.ru/peredelka-shurupoverta-18-v-na-setevoe-pitanie/