How to check the battery for a screwdriver yourself using a multimeter? This question is often asked by the owners of the named tool when they notice that the charge is being used up too quickly. Typically, the battery life is no more than three years. If it is used very rarely or improperly, the operating time is noticeably reduced.
What does the battery consist of?
The internal structure of the battery of any screwdriver, regardless of the country of origin, is absolutely identical. If you disassemble a plastic block, there are always “cans” inside, assembled in a certain sequence. The battery voltage indicator as a whole is added up based on the U level that each battery has individually. The battery also has four contacts, two of which provide charge-discharge cycles, the third is connected to a temperature sensor, and the fourth, which has a service purpose, is responsible for equalizing the charge potential in all batteries.
So, the interconnected “banks” of a power tool battery are nothing more than a constant current source in which chemical reactions are constantly converted into electricity. This is how the battery releases its accumulated energy into the circuit. And when it charges, the process occurs in the opposite direction: the battery simply takes energy from the network.
Repair of the charger of a cordless drill (screwdriver)
The charger of cordless drills and screwdrivers fails quite often. There is no point in repairing them in workshops. Repairs will be more expensive than a new charger. And in some cases it is comparable to the price of a new screwdriver. Therefore, in this article we will describe an elementary breakdown that any user can fix with a minimum of tools.
So, we have a charger. It shows no signs of life:
Let's turn it over. Unscrew all the screws:
Remove the cover. We see two more screws that secure the board. Unscrew them too:
First of all, we check the transformer. Using a tester, we measure the voltage at its output:
There is no voltage, as can be seen in the photo. Nicknamed the network cable to prevent it from breaking. We check the secondary and primary windings with a tester. We see that the primary winding is broken. A new transformer costs the same as the charger. The domestic analogue is half the price. But don't rush to buy a new part. In imported transformers, there is a fuse in the primary winding. Remove the shell. Here was a 2A fuse:
We unsolder it and check it. Lucky, he's in a cliff. We take any fuse suitable in size and current:
Solder it into place:
We isolate it using any available means. It is most convenient to use hot melt glue:
While the charger has not been assembled, let’s check it:
We assemble in reverse order. Control check:
Instead of soldering a fuse every time, you can buy a connector for a domestic fuse, drill a hole in the case and bring it out. Then, in the future, replacement will be a matter of seconds, but repairing the charging screwdriver will take longer. If you don’t urgently need the device, as in our case, then take your time. Do everything once and for all. After all, if the fuse is sealed and burns out again, you will have to repeat the repair procedure from the very beginning.
muzhik-v-dome.ru
General recommendations before checking the battery
Before you check the screwdriver battery with a multimeter for possible faults, you should remind yourself that the nickel-cadmium batteries installed in most power tools have a so-called “memory effect”. Briefly, its essence is that due to frequent and irregular recharging, the capacity of the battery “cans” decreases, and the battery does not use its resource to its fullest.
Before testing the battery, it should be fully charged so that the readings taken by the tester are as accurate as possible. Keep in mind that testing will be optimally accurate if it is carried out under load. It is for this that the battery will need a sufficient amount of charge.
The set of tools you will need is simple:
- tester (or multimeter);
- screwdriver;
- knife;
- soldering iron;
- pliers.
First stage of testing
Checking the screwdriver battery at the first stage is the simplest; current and voltage readings are taken from the battery while it is charging.
Readings are taken several times, at certain time intervals:
- 30 minutes after charging has started, U will be about 13 volts ;
- another 30 minutes U will increase to 13.5 volts ;
- two hours after the start of the process - 14 volts ;
- a fully charged battery will produce a voltage of 17 volts .
As for the increase in current (amperage) during charging, if the operating condition of the battery is in order, then the current increases steadily during the first hour. In addition to the voltage, measure the current an hour after the start of the process. If the indicator has passed the “mark” of 1 ampere, your battery is in good health and does not need to be disassembled and repaired.
Repair and spare parts for a screwdriver: charger diagram and causes of failure
Perhaps the most popular tool for any home craftsman is a screwdriver. But this device, like any other, sometimes breaks down. If this happens, then in some cases you can replace the screwdriver with an electric drill. But if the work cannot be done with a drill, then you need to take the screwdriver to the service center so that the technicians can repair the device. But this may take a lot of time and also cost money. Therefore, it makes sense to try to repair the screwdriver yourself.
Before you begin repair work, you need to get acquainted with the design of this tool and determine the elements that will be required to repair the screwdriver, among them:
- clamps;
- multimeter;
- required spare part.
- sandpaper.
Standard screwdriver design
The main element is the start button; it performs a number of functions: turning on the power supply and the engine speed controller. If you press the button all the way, the power supply circuit of the electric motor is closed, resulting in maximum power. The number of revolutions in this case will also be maximum. The device contains an electrical regulator consisting of a PWM generator. This element is located on the board.
The contact placed on the button will move along the board based on pressure on the button. The level of the pulse supplied to the key depends on the location of the element. A field-effect transistor acts as a key. The operating principle will be as follows: the harder you press the button, the higher the pulse value on the transistor and the greater the voltage on the motor.
Reversing the rotation of the motor occurs by changing the polarity at the terminals. This process occurs using contacts that are switched using a reverse handle.
As a rule, screwdrivers contain commutator single-phase DC motors. They are quite reliable and very easy to maintain. A standard screwdriver consists of the following elements:
- frame;
- brushes;
- anchor;
- magnets.
The gear system converts high rotations of the motor shaft into chuck rotations. Screwdrivers use classic or planetary gearboxes. The first ones are installed very rarely. Planetary gearboxes consist of the following parts:
- sun gear;
- ring gear;
- carrier;
- satellites.
The sun gear works with the help of the armature shaft, its teeth activate the satellites that rotate the carrier.
A special regulator is installed to regulate the force with which it is applied to the screw. Typically, there are 15 adjustment positions.
Electrical breakdowns
The main signs of spare parts failure in this case are:
- impossibility of adjusting the number of revolutions;
- inability to switch to reverse mode;
- charger failure;
- The screwdriver does not turn on.
First you need to check the tool's battery. If the screwdriver was set to charge, but this did not produce results, then you need to prepare a multimeter and try to determine the breakdown using it.
First you need to measure the battery voltage. This value must correspond approximately to the one written on the case. If the voltage is low, then you need to determine the faulty part: charger or battery. Why do you need a multimeter? We plug this device into the network, then measure the voltage at the terminals at idle. It must be several volts higher than indicated on the design. If there is no voltage, then you need to repair the charger.
Charger repair
A very common problem when working with a screwdriver is the rapid discharge of the battery. The reason is either the battery is worn out or the charging is not working properly. Let's tell you in more detail about repairing the charger. For example, we will use a BOSCH AL 60DV charger - this device is used in conjunction with nickel-cadmium batteries.
As a rule, all chargers, like most spare parts, are not original, and they are made not in Germany or Switzerland, but in China. But there is nothing wrong with this; the quality usually meets the standard.
BOSCH three-pin connector: one control connector and two power connectors.
Most often, this situation occurs - the battery is installed in the charger - but the charging process ends literally after a few minutes, and the battery is discharged and the charger stops.
To understand the problem and find the faulty spare part, you need to disassemble the charger. Unscrew the four screws at the bottom and open the case. In the case, in one compartment there is an alternating voltage transformer, and in the other there is a rectifier circuit with power connectors and a control chip.
Then we plug in the charger and measure the current strength on the transformer - if everything is normal, then we proceed to the next procedure.
There is no need to touch the control chip and rectifier; they are most likely fine. Let's move on to the contact group - one control contact and two power contacts. To determine what the problem may be, we need to measure the current at the power terminals when the charge is operating. Why do we solder a thin wire to all contacts - so that we can measure the voltage during charging.
It is advisable to use several colors of wires in this circuit and solder them plus and minus accordingly. Then we assemble the charger and use a multimeter to test the current strength at the terminals during charging.
If the current on the device is unstable and ranges from 3-4 to 14-18 volts. Moreover, if you move the battery, the contact disappears. This is where the reason lies - during the operation of the device - the terminals bend and poor contact leads to unstable charging of the screwdriver battery.
That is, it is clear that an unstable contact disrupts the operation of the charging logic - especially the third contact, the control one, which is responsible for how much current is supplied to the terminals. It cannot be closed, since there is a thermistor inside the circuit of any battery and its resistance changes taking into account the temperature of the spare parts inside the battery. That's right, it protects the battery from overheating and overcharging at the same time. But in this case there is a way out. We again disassemble the charging, bend the terminals, then use a multimeter to monitor the charging process - the current strength at the terminals will gradually increase and then decrease, and the indicator light on the charging is an additional indicator of operation.
The rate of increase in current at the terminals indicates another important factor - battery wear. If the current increases very quickly and reaches 18-19 volts, then the battery is in normal condition. When the battery slowly accepts charging, there is a high probability that some part of the battery is no longer usable and needs to be replaced.
Thus, after the contact between the charger and the battery is restored, we see a normal charging process. If the charging seat is loose, then you need to fix the battery in the required position using electrical tape. We recommend leaving the wires that were soldered for indication; using them, it is very easy to determine which part is faulty, the battery or charger.
Battery repair
If the battery is faulty, then you need to disassemble the unit and carefully inspect all places for the quality of fastening of the wires. If there are no damaged fasteners, then it is necessary to measure the current strength with a multimeter on each element. It must be 0.8-1.1 volts or higher. If there is a spare part with less current, it must be replaced. The type and capacity of the element must necessarily correspond to the installed elements.
If the charger and battery are working properly, but the screwdriver still does not work, then you need to disassemble this device. There are several wires coming out of the battery terminals; you need to take a multimeter and measure the current at the input of the button. If it is present, then you need to remove the battery and short-circuit the wires from it using clamps. The multimeter should determine the resistance, which should tend to zero. In this case, this spare part is working properly, the problem is in the brushes or other elements. If the resistance is different, then the button will need to be changed. To repair a button, sometimes it is enough to clean the contacts on the terminals with sandpaper. You also need to check the reverse spare part. Repair occurs by cleaning the contacts.
Mechanical failure
You need to check the quality of the armature windings, since this spare part can be bought and replaced with your own hands. To check the armature, you need to measure the resistance on the collector plates located nearby. The value must tend to zero. If during the inspection plates with a resistance different from zero are found, then it is necessary to repair the armature spare part or replace it.
Mechanical failures are determined as follows:
- The screwdriver vibrates a lot during operation.
- The screwdriver makes strange noises during operation.
- The screwdriver turns on, but it cannot work due to jamming.
- Strikes the chuck clamp.
If the screwdriver makes extraneous noise during operation, this means that the bearing or bushings are worn out. To fix this, you need to disassemble the engine, then check the wear level of the bushing and the integrity of the bearing. The anchor must spin freely, there should be no distortions or friction. These devices can be purchased at the store and you can replace the spare part yourself.
The most common gearbox design malfunctions include the following:
- a break in the pin where the satellite is attached;
- gear abrasion;
- shaft malfunction.
In all cases, it is necessary to replace the faulty spare part of the gearbox. All the steps described above must be performed very carefully. Disassembling the screwdriver must be done in a clear sequence, as some of the spare parts may be lost. Anyone can repair a screwdriver on their own; you just need to correctly identify the broken part.
- Author: Nikolay Ivanovich Matveev
stanok.guru
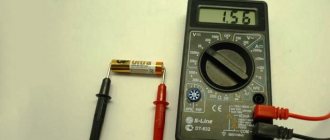
Express testing method: measure U at the battery poles
This method is even simpler, but with its help you can get an initial idea of whether the battery is ok. If we measure U without connecting a load, we get an indicator equal to the “idle speed” of the tool.
For example, if we have 12 cells in the battery with a voltage of 1.2 volts each, and the operating U is 14.4 volts, the “idle” U will increase to 17 volts. If the “idle” voltage is less than specified, this means that there are “banks” in the combination that have failed and need to be replaced. Also, a decrease in idle voltage may mean that the battery is not fully charged.
Checking performance under load
This means that we will check how long it will take for the screwdriver battery to be completely discharged if an additional load is connected to it - for example, a light bulb.
The load level must be selected based on the power of the battery. If it is not indicated in the operating instructions, it should be calculated independently. It will be equal to half the current supplied by the battery during operation, multiplied by U of the current source. Typically this figure is from 35 to 40 Watts, which means that the load can be a headlight from a 35 Watt car, or a 12-volt light bulb.
To take readings, the battery must be connected to the lamp via an ammeter, and the readings themselves must be taken with a voltmeter. The connection time is two to three minutes, after which we measure U. If it is less than 12.4 volts, some “can” is definitely out of order. A significant decrease in the brightness of the light bulb may also indicate a battery malfunction. If it goes out quickly within two to three minutes, the battery is clearly not in order and its capacity is very low.
Checking the elements in a disassembled battery
So, if preliminary testing has shown that the screwdriver may have faulty elements, the battery should be carefully disassembled and the batteries unsuitable for operation should be identified. As already mentioned, the normal voltage of each battery individually should be 1.2 volts. If this indicator is less, the “can” is carefully removed from the chain using pliers. It also doesn’t hurt to carefully inspect the entire bunch for external damage: rust, leakage of electrolyte.
If the voltage on all “banks individually” is within normal limits, you need to use load testing again, checking the level of internal resistance. This value is determined as follows: the voltage is divided by the current, and then the load resistance is subtracted from it.
To find out the voltage, immediately connect the load. This time you should use a resistor with a power of 25 watts and a resistance of 10 ohms . We check each battery, measuring the operating current and U.
The calculations should be something like this: let’s say, when taking measurements under load, we got the operating voltage of one element to be 1.19 volts and the current to be 112 milliamps. Before calculating, it is necessary to convert milliamps to amperes. It turns out 0.112 amperes, therefore: divide 1.19 by 0.112 and subtract the resistance of 10 ohms. The result is a value of 0.63 Ohm - this means that the indicator is normal.
Checking the performance of a screwdriver battery yourself using a multimeter is a useful skill that allows you to find out whether the battery needs repair or complete replacement of the batteries. Measurements of voltage indicators in general, without disassembling the battery pack, should be carried out from time to time. This will help to avoid sudden failure of the tool and eliminate the malfunction in time. Also, to avoid the accumulation of “memory effect”, do not neglect to fully charge your battery. This will help avoid premature loss of its capacity.
How to use a multimeter to check the battery of a screwdriver
Many people do not know how to check the battery of a screwdriver. There are several ways to do this.
Test under load
A car headlight bulb is used to create a load on the battery.
If a person needs to figure out how quickly the drive will discharge, it will have to be tested under maximum load. Its power is equal to half the current supplied by the battery. Most often this value is about 30-40 W. Therefore, to create a load, you can use a regular car headlight lamp.
When taking measurements, the battery is connected to the load source using an ammeter. To measure the readings, you need to use a voltmeter. The battery turns on for 3-4 minutes. During its operation, the voltage should not fall below 12.4 V.
Important! If the reading fluctuates, the battery is partially damaged and will discharge quickly.
Checking the drive's batteries
A breakdown of the battery bank often leads to deterioration in battery performance.
If the preliminary checks reveal faulty components, you will have to disassemble the battery and remove all the main batteries. Perhaps one of them has failed and it is because of this that the performance of the battery has deteriorated.
First you need to carefully inspect the connections. Quite often they become damaged, which leads to a general decrease in battery parameters. If visually everything is in order, you need to ring the “banks”. The voltage of these elements should not fall below 1.2 V.
Checking by resistance value
You can check the performance of the battery by comparing the internal resistance of the “cans”. To find out this value, you will have to divide the voltage by the current and subtract the load resistance.
It is recommended to use a 10 ohm resistor for the load. If the resulting value is less than 1 ohm, then the battery is functioning normally.
How to measure capacitance
Capacitance tester is used to accurately determine battery capacity
To determine the actual battery capacity, you need to use special capacitance testers. During operation, such devices send probing pulses to the battery. When receiving a response signal, the tester analyzes them using the installed processor and makes the necessary calculations, as a result of which the real capacity can be found out. This information is displayed on the display.
Additional Information! Capacitance testers are very effective and allow you to quickly get the information you need. They must be kept connected to the battery for no longer than 15 seconds.
How to check leakage current
To find out the leakage current, you will have to use a multimeter. This is a universal device that can work as an ammeter, ohmmeter and voltmeter. To measure current leakage, you must perform the following sequence of actions:
- Set the multimeter ampere detection to 10 A.
- Break the circuit and connect a measuring device to the break point on the negative pole.
- Read the readings on the display.
Readings at 30-70 mA are considered normal.