Battery types
Based on design features, batteries are distinguished in the form of sliders and clips.
Screwdriver battery in the form of a slider
But these are minor differences compared to battery types. Both the slider and the clip are used in different types of batteries.
Screwdriver battery in the form of a clip
There are three types of batteries for screwdrivers:
- Nickel - cadmium (Ni-Cd).
- Nickel - metal hydride (Ni-Mh).
- Lithium - ion (Li-Ion).
Lithium polymer batteries (Li-Pol) are not produced for screwdrivers. Their main areas of application: smartphones, cell phones, tablets, laptops, radio-controlled devices, electric vehicles.
Nickel - cadmium batteries are the cheapest, charge quickly, and have more than a thousand charging cycles. The batteries are resistant to operation at low temperatures. But they have a memory effect. That is, they can be charged only after they are completely discharged, otherwise the capacity will drop. They have a high self-discharge current. They are made from toxic materials and are difficult to dispose of. These batteries are in greatest demand.
Nickel - metal hydride batteries are more expensive, non-toxic, and have a low memory effect. The self-discharge current is higher than nickel-cadmium. The capacity is higher, the charge cycle is more than five hundred. These batteries are less resistant to high discharge rates. They are less suitable for maximizing the power of the tool. They need to be constantly recharged.
Lithium ion batteries are more expensive, more powerful, and charge quickly. They have no memory effect. Low self-discharge current. The voltage of the battery cells is higher, so their number is smaller. Consequently, the dimensions and weight of such batteries are smaller than those of nickel ones. But they cannot be completely discharged, otherwise after several such cycles you will have to buy a new one. To improve the quality of lithium-ion batteries, manufacturers install a microcircuit in the case of the battery or screwdriver that controls the operation of the battery. A multi-level multi-stage protection is formed:
- From high temperature.
- From full discharge. These batteries are afraid of being completely discharged and cannot recover if the discharge is below the permissible norm.
- From short circuit.
- From overcharging, as an explosion may occur.
- From overload currents.
A control board installed in the battery case is more efficient. When the battery is kept separate from the screwdriver and is not in use, the microcircuit monitors its condition and, in case of any problems, opens the circuit. The battery is completely protected.
Review of lithium-ion battery with chip
Repacking screwdriver batteries
If one or more (or all) elements cannot be restored, you will have to resort to repacking the battery. This procedure is the replacement of faulty cans. In some cases, it is rational to completely assemble a battery from elements of a different type.
When partially replacing, all types of batteries are afraid of overheating, which can occur during soldering (especially incompetent soldering). But for Li-Ion elements, overheating can be critical - inside the cases, in addition to chemical reagents, there are safety devices (valve for releasing excess pressure, etc.), made mostly of plastic. If they are damaged under the influence of elevated temperatures, further operation will be dangerous. Therefore, to replace it, you need to take batteries with already installed connecting bars.
Li-Ion battery with connecting bars.
It’s even better to purchase ready-made battery assemblies. In this case, the soldering process is completely eliminated.
Ready assembly of 18650 batteries.
Complete or partial replacement of batteries
Rejected cells must be removed from the battery by cutting the connecting bars. Instead, you need to buy new cans. If the replacement is partial, then elements of the same type and the same capacity are purchased, otherwise problems with charging will arise - newly installed elements will always be either undercharged or overcharged compared to the rest of the banks.
In the case of a complete replacement, you can upgrade the battery - install elements of a different type or higher capacity (due to improvements in technology, it may turn out that this will not lead to an increase in size). If you decide to install cans of a different type, it is more rational to use lithium-ion batteries.
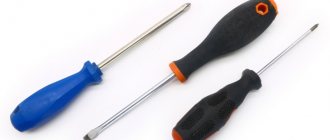
How to properly repair it yourself.
Be patient and start repairing.
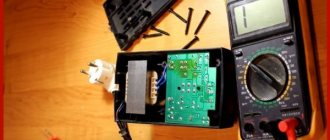
Let's disassemble the battery.
Disassemble the battery carefully. Do not use force to avoid damaging the housing.
- Remove the battery from the screwdriver. If the buttons are stuck and cannot be removed, unscrew the screws of the tool body and remove the top half. One of the buttons has become free. Pull the battery towards you, moving it slightly in different directions, and it will also come off. When you take the battery apart, position the buttons so that they press easily into their grooves.
- The battery case consists of two parts and can be dismounted or non-removable. In the first case, unscrew all the screws and separate both parts.
Collapsible battery case
Disassembling the battery using a knife
Video: How to disassemble a screwdriver battery
Inside there are several elements soldered in series. This cassette provides the necessary voltage and current characteristics for the battery. Some nickel batteries have a temperature sensor attached to the cells.
Nickel battery temperature sensor attached to cells
In lithium-ion batteries, everything is more complicated. There is a control board, and the elements are covered in a protective case or film.
Lithium ion battery
How to increase battery capacity.
A new battery must be fully charged before use. The average ambient temperature is from 10 to 40 degrees. The chargers have indicator lights. When they show that the battery is charged, you must immediately turn off the process.
- New nickel-cadmium batteries must be rocked before first use. Fully discharge and charge three times. The capacity will become maximum. If the instructions for the device say that the build-up should include a greater number of charge cycles, then follow these recommendations. During operation, fully discharge the battery before charging.
- Nickel metal hydride batteries have less memory effect, so they can be cycled once before first use.
- Lithium-ion batteries do not need to be pumped. They simply need to be charged to full power.
To discharge the battery, a load in the form of a 12-volt lamp is used. It is connected with crocodile clips to the terminals. If the battery is disassembled, then to the terminals of the serial battery circuit. The discharge process will take less than an hour.
Video: How to drain your battery
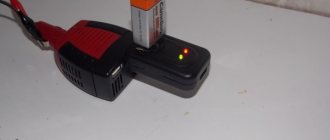
The second way to properly discharge is to use a “smart” charger like imax b6, which is very convenient for charging batteries. In it you can configure the current and voltage parameters for charging and discharging the battery. Set the automatic cycling mode to boost the battery. That is, you do not need to constantly monitor the capacity and voltage. The device will do this for you. Up to 5 cycles are provided. Moreover, at the end you will be able to see the current and voltage values after each cycle and analyze the result.
imax b6 charger
Video: Review of the imax b6 charger
Diagnostics.
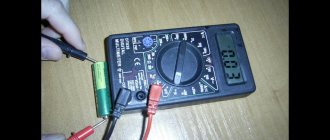
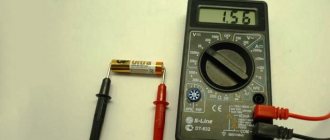
Once fully charged, disassemble the battery. Inspect the elements for swelling and oxidation. Use a multimeter or tester to measure the voltage of all elements. Voltage limits for different batteries:
- For nickel-cadmium 1.2 - 1.4 volts.
- For nickel-metal hydride 1.2 - 1.4 volts.
- For lithium-ion 3.6 - 3.8 volts.
Battery cans are wrapped in paper casing. The voltage is plotted on each element. If all banks have normal voltage, discharge the battery to half capacity. Measure the voltage again. Those elements whose voltage has decreased by 0.5 - 0.7 volts compared to the average must be restored or replaced. They say about such banks that they “leak”.
Video: How to check the battery condition
Why isn't it charging?
If the charger is normal, check the contacts between the battery and the charger. The charger's contacts may have become bent. Because of this, the battery does not charge. Disassemble the device and bend the terminals. The second reason may be a faulty or unsoldered temperature sensor. It needs to be soldered or replaced with a new one.
Charges and discharges quickly.
When the contacts of the battery, charger and tool become oxidized and dirty, the battery quickly charges and discharges. Clean contacts periodically.
Electrolyte boiling away.
Electrolyte boiling occurs due to accelerated charging and overcharging. If the cells are not swollen and show operating voltage after a full charge, they can be restored without replacement. It is necessary to replenish the empty volume with distilled water.
- After identifying the defective cans, cut the connecting metal tape. Unsolder the elements.
- Take a punch no more than 1 millimeter thick. Where the minus is on the can, make a hole in the body.
- Pump out up to 1 cubic centimeter of air and pour in the same amount of water.
- Seal the elements with epoxy resin and connect them to the circuit.
Read also: Do-it-yourself warehouse racks
If this method does not help, then replace the jars with new ones.
Video: Adding distilled water
Replacing and soldering batteries.
When you have carried out diagnostics and identified defective cans, you need to purchase replacements. New elements must match exactly in size and technical characteristics.
- Cut or unsolder the old elements from the plates.
- Put new ones in their place. For connection, use the same plates or copper conductors of the same cross-section.
- To prevent the cans from overheating, do the soldering quickly. Observe the polarity of the series circuit. Connect plus with minus, and minus with plus.
Soldering batteries
Video: Replacing elements in the battery
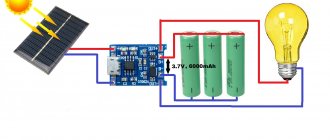
How to convert a screwdriver to use a lithium-ion battery.
Many owners of a screwdriver with a nickel-cadmium battery have encountered the problem that when they need to use it, the battery is always low. And constant charging kills it due to the memory effect. Therefore, such a battery is converted to lithium-ion.
The source of lithium batteries can be an old laptop battery or you can buy new ones. Laptops and new banks are unprotected. You cannot use them without protection, because you will not be able to charge them and control the discharge. And when recharged, they will die safely. It is allowed to connect absolutely identical batteries in parallel, then they will work as one unit. Purchase a battery protection module for series-connected batteries that monitors and takes care of each cell individually. Monitors voltage and current, provides short circuit protection. Such modules are available for one, two, three and four batteries.
Skip the talk about the benefits of screwdrivers, you can go straight to the topic. The battery or accumulator is the biggest concern for screwdriver owners. It is better to handle them strictly according to the instructions. In the event of a breakdown, there is only one solution - buy a new battery. But you can temporarily try to use the problem battery, for which a number of tips are offered here. We emphasize that repairing the battery is a temporary solution, but first you need to accurately investigate the causes of the malfunction.
Battery cell recovery
Here I will give a story from Master Sergei on the restoration of a nickel-cadmium screwdriver battery. The owner began to complain about the short operating time of the electric screwdriver and that “the battery doesn’t hold up.” Disassembling the battery case showed that there are factory Ni-Cd banks from Liang with a capacity of 1000 mAh.
You can restore a Ni-Cd battery in a fairly simple way. You need to do several deep discharge and charge cycles. In such extreme modes, hard-to-reach areas of battery charge accumulation begin to operate, the output of which has deteriorated due to the memory effect, violation of operating or storage conditions.
Such problems arise not only with screwdrivers. The battery-powered radio-controlled model industry has long ago solved the problems of automated discharge/charge. There are special chargers for this.
Master Sergey had a Vista Power AK610AC. This is a charger with a charge function of 90 W and a load discharge of 20 W. This is a wonderful professional device with a touch screen! This can be found on Avito for about 5,000 rubles.
Instead of such a charger, you can use something more Chinese, for example the popular IMAX B6 at a price of about 2000 rubles.
It is best to start cyclic battery recovery by deeply discharging the battery and then immediately charging it.
After the first cycle, the discharge capacity was 707 mAh, and the charging capacity was 879 mAh. As you can see, the capacity decreased by 30% relative to that declared by the manufacturer.
Read also: Aluminum cutting disc for grinder 125
The second discharge/charge cycle showed figures of 781 mAh / 937 mAh. As you can see, this is 10% more than the previous values.
The third battery recharge cycle showed minor deviations from the previous second recharge. So this is enough. If you see on your batteries that the capacity is increasing, then you can continue.
Upon restoration of the battery, it was possible to restore about 8% of the originally declared capacity of the screwdriver. In principle, not bad, but I would advise replacing the battery banks with new ones with a larger capacity.
Types of batteries and their differences
The power source for a hand tool should provide it with energy for at least half an hour of operation at moderate load or 10 minutes at full load. And at the same time, it can quickly restore its charge. Without these conditions being met, the tool loses all commercial meaning; people simply won’t buy it. Typically, the power of a screwdriver varies between 80-160 W.
Of all the types of batteries that the industry produces, only three types fit these criteria:
- Ni-Cd – nickel-cadmium;
- Ni-MH – nickel metal hydride;
- Li-ion – lithium-ion.
Nickel-cadmium appeared earlier than all the others and showed good performance properties. Such a battery has a voltage of 1.35 V ... 1.0 V. Here and further we denote the rated voltage first, and the voltage at the end of the discharge cycle last. Ni-Cd have a number of charge/discharge cycles ranging from 100 to 900, this depends on the quality of materials and operating mode. Ni-Cd is also characterized by very low internal resistance, they hardly heat up when charging, and are stored for a long time.
- “memory effect” interfering with operation.
- The toxicity of cadmium is a strong carcinogen.
Another type: nickel-metal hydride battery. These batteries have been proposed as a replacement for Ni-Cd. The justification was the disadvantages of traditional cadmium batteries. In theory, Ni-MH is good: it has a high energy intensity (up to 300 Wh/kg) and is not subject to the memory effect. Voltage 1.25 V ... 1.1 V, number of charge cycles 300-800. Ni-MH of the old type completely self-discharges after a year of storage. It is recommended to store them at a low temperature, from 0 to 20 degrees Celsius. Batteries of the new type LSD Ni-MH (Low Self-Discharge), as their name indicates, have low self-discharge and heat less when charging.
Disadvantages: Ni-MH batteries have a 10% discharge rate during the first day, and generate significant heat when charging.
Li-ion batteries have a voltage of 3.7 V ... 2.5 V, but in reality it is a little more complicated, it all depends on the mode of use of the battery. The number of charge cycles is approximately 600, but this is provided that no more than 20% of the capacity is taken from the battery. Lithium-ion batteries do not like deep discharge. This causes them to quickly fail. The internal resistance of Li-ion is very small, 5 ... 15 milliOhms. Self-discharge is about 1.6% per month when fully charged and without load.
Disadvantages: high cost, limited shelf life, independent of use. Risk of explosion and fire if handled incorrectly.
Diagnosis of battery faults
You should not immediately suspect a malfunction of the screwdriver battery or restore it, but first try to replace it with the second one from the kit, first charging it properly. If the screwdriver rotates poorly, this may be caused by a breakdown in its mechanics (motor or gearbox). If in doubt, replace the power supply if possible. If everything points to the battery, then you can begin to diagnose and restore it.
First of all, you need to find out the type of battery. This is written on its body and the possibility of restoration depends on it. The rated voltage must also be indicated. It usually lies within the range of 14 ... 19 V. Then, without disassembling the body of the battery pack, it is checked. To do this, you can use two methods:
- Check with a multimeter;
- Load test.
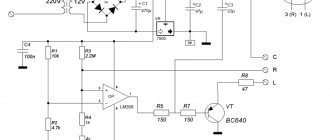
Multimeter method
The multimeter can be used in two modes: voltage measurement and current measurement. If there are two devices, then this is even better; you won’t need to make unnecessary switches.
The measurement setup is shown below: One multimeter switches to voltage measurement mode (voltmeter), the other switches to current measurement mode (ammeter). If there is only one device, then instead of an ammeter you will have to use just a wire. The wires from the battery to the voltmeter can be thin, and the wires from the power source to the battery can be thicker, but don’t get carried away too much; in the end, wires with a cross-section of 0.5 mm2 are suitable for the entire circuit.
If the voltage on the battery is normal, but the charging current is small, significantly less than one ampere, then for a Ni-Cd battery this may mean a malfunction of one of the battery elements. Restoring the screwdriver battery is canceled here; repairs are needed. For Li-ion, this means that either it is normal, or one of the elements is also faulty.
Let the Ni-Cd battery have a nominal voltage of 18 Volts. Then it’s easy to find out how many elements are inside without opening the case. Knowing the nominal voltage of Ni-Cd 1.2 V, divide: 18/1.2 = 15. This means there are 15 elements in the case. If the voltmeter shows an idle voltage of 16.8 V, then this may mean that one of the banks is short-circuited, or simply a discharge of a normal battery. Such a battery gives 15 V when discharged. If the charged one shows 16.8 V or so, then one of the cells is short-circuited. It won't be possible to restore either, you will have to replace it.
If the battery passes a current of more than one ampere when charging, and the voltage gradually increases, increasing by 0.1 V every 5-10 minutes, and at the end of the charge the voltage is slightly higher than the nominal value, then the battery is in order and no restoration is required.
Load method
This method is similar to the previous one and is perhaps simpler. No need to disassemble the charger, or use a laboratory power supply. All you need is:
- Automotive light bulbs;
- Multimeter;
- Pieces of wire;
- Soldering iron with solder and flux.
Test scheme: For this test, you must first put the battery on charge and charge it in the usual way. Then the rated load is applied. It is easy to find out the current; to do this, divide the power consumption by the rated voltage. For example, if a screwdriver consumes a power of 50 W (typical case), at a voltage of 18 V, then the current should be 50/18 = 2.77 A. You can achieve this current, or something close to it, by dialing car turn signal bulbs in parallel.
If the battery supplies the rated current for several minutes, the voltmeter shows a voltage slightly below the rated value, and the lights do not dim, then the battery is working. However, it may happen that for Ni-Cd the current will soon begin to weaken. This is a manifestation of “memory”. In this case, you need to carry out a restoration. Lithium-ion batteries do not have a memory effect, although in theory it exists, in practice it is believed that it simply does not exist.
Read also: Melting point of glass in degrees Celsius
Element-by-element check
This method requires disassembling the battery case. It is used when a battery or its cell stops delivering good current, and restoration attempts fail. One bad link is enough here, since they are connected in series. But to find such an element, you need to check the internal resistance of each of them.
Of course, you need to start with a general inspection of all cans: are there any cracks, leaks, etc. A faulty element will immediately reveal itself by its appearance.
Testing for current output is carried out using Ohm's law for a complete circuit (also known as Kirchhoff's first law). To do this, you need to take a resistance with a nominal value of 10 Ohms, rated for 25 W, and an ammeter. The element being tested is short-circuited to a resistance connected in series with the ammeter.
For example, let a Ni-Cd battery with a voltage of 1.2 V receive a current of 100 mA. Let's write it down and measure again, but not the current, but the voltage on the element. First, let's measure the idle voltage, without connecting a resistor, and then connect the resistor and see how much the voltage has dropped. Let it be 1.2 V the first time, and after connecting the resistor it became 1.05 V. Then the internal resistance of this element is: This is not too small, if all the elements are the same, then the battery will be able to provide the screwdriver with only half the power. The lower the internal resistance, the better the quality of the element, but under an indispensable condition: it must produce a nominal voltage, or one close to it. If the voltage is too low, or very close to zero, then the element has shorted, it is no good and cannot be repaired. If the internal resistance is more than 3 ohms, then you can try to restore (see below) or replace.
How to restore the battery?
There are several ways to ensure normal battery operation and revive it at home. Firstly, this is the restoration of the normal charge-discharge cycle. It is also possible, in case of failure, to open the battery case as a last resort and examine the individual condition of the cells. In some cases, this allows you to completely repair the battery (if there are similar ones for replacement).
Eliminating the memory effect
This recovery method is applicable to nickel-cadmium batteries. It's very easy to do. First, the battery is completely discharged by a screwdriver or other load, such as lamps or resistance. Then it is fully charged. And this needs to be done several times. If the battery has no other defects, it will be fully restored. There is no point in restoring lithium-ion batteries in this way.
There are methods of “restoration” with asymmetrical current, when the charging current pulse is larger, and the following discharge period is smaller, so that the difference turns out to be positive. This method is incorrect; it does not take into account the fact that chemical processes proceed much more slowly. Even more wild is the method of restoration with high current pulses. They should not be used.
To restore a Ni-Cd battery, you will need:
- Charger;
- Several car light bulbs;
- Copper wire 0.5 ... 0.75 mm.sq.;
- Multimeter.
It is better, of course, to have a simple special stand for restoration, but this is more suitable for professional repairmen than for ordinary users of screwdrivers. But be that as it may, working with two multimeters is much more convenient than with one.
The recovery steps are as follows:
- Determine the minimum, nominal and maximum battery voltage.
- Determine the rated load current.
- Turn switch S1 to position P (discharge). If the current is low, you can increase the load a little by adding a few light bulbs.
- Wait until the voltmeter shows the minimum voltage.
- Turn switch S1 to position Z (charge). Monitor the current during charging.
- Wait until the voltmeter shows the maximum voltage.
- Switch S1 to position 0.
- Wait 20-30 minutes.
- Switch S1 to discharge position.
- Go to point 4.
- Repeat steps 4-10 until the discharge current is less than the rated load current during the normal operating time of the screwdriver.
In practice, do from 3-4 to 7-8 cycles. If it is not possible to achieve condition 11 in the recovery algorithm, then the battery must be repaired.
Adding distilled water to Ni-Cd batteries
This is done when disassembling the case and if the internal resistance has increased (significantly more than 0.3 ... 0.6 Ohm). Using a small drill (0.5 mm), the body of the element is carefully drilled and a few milliliters of pure distilled water are injected into it with a syringe. Then the hole is sealed with a soldering iron. These manipulations require skill and may not be easy for a beginner.
After some time, about 12-24 hours, the electrolyte will return to normal and the element will be restored for a more or less long period.
To complete the work you will need:
- Mini drill + drill 0.3-0.5 mm (as a last resort, a strong awl);
- 1 ml syringe with needle and distilled water;
- Soldering iron 40-60 W, POS-61 solder and flux.
Place to make the hole:
The sequence of actions is as follows:
- Cut the paper cover from the element along the axis and remove it;
- Drill a hole as shown in the picture above. The drill should go in 3-4 mm, no more;
- Introduce 10-15 ml of distilled water into the hole made;
- Wait 12-24 hours until the entire volume is soaked;
- Charge the cell to rated voltage;
- Solder the hole with a well-heated soldering iron;
- Put on a paper cover and seal it with tape.
The recovered cells can be collected into a battery.
An example of how to do it yourself in the video:
Resuscitation by replacement
This is the most technically competent type of repair, since chemical power sources are considered non-removable and cannot be repaired; they can only be disposed of at the end of their service life.
For such repairs, you can use two faulty batteries, and the probability of making “one out of two” is very high. Elements must be the same type and size. And also preferably close in production time. During assembly, the terminals must be properly soldered, and the entire assembly must fit into the housing without interference or effort.
To work you will need:
- Sharp nippers;
- Soldering iron 40-60 W, POS-61 solder, flux;
- Stranded installation copper wire with a cross-section of 0.75 mm2;
- Scotch tape or tape.
Here the order of work is as follows:
- Disassemble the battery pack (and possibly another one);
- Check each of the elements (see above);
- Select the highest quality ones;
- Remove the old tire;
- Quickly and thoroughly tin the soldering areas;
- Solder the connections with pieces of wire;
- Assemble the elements and wrap once with tape;
- Assemble the block.
TIP : To avoid problems with tinning of elements, which should never be overheated, you need to warm up the soldering iron well and use an effective flux. An aspirin tablet is suitable. Do the work while extracting air, as the decomposition of aspirin produces harmful and irritating substances. Wash remaining flux with acetone or alcohol.
Release of gas from Li-ion batteries
As a result of improper use of Li-ion cells (abuse of overdischarge), swelling is possible. As a result of the decomposition of salts, oxygen is released and creates high pressure in the housing of the sealed element. These gases are released using special valves, but in small elements they may not be present.
ATTENTION! Forcibly releasing gas from swollen Li-ion batteries by destroying their casing is strictly prohibited by any instructions for their operation; this is a gross violation of fire safety!
The consequences of such an autopsy can be seen in this video:
Useful tips
As a bonus, take a few valuable tips into account, perhaps they will help you in solving energy problems:
- Don't bother if your battery is a lithium-ion type. It is unlikely that you will be able to restore it.
- A traditional nickel-cadmium battery can always be "pumped" by briefly applying a higher voltage. However, before resorting to such radical measures, it is necessary to study this electrical issue of “reincarnation” in more detail.
- You may not know, but the traditional type of battery, which is a nickel-cadmium battery, cannot be connected to a charger if its capacity has sufficient energy potential. Otherwise, the destructive consequences of the battery “memory effect” simply cannot be avoided.
Types of battery elements
Batteries for screwdrivers are produced in the same blocks from all manufacturers. Each is assembled from several individual elements connected in series. Therefore, the total voltage of the block is the sum of the voltages of the individual elements. The capacity values, rated voltage and type of battery used are marked on each element.
Let's look at the types of battery elements for a screwdriver:
- Ni-Cd , a nickel-cadmium battery has a nominal cell voltage of 1.2 Volts;
- Ni-MH , 1.2 Volt nickel metal hydride cell;
- Li- Ion Lithium-ion, voltage - 3.6 Volts.
Nickel-cadmium
The most common and affordable type of battery for screwdrivers. They can maintain good performance even at negative ambient temperatures. They retain their performance characteristics even when stored for a long time in a discharged state.
But there are still some disadvantages: quite high self-discharge and not very large capacity. A property such as the memory effect is also considered a disadvantage in the operation of batteries.
Nickel metal hydride
This type of battery is less common than nickel-cadmium devices. The advantage of such elements over cadmium batteries is considered to be lower self-discharge and insignificant memory effect. In addition, these batteries have a large capacity, which allows them to withstand a greater number of charge-discharge cycles.
The disadvantage is the higher price and sensitivity to negative temperatures. During long-term storage in a discharge state, some of the characteristics may be lost.
Lithium-ion
is very rare in screwdrivers . Self-discharge and memory effect are absent in lithium-ion cells, which is an advantage. The capacity is much higher. The number of charge-discharge cycles is several times greater than all other types of batteries. The high rated voltage made it possible to reduce the number of elements in the block.
The disadvantage is the price of the element, which is three times higher than that of conventional batteries. It is worth noting, of course, that such an element, with intensive use, can lose capacity within two years only due to the decomposition of lithium.
“Banks” that do not store money
Speaking about, it is necessary to say what it really is, that the batteries with which the specified construction tool is equipped have different technical characteristics. Often this kind of “energy individuality” of the power source plays an important role at the time of operation. Nettle, under low-temperature operating conditions, preference should be given to nickel-cadmium batteries. While the nickel-metal hydride type of battery is more durable during use, it does not have a relatively large capacity. If you look at it, it is not lithium-ion batteries that have become widely used. This type does not require maintenance at all, is devoid of the “memory effect”, and - with a high capacity, “energy banks” batteries have more compact dimensions than those of “competitors”.
Design features of the battery
Regardless of the brand of the power tool and its technical requirements, the design of the batteries is almost no different from each other. If you disassemble the battery, you can see that it consists of identical batteries assembled in a series electrical circuit.
Moreover, for any types of elements that have almost the same size and nominal voltage value, they may differ in capacity (indicated on the case). If the repair is carried out independently, then it is necessary to pay attention to the type of batteries used, because the restoration method for each type may differ.
To connect the device to the network and charge it, the design provides power contacts that are connected to the terminals of the circuit. There are two more control contacts on the battery case, to which a resistor and a thermistor are connected. From these parts, a system is assembled to protect equipment from overheating during charging and equalize the level of required charge on each battery bank.
Methods for determining battery failure
The electrical circuit of the battery is assembled according to a sequential circuit, so first of all you need to understand which element is faulty, since a malfunction of at least one bank entails an almost complete loss of functionality of the entire battery. Simultaneous failure of all elements is almost impossible. In this regard, it is necessary to determine the part of the circuit that operates with significant deviations from the technical parameters.
Multimeter Method
Considering the same voltage level on all batteries in the circuit, you can find the faulty element using a voltage measuring device (multimeter), which must first be switched to voltage measurement mode.
The malfunction determination technique itself is performed according to the following algorithm:
- the battery must be fully charged;
- Once fully charged, the device must be disassembled. To do this, unscrew several fixing screws. If the batteries are made without screws, you will have to carefully separate the case at the gluing points using a knife. At the same time, try not to exert a lot of physical effort so that the plastic on the case does not deform;
- Using the device, we alternately measure the voltage on each battery. It is advisable to write down the data obtained, where the voltage is below normal, in pencil on the case. It is necessary to mark such parts so as not to confuse them with serviceable parts in the future, because they are identical in appearance;
- then we assemble the battery and install it in the screwdriver. We discharge the device’s battery until there is a noticeable decrease in power. To do this faster, you can perform a series of power operations with a power tool;
- after complete discharge, the case is disassembled again, voltage measurements are repeated at each section of the chain, and special attention must be paid to the marked parts;
- if there is a voltage drop on one of the elements by 0.5-0.7 Volts, the part is faulty.
Load method
This technology for detecting a malfunction is similar to that already discussed, only in this case a light bulb is used to discharge the battery.
First you need to fully charge the battery. Then we connect one light bulb or a low-power motor to each jar. This will allow you to determine an inoperative element without an electrical measuring instrument. The visually connected light of a non-working can will go out much faster than working batteries.
To obtain more accurate results, you can use a measuring device to determine the voltage value on each bank under load. This result will be more accurate. If the voltage on the battery is 0.5-0.7 Volts less than the nominal value, then it is considered faulty.
Battery restoration by replacing several elements
Restoring a screwdriver battery by replacing several elements can be successful for all types of batteries. It also does not pose any risk to them, as does manipulation with distilled water, provided that care is taken during soldering.
First, the output voltage of each “can” is measured using a multimeter, which in total should be 12-14 V. Accordingly, the voltage of one “can” should be 1.2-1.4 V. The U indicators are compared with each other, the most weak elements. Read more about how to check a screwdriver battery with a multimeter →
After this, the battery is inserted into the screwdriver and works until the moment when the power begins to noticeably decrease. The voltage readings are taken again, and those “cans” whose voltage difference is 0.5-0.7 V compared to the “stronger” ones should be desoldered, disposed of and replaced with new ones, similar to the old ones, having previously ordered them from the online store.
It is recommended to solder the battery chain using spot welding, but if this is not available, there is nothing left to do but use a regular soldering iron and do everything as quickly and accurately as possible, in order, if possible, to prevent the battery from overheating.
The “original” battery connecting plates should not be lost; they must be soldered back without reversing the polarity. In addition, all elements of the chain must have the same capacity.
After soldering is completed, insert the battery back into the screwdriver and carry out 2-3 complete charge-discharge cycles to equalize the energy potential of all batteries. In order for the updated battery to last longer, it should carry out such training 2-3 times a month. How to quickly and completely discharge a screwdriver battery →
Restoring a screwdriver battery
It should be immediately warned that batteries with lithium-ion type cells cannot be repaired. They can only be replaced.
Basic methods for restoring the parameters of individual batteries :
- battery restoration through freezing;
- elimination of memory effect;
- adding evaporated electrolyte.
Battery restoration through freezing
You can try to restore nickel-cadmium batteries using the simple freezing method. Let's consider the procedure :
- Place the completely discharged battery in a plastic bag and place it in the freezer compartment of a household refrigerator;
- After 10-12 hours, you need to remove the battery from the freezer;
- put it on charge;
- after which, you need to charge the battery, that is, turn it on until the energy is completely lost;
- repeat this operation 2-3 times.
If the attempt to restore the battery is unsuccessful, you must resort to other methods.
Elimination of memory effect
It is not very difficult to recognize such a defect. After the battery is fully charged, it quickly discharges and stops working. After some time it begins to function again.
First, you need to complete the charging process, preferably with a small current (if possible). Then, completely discharge at low load. Such actions will allow for subsidence of not only the top layer, but also all the plates completely.
For the load, you can use an ordinary light bulb with a power of 60 W and a voltage of 220 V. The discharge is carried out up to 30% of the nominal capacity of about 5 V.
This procedure must be repeated at least five times before using the battery. Of course, such a “treatment” will not completely restore the battery, but it will extend its life by at least a year.
Adding Electrolyte
It is believed that electrolyte evaporation is the most common problem with rechargeable batteries.
To solve this problem, you need to dismantle the faulty elements by cutting the connecting plates. After that, you need to make a small hole in the element body (up to 1 mm in diameter) from the negative terminal side. Then, using a medical syringe, add a few drops of distilled water. After that, be sure to properly seal the battery with epoxy resin. Insert the revived element into the existing diagram.
To equalize the potential of all elements, they need to be discharged with a 1.5 Volt light bulb. The charge-discharge cycle must be performed at least five times, only then use the tool.
Battery won't charge
A screwdriver sometimes fails after prolonged use. Its working element may stop charging, which will lead to the impossibility of fulfilling the functional capabilities of the tool; the tool, roughly speaking, will “die”.
In order to extend the life of the instrument so that you do not have to remove it from visibility, you can try three methods in turn. Each subsequent one is considered more complex and costly. They are:
- restoration and increase in capacity after its reversible loss (memory effect);
- adding distilled water to the electrolyte;
- replacing some or all of the battery packs.
Replacing faulty batteries
Replacing worn parts is considered the most effective method of restoring the entire battery. Before starting work, you need to purchase serviceable elements, and it is necessary to take into account the dimensional and technical characteristics.
The replacement process itself will not cause difficulties even for an inexperienced tool owner. All you need is a soldering iron and soldering materials. Moreover, in order to protect the battery from complete failure during work, it is necessary:
- try to leave the original ones as connecting plates or use a copper conductor of the same cross-section. This condition is associated with a high charge current;
- soldering should be carried out quickly to avoid overheating of the elements;
- the negative terminal of the battery is connected to the positive terminal of the next element, which corresponds to a series connection of the circuit.
Disassembling the housing part of the autonomous power supply
Once you have made sure that several deep charge/discharge cycles of the battery have not given a positive result, and your battery is still quickly discharged during operation, follow the step-by-step action scenario. As an example, let's take the battery for a Makita screwdriver.
- Before you begin the actual disassembly process, charge the device.
- To gain access to the capacitive elements of the battery, you need to unscrew several fixing screws.
- In some cases, it is necessary to carefully break open the housing at the junction of structural parts.
Attention: when implementing the last dismantling option, do not use excessive physical force, as you can deform the plastic housing of the battery. Remember: after “restoration” work, the container must fit securely into place.