Types of battery cells
These devices use elements of different types and voltages, each of which has its own advantages and disadvantages.
The most common are nickel-cadmium (Ni – Cd) with a voltage of 1.2V.
Advantages:
- low price;
- stored in a discharged state.
Flaws:
- have a memory effect;
- high self-discharge;
- small capacity;
- small number of charge/discharge cycles.
More advanced nickel-metal hydride (Ni-MH) voltages are 1.2V.
Advantages:
- less memory effect and self-discharge;
- large capacity and number of charge/discharge cycles.
Flaws:
- higher price;
- do not tolerate low temperatures and storage in a discharged state.
The most advanced lithium-ion (Li-Ion) voltage 3.6V.
Advantages:
- no memory effect;
- very low self-discharge current;
- high specific capacity, allowing to reduce the weight and dimensions of the device;
- the number of charge/discharge cycles is many times higher than other types of batteries.
Flaws:
- high price;
- loss of capacity three years after manufacture.
Homemade power supply
It is necessary to start making a homemade power supply if you have knowledge in the field of radio engineering. It is necessary to prepare parts and tools in advance and fully concentrate on the work, during which the radio element may fail or suffer electric shock (supply voltage 220 V).
The simplest scheme
During manufacturing, it is necessary to prepare a housing for mounting radio components, a tool, a piece of getinax, wire and radio components. Then proceed with assembly according to diagram 1.
Scheme 1 – Simple 12 or 18 volt power supply.
Almost any transformer with the following parameters is suitable: power 250..300 W, secondary voltage 24..30 V, and current rated from 15 A and above. The diode bridge is assembled from powerful diodes (selected from a reference book). After assembly, it is necessary to check the supply voltage: if it is higher than the required value, then you need to reduce the voltage of winding II (reducing the number of turns). At low voltage, wind the secondary with a wire of the same cross-section. After assembly, install it in the housing.
Provided that the screwdriver is not powerful enough, you can install it directly in the battery compartment. If the power supply is assembled separately, it is recommended to provide cooling, because during engine startup the rated current increases by 7 times. As a result of this increase, a load is placed on the power supply unit, and it begins to heat up. Heating occurs due to insufficient power from the power supply. After the power supply is ready, you need to check the screwdriver: run it several times and make sure that the radio elements do not heat up. When using a converted screwdriver, you must adhere to the basic requirements:
- It is necessary to give the tool time to cool down after every 20..30 minutes of operation.
- Do not work at high heights or do it carefully (the BP may fall and, as a result, loss of balance and injury).
- Monitor the condition of the power cable; it should not be pinched (this can lead to a short circuit, which is fraught with negative consequences for the tool and people).
Thus, if the screwdriver battery outputs 18 V or 12 V, it is not at all necessary to buy a new battery or screwdriver. It all depends on the scope of use of the tool: if you need to move the tool, you should replace the battery or purchase a new screwdriver. In the case where mobility does not play a special role, you need to convert it to power from the network. By following simple recommendations and observing safety regulations, you can not only increase the likelihood of extending the service life, but also reduce the risk of injury.
How to convert a cordless screwdriver into a corded one
There are several ways to improve a cordless tool at home. It is not possible to connect a screwdriver directly to a 220 V network. It will not be able to work with a high output voltage.
To convert a battery device, it will need to be equipped with a power source that provides the required current. In some cases, you will have to buy an element, in others you will only need to slightly improve a part taken from other equipment.
How to make a networked screwdriver with a power supply from a computer
You can connect a screwdriver to a 220V network using a computer power supply. Such elements are bulky and large in size. But their advantages include high reliability, durability and overload protection. You can convert the battery unit to connect to an external power supply according to the following scheme:
- The computer unit is disassembled, the green and black cables are found on a large square connector, they are connected to each other and isolated.
- On the smaller connector, all wires except yellow and black are removed.
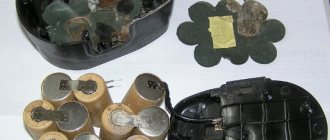
- The battery is removed from the construction device and the batteries that have exhausted their service life are removed from it.
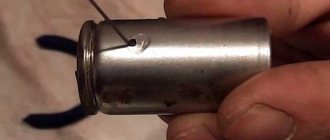
- Solder a cord designed for low voltage to the terminal holders inside the battery case.
- Drill a hole in the battery box to bring the cable out.
- Connect the latter to the black and yellow wires of the power supply.
- Insulate all open contacts with adhesive tape.
After this, all that remains is to connect the 12 V screwdriver to a 220 V network and check whether it was possible to remake it correctly.
Usually the power supply case indicates which wires in it provide 12 V voltage.
How to assemble a networked screwdriver with a Chinese power supply
If the power supply from the computer is not at hand, at any radio market you can purchase an inexpensive Chinese-made element with an output voltage of 24 V. Before connecting to a cordless screwdriver, the source will only need to be slightly improved so that it can supply current up to 18 V. The circuit looks like this:
- A resistor R10 with a high constant resistance is removed from the purchased mains power supply and an adjustable element with a maximum limit of 10 kOhm is installed instead. The value must first be set to no higher than 2300 Ohm, otherwise the construction device will not work.
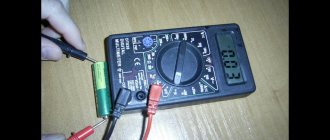
- Electricity is supplied to the power source and the current parameters are measured using a multimeter. The adjustable resistor is adjusted so that the output voltage does not exceed 9 A.
- All internal contents are removed from the battery compartment of the battery device. Using soldering, connect the power supply cable to the contacts inside the instrument.
- A hole is made on the battery body for the wire. The battery is assembled, attached to a screwdriver, and a test run of the converted device is carried out.
After removing the batteries from the special compartment, the instrument will become much lighter, but will lose balance. To restore it, you can place a small weight inside the empty battery case.
Attention! When using an external converter, you need to make sure that the wire connecting the tool to the power source is sufficiently long, otherwise it will be inconvenient to work.
It is recommended to use a corded screwdriver with a Chinese power supply without interruptions for no longer than 20 minutes at a time
How to convert a screwdriver into a mains-powered one using a laptop charger
You can connect a 12 V screwdriver to a 220 V network using a laptop charger. It is designed to convert high voltage into a low output current of up to 19 V. Accordingly, charging can be used together with a construction unit with virtually no modification to both parts of the system. You can convert the tool to a network one using the following algorithm:
- The output cord from charging is cut and the end is stripped of insulation.
- Remove the battery from the screwdriver, open and remove the discharged batteries, while leaving the terminals in place.
- Using a soldering iron, attach the bare wires of the charger to the latter. In the process, it is recommended to use a special liquid - the so-called flux. It improves the quality of soldering and also forms a thin protective film on the surface of copper wires that prevents oxidation.
- The exposed connections are insulated with adhesive tape and the cable is released through a hole drilled in advance in the battery compartment housing.
- The former battery unit is reassembled and tested for functionality as a network unit.
It is convenient to convert a construction tool using a laptop charger, not least because the converter is compact in size and light in weight. Unlike a conventional power supply, it will not take up much space on the table and will not make the former battery unit bulky and inconvenient. The converted device can be easily carried in your hands or carried with you in a car.
When using a converted cordless screwdriver, you need to make sure that the wire is not pulled too tightly
How to remake a screwdriver using a homemade power supply
If you wish, you can convert an 18V cordless screwdriver to a 220V network using a converter that you assemble yourself. This will require some knowledge of electrical engineering and will take more time. But the finished converter will be quite compact, and it can be installed directly into the screwdriver body. Thus, during operation you will not have to constantly monitor the external power supply and control its position.
You can remake a construction tool and install a homemade network converter into it like this:
- The battery case is disassembled and all elements that have become unusable are removed.
- In accordance with the finished electrical circuit, a homemade unit is made from purchased parts. For assembly you will need a small board, a transformer and rectifier, a filter and a stabilizer. The elements are securely soldered to the base.
- Output holes for the wires are drilled in the battery case.
- A homemade power supply is inserted into the box and connected to the terminals.
- Network wires are brought out through prepared holes.
- Reassemble the body and insert it back into the instrument.
When converting a screwdriver to be powered from an electrical outlet through a homemade unit, you need to pay attention to the dimensions of the transformer and other parts. The structure must fit freely into the battery housing.
When making a power source, you need to use parts that provide the power tool with a power of 300-400 W
Screwdriver device
This mechanism consists of the following parts:
- DC motor. It has the shape of a cylinder; instead of an excitation winding, the housing contains permanent magnets. This simplifies the design and provides sufficient torque at low speeds. The drive (sun) gear of the planetary gearbox is mounted on the electric motor shaft;
- Reversible speed controller. The adjustment circuit is assembled on a PWM controller and a field-effect transistor. Reversing is carried out by switching the polarity of the power connection to the motor brushes;
- Planetary reductor. Made in a separate building. It got its name because of its resemblance to the solar system. Consists of a ring gear, a central (sun) gear, satellites and a carrier. The ring gear transmits force through the spring-loaded balls of the load regulator. There are models with two-speed gearboxes. Increased speed is activated when using the device as a drill;
- Rotation force limitation mechanism. Serves to limit the force when tightening screws. Transmits torque through balls pressed by an adjustable spring;
- Removable battery. Consists of individual elements in one housing. The voltage in different models ranges from 9 to 18 volts.
Screwdriver device
Homemade charging devices
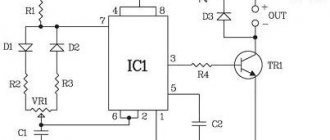
It’s quite simple to make a charger for a 12-volt screwdriver yourself, by analogy with the one used in the Interskol charger. To do this, you will need to take advantage of the ability of the thermal relay to break the contact when a certain temperature is reached.
In the circuit, R1 and VD2 represent a sensor for the flow of charge current, R1 is designed to protect the diode VD2. When voltage is applied, transistor VT1 opens, current passes through it and LED LH1 begins to glow. The voltage drops across the chain R1, D1 and is applied to the battery. The charging current passes through the thermal relay. As soon as the temperature of the battery to which the thermal relay is connected exceeds the permissible value, it is triggered. The relay contacts switch and the charging current begins to flow through resistance R4, the LED LH2 lights up, indicating the end of the charge.
Circuit with two transistors
Another simple device can be made using available elements. This circuit operates on two transistors KT829 and KT361.
The amount of charge current is controlled by the KT361 transistor to the collector to which the LED is connected. This transistor also controls the state of the KT829 component. As soon as the battery capacity begins to increase, the charging current decreases and the LED gradually goes out accordingly. Resistance R1 sets the maximum current.
The moment the battery is fully charged is determined by the required voltage on it. The required value is set with a 10 kOhm variable resistor. To check it, you will need to place a voltmeter on the battery connection terminals, without connecting the battery itself. Any rectifier unit designed for a current of at least one ampere is used as a constant voltage source.
Using a custom chip
Manufacturers of screwdrivers are trying to reduce prices for their products, often this is achieved by simplifying the charger circuit. But such actions lead to rapid failure of the battery itself. By using a universal chip designed specifically for the MAXIM MAX713 charger, you can achieve good charging performance. This is what the charger circuit for an 18-volt screwdriver looks like:
The MAX713 chip allows you to charge nickel-cadmium and nickel-metal hydride batteries in fast charge mode, with a current of up to 4 C. It can monitor battery parameters and, if necessary, reduce the current automatically. Once charging is complete, the IC-based circuit draws virtually no power from the battery. It can interrupt its operation due to time or when the temperature sensor is triggered.
HL1 is used to indicate power, and HL2 is used to display fast charge. The setup of the circuit is as follows. To begin with, the charging current is selected, usually its value is equal to 0.5 C, where C is the battery capacity in ampere hours. The PGM1 pin is connected to the positive supply voltage (+U). The power of the output transistor is calculated using the formula P=(Uin - Ubat)*Icharge, where:
- Uin – highest voltage at the input;
- Ubat – battery voltage;
- Icharge – charging current.
Resistance R1 and R6 is calculated using the formulas: R1=(Uin-5)/5, R6=0.25/Icharge. The choice of time after which the charging current turns off is determined by connecting the PGM2 and PGM3 contacts to different terminals. So, for 22 minutes PGM2 is left unconnected, and PGM3 is connected to +U, for 90 minutes PGM3 is switched to the 16th leg of the REF chip. When it is necessary to increase the charging time to 180 minutes, PGM3 is short-circuited with the 12th leg of the MAX713. The longest time of 264 minutes is achieved by connecting PGM2 to the second leg, and PGM3 to the 12th leg of the microcircuit.
Assembly of the working structure
For ease of use and connection, I brought the cord from the power supply into the battery case. I took a 3.5 meter long cord that was available. I removed all the battery cells from the battery and installed an LC filter. Now, if I somehow get a working battery, I can always put it on a screwdriver and put the power supply away as a reserve. I didn’t throw the batteries out of the battery, I have an idea where to use them, but that’s a topic for another review.
Since the cord connecting the unit to the screwdriver has a certain resistance and inductance, you can try to close the terminals of the L1 coil with a jumper. In theory, this could increase power by a tiny amount.
The screwdriver feels great with a cord, but to be honest, it seemed a little weak to me when braking by hand. But trial tightening of the self-tapping screws dispelled my doubts: self-tapping screws 35 mm long can easily be screwed into 20 mm plywood. This means that a screwdriver will cover most repair needs.
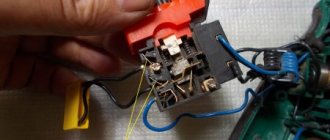
I cut off all the output wires from the block, leaving the green starting wire; I soldered its end to the common conductor of the board, where all the black ones are soldered. It's best to carefully desolder all the wires, but my soldering iron was too weak for this and had to be cut. I soldered two short, hard copper wires to the common contact and +12 (where the yellow ones are soldered) and connected them through the terminal block to the cord to the Shura.
This is where we will finish this review; we have achieved what we wanted - the screwdriver works perfectly with a computer power supply. In the future, I plan to make a high-quality plywood case without cracks for the power supply board - tests have shown that the heatsinks on the board do not heat up at all and you don’t have to worry about overheating of the elements in a closed case.
Manufacturing a power supply based on the battery compartment of a screwdriver
Initial data
We have two Chinese cordless screwdrivers in stock. Only one of them has a battery compartment; and even that one, over the years, unfortunately, stopped holding a charge. It did not seem economically feasible to buy a new battery compartment or replace batteries due to the fact that its cost is often comparable to the cost of a new similar screwdriver.
Result of the work performed
The inside of the battery compartment has become unusable
Task
Upgrade the battery pack to obtain an easy-to-use power supply from mains voltage with low financial costs. In the end it came out to about $7, since there was a lot in stock.
PSU manufacturing
List of elements used:
- Step-down transformer 220/12 (was available)
- Diode bridge KVRS 2510 ($1.5)
- Adjustable Voltage Stabilizer 20A ($3)
- Capacitor 10000uF/25V ($1)
- Two diodes (were available)
- Network connectors 4 pieces ($1)
- Fan 12V (was available)
- Radiator (was available)
List of necessary tools, in addition to standard ones:
- Construction hair dryer with temperature control - for extruding the desired shape of a plastic case
- Mini-drill engraver - for grinding and finishing holes for plugs
- Soldering iron 100W - for straightening plastic
- Three clamps for extrusion
Sequence of work:
Making holes for the stems
To do this, we use a powerful 100W soldering iron. Plastic melts well. We remove the remains with pliers and modify the hole to the required shape with a mini-drill with the necessary attachments.
We make holes for the remaining two plugs in the same way.
Transformer installation
Due to the fact that the available transformer did not fit slightly (by 4 mm) into the battery compartment, it was decided to enlarge the latter by squeezing out the plastic when heated.
ABS plastic softens noticeably after 100 degrees Celsius. We secure the block together with the transformer using three clamps and remnants of chipboard. Gradually heat up the plastic with a construction hairdryer and tighten the handles of the clamps in parallel. We achieve the desired degree of extrusion and let the plastic cool. After this we remove the load.
As a result, we obtain an acceptable block shape.
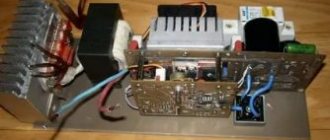
Installation and testing of “electronic filling”
The connection diagram of the elements is quite simple.
Transformer - diode bridge - voltage stabilizer - capacitor.
A radiator was attached to the transistor to remove heat. Additionally, a fan is connected to improve air circulation. I also subsequently made a dozen holes in the case to improve air circulation. The capacitor was placed in the vertical part of the block. The output voltage was set to 14.4V
Plugs and reverse polarity protection in screwdriver housings
A diode was added to the wiring inside the screwdrivers to protect against over-reversal.
Finish photos
Result
Supply voltage at the power supply output without load = 14.4V.
At idle, when one screwdriver is connected = 12.8V (current 1.3A) In operating mode, the current approaches 3A. At idle when two screwdrivers are connected = 10.2V
To use the power supply, three power cables were soldered in length: 2.7 m, 4.9 m, 10.4 m. The voltage drop when using them, respectively: 0.2V - 0.3V - 0.9V (at idle, i.e. e. current 1.3A)
The temperature regime when operating two screwdrivers in XX mode for three minutes is satisfactory. The temperature rose to 55 degrees Celsius.
Video (photo collage) showing the manufacturing process:
Video showing the process of demonstrating the work:
PS There is a suspicion that there are too many photos in the post. If this is the case, I apologize. The first post - it’s not entirely clear to what extent everything needs to be presented and shown.
Is a rework necessary?
Should I remake the screwdriver or not? Before starting work, it is necessary to evaluate the advantages and disadvantages of this solution. If we talk about the first, then as a result the owner will achieve:
- disappearance of problems with a suddenly discharged tool;
- lack of dependence on low temperatures, because under such conditions the batteries discharge very quickly;
- obtaining stable torque;
- significant savings, since purchasing a new, rather expensive battery is not required.
In addition, this is the only remaining option if the model has already been discontinued, when the tool is urgently needed, and there is no time to wait for the arrival of a new battery. If the screwdriver itself works flawlessly, then there are no contraindications to modifying it. The only thing he will lose is mobility, but this minus is still not so significant, it can be dealt with.
Easy tool restoration
The main advantage of a cordless screwdriver is its mobility. These tools use a lithium-ion battery, which is protected from overload and complete discharge. In addition, there is protection against overcharging in the form of a separate circuit built into the element itself. The main power source (primary) is 220 V, and the battery is also recharged.
Depending on the model of the screwdriver, the battery receives a charging voltage from 14 V to 21 V. The battery output produces a supply voltage from 12 to 18 V. This type of battery lasts a long time, but if the tool is not used for a long time, the built-in discharge protection will not help battery cells: discharge occurs constantly.
To increase service life, it is necessary to constantly discharge and charge the battery. If for some reason it was not possible to “keep track” of the tool, a specific battery element often fails. There are basic ways to solve this problem:
- Replace the battery with a new one.
- Buy a new tool.
- Convert a mains-powered screwdriver.
When replacing the battery, please note that a new one is quite difficult to find. The tools are made in such a way that it is difficult to find spare parts for them. It is not profitable for a company to produce its product with high repairability, since it needs income from the purchase of products. You can only find a new battery at dealers. In addition, another option is possible: disassemble the battery and replace the faulty battery.
When purchasing a new tool, the user tends to buy a model of a higher quality, forgetting about the rules for using lithium-ion batteries. Basic rules that will help preserve the service life of the tool for a long time:
- When purchasing in winter, it is strictly forbidden to “launch” the tool immediately. You need to wait about an hour until it “warms up” to room temperature.
- Place the battery on charge.
- Perform the battery charging and discharging cycle about 3 times.
If none of the options for solving the problem are suitable, you need to start converting the screwdriver to a network one with your own hands. It's easy to do. There are many simple and complex ways. Changing the tool model has several positive aspects:
- There is no need to recharge the battery.
- The load on the mechanical part is reduced.
- Lots of power supply options.
- Increasing the quality characteristics of the product.
This is interesting: Sanding machine for parquet and floors - we look at it in detail
Reviving the screwdriver. Everything for converting a screwdriver to 18650 lithium-ion batteries
The screwdriver battery will sooner or later get tired and will need to be replaced. Buying a new battery is justified in a situation where the tool costs a penny. But if you have something more or less decent, or an old Ni-CD battery, then it definitely makes sense to replace dead 18650 batteries with new ones or completely convert nickel screwdrivers to lithium ones.
Of course, as in any business, there are some nuances here, but if your hands are at least minimally straight, then converting a screwdriver to lithium yourself is not at all difficult. You just need to know what to buy for remodeling and understand the basic nuances of the process. And it’s easy to buy everything on Aliexpress to convert a screwdriver to lithium.
Why 18650 Li-ion? The advantages of lithium batteries are obvious:
- high energy density per unit mass
- low self-discharge
- virtually no memory effect
- availability and price
By the way, if you like to read , then there is a great option to save money! book service , the largest in Russia and the CIS countries, gives the fourth book as a gift when you buy three. Personally, I have been buying books there for about 5 years now. The price tag is already affordable, but with such a bonus it turns out to be quite small. There is a convenient application for reading and listening to books. The link above is one of my selections, which has a bold, updated promotional code.
Reworking the screwdriver battery. What you need to know:
1) The screwdriver requires high-current 18650 batteries (ideally - Sony/Murata VTC5, VTC5A, VTC6. Acceptable - Samsung 25R), or less high-current batteries connected in parallel (if space allows).
2) You should absolutely not use old laptop batteries or just different batteries. All 18650 batteries in the assembly must have a minimum variation in capacity and other characteristics. Of course, buying a high-current 18650 battery on Aliexpress is the easiest solution. Just keep in mind in advance that the model name will have nothing to do with the cell inside. 4 batteries purchased in one lot from one seller may differ significantly in capacity and internal resistance. Although the link below will be a good option for those who don’t want to solder.
The ideal option is to buy 18650 from a trusted seller on the same avito, or order 18650 on nkon. In the latter case, you will have to pay 10 euros for delivery, but the batteries will be 100% original and much cheaper than buying locally (which will reduce the delivery fee to zero). Personally, I have been buying batteries from this store for many years.
I did an article on how to choose a 18650 lithium-ion battery, if you are interested, read it here
3) The batteries are connected to the BMS board strictly sequentially: first 0 V, then 4.2 V, 8.4 V, 12.6 V, 16.8 V. If the BMS is broken, it will not work!
4) 18650 batteries in the assembly must be charged equally. It is best to charge each battery separately and then assemble it into an assembly.
5) How to calculate how many 18650 lithium batteries are needed instead of nickel ones? In general, the calculation is as follows: 2-3 NiCd = 1 lithium, 5-6-7 NiCd = 2 lithium, 8-9-10 NiCd = 3 lithium, 11-12-13 NiCd = 4 lithium
6) Lithium batteries very susceptible to overheating. The ideal option is spot welding. Soldering also works quite well. How to solder 18650? The most important thing is that you want largest sting possible Reduce the contact time between the tip and the 18650 battery to a minimum and do not overheat the latter. Otherwise, the process is no different from any other soldering. It is best to get your hands on those old batteries that you will be replacing.
BMS board
For 3\4\5 x 18650 batteries 100A with balancer
BMS (Battery Management System) – battery management system. The BMS board is extremely important when converting a screwdriver to lithium. Why is it needed and how does it work? It controls charge and discharge, preventing overdischarge and overcharging of the screwdriver battery; it has a built-in “balancer” that separately charges each Li-Ion battery in the assembly. The latter is extremely important! There are BMS without a balancer! 3S - 12v, 4s - 14v, 5s - 18v To choose a BMS board, you must take into account that the minimum current must be 30A, otherwise it will go into protection.
The BMS board option in the link is 2-3 dollars more expensive than some basic versions, but you get 100A instead of 30A or 40A. In my opinion, in terms of functionality, this is the best BMS board from Aliexpress and deserves this symbolic overpayment.
Ready-made 18650 battery assemblies
Buy here
For those who don’t want to solder, you can buy ready-made welded 18650 screwdriver assemblies on Aliexpress! S – number of batteries in series (voltage increase), P – number of batteries in parallel (capacity increase). Thus, for a basic 12V screwdriver you need to buy 3S1P or 3S2P (increase the capacity), for an 18-20V screwdriver - 5S1P / 5S2P (lots of capacity). Read below for descriptions of battery models.
I am 100% sure that there will not be any VTC6 on the link, but even what is there allows you to count on normal operation, the reviews are good.
Power indicator
Buy here
A simple and useful thing that shows the battery charge.
Mini spot welding machine
Buy here
If you have no desire to solder or make your own spot welding machine from microwave offal, then this tool can help you out. Despite its extremely compact size, it is completely functional and can be a great help. Especially in a situation where you need to cook somewhere on the spot where it is inconvenient to drag a full-fledged apparatus.
Welding tape for 18650 batteries
Buy here
If buying ready-made battery assemblies is not interesting to you, then you will definitely need a tape to connect the batteries. Of course, you can buy it locally. But if you are still waiting for the same BMS board from Aliexpress, then it makes sense to order everything else there and save time on shopping trips.
CC/CV charging module
Buy here
But this CC\CV module is needed for those who decide to convert the screwdriver to lithium. The old charger will not charge and you will need this small unit. If you have a multimeter, you can adjust it using it. If spending an extra couple of bucks is not a problem, then you can ensure maximum visibility of all parameters, from voltage to current, and buy a version with a display.
Power supply for charging
Buy here
Attention! The Li-ion assembly must be charged strictly with a charger for lithium batteries! Nickel charger will not work! To buy the required charging unit, you need to multiply the number of batteries in your assembly by 4.2. Those. 1x188650 – 4.2v, 2 – 8.4v, 3 – 12.6v and so on. There are a lot of different power supplies on Aliexpress, just search for Power supply 4.2v (or some other required voltage)
18650 battery holder
Buy here
Far from being the most important part in your assembly. To prevent the batteries from shaking, you can also use some options made of foam rubber and heat shrink. But, if you want everything to be beautiful and neat, there is nothing better than these holders.
Silicone wire
Buy here
Of course, you will also need a wire. And, I’ll tell you straight, a good piece of good quality, soft silicone wire will come in handy even without altering or repairing the screwdriver. I have a meter of black and red at home, and this supply has helped me out a lot more than once.
Well, that's all. Aliexpress has absolutely everything you might need to replace old 18650 batteries in a screwdriver with new ones or convert a screwdriver from nickel to lithium-ion batteries.
Here's another important point. Often, delivery from Ali will take a long time. It’s worth looking at products for converting a screwdriver to lithium here on Yandex Market.
If you work with a screwdriver or any other tool, you'll probably need a good headlamp. Now on Aliexpress it is possible to buy a really inexpensive and good model: with built-in charging, light with good brightness and color temperature, and a magnet at the end (ideal for working under the hood). If you're interested, here's my full review and comparison of Sofirn SP40
I hope the text was interesting. I invite you to subscribe to my:
Review channel on UTUBE
Group in , where before publishing reviews, I post announcements of some materials from them, publish promotional codes and coupons for some interesting flashlights + talk about the release of new models.
Telegram channel with the latest discounts and promotional codes!
Connecting the screwdriver to the charger
Sequencing:
- Solder or attach two wires with alligator clips to the terminals of the charger.
- Disassemble the old battery and remove the dead cells from it.
- Drill a hole in the battery case for the cable, thread the cable into the hole. It is advisable to seal the connection with electrical tape or heat-shrink tubing to prevent the wire from tearing out of the housing.
- Elements removed from the battery will disrupt the weight distribution of the screwdriver - your hand will get tired. To restore balance, a weight should be placed in the body - it can be dense wood or a piece of rubber.
- Solder the cable to the terminals of the former battery, connected to the screwdriver.
- Assemble the battery housing.
- All that remains is to test the updated tool in action.
Installation of a finished power supply in the housing of an old battery
Procedure:
- Disassemble the old battery and remove the non-functioning elements from it.
- Install the power supply into the battery case. Connect the high voltage terminals and low voltage terminals.
- Assemble and close the battery case.
- Install the battery into the screwdriver.
- Plug the power supply into the outlet and check the updated network tool in operation.
Homemade power supply
Step-by-step instruction:
- Disassemble the old battery case and remove the dead batteries from it.
- Install the elements of the electrical circuit of the power supply onto the circuit board, solder the contacts.
- Install the assembled board into the case. Use a tester to check the presence of voltage at the output.
- Connect the low voltage wires to the terminals of the old battery. Assemble the body.
- Connect the screwdriver to the electrical network and check its operation.
Connecting to an external power supply
What to do:
- Disassemble the screwdriver and find the motor power wires inside. Install the connector for the power supply into the case and solder the wires to the connector. Secure the wires with hot glue.
- Choose a suitable power supply, for example, from a laptop. Find an adapter for the low voltage connector.
- Connect the screwdriver to the new power supply and check its operation.
Connecting to a power supply from a computer
Instructions:
- Find or buy a computer power supply with a power of at least 300 W.
- Disassemble the screwdriver body. Find the motor power wires inside. Solder the connectors for the computer power supply to the wires.
- Remove the connectors for connecting the computer power supply from the case.
- Connect the screwdriver to the new power supply.
- Connect the power supply to the network and check the operation of the device.
Connection
You should not install a capacitor with a capacity of several tens of thousands of microfarads in parallel with the motor, as some experts advise. Firstly, with a starting current of about 20 A, it will be of little use. Secondly, it will make it difficult to start the power supply. If, when you gradually press the start button, the chuck accelerates and rotates normally, and after a sharp start of the screwdriver the engine stops, it means that the current protection of the power supply unit is triggered. It should not be removed from the device; you just need to increase the shutdown threshold. How to do this in practice depends on the design of your power supply. Theoretically, it is necessary to attenuate a signal at its input that is proportional to the output current.
In order not to disassemble the screwdriver and solder wires to the motor terminals, you can use an unusable battery to connect the power supply.
- Disassemble the housing of the faulty battery. To do this, use a Phillips screwdriver or an asterisk to unscrew the screws from the bottom and remove it;
- Remove the batteries from the case;
- Make a hole in the bottom for the wires;
- Insert the wires into it;
- Strip their ends, tin them and, observing polarity, solder them to the contacts at the end of the case;
- Secure the wires in the hole with a glue gun. And if you don’t have it, then wrap several turns of electrical tape around them from the side of the body and pull the wires out so that the bottom divides the winding in half;
- Assemble the body, putting the bottom in place, and screw the screws into place;
- Installation of the modified housing into the screwdriver handle is complete. Now plug the power cord into a 220V socket. Turn on the power supply switch and, by pressing the Shurik start button, check whether you did everything correctly.
Remote power supplies
There are several types of power supplies that can be used as a power source for a cordless screwdriver. Let's look at some of them.
Power supply from a personal computer. You will need an AT format PC power supply. This power supply differs from others in that it always has a button to turn on the 220 V network. Also, such power supplies are distinguished by the fact that the power indicated on it always corresponds to the actual power, in addition, such power supplies have good overload protection and a cooling fan . We need a power supply with a power of 300–350 W, and the current in the 12 V circuit must be at least 16 A. To remake such a power supply, it is necessary, firstly, to remove the switch-on protection by unscrewing the power supply housing. To perform this work, you need to find a green wire on the power supply connector and connect it with a solder or jumper to any black wire located on the same connector. Secondly, in the MOLEX type connector (it is smaller) we leave only the yellow (+12 V) and black (body) wires, remove the red wire (+5 V). Next, use a flexible wire with a cross-section of at least 2.5 mm and the length you need to connect the power supply wires to the screwdriver terminals
It is very important to maintain the correct polarity here, so the cable must first be marked.
Charger for car battery. If you have an analog charger with manual adjustment of voltage and charge current, then no modification is required, just connect it via a cable to the screwdriver terminals and adjust the voltage according to the voltage of the screwdriver
And we also must not forget about the polarity of the supplied voltage.
Laptop charger. This method is simple because it requires almost no technical knowledge. If you have an unnecessary laptop charger of suitable voltage, then after checking its output voltage, you can connect the charger to the contacts of the screwdriver. To do this, you need to disassemble the battery pack of the screwdriver and remove the batteries that have become unusable. Having made a hole in the body of the battery pack, pass the wires from the charger through there and connect them to the contacts of the screwdriver, while observing the required polarity. Having supplied a 220 volt network to the charger, you can start working with a screwdriver.
Car battery. This method is used when wires for connection from a network device are removed from the screwdriver. It is enough to connect them, observing the polarity, to the terminals of the car battery to continue working with a screwdriver.
Homemade power supply. In order to make a portable homemade power supply yourself, you need knowledge in the field of radio engineering, as well as the ability to read electrical circuit diagrams. In order to make a homemade power supply you will need a power transformer. Such transformers were previously used in tube televisions, as well as in other similar household appliances. The power of the transformer on the primary winding should be 205–300 W. The voltage of the secondary winding must be selected within the range of 18–30 V. The cross-section of the wires of the secondary winding must withstand a current of at least 15 amperes. A diode bridge or a bridge assembled from individual diodes must also be designed for the appropriate current. The losses at the diode post are approximately 1.5 volts, so the output voltage will be close to the required one. In practice, you can select the required voltage using a conventional incandescent lamp with a voltage of 220 V and a power of 100 watts. By connecting it as a load, the required voltage must be achieved by the number of turns of wire on the secondary winding of the transformer. Next, the assembled power supply must be placed in the case and the low-voltage wires must be brought out to a connector for connecting to a screwdriver. It is also important to install fuses in the primary and secondary circuits of the transformer, thus protecting the power supply from short circuits.
How to remake it yourself
Before you remake a screwdriver, you need to clearly determine what power and what voltage the tool needs to operate. This will be the starting point.
It is important to choose a power supply that is not very large and relatively light, so as not to make working with a screwdriver completely inconvenient. If the block is planned to be installed directly into the screwdriver itself, it is important to maintain the dimensions.
The body of the instrument is then opened. The two halves of the housing can be fastened with screws or with glue. A knife can be very useful during disassembly.
After opening the case, a power supply or wire is inserted inside, the contacts of which must be soldered to the charger. Soldering should be as efficient as possible, using special solutions.
The second end of the wire must be intended for power supply from the network. So there must be a plug there. It is recommended to make a hole in the housing in advance through which the cable will pass.
A homemade power supply can be obtained in several ways. In any case, you will get a full-fledged tool that can be used to perform work after connecting to the network. It is advisable to first prepare a diagram that will help you avoid mistakes when creating a block.
Reworking a Chinese-made power supply
Ordinary Chinese power supplies with an output voltage of 24 V and a current of 9 A are excellent for creating a power supply for a 12-volt screwdriver with your own hands. But since the tools use less voltage, you need to lower it first.
To achieve the goal, you need to replace the original resistor R10 with an adjustable resistor, with which you can achieve the desired voltage. This is done in several stages:
- the permanent resistor is removed;
- in its place a pre-prepared adjustable resistor is inserted, on which a resistance of 2300 Ohms will be set;
- so far the voltage is still 24 V;
- Using the resistor settings, you need to achieve the required voltage at the contacts.
After all the manipulations, you need to check that the output voltage is the required value (12 V, 14 V, etc.), and also that the current exceeds 9 A.
Reworking purchased blocks
You can also power it from any other purchased power supplies. The conversion process in this case will be almost the same, however, in addition to the resistor, you may need to solder in additional diodes. The most important thing is to achieve the required output parameters. And this can be easily done using a combination of components.
After the conversion, it is important to ensure good air flow into the box with the power supply. To do this, holes are drilled. Do not allow the device to overheat.
We use a laptop charger
An excellent option is to use a laptop charger. Such devices usually operate with a voltage from 12 to 19 V. This is quite enough to ensure high-quality operation of the screwdriver. But do not neglect the output current indicators. The closer it is to what is required, the better.
In this case, converting a screwdriver to mains power comes down to simply soldering the wires from the charger to the board in the tool. It is advisable to insulate everything using electrical tape or other similar materials. After this, the wire is brought out and the tool can be used.
Computer power supply
You can make a screwdriver from the network using an unnecessary power supply from a computer. There are many varieties of such devices, but almost all of them are suitable for a screwdriver. The required wires can be identified by color by checking on the manufacturer's website.
In most cases, black and yellow wires are used to transmit 12 V.
Computer power supplies are distinguished by durability, advanced overload protection and many other advantages. They may not be very convenient due to their size, but a long wire will help solve this problem.
Procedure for connecting a computer power supply to a screwdriver:
- disassemble the block;
- remove the power-on protection by disconnecting the green wire from the board;
- this wire must be connected to the black connector on the device;
- separate all wires except yellow and black;
- these two wires are soldered to the extension cable;
- the second end of the cable is directly connected to the screwdriver;
- All open contacts are isolated if possible.
Thus, from a computer device you will get a power supply for a 14 volt screwdriver.