A screwdriver is a multifunctional power tool that helps in assembling furniture, carrying out minor repairs or performing other tasks. But this device breaks down over time. If you don’t have the money to repair or purchase a new device, you can try to fix it yourself. To do this, you should know what malfunctions are typical for tools of this type and understand how to correct them correctly.
Main causes of malfunctions
Screwdrivers are either corded or cordless. Their main faults are almost the same, and the differences are related to the type of power supply.
Corded screwdriver
If the device does not turn on, first check the condition of the socket, and then, if it is working, inspect the plug. Often the screwdriver does not start because the contacts burn out. If both nodes are intact, you should inspect the cable to make sure that it is intact and not broken or bent. Possible causes may also be a faulty power button, worn out electric brushes, or a burnt-out motor winding.
If the equipment sparks, you need to look for a defect in the armature, electric brushes or motor commutator.
A self-starting screwdriver indicates that the power button has broken down.
If the cartridge is loose, the cause is damage to the gear shaft. If the chuck is jammed and the drill bit or bit cannot be removed, the clamping jaws are jammed. The reason is lack of lubrication or breakdown of the internal components of the cartridge. If this mechanism spins, the problem is the gearbox is faulty.
If the ratchet is defective, inspect the petals of its locking device, the spring and the pins.
Cordless screwdriver
If the equipment does not turn on, check the charger and battery health. When discharging quickly, its condition is diagnosed using a special tester.
Other malfunctions of a cordless screwdriver are similar to network equipment.
How to disassemble the cartridge + (Video)
If the cartridge fixation is conical, then it is simply removed - by carefully hitting the block body with a hammer. If the fastener is threaded, the following steps will be needed:
- Unscrew the screw with the left-hand thread in a clockwise direction.
- We squeeze the hexagon in a vice, place the key on it and hit it with a hammer. Likewise, the cartridge should move from its original position. You can choose one more option:
- Place the screwdriver on a flat surface, on a table, for example.
- Turn it on.
- Observe whether the cartridge has moved from the table. when struck by a hexagon.
It also happens that all of the above methods do not work, and then there is only one thing left to do - disassemble the screwdriver, after which:
- Remove the gearbox and spindle;
- Place the assembly in the clamps of a vice;
- Take a pipe wrench and then disconnect the chuck.
And if there is debris in the gearbox, then that’s what you need to do.
How to disassemble
Disassembling the screwdriver is performed on a table or other flat surface to avoid loss of parts or fasteners.
Screwdriver
To disassemble the screwdriver, you first need to remove the battery and then unscrew all the screws. Then the case is carefully opened, trying not to damage the structure. If difficulties arise, you need to inspect the device again. There may be fasteners left somewhere or the parts are connected by staples that need to be removed.
After the case is opened, remove the parts one by one and lay them out on the table in the order in which they were removed. You can take several photographs so as not to make mistakes during the assembly process of the equipment.
Gearbox
A breakdown of this unit is indicated by strong vibration during operation, unusual noises or other signs. For repairs, you will need to disassemble the screwdriver gearbox. It includes ring gears, satellite gears, and carriers. All parts are removed from the housing one by one, then thoroughly cleaned and lubricated.
The procedure is carried out on a flat surface, removing all the parts, laying them out in the correct order so as not to experience problems during reassembly.
The disassembly itself looks like this: the cartridge is removed, the housing is disassembled, the gearbox is separated from the engine. Next, the plate is removed, all parts are removed from the housing, and the bolts connecting the halves of the gearbox are unscrewed. Use pliers to adjust the diameter of the spring to improve gear engagement. Next, the coupling is disassembled - the retaining ring, washers, and bulk bearing are removed. The shaft is removed.
After disassembly, faulty elements are replaced with new ones. Sometimes, for example, when a shaft is bent, it is necessary to purchase a new gearbox.
Engine
If the motor does not work, the problem is usually associated with the brushes, or less often with the armature winding. In the first case, the brushes are replaced with new ones. In the second, you will need to change the engine itself. The gear pressed onto the shaft of this unit remains intact; it must be disconnected with a special puller or improvised tools. The part is then placed onto the new engine using a hammer and a hard surface.
button
Repairing a screwdriver button is usually impractical, but sometimes it is enough to simply disassemble it and thoroughly clean it. Conventionally, it includes three nodes:
- control button for turning on and off, as well as speed adjustment;
- soft start lever;
- reverse button.
If the part is collapsible, to separate it, you need to find the plastic latches and bend them. The button that cannot be disassembled is replaced with a new one.
How to remove a chuck from a Zubr screwdriver
The chuck is one of the screwdriver design elements most susceptible to wear, so it is disassembled more often than other parts. When disassembling it, you should pay attention to how the cartridge is secured. There are three methods of fastening in total. The simplest and oldest of them is using a Morse cone. With this method, the taper of the cartridge and the shaft coincide. This cartridge is removed by light blows of a hammer on the body. The second method is to attach the chuck using a thread, when it is screwed onto the threads of the end of the shaft. In this case, the procedure will be slightly different.
- Unscrew the screw securing the cartridge in a clockwise direction.
- Then you should clamp the hex key, after inserting it into the chuck, in a vice, put a spanner on it and hit it with a hammer. The cartridge should move.
In cases where the cartridge is not susceptible to such influence, you need to do the following. You need to pull out the gearbox, and with it the spindle, then clamp the entire assembly in a vice and remove the chuck using a pipe wrench.
In this article, we briefly highlighted possible problems that arise when operating the Zubr screwdriver, examined the main malfunctions, and also discussed ways to eliminate them. We hope that the time you spent reading this article was beneficial to you.
Innovative technologies in construction are developing every day; it has long been no secret that a screwdriver is an indispensable assistant for both an experienced specialist and a novice craftsman. Thanks to it, you can easily tighten all kinds of screws and self-tapping screws when assembling furniture structures, as well as when repairing equipment and residential premises.
The fact that any equipment breaks down over time is no longer news to us, so it becomes possible to disassemble the screwdriver and try to fix it with your own hands. But only without fanaticism, be careful when disassembling, especially such models as: interskol yes 12er 01, interskol yes 18er.
How to test the motor and button with a multimeter
To determine the functionality of the button and motor, a multimeter is used.
To diagnose the motor, the gearbox and the wiring connecting the part to the start button are disconnected, and then the resistance of the armature winding is measured. If there is no reading, this indicates a winding break. If the numbers on the screen are very low, a short circuit has occurred.
To test a button with a multimeter, the wiring connecting its input terminals to the battery is twisted, and the tester probes are connected to the outputs. The device is switched to resistance measurement mode and turned on. If the values on the display are close to zero, the part is working properly. When broken, the screen shows infinity.
Repair of power control and reverse mechanisms
A situation arises when the tool turns on normally, but the rotation is not adjusted when the push-button switch is pressed differently. In this case, the cause of the damage must be found in the engine rotation control mechanism. The main causes of such damage can be failure of a push-button switch, breakdown of a transistor, or destruction of the armature brushes.
The functionality of the contact system of the start button is checked using a tester. It cannot be repaired and should be replaced.
The integrity of the transistor located on the control panel is checked by inspection (by color change) or by measuring the voltage and current of the input and output signals.
Then you should check the integrity of all soldering and the condition of all elements in the speed controller circuit diagram.
Malfunctions in the motor rotation reversal mechanism can occur due to damage to the lever mechanism or destruction of the armature brushes. The performance of the contact system of the mechanism is assessed with an ohmmeter with different fixations of the flag.
How to repair
If the screwdriver cannot be turned on, this means that the problem is related to the electrical part. For network tools, the socket, plug, power cord, button, and motor are checked in sequence. On batteries, the charging unit, battery, power button, and motor are diagnosed.
Problems with the mechanical part (extraneous sounds, noise, vibration) are associated with malfunctions of the gearbox, ratchet or clamping motor.
Charging block
If the cordless screwdriver does not start, remove the battery, charge it, and check its operation after a couple of hours. If the problem persists, diagnose the charger and battery using a multimeter.
To check the charger, select a DC voltage measurement on the tester and set the nominal to 20 V (or 200 V if the battery nominal is 24 V). Next, the charger is connected to the network and the voltage at the output terminals is measured. The value should exceed the battery parameters by approximately 2V. If the values are lower or there are no readings, the memory is faulty. It is very difficult to repair it if you do not have skills in working with electronics, so it is more advisable to purchase a new charger.
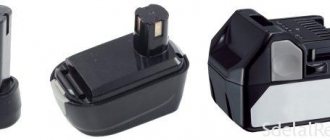
Battery
To check the health of the battery, simply replace it with a working one and see if the equipment starts. If this is not possible, the battery is charged and removed after three to four hours. Next, connect a tester to the terminals and measure the voltage at the output. If the readings on the multimeter are lower than the nominal values, the battery is broken.
First you need to disassemble the battery. To do this, unscrew the screws and divide it into two halves. If the battery is not removable, which is very rare, it is disposed of and a new one is purchased in return.
Having disassembled the battery, the user will see a certain number of barrels (cans), depending on the battery voltage. The nominal value of each of them is 1 Volt; to obtain 12V or other values, the banks are connected in series. Further:
- Examine contacts between banks. If breaks are detected, restore the circuit.
- Measure the voltage on each barrel. If it is below 1 V, this element will need to be unsoldered and replaced with a similar one. The necessary parts can be purchased or taken from an old, unused battery.
- Having restored the circuit and changed the banks, the battery is assembled, charged and its operation is checked.
It is important to remember that the battery contains electric current, so all work must be carried out very carefully, observing safety precautions.
Problems with the button
Repair of the screwdriver button will be required if the charger and battery are working properly. First, check the voltage coming from the battery to its terminals. If it is missing, look for a damaged wire or contact, otherwise check the button.
You will need to short-circuit the wiring coming from the battery to the input contacts of the button, and connect the probes of a multimeter set to resistance measurement mode to the output terminals and turn on the device. The fact that the part is intact will be indicated by zeros on the screen. Otherwise the user will see the value of infinity.
If the button is collapsible, open it and clean the inside of dirt, and also check the contacts. They often burn out, but after cleaning with sandpaper the functionality of the screwdriver is restored.
If the contacts are badly burned or the button is not removable, you should replace it with a new one. It is inexpensive, so it is easier to recognize it as beyond repair than to waste time and energy trying to restore it.
Electric motor
The next unit that needs checking is the electric motor. Typically, it wears out the brushes that transmit voltage to the motor armature. If their length is reduced by more than 40%, the parts are changed. This is also evidenced by sparking that could be seen inside the case when the device was operating. These elements cannot be repaired, so they are replaced with similar ones in shape and size.
If the brushes are intact, the reason is in the motor itself. You will need to check the screwdriver motor with a multimeter by measuring the resistance of the armature winding. The infinity value indicates a winding break. This part is sometimes changed or rewound, but it is easier to purchase and install a new electric motor, because Finding an anchor for a screwdriver, especially one made in China, can be very difficult.
Replacing brushes
To change brushes, you will need to buy a new original set or select identical ones in shape and size. The motor itself can be serviced or maintenance-free. In the first case, the steps are simple - just disassemble the case, remove the worn ones, install new ones and reassemble. In the second case, the process is more complicated - you will need to bend the rolling to remove the part with the brushes, then replace the worn-out elements and return them to their original place.
Gearbox
A gearbox is a mechanical unit used to transmit torque from the axis of the motor-power unit to the cartridge and consists of a set of gears. If they are metal, it is better to repair the part rather than replace it with a new one. The assembly is disassembled, cleaned of old grease, then the damaged gears are removed, and new ones of similar size are installed in their place. Then the gearbox is carefully reassembled in the reverse order.
If a grinding noise is heard during operation and the device jerks, this indicates a bent shaft. A noticeable beating appears. The gearbox must be completely replaced.
Ratchet
This is an adjusting ring with numbers that limits the force when rotating the cartridge. It allows you to adjust the screw-in depth of the self-tapping screw, prevents bit wear and cutting off the splines of the fastener. Each number indicates a certain force - the larger it is, the higher the force of action. The last icon is a picture of a drill, it is set to maximum torque.
Do-it-yourself screwdriver ratchet repair consists of an external inspection, checking the integrity of all elements, removing contaminants and subsequent lubrication.
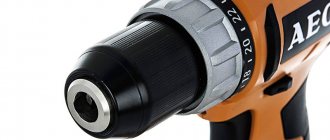
Keyless chuck
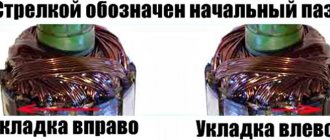
Chucks in screwdrivers differ in the type of fastening. The first - Morse Cone - is indicated by the symbols “1-6 B10”. To knock it out, they hit the body with a hammer.
The other two types of parts are fastened with a threaded connection or the same, but with a fixing screw. To remove them, open the cams and unscrew the screw clockwise if there is one. Next, a 10 mm L-shaped hex key is clamped in the fists and struck with a hammer. The thread is displaced and the cartridge is unscrewed.
If the assembly is faulty, this is indicated by play or misalignment of the clamped bits, as well as uneven extension of the cams. To fix the problem, the cartridge is disassembled by removing the plastic plug from the base. If it is metal, it is knocked out with a hammer. Next, remove the flare nut, unscrew the clamping jaws and check the threads on both parts. If it is broken, the damaged elements are replaced.
Cams or flare nuts are rarely found on sale. To replace them, they are removed from another instrument. Therefore, usually the cartridge is simply replaced with a serviceable one.
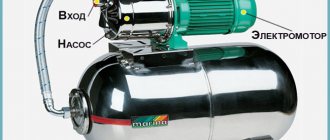
Operating principle and main components
Before you start repairing a screwdriver with your own hands, you need to understand the principle of its operation and what parts it consists of. The main difference between a screwdriver and other power tools is the use of a mechanism that stops the rotation of the working part of the device. This happens when the maximum resistance configured for the instrument is reached. This value is not constant and can be adjusted. There are two types of device:
- operating from a 220 volt network;
- using a rechargeable battery.
Regardless of the type of device, their operating principle is the same and is based on the transmission of torque. It determines which fastening tool the screwdriver can tighten. To increase torque, devices use gearboxes with a large gear ratio, but the rotation speed is reduced. For screwdrivers operating on AC power, the torque value is related to the power consumption of the tool. The main parts underlying the device of a screwdriver, be it Makita, Hitachi or Bison, are as follows:
- electric motor;
- push button;
- speed controller with reverse;
- chuck;
- the electronic unit;
- gearbox
The electric motor rotates the spindle at a set speed using a planetary gearbox. The torque is controlled by a clutch, and a chuck or hex holder is placed on the spindle. A replaceable device called a “bit” is installed in this cartridge. The screwdriver is controlled by an electronic circuit and reverse switching .
Reverse occurs by changing the polarity of the power supply. The motor is a single-phase continuous current commutator motor. This motor is designed to be connected to an alternating current network. The field winding is connected in series with the armature winding and is divided into two parts. One turns on before the anchor, and the other after it.
Causes of breakdowns of different brands of screwdrivers
Typically, screwdrivers break for common reasons, regardless of their brand and cost. Most often they are associated with incorrect user actions. Among them:
- Operation errors. The equipment is used only for its intended purpose. If you start drilling concrete with a low-power device, it will only work for two to three days.
- Exceeding the permissible operating time. Screwdrivers are intended for home and professional use. The former should work no more than a couple of hours a day, the latter can be used longer.
- Failure to comply with storage rules. The equipment must not be kept in damp or cold areas. Moisture causes mechanical and electrical parts to oxidize, and cold damages batteries. In addition to dampness, the devices are afraid of direct sunlight. Overheated screwdrivers are highly likely to burn out during operation.
- Batteries are not charging correctly. It is not allowed to leave them discharged for a long time, or to exceed the charging time. At least four to eight times a month, start the tool and allow it to work for a short time.
By following the recommendations for care and use, the owner of the equipment will ensure its long service life, regardless of whether it was produced in China or Europe.
If a screwdriver breaks down, you can diagnose the device and repair it yourself. Most broken parts cannot be repaired or are quite difficult, so they will need to be replaced with working ones. When purchasing spare parts, you need to check that the new elements match the old ones. If this is not the case, at best the equipment will not be assembled, and at worst it will be completely damaged.
Diagnostics and troubleshooting of the electrical part of the screwdriver
If you have a battery-powered device, then the first thing you need to do is check the batteries in the battery pack by disassembling it. There are collapsible and non-dismountable blocks. In the second case, you will need to carefully insert a screwdriver into the place where the walls of the block are glued and, slowly, separate them.
Next, you need to measure the voltage on all “banks”. The voltage rating is indicated on the body of each battery. The voltage should be slightly lower than specified, but the same on working batteries. Faulty batteries will differ significantly from the rest in the voltage they produce - they will need to be replaced. New batteries can be purchased online.
It is important to solder them correctly, that is, in series: the plus of one battery is connected to the minus of the other, and the plus of the second to the minus of the next, etc.
If you are the owner of a networked screwdriver, then the verification algorithm is slightly different. First, you will need to unscrew the body of the device and remove one half of it. Take a tester and “ring” the power cord for a break. If the cord is working, you need to check the start button. With the button pressed, check whether there is a circuit at its output contacts. If the button is faulty, it will need to be replaced or repaired. How to do this will be discussed further. If the button is working properly, the problem may lie in the electric brushes or the motor.
Button repair
Below is an electrical diagram of a cordless screwdriver.
From the diagram you can see that 2 wires from the battery go to the button, and 2 wires come out of it to the engine. Also, 3 wires from the transistor responsible for adjusting the speed are connected to the button. To understand the structure of the screwdriver button, it must be disassembled. All wires going to this part do not need to be soldered. They will not interfere with disassembly.
Remove the push mechanism (red) from its seat. Do this with gentle rotational movements, while simultaneously pulling the part in the direction opposite to the button, making sure that the joke does not break.
Next, remove the button cover. In the places indicated by arrows in the figure, use a knife and a screwdriver to pry and push out the latches, and then remove the cover.
After removing the cover, you will see the reverse compartment. But the button mechanism will still be unavailable. Using a soldering iron, separate the 2 elements (indicated by an arrow in the following figure).
Carefully pull out element number 1, then remove the cover that covers the compartment with the device’s activation mechanism.
Holding the return spring, remove the mechanism from the housing.
In the faulty button you will see erased contact pads.
The contact pads wear out quickly due to the poor quality of the metal. Fine metal dust from actuated contacts accumulates between them and shorts out the pads. As a result, the device starts spontaneously.
Use cotton wool soaked in alcohol to remove metal dust. If this fails, you can scrape it off with a knife. After these steps, the spontaneous startup of the device will stop.
If the speed controller does not work, it means the transistor has burned out and needs to be replaced.
Replacing brushes
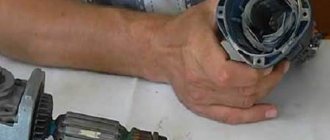
To check the condition of the brushes, it is necessary to disassemble the engine by bending the “antennae” located at the end of the housing.
Next, lightly tap the motor shaft with a hammer to knock the rotor out of the housing.
In this case, the cover in which the electric brushes are located will first be removed.
The next photo shows that the collector is black. This means that it will become contaminated with dust from the brushes. As a result of contamination of the commutator, as well as the grooves between its plates, engine power drops and the brushes spark. It is necessary to wipe the collector with cotton wool soaked in alcohol and clean the grooves with a needle.
The following photo shows what a clean manifold looks like.
If the brushes are worn out, they will need to be replaced. It is difficult to find original brushes on sale for some models of screwdrivers. But you can find brushes that are suitable in size, then use a sharpening machine to trim them and connect (solder) them to the brush holders.
Sometimes, to replace the brushes, you will need to cut a groove into them. It depends on the way they are attached.
To better understand how brushes are replaced, you can use the following video.
Engine brake repair
The engine brake is a device that stops the rotation of the armature when the start button is released. In screwdrivers, this function is implemented by closing the plus and minus of the motor when the button is released. As a result, a large self-induction occurs, and the spindle locks (with large sparks from under the brushes). If engine braking does not work, then the control transistor or start button will need to be replaced.
Malfunctions that occur with a screwdriver
Most modern screwdrivers are equipped with a standard device of the same type. For this reason, they all have the same faults. Among the main defects that indicate tool failure are problems with:
- battery malfunction;
- brush wear;
- broken buttons;
- cartridge runout;
- unsuccessful attempts to turn on/off;
- the occurrence of interruptions.
Each such breakdown can be easily repaired on your own, if you have experience in using measuring and soldering instruments. Remember that in certain situations, complete replacement of components is not excluded, since not every part is sold separately.
Video “How to disassemble a screwdriver”
Disassembling a Makita screwdriver: repairing the device and battery
Operating a Makita screwdriver inevitably leads to wear of certain parts of the mechanism. And in order to continue to use the tool perfectly, it will be useful to carry out some repair work. The procedure for disassembling and repairing such equipment is presented below.
Soldering new cans
Immediately after freeing the frame and board from the old power parts, new ones can be attached to them. Before soldering, it is recommended to properly clean the surfaces on the cans and on the board itself from remnants of previous soldering. This will allow you to achieve the best contact for a long time.
Now all new cans from other devices are placed in the appropriate places on the frame and soldered to the power controller one by one. It is recommended to do this using a thick tip on a soldering iron, because you will need quite a lot of solder. The contact must be very reliable and have a huge contact area.
After assembling one by one, it is recommended to wrap the entire structure in special paper and place it back into the case. Then the battery is reassembled and locked with a lid that is secured with screws.
Before implementation, the battery must be charged at a special station to full capacity, and only then connected to a screwdriver for testing. If everything is done correctly, the battery will become operational again.
Cans for replacement can be taken from other batteries or taken separately. The price for them is quite decent, but still manual replacement will cost even less than buying a new battery.
Disconnecting cans from the board
Using a drill with a disk attachment, the cans are sawed off from the board. The connections of each contact to the controller are removed one by one, and the elements are also disconnected from the common frame.
You need to do this quite carefully so as not to destroy the board itself, but quite forcefully to completely disconnect it.
Repairing a screwdriver button - instructions and diagram
Screwdriver
— a mobile tool that makes it easier to work with fasteners and threaded connections.
Until recently, cordless screwdrivers could only be found in the arsenal of experts, but with the emergence of cheap household models on the market, their popularity has increased sharply.
Unlike expensive professional tools, economical analogues have the shortest service life, which is why they fail more often.
One of the weakest points of a household screwdriver is the start button and reverse switch. As practice shows, they break down in most cases.
Over time, the instrument completely stops responding to any manipulation. Often there is a problem of the opposite nature, when the motor begins to work spontaneously.
In some cases, to eliminate the defect, it is enough to disassemble the tool and clean it, although more often a complete replacement of the screwdriver button is required. In both the first and second cases, you can remove the problem with your own hands. First things first.
DIY screwdriver repair
To eliminate most screwdriver malfunctions, it requires disassembling it, that is, removing the body and disconnecting the main components from each other.
How to disassemble a screwdriver
The screwdriver is disassembled in the following sequence:
- Remove the battery.
- Remove the screws connecting the two halves of the case.
The screwdriver body consists of two parts connected by a fairly large number of screws - in order to disassemble it, you need to find all the attachment points
- Remove its top.
- Remove the contents.
- Disconnect the button.
- Remove the speed switch.
- Disconnect the motor, gearbox, adjusting coupling and chuck.
The screwdriver button is integral with the switching mechanism, which is connected to the motor, so when separating the button from the socket on the case, you must be careful not to break the wires
In order to disconnect the screwdriver gearbox from its motor, you need to unscrew the four screws located at the contact point of the two plastic casings
Video: how to disassemble a screwdriver
Chuck repair
The chucks in different models of screwdrivers may differ slightly from each other. They can be attached to the shaft in three ways:
- Morse taper.
- Threaded connection.
- Threaded connection with fixing screw.
To determine the method of mounting the cartridge, you need to read the inscription on its sleeve: