One of the most popular and in-demand tools in the household is a screwdriver. With its help, you can not only screw and unscrew fasteners, but also drill and perform other types of work, replacing only the nozzles. Frequent use of the tool requires regular charging of the battery, and therefore entails failure of it or the charger. In the material we will pay attention to the question of how to repair a charger for screwdrivers.
Why is the screwdriver battery not charging?
If the screwdriver is equipped with a rechargeable battery, then a charger must be included with it. If at one point you discover that the tool’s battery is not charged after you put it on charge, then there may be several reasons for this:
- Battery malfunction, which happens quite often when the tool is not handled properly.
- Charging fault. This happens very often with Chinese instruments, which are much cheaper than branded products.
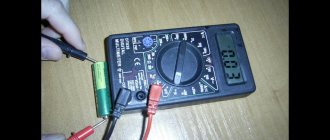
Despite the fact that there are two reasons for the battery not charging, the first thing you need to do is check the health of the battery. You can check its serviceability by connecting it to the terminals of a voltmeter or multimeter. If the device shows at least a similar value (12V, 16V, 24V), then the problem is most likely in the charger.
It is important to know! Most chargers are equipped with indicator lights (diodes) that indicate the charging process and its completion. If, after connecting the battery, these elements do not show the charging mode, or do not light up at all, then the problem is in the charger itself.
Typical malfunctions of the screwdriver charger
Typical charger malfunctions include:
- Fuse blown.
- Rectifier malfunction if the device reduces the voltage from 220V to 12V.
- Failure of the high-voltage transistor of the inverter.
The remaining components, as practice shows, work for a long time and without failure, therefore, if you suspect a faulty charger, you should check these three main components. You can repair the screwdriver charging yourself. To do this, you will need to disassemble it, which is possible if you have a regular square screwdriver in your arsenal.
Repairing a screwdriver charger
Repairing a screwdriver charger begins with the initial need to identify the possible cause of the malfunction. After all, quite often the reason for the battery not charging is oxidation of the contacts or their clogging while charging. First, carry out a visual inspection of the product, assessing its condition. If there is a burning smell, this indicates burnout of the internal elements.
Do-it-yourself charger repair is carried out by performing the following steps:
- First, remove the housing cover by unscrewing 4 or 6 fasteners.
- We remove the cover and see that the charger consists of two parts: a transformer and a board.
- We begin the repair by checking the voltage at the transformer output. To do this, the tester is set to the “Voltmeter” mode. In this case, you need to plug the plug into the socket.
- If the multimeter shows the corresponding value, then the transformer is working. If there is no voltage, then you need to ring the network cable. If damage to the network cable is excluded, then you need to make sure that the primary and secondary windings are not broken. Typically, imported transformers have a fuse installed in the primary casing. It is usually hidden under the shell, so you should find it and ring it. If a fuse blows, it should be replaced with a similar one. If the primary or secondary winding is damaged, then it makes no sense to repair the transformer, since it is easier to purchase a new device. If the cause of the malfunction is a fuse, then after replacing it, you should check it before assembling the product.
- If voltage is supplied to the board, then you should start looking for the faulty element. It is necessary to check the high voltage rectifier. Very often in this case one of the capacitors turns out to be faulty. This is usually the electrolytic capacitor on the board, which is the largest. It must be replaced with a similar one with the appropriate parameters.
- If the capacitors are working properly, then the cause of the malfunction is a breakdown of the transistor. It should also be re-soldered.
After repairing, the charger should be checked for serviceability and operation. Standard battery charging time ranges from 1 to 4 hours when the battery is completely discharged.
It is important to know! Do not store the screwdriver for a long time with a completely discharged battery. You should also not store the screwdriver for a long time without using it.
To summarize, it should be noted that to repair a screwdriver charger, you do not need to be a specialist. The design of this product is quite simple, but do not forget that this element runs on electricity, which is dangerous to life. When carrying out repair work, do not forget to follow safety precautions.
Until recently, the main assistant in the hands of a master was a drill, but today it has been replaced by a screwdriver. This portable power tool is used for screwing and unscrewing fasteners, drilling holes and even sanding surfaces. However, the instrument breaks down for various reasons, and how to repair it is described here. In the description, we will consider how to repair a charger for a screwdriver, and whether it is possible to restore the integrity of the electronic unit.
How to identify a faulty charger
Before you start repairing the screwdriver charging, you need to check whether the power supply is really the reason for the lack of battery charge. After all, much more often the tool’s battery fails first. How to check the battery for serviceability is described in detail in this material. The easiest way to make sure that the screwdriver charger requires repair is to plug in the power supply and look at the indicators. Typically, each charging unit has an indicator light that indicates whether the battery charge is restored (whether the unit is charging the battery). If the indicators do not light up, then the unit is most likely faulty and requires repair. However, there is no need to draw hasty conclusions here either. To make sure that the charging unit from the screwdriver is not working, you need to do the following:
- Pick up a tester or multimeter
- Plug the power supply into a power outlet
- Set the multimeter to DC voltage measurement mode. The amount of voltage depends on the tool itself. To find out the output voltage, you need to examine the description sticker. Typically the output voltage is in the range from 9 to 24 V
- The red probe of the multimeter needs to be touched to the positive contact of the charging unit, and the black probe to the negative (or minus)
- Pay attention to the multimeter screen and the values it shows
Depending on the multimeter readings, you can draw the following conclusions:
- If there are no readings, that is, the number “0” on the screen, the unit is not working and therefore requires repair or replacement
- If the multimeter readings correspond to the value indicated on the power supply, the device is working properly, and the reason for the multimeter’s inoperability is most likely hidden in the instrument’s battery
- If the readings on the device are lower than the values indicated on the power supply, that is, when the output voltage is 9V or 12V, the device shows 3V, 5V or 7V (or other values) - the electronic elements in the charging unit have failed, so minor repairs will be required
There is another scenario - the device shows values higher than the nominal value indicated on the charging unit. Such situations are rare, and if the unit produces a voltage higher than that indicated on the power supply, this can damage the battery or reduce its service life. In this case, you also need to resort to repairing the charger from a screwdriver. If checking with a multimeter confirms that the charging unit is faulty, then it’s time to start troubleshooting.
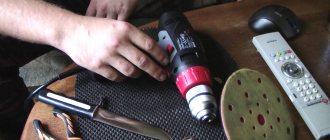
DIY screwdriver repair
To troubleshoot the device, it is necessary to disassemble it by removing the housing and disconnecting the main elements of the tool from each other. Repair of any equipment can be divided into several stages. In the case of a screwdriver it looks like this. Moreover, in each individual case, the repair steps may differ depending on the cause of the breakdown that needs to be eliminated.
What can break in a charger from a screwdriver?
What breaks down in a screwdriver's charger is known to specialists who are faced with the problem of tool inoperability every day. It is irrational to buy a new charger for a screwdriver, so if the battery of a power tool does not gain a charge, then you need to start repairing by finding the cause of the breakdown.
The reasons for the inoperability of battery charging units are the following parts and mechanisms:
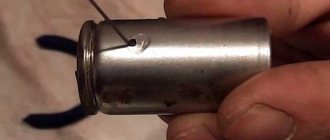
- Fuse - all electrical appliances that are not assembled “in the basement” have protective elements, and one of these is a fuse. It protects the charger board from overvoltages, stray currents, short circuits, etc. To do this, the circuit design uses a fuse designed for the appropriate current rating, the value of which depends on the battery voltage. Typically its rating is 5A, and it is located immediately after the transformer in front of the rectifier bridge. The fuse has a cylindrical design made of transparent glass with steel contacts on the sides. There is a “hair” inside, which is designed to pass current up to 5A (the current may vary on different models)
- Rectifier or diode bridge - if the fuse is working, and how to check it is described below, then we move on to considering the diode bridge. These are four diodes that are designed to rectify the current from the alternating current coming from the network to the direct current required to charge the battery. To repair the rectifier, you will need to unsolder the faulty diode or all diodes and replace them
- A capacitor is a large cylindrical barrel, which very often causes device failure. The capacitor swells, as a result of which the fuse fails, and often this also entails burnout of the diode bridge
- High-voltage inverter transistor, which very often fails on charging blocks of screwdrivers designed for 220V
Which element would not fail, but first you need to make sure that the failure lies in the power supply itself. After all, they often blame the power supply, although in fact it is high time to replace the battery. If you are going to repair the charging screwdriver, then you should start by checking the device for malfunctions. The instructions on how to check the unit itself are described above, so now we will find the faulty element, which is the reason for the charging failure.
Rules for choosing power tools
First, it’s worth understanding what types of power tools there are:
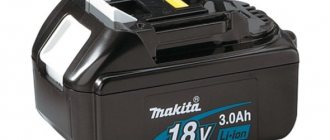
- Professional models, for example, brands Makita, Bosch (blue), Kress, Stihl, Hitachi, etc.;
- Amateur options are manufactured by Bosch (in greenish color), BlackDecker, Skil, Ferm, Einhell, etc.
Professional tools are characterized by long-term performance: you can work with them throughout the day. They are thought out to the smallest detail, and the construction is very strong. But you should be aware that the cost of similar models is high. If you need an electric scythe or a welding machine for home use, it is better to stick to amateur options.
Decide on other parameters:
- Power supply (battery or mains) The first ones are mobile, but you should keep in mind that batteries often fail;
- The case material should be high-quality and reliable plastic that will serve you for many years.
Screwdriver Battery Metabo Bosch Dewalt Hilti 12v 14.4v 18v 22v
150 UAH
How to find a breakdown in the charging unit of a screwdriver
Few people know what is needed in order to find a breakdown in the charging unit of a screwdriver, so we will consider this process in detail. You should start by disassembling the charger case, but this is done exclusively with the device disconnected from the network. Make sure that the plug of the device is not connected to the outlet, and only then begin to disassemble the housing structure.
To get to the inside of the screwdriver charger, which is being repaired, you must first unscrew 3-4 or 6 screws securing the cover. The number of screws depends on the model of the screwdriver and the power supply itself. As soon as the case is disassembled, the following picture will appear before your eyes, as shown in the photo below.
What to do with all this? You need to start repairing the charging screwdriver by identifying the faulty element or assembly. To get started, do the following:
- An inspection is being carried out. If there are traces of soot, then the breakdown has been found, and you can begin to fix it, but do not rush. After all, the presence of carbon deposits on one element could cause failure of other parts. To find them, you need to do the following, so read on
- We arm ourselves with a tester, and, having set the switch to the dialing mode, we touch the fuse terminals with the probes. What it looks like is shown in the photo above. If the tester beeps, it means the fuse is good and the problem is somewhere else. Let us remember our initial check of the device for serviceability - if the tester readings were positive (and not zero), then the fuse need not be checked, and the reason is different. If the tester readings are zero, then the fuse is checked first.
- The next thing to check is the capacitor. Its malfunction can be identified by its shape - if it is swollen, then the repair of the screwdriver charging can be completed by replacing the burnt out element. Before soldering, it is recommended to make sure that the element is really faulty. To help, we again take a multimeter, only now we set the switch to the resistance measurement mode, and touch the terminals of the device with the probes. Shows “0”, which means you need to replace the capacitor and “it’s in the bag”
- Often the failure of a capacitor entails a burnout of the diode bridge. All or some of the diodes may fail, but in any case, they are worth checking. The photo below shows what a capacitor and diodes look like. You can check the health of the diodes by setting the multimeter to DC voltage measurement mode. To do this, we touch the leads of the diodes one by one with the probes. In one direction, the diodes must pass voltage and display the corresponding value on the device. After this, you need to change the polarity and ring the outputs again. If they pass in the opposite direction, then the corresponding elements should be replaced. If none are missing, then they are intact and do not require replacement.
- Checking the inductor or resistor is also checked using continuity testing or resistance measurements. If the continuity signal does not beep, then the resistor is faulty and needs to be replaced. All other elements rarely fail (unless it is a lightning strike in the electrical network, after which the entire board burns out completely), so usually this is where the search for faulty elements ends
Found faulty elements need to be replaced, but how to repair the screwdriver charger is described in detail below.
Design and possible defects
The charger (charger) consists of several key elements. Each of them can fail, which will lead to breakdown of the entire structure. These parts are quite simple, it is not difficult to find a replacement for them - in a store, similar to the device or power supply. However, it must be clarified that we are talking about an analog transformer device, and not a pulse one. The latter are usually more reliable, but practically unrepairable in the absence of the necessary knowledge. Although wires, fuses or toggle switches are easily replaceable in them too.
- electrical wiring components,
- fuse,
- toggle switch,
- a step-down transformer,
- rectifier block,
- filter capacitor,
- output contacts,
- control elements (microcircuit, zener diode, relay).
How to repair a screwdriver charger
When the power supply is disassembled and faulty elements are found, it will not be difficult to repair the charging of the screwdriver. To do this, you will need to arm yourself with a soldering iron, as well as flux and solder, and then get down to business.
In order to repair a charger for a screwdriver with your own hands, you will need new elements that need to be installed in place of the failed ones - these are a fuse, resistors, diodes and a capacitor. These elements cost a penny, and if you have old charging blocks or microcircuits at your disposal, you can remove them from there. When all the tools and elements are ready, you can begin the repair.
- First you need to unsolder or remove the fuse. Depending on the model of the power supply, the fuses in it can be plug-in or soldered. Even if this is a plug-in fuse, and you only managed to find one with legs, then the inserts need to be unsoldered from the board and a fuse element soldered to the contacts instead
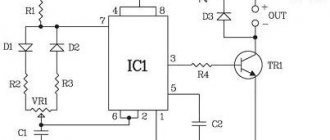
- If the capacitor is swollen and does not work, then it must also be removed and replaced. When soldering, do not forget to look at which legs are located where. This is very important, otherwise the element will not work correctly, which will lead to repeated failure. The positive contact of the “plus” capacitor must be connected in a chain to the cathodes of the diodes. In order to understand what we are talking about, below is a diagram in which the area of interest is highlighted. When installing a new capacitor, you need to select it according to the parameters that the failed element has
- If the diode bridge fails, then you need to remove the diodes and solder them. It should also be taken into account that the diodes must be soldered in the correct position - the anode to the input of the high-voltage part, and the cathode to the low-voltage part. If you focus on the diagram presented above, then there will be no difficulties with soldering the elements
If a resistor, transistor or other elements are faulty, they must also be replaced. The biggest difficulty that can be encountered when repairing a charging screwdriver is the failure of the microcontroller. The thermistor, which is located in the design of the primary winding of the transformer, may also fail. Its purpose is to limit and reduce the inrush current. The thermistor helps charge the capacitors that are at the input of the circuit. How to repair the charging unit of a screwdriver if the thermistor has failed is described in detail in the video.
If this element fails, then it is easier to buy a new unit, since it is very difficult to find a similar element, and even if you succeed, you will need to use a special hair dryer for soldering.
After carrying out a simple repair of the screwdriver charger, you need to initially check its functionality, and only after that you can connect the battery. How to check the functionality of a repaired charging unit - plug it into a power outlet (just replace the cover first), and connect the multimeter probes to the terminals. The corresponding values mean that the device is working and can be used. Now your “Shurik” is saved, and can serve you for a very long time.
To summarize, it should be noted that it is impossible to keep the battery discharged for a long time, and if your charging unit from the screwdriver is broken, then you need to start repairing it immediately, otherwise putting off this process for a long time will not lead to anything good, but will only contribute to the need to buy a new one battery in addition to the charger. By the way, if you cannot repair the charger from a screwdriver or the device has been lost and it is impossible to find one on sale, then making a charger yourself will help solve the problem. However, this will require some knowledge of electrical engineering.
During intensive use of the screwdriver, there is a possibility of its breakdown. And one of the most vulnerable parts is the battery. Let's look at how to check the functionality of a screwdriver battery using different methods.
Replacing battery cells
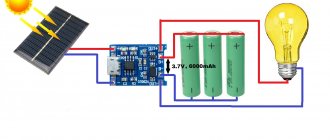
Sergei's battery uses 1.2 V nickel-cadmium batteries. They are not interchangeable, so it is better to select something similar to the original in size and with the largest possible capacity available. Sergey’s battery cells are similar to type D batteries , which is why we order them. Can be found with a capacity of about 2400 mAh in the same sizes.
I already wrote about how I changed the battery elements of an Interskol screwdriver. It contained 3.7 V lithium-ion banks of the most budget class, and even discharged. Then I replaced them with slightly better batteries. Now I would put branded Liitokala 2200 mAh or Panasonic 3400 mAh 18650 batteries.
One inconvenient thing is that you have to solder batteries that are sensitive to overheating. Repairing or restoring the battery in this way may have the opposite effect. The solution is a powerful soldering iron for 0.5 - 1 second. or use a spot welder . The second option will be more reliable.
General recommendations before checking the battery
Immediately before checking the battery, it is necessary to clearly determine what type of battery it is. Depending on this type, the approach may be different. For example, the most common nickel-cadmium batteries are highly sensitive to operating conditions. Infrequent or irregular full recharges significantly reduce the battery capacity and the battery does not use its full resource. We will consider battery types in more detail below.
It is also recommended to fully charge the battery before testing. This will allow you to make more accurate conclusions about the performance of the device. It has been proven that the most accurate readings are taken under load. And a full charge represents a very suitable type of load.
Before testing, it is necessary to minimize the influence of the “memory effect” on the device. Since this effect appears in batteries in case of improper use, in order to eliminate it, it is necessary to use the battery several times according to all the rules.
It is enough to carry out charge/discharge cycles 3 times for the effect to be significantly reduced. For accelerated discharge, it is best to use an incandescent lamp, which, together with a multimeter, will need to be connected to the battery.
If everything is done correctly, then after several full cycles the battery will be able to restore its capacity and can again be used in a screwdriver. If the operation did not help, then the problem was elsewhere.
Nickel-cadmium battery
The most common type of battery. They charge quite quickly and have a good volume. They are durable and resistant to external influences. The average number of charge/discharge cycles can reach 3500. When using rapid chargers, the battery does not wear out faster and can last a long time. Separately, it is worth noting the low cost of such batteries and the ability to operate at temperatures below zero.
But there are also disadvantages, the main one of which is the so-called “memory effect”. Batteries are quite toxic if they malfunction and have a high self-discharge rate. Due to toxicity, manufacturers are now trying to rapidly reduce the percentage of such devices.
To extend the life of such a battery, it is recommended to completely discharge it before recharging.
Li-ion battery
A much more expensive analogue, which however has a number of undeniable advantages. Such batteries are used in advanced models of screwdrivers from well-known brands.
Such batteries have a large capacity and a much lower percentage of charge loss due to self-discharge. However, it is strictly not recommended to overheat such batteries and leave them completely discharged for a long time. This can lead to crystal degradation and battery failure. If it overheats, there is a risk of such a device exploding.
Like the first type, the lithium-ion battery is capable of functioning in the cold.
What types of batteries are there?
What types of batteries are used in drills and screwdrivers?
- Nickel-cadmium (NiCd). The first type of device holds a charge for a long time and is equipped with sufficient capacity. There is a memory effect that prevents charging when the battery is not completely discharged. Therefore, frequent recharging is unacceptable, as this leads to a reduction in battery capacity. Before the first deployment, first fully charge the unit, then start working with the inventory. Nickel-cadmium screwdrivers are used in economical class screwdrivers. They're cheap. Suitable for infrequent use.
- Nickel metal hydride (NiMH). They came to replace nickel-cadmium ones. More environmentally friendly and weigh less. They retain their charge worse when in idle mode, which can quickly reduce battery capacity. It is better to charge before each use, always take a charger with you.
- Lithium-ion (Li-Ion). Characterized by sufficient battery capacity. Free from memory effect, designed for intense and constant use. They charge quickly, with up to 1000 cycles. They are distinguished by a comparatively high price. They discharge faster when operating at low temperatures, giving an unstable flow of energy. Such batteries must be stored half-discharged, replenishing the capacity from time to time.
How to check
Battery
To check the screwdriver’s power supply for functionality, you simply need to take the current and voltage readings at the time of charging. Moreover, it is necessary to repeat the procedure several times to obtain the most accurate values.
Stages of voltage increase U:
- after 30 minutes of charging – 13 V;
- after 60 minutes of charging – 13.5 V;
- after 2 hours – 14 V;
- at the end of charging - 17 V.
Such observations indicate that the battery is fully operational and functional. In most cases, no further analysis will be required.
At the same time, a working battery will also have a steady increase in current within an hour after charging starts. If after an hour the indicator reaches 1 A, this indicates that the device is working properly.
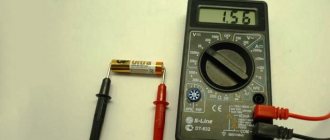
There is also a method for accelerated battery testing, which consists of measuring the voltage at idle (without load). This voltage must reach the required value, which is directly related to the operating voltage of the battery cells (cans). If the indicator is lower, then there is a high probability of failure of one or more elements.
A separate type of testing the battery capacity with a multimeter from a screwdriver can be considered testing under load. This uses additional equipment that needs recharging. Incandescent lamps are ideal for this. The power of such a lamp must match the power of the battery. Otherwise, the test results may not be accurate enough. In most cases, power is equal to half the current the battery is delivering multiplied by the voltage. For standard screwdriver batteries, 12 V lamps are used for testing.
The battery is connected to the load through a multimeter, which is then used to take readings. After a few minutes you need to measure the voltage. It should be above 12.4 V. If this indicator has not been achieved, then there is clearly some kind of malfunction. Additionally, it is recommended to pay attention to the brightness of the light bulb. It should be fairly stable.
Charger
The malfunction may lie not only in the battery, but also in the charger itself. Therefore, you first need to check the charger for the screwdriver with a multimeter.
It switches on the DC current measurement mode and connects it to the charger using probes. The current value on the meter should be as close as possible to what is indicated on the housing. If this is not the case, then it is better to replace the device with a new one.
Battery bank voltage
After the first stage of testing, it will become clear whether the device is working or not. If testing indicates a discrepancy between the parameters, then it is logical to proceed with repairs, accompanied by the replacement of faulty cans.
You need to open the battery case and identify the fault. For this, they also use a multimeter, which is connected to each element separately. The voltage of each bank must be at least 1.2 V. All discrepancies indicate a breakdown of the element. Faulty banks must be removed from the common circuit and replaced with new ones.
If such a check does not reveal a breakdown, then you need to resort to load testing again. And here the level of resistance, which is directly related to voltage and current, is of fundamental importance. Each element is tested separately and resistances are also calculated. In the event of a malfunction, this indicator will clearly deviate from the norm and will quickly identify the broken element.
Screwdriver without battery
One should not rule out the possibility of damage to the screwdriver itself. Using a known-good battery or connecting the equipment directly to the network will help identify this fact. The second approach will also be an excellent option in case of urgent need to use the tool. Of course, mobility will be lost, but the functionality will still be usable.
The screwdriver can be used with an external power supply plugged into an outlet. Then you just need to choose a rectifier with the necessary parameters. Movement will be limited only by the length of the low voltage cable connected directly to the instrument.
You can also create your own prototype of a regular corded screwdriver. Then the power supply will be placed in the battery case and will allow you to use the tool quite conveniently. In this case, the main question will be to select the required small-sized power supply with suitable characteristics. The process can be complicated by the need to find a powerful but compact transformer.
It is advisable to check the screwdriver battery regularly to prevent various breakdowns at the most inopportune times. Of course, this only applies to preliminary testing, without disassembling the case. Batteries are relatively short-lived components that must be replaced periodically. But proper operation in compliance with charging standards will help keep the devices operational for as long as possible.
Features and rules for charging batteries of screwdrivers
Batteries are made from various materials. This affects the size, weight, ability to drill at sub-zero temperatures, voltage, capacity, and susceptibility to the memory effect. The latter especially affects the principle of charging the screwdriver.
Refurbishment of nickel-cadmium batteries for screwdrivers
The device of ni cd batteries is made using the same technology, therefore any battery can be made a donor of this type.
Such devices are separate component blocks, with a nominal voltage of 1.2 V and an energy capacity of twelve million one thousand 500 MA/h. They are found in screwdrivers from the Interskol company. Each block affects the power, in other words, if its value is twelve V, the number of blocks is 10 pieces, 14.4 V is twelve, etc. After changing the battery, the power may drop for the first time of operation, but then everything will be restored.
READ How to cut corners for windows
Elimination of memory effect
Often, a battery needs to be restored after acquiring a memory effect that appears after repeated small recharges, when it is not fully charged. This disease is recognized quite easily. The battery discharges very quickly after being fully charged, but after a short break it can resume its operation for a short period of time. The problem is partly solved by the following method:
- It is recommended to charge the battery one hundred percent using a low voltage. After which, using small loads, it should be discharged. Small loads ensure a leisurely (smooth) discharge of the battery, which allows all its plates and outer layer to drain completely.
For discharging, it is best to use a twelve V light bulb, which is connected to the side terminals of the battery. The new charge can be created after the light bulbs stop glowing.
Before using the battery for operation, it is recommended to repeat the above function for 3-5 times. After which the battery capacity may decrease, but the introduction of such a recovery method is quite successful and can extend its service for at least some more time.
Reference
If, after disassembling the battery, it is impossible to read their markings on the battery cells, and without identifying the data, it is virtually impossible to carry out high-quality repairs, you need to pay attention to the designation of the material of their production:
- Nickel-cadmium batteries are designated Ni-Cd. The rated voltage of each element is 1.2 V;
- Nickel metal hydride elements are designated Ni-Mh. And the indicated voltage is similar to nickel-cadmium and is 1.2 V;
- The abbreviation Li-Ion corresponds to a lithium-ion battery with a voltage of 3.6 V.
Fundamentally. When selecting new power parts to replace failed ones, you should pay attention to their dimensions and data, which must coincide with the originals.