History of the device
A screwdriver is a power tool.
Its main purpose, as the name suggests, is to tighten or unscrew a fastener. After the electric drill was invented in 1868, the development of power tools became widespread. Founding companies DeWalt, Bosch, Black & Decker, Makita and Hitachi developed the industry by creating new devices. The introduction of the Phillips head screw in 1934 created a demand for electric tools to tighten them. It was especially in demand in mechanical engineering. The first device of this kind was called a wrench. With the advent of batteries, the device gained mobility, and the name screwdriver came into use. Its mass production began in the early 80s .
Modern devices are constantly improving, but to a greater extent this relates to the method of autonomy and control. The design of the device remains unchanged.
Operating principle and main components
Before you start repairing a screwdriver with your own hands, you need to understand the principle of its operation and what parts it consists of. The main difference between a screwdriver and other power tools is the use of a mechanism that stops the rotation of the working part of the device. This happens when the maximum resistance configured for the instrument is reached. This value is not constant and can be adjusted. There are two types of device:
- operating from a 220 volt network;
- using a rechargeable battery.
Regardless of the type of device, their operating principle is the same and is based on the transmission of torque. It determines which fastening tool the screwdriver can tighten. To increase torque, devices use gearboxes with a large gear ratio, but the rotation speed is reduced. For screwdrivers operating on AC power, the torque value is related to the power consumption of the tool. The main parts underlying the device of a screwdriver, be it Makita, Hitachi or Bison, are as follows:
- electric motor;
- push button;
- speed controller with reverse;
- chuck;
- the electronic unit;
- gearbox
The electric motor rotates the spindle at a set speed using a planetary gearbox. The torque is controlled by a clutch, and a chuck or hex holder is placed on the spindle. A replaceable device called a “bit” is installed in this cartridge. The screwdriver is controlled by an electronic circuit and reverse switching .
Reverse occurs by changing the polarity of the power supply. The motor is a single-phase continuous current commutator motor. This motor is designed to be connected to an alternating current network. The field winding is connected in series with the armature winding and is divided into two parts. One turns on before the anchor, and the other after it.
The tool uses a planetary type gearbox. The gearbox includes sun and ring gears, satellites, and carrier. The electric motor shaft rotates the sun gear, which transmits torque to the satellites, and they directly affect the carrier.
The gearbox is available in one- and two-stage types. In the second case, a double carrier connected to the shaft is used. The design of two carriers and satellites is located in the middle of the ring gear. It is fixed through special grooves on the body. Along the entire perimeter, the lugs of the ring gear rest against spring-loaded balls through the ring. The load control mechanism acts on the ring through a controlled spring, the force of which is changed by moving the regulator.
Speed control is performed using a pulse circuit assembled on a pulse-width modulation (PWM) chip. The controller controls a field-effect transistor operating in switch mode. The pulse frequency is changed using a variable resistor. The resistance value of the resistor depends on the force applied to the button.
The screwdriver clutch is a ratchet. If the load on the cartridge exceeds the permissible value, the load regulator is activated. The spring force becomes insufficient to hold the ring gear, and it comes off the balls. The electric motor begins to rotate the gear idle. When switching to electric drill mode, this gear is turned off and does not participate in the work .
A rechargeable battery with a voltage of 12 V or 18 V is most often used as a power source. It characterizes the power of the device.
The battery consists of several elements installed in one housing and connected in series. The case has a special latch that allows you to quickly remove the battery.
Moment of power
Torque is defined as the force exerted on a rigid body during rotation. For example, you need to tighten a hex bolt. For this task, there is a key that requires force. The product of this force and the length of the key is that very torque. More leverage provides more torque. This indicator is measured in newtons per meter.
A traction torque of 10 Nm for a screwdriver can be represented as a load with a mass of 100 grams at the end of a meter-long lever, or you can reduce the length of the lever to 10 cm, increasing the weight of the load to 10 kg.
The importance of increased torque when working with fasteners of large diameters and lengths is due to the high friction force that occurs at the moment of screwing. The deeper the fastener is immersed in the material, the higher this force will be.
It is for this reason that the “torque” characteristic is one of the most significant for a tool. The value directly correlates with the available size of the fastener or the diameter of the hole when drilling. In simple terms, high torque means high power of the tool itself, as a result of a greater range of available capabilities. Such a product is potentially more interesting to the buyer.
Disassembling a screwdriver
Most often, in order to find a fault and repair the device, you will need to disassemble it. Since all devices are similar in appearance, resembling the shape of a pistol, their disassembly can be presented in the form of recommendations given for repairing an Interskol screwdriver:
- First of all, the battery pack is disconnected. To do this, you need to press the latch and unfasten the module.
- Unscrew all the screws around the perimeter of the device using a Phillips screwdriver.
- After unscrewing the screws, the two halves of the housing are separated, while holding the structural parts installed in the grooves.
- The speed switch, start button and reverse mechanism are carefully disconnected.
- The gearbox is removed from the removed half. To remove it, you will need to rotate the gearbox in its seat.
Assembly occurs in reverse order . In this case, it is necessary to ensure that all removed elements and wires are located in specially made recesses for them.
To lubricate the mechanical parts or restore the gearbox, the latter often has to be disassembled. To do this, first remove the protective plate, then unscrew the screws in a circle and remove the top cover. Viscous materials, for example, Litol, are used as lubricants. It is important to note that it is almost impossible to carry out serious repairs to a screwdriver gearbox with your own hands, since gears are not produced separately by manufacturers. Therefore, if it is damaged, you will have to replace the entire unit.
The next element that has to be disassembled is the cartridge. It is a quick-clamping design that is secured with a threaded connection, a screw, or a Morse taper. With the first method, you will need to unscrew the fastener using a hex key, and then, placing the key in the chuck, tighten it tightly. The cartridge is unscrewed by turning the key.
With the second type of connection, use a screwdriver to unscrew the screw located in the middle of the chuck jaws counterclockwise. Next, having installed and clamped the L-shaped key in the jaws, with a sharp movement the key must be turned counterclockwise. Removing the fastener using a Morse taper occurs by carefully striking the end of the cartridge.
Cartridge
The mechanical part of the tool, designed to attach attachments and transmit rotational motion to them.
Usually installed on the threaded part of the spindle. Can be secured with a screw, clamp or ratchet. High-quality models have a lock that allows you to clamp a drill or bit without additional twisting. Almost all modern screwdrivers in the professional and amateur segment are equipped with a three-jaw self-clamping chuck with self-centering. This allows you to quickly change attachments and securely attach them for long and intensive work. Inside the chuck there is a hexagonal hole for fixing the shank of the nozzle. Usually the attachment occurs between all three cams by slightly rotating the coupling.
To install the nozzle, you need to grab the lower coupling and start turning the upper one - this allows the cams to unclench. To speed up the process, you can fix the nozzle by holding the upper coupling and pressing the start button to clamp, the reverse button to release.
Important! Some manufacturers equip the screwdriver with a magnetic holder for bits without mechanical elements. It is convenient to install a screw depth limiter on such a chuck, but with frequent and intense loads, play appears.
Finding the cause of the breakdown and eliminating it
The final breakdown of a tool is often accompanied by preliminary events, by paying attention to which you can prevent a serious malfunction: the appearance of extraneous sounds, sparking, burning odors, increased vibration, rapid battery discharge.
By disassembling the device, you can understand which unit is faulty. All device problems are divided into two types:
Each type has its own primary characteristics, by which the damaged part can be easily determined. A special type of problem is related to the battery. The nature of the failure is due to the fact that the battery is quickly discharged, or the device does not want to start at all.
If purchasing a new battery is problematic, you can try to disassemble it and replace the faulty element.
The battery is disassembled by removing its latches from the grooves. Under the casing there are elements with a container. Their connection to each other is made by contact welding. You can use a multimeter to measure the voltage on each bank. The normal value of a charged cell is 1.2 volts. Faulty elements are removed - to do this, they are carefully bitten off with pliers at the point of contact, and similar ones are installed in their place. If there is no welding, you can use a soldering iron. Then the battery must be assembled and installed in a screwdriver for testing .
If the screwdriver does not want to turn on, check the charging unit
It doesn’t matter what brand of screwdriver fails - Bosch, Makita, Interskol, Metabo, Zubr, DeWalt and others. If the tool does not start, then first you need to check the battery charge and its serviceability. To do this, charge the battery (for 1-2 hours), and then install the battery back and check its performance. If there are no signs of life, then you need to arm yourself with a measuring device called a multimeter or tester, with which diagnostics will be performed.
This is interesting! If you pick up a multimeter, you probably know how to use it. If not, then you should read the instructions.
Using a multimeter, we will find out what is causing the breakdown - the battery or the charger. First, let's find out if the charger is working properly. To do this we do the following:
- Set the multimeter to DC voltage measurement mode at a nominal value of 20V. If the battery on the tool has a 24V rating, then the device needs to be set to 200V.
- Insert the charger plug into the socket
- Measure the output voltage at the charging block terminals
Its readings should be 2V greater than the rating of the battery being tested, for example, for a 12V battery, the charger readings should correspond to a value of 13.5-14V. If the rating is lower or there are no readings at all, it means the charging unit is faulty. It can be repaired if you have knowledge of electrical engineering. If you can’t fix the charger, you need to buy a new unit of the same brand.
Screwdriver speed controller
An electric screwdriver operates either from a 220 V network or from a rechargeable battery. Its power depends on the battery voltage. The screwdriver rotation speed starts at 15,000 rpm. In addition, a powered screwdriver has 2 rotation speeds: a slower one for screwing, a higher one for drilling. The speed control is located inside the power button. The rather miniature size of this tool assembly is achieved using microfilm technology. Its main part is a triac. The operating principle of the regulator is as follows:
- When the button is turned on, an alternating current having a sinusoidal phase is supplied to the control electrode of the triac.
- The triac opens and current begins to pass through the load.
The response time of the triac depends on the amplitude of the control voltage. The greater the amplitude, the earlier the triac is triggered. The amplitude value is set using a variable resistor connected to the start button. The button connection diagram differs in different models. It is possible to connect a capacitor to the speed controller.
Often, in the current economic conditions, the buyer cannot always afford a full-fledged expensive screwdriver from reputable companies. Cheaper models may not have this feature. But this is no reason to despair. You can assemble the speed controller yourself, which we will talk about below.
The screwdriver speed controller is assembled on the basis of a PWM controller and a key multi-channel field-effect transistor. The operation of this tool unit is controlled by a resistor. Its position depends on the pressure on the screwdriver start button.
The direction of rotation of the working body changes by changing the poles of the voltage that is supplied to the motor brushes. This is done instrumentally using changeover contacts actuated by a reverse lever.
It is possible to assemble such a regulator with your own hands. We will look at how to do this below.
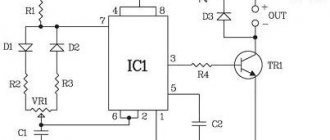
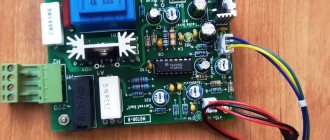
A diagram of the elements that make up the speed controller is shown in the figure below.
Scheme
In this case, a dual comparator microcircuit LM 393 is used. Here, the first comparator works as a sawtooth voltage generator, and the second one is PWM. The control signal for PWM is the voltage drop across the motor contacts. To put it simply, in the diagram the electric motor looks like active and inductive resistances connected in series with each other. When the load changes, the ratio of these resistances changes accordingly, the regulator controls this and changes the PWM filling, thereby stabilizing the speed.
An electronic transformer should be used as the power source for PWM. It is a half-bridge voltage converter from 220 to 12 V, which is used to power halogen lighting lamps. Its dimensions are comparable to the size of a matchbox. The price fluctuates between 2–3 USD. e. It is necessary to add a rectifier to the output (these are four diodes, for example, KD 213), as well as a capacitor with a capacity of several thousand microfarads at 25 volts. All this will constitute a switching power supply with a constant output voltage.
We should also talk about making a printed circuit board for the regulator. To make it you need a sheet of photo paper and a laser printer. First you need to print the design on photo paper using a laser printer, then transfer it to the board blank using a heated iron. The board blank with the paper attached is placed in a container and placed under a stream of hot water. This is done so that the gelatin layer of the photo paper swells and it peels off from the board. The remaining pattern on the board is etched with ferric chloride.
Electric motor
A small-sized commutator-type motor is the main part of the tool. Mains-powered screwdrivers are equipped with a two-phase AC motor and start via a starting capacitor. Battery models operate from a constant power source. Main elements of an electric motor:
- a cylinder made of durable steel containing magnetic elements inside;
- the anchor part is fixed on brass supports;
- windings made of material susceptible to magnetic fields are laid in the grooves;
- through an equal number of winding turns there is access to the collector plates;
- brushes made of graphite or other durable metal are attached to the tail part of the anchor.
Scientific forum dxdy
VIDEO ON THE TOPIC: SPEED CONTROLLER FOR ELECTRIC TOOLS IN 5 MINUTES The lack of speed control of the screwdriver motor significantly reduces the convenience of operation. The regulator is located in close proximity to the start button or is made as one piece with it, however, the speed control transistor is attached to the electric motor, where it is cooled through the radiator grilles. If you have problems and you cannot control the speed of the tool, you will need to replace the speed control with a new one. If you do not have special repair skills, we do not recommend experimenting. Contact the Umedia service center in St. Petersburg. Umedia Service provides post-warranty repairs of screwdrivers with free diagnostics in 21 service centers in St. Petersburg and at home!
Malfunctions of the reverse motor and speed controller
If the screwdriver shows no signs of life, then the fault may be hidden in the engine itself. Most often, the brushes through which voltage is supplied to the armature are worn out in the engine. If graphite brushes are worn away more than 40% of their length, they need to be replaced. The fact that it is time to replace the graphite brushes is indicated by sparking inside the tool body. Brushes cannot be repaired, so you need to buy parts of a similar type and size.
If it turns out that the brushes are in order, but the tool still does not work, then the reason lies in the electric motor itself. To check it, you need to measure the resistance of the armature winding. If the multimeter readings tend to zero or have a low value, then a winding break is appropriate. To restore the device's functionality, you will need to buy a new electric motor.
This is interesting! If the armature winding breaks, this part can be replaced or rewound. However, it is difficult to find an armature for Chinese power tools, and it is much easier to buy a new electric motor.
If there is no reverse, you need to check this mechanism. To do this, follow these steps:
- Take a multimeter and connect one probe to the input contact of the button, and the second to the contact of the electric motor
- Reverse handle switches
- The device records the readings, and if any value is displayed on the display, then the part is working properly. If the device remains silent, then you need to replace the part.
If the reverse option does not work, then you don’t even have to check the serviceability of the device with a multimeter. Disassemble the device and check the quality of the contact connections. If the wires do not come off, then the switch itself needs to be replaced.
If the speed controller is faulty, the speed controller (field-effect transistor) should be replaced. This part is connected to the start button, so replacing it is not difficult.
There is nothing complicated about repairing the electrical part; you just need to follow a clear sequence of actions to identify the cause of the malfunction and eliminate it.
Screwdriver force regulator
The force regulator is a clutch that limits the force when the chuck rotates. It is made in the form of a rotating plastic drum. The amount of tightening is adjusted using a digital scale located around the circumference of the drum. By increasing the tightening value, you screw the screw in deeper.
This function will be necessary when working with material products of varying degrees of hardness, since when working with soft material, the body of the self-tapping screw will be easily recessed into it; too high a hardness of the material will contribute to the violation of the geometry of the screw, especially if it is small in size. The ratchet, as the regulator is also called, prevents cutting off the splines of the screws, as well as wear on the screwdriver attachments. The adjusting ring should be tightened in stages, starting with the slightest force. In those screwdrivers in which drilling can be done, the last pictogram on the ring will be in the form of a drill. In this position, maximum torque is achieved.
Technical specifications
Once you have decided on the type of screwdriver and power supply, you need to focus on the technical specifications. They determine what screws and what material you can screw into.
Example of technical characteristics of a screwdriver
Rotation speed and torque
The force with which a screwdriver can turn a screw is determined by the torque. It can be very small for household models - 10-15 Nm, or can reach 130-140 Nm for professional ones. Therefore, professional screwdrivers can easily and quickly tighten large screws and work with hard materials.
But high torque is not always necessary and not with all materials; therefore, screwdrivers provide the ability to adjust the applied force. There is a limiter for this. It is made in the form of a movable ring, which is located behind the clamping chuck.
The higher the number of revolutions, the stronger the torque
Many models of screwdrivers can operate in two modes: actually tightening the fasteners and drilling. Such models are called drill-screwdrivers, but they are now the majority. To switch to the drill mode, the switch is set to the extreme position (having first replaced the nozzle). At the same time, maximum speed is turned on, which allows you to drill even quite hard materials.
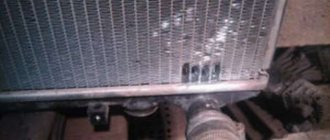
Screwdriver chuck runout
The runout of the screwdriver chuck indicates that there are problems in the serviceability of the tool gearbox, which is located immediately behind the electric motor. This is another reason why the screwdriver does not work with full impact.
Screwdriver planetary gear parts
The output shaft of this gearbox is the mounting location for the clamping chuck, so if we talk about the runout of the chuck itself, you need to keep in mind the runout of the gearbox shaft. The reasons for this may be the following:
- a) curvature of the gearbox shaft;
- b) wear of gears of the gearbox;
- c) failure of the gearbox shaft support bearing;
- d) the maximum output of the pins on which the satellites of the planetary gear are attached.
All of the above parts are of factory origin and cannot be repaired. The problem of screwdriver chuck runout in this case is solved by replacing the gearbox parts with new ones.
What is meant by torque?
Torque is a value that allows you to determine the level of load on the equipment . Which option should I choose? It is usually equal to 5-10 Nm, this is quite enough for safe and high-quality operation of the tool. This option is provided for most household and semi-professional models, which can easily cope with tight screws, drilling steel, and concrete.
What should the torque be ? You should pay attention to what the tool will be like. For example, for a universal device, it is necessary to select fairly high torque values so that the tool copes equally well with any type of work, be it self-tapping screws or structurally rigid materials. If you only need a tool for drilling wood, then you may prefer a model with a small torque from among household ones. When choosing, you should pay attention to the number of revolutions. For example, 400-500 is quite enough for screwing self-tapping screws. For drilling hard surfaces, it is best to use devices with a speed of 1200-1300 per minute.
Sources:
https://moiinstrumenty.ru/elektro/krutyashhii-moment-shurupoverta.html
Electronic screwdriver speed control
The rotation speed of the screwdriver attachment can be adjusted mechanically or automatically. Automatic speed control occurs using a processor. You can set the desired operating parameters using the speed selection toggle switch. It is located on top of the body. In many models, speed control is realized through the start button. The stronger the finger pressure on it, the higher the speed will be.
After reading this article, you received information on how to assemble a screwdriver speed controller with your own hands, became familiar with the design of the force regulator, and understood the function of electronic adjustment of the tool. We hope you found the article useful.
Failure of the screwdriver start button
As a result of long-term use of the tool, as well as the conditions in which it has to be used, there are often cases when the start button of a screwdriver fails - this is also one of the reasons why a screwdriver does not work. The problem is solved by purchasing a new start button mechanism in the store and replacing it with an old, faulty one.
Start button (red) of the screwdriver
Getting to a faulty start button is not difficult: you need to use a Phillips screwdriver to unscrew all the screws connecting the two halves of the tool body. Next, using an electric soldering iron, disconnect the button wires from the electric motor, disconnect the terminals connecting the button to the battery or power cable and remove the problem from the case. We insert a new button in its place, perform the connection process in reverse order and check the operation of the new part by connecting it to the battery or power cable.
Stages of disassembling the screwdriver button
Sometimes it is impossible to purchase a new start button in stores and you have to restore it yourself. However, we will not describe this entire process in detail for two reasons: firstly, the Internet is full of articles on this topic, and secondly, repairing the start button with your own hands is not the topic of our article. Therefore, we will move on.
12V screwdriver speed controller diagram
The 555 timer is widely used in control devices, for example, in PWM speed controllers for DC motors. Anyone who has ever used a cordless screwdriver has probably heard a squeaking sound coming from inside. This is the whistling of the motor windings under the influence of the pulse voltage generated by the PWM system.
It is simply indecent to regulate the speed of an engine connected to a battery in another way, although it is quite possible. For example, simply connect a powerful rheostat in series with the motor, or use an adjustable linear voltage regulator with a large radiator.
A variant of the PWM regulator based on the 555 timer is shown in Figure 1.
The circuit is quite simple and is based on a multivibrator, albeit converted into a pulse generator with an adjustable duty cycle, which depends on the ratio of the charge and discharge rates of capacitor C1.
The capacitor is charged through the circuit: +12V, R1, D1, the left side of the resistor P1, C1, GND. And the capacitor is discharged along the circuit: upper plate C1, right side of resistor P1, diode D2, pin 7 of the timer, bottom plate C1. By rotating the slider of resistor P1, you can change the ratio of the resistances of its left and right parts, and therefore the charging and discharging time of capacitor C1, and, as a consequence, the duty cycle of the pulses.
Figure 1. PWM circuit - regulator on a 555 timer
This scheme is so popular that it is already available in the form of a set, as shown in the following figures.
Figure 2. Schematic diagram of a set of PWM regulators.
Timing diagrams are also shown here, but, unfortunately, the part values are not shown. They can be seen in Figure 1, which is why it is shown here. Instead of bipolar transistor TR1, without altering the circuit, you can use a powerful field effect one, which will increase the load power.
By the way, another element has appeared in this diagram - diode D4. Its purpose is to prevent the discharge of the timing capacitor C1 through the power source and load - the motor. This ensures stabilization of the PWM frequency.
By the way, with the help of such circuits you can control not only the speed of a DC motor, but also simply an active load - an incandescent lamp or some kind of heating element.
Figure 3. Printed circuit board of a set of PWM regulators.
If you put in a little work, it is quite possible to recreate this using one of the programs for drawing printed circuit boards. Although, given the small number of parts, it will be easier to assemble one copy using a hinged installation.
Figure 4. Appearance of a set of PWM regulators.
True, the already assembled branded set looks quite nice.
Here, perhaps, someone will ask a question: “The load in these regulators is connected between +12V and the collector of the output transistor. But what about, for example, in a car, because everything there is already connected to the ground, the body, of the car?”
Which torque is best?
A screwdriver is a tool that is necessary for carrying out various types of work. This is not only construction, but also many home repairs, such as furniture assembly and communications installation. To select the right equipment, you should pay attention to torque , which determines comfort and quality of work. For example, you don’t need a very powerful tool to assemble furniture. If you plan to install an interior partition, then you need to take more professional equipment that will cope with the task perfectly.
Drills and screwdrivers are used to mix construction mixtures; you just need to purchase a construction mixer attachment.
The torque of such tools must be sufficient to allow mixing even the most viscous mixtures and solutions, ensuring their uniformity and high quality.
Special attachments are used for mixing concrete and other viscous mixtures.
If you need to use nozzles for mortars, then the torque must be sufficient to cope with mixtures of not only low viscosity, but also high ones. The choice of model depends on the planned work. If you need to use a screwdriver for mixing liquid mixtures, then the torque may not be too high. If a tool is purchased to work with viscous mixtures, then it is necessary to prefer professional devices whose speed is high.
READ Do-it-yourself circular broach
Equipment that will be used for a variety of work must have a speed regulator. Then the torque can be changed depending on what type of work needs to be performed. When choosing a screwdriver, you need to make sure that the lock for the control button always works, and not just with maximum force. In the first case, the tool can be used for any job under the most convenient conditions. The torque value can be changed. It is recommended to buy models that have manual or electronic control. They have a special step-down transformer that works great with liquid mixtures when the voltage drops.
Troubleshooting a screwdriver
In order to make sure that the screwdriver battery is broken, you need to check it with a multimeter.
The battery should first be checked before it can be replaced. The battery should be checked by routinely measuring the voltage level using a multimeter at the terminals of the device. You can also check using any other tester. In this case, the output voltage of the batteries should match in operating condition if they are charged. The values 12V, 18V, etc. indicated on the battery cases must be strictly observed. If this condition is not met, the device should be replaced.
Possible malfunctions of the screwdriver charger lead to the need to disassemble it and then check it using a tester that has already been used. Each battery included in the battery must be subjected to a similar test. After identifying the faulty elements, you should buy special elements of the same type with a similar capacity in the store in order to install them in place of the previous ones, replacing the old ones with new ones.
Battery characteristics.
If a screwdriver does not use an electrical network (corded screwdriver) for operation, but an internal battery, then it is a cordless screwdriver. From battery
The duration of operation of the tool and many of its other parameters will depend. When purchasing a screwdriver, you should pay attention to the type, capacity and voltage of the battery.
There are the following main types of screwdriver batteries: lithium-ion, nickel-cadmium and nickel-metal hydride batteries. Most household models of screwdrivers are equipped with nickel-cadmium batteries. Such batteries
They have a limited number of charging and discharging modes and the so-called “memory effect”, so they need to be fully charged and discharged too.
More expensive tools
have lithium-ion batteries that do not have a “memory effect” and can be recharged without waiting for complete discharge. Nickel-metal hydride batteries for screwdrivers are no longer considered relevant.
Screwdriver battery capacity
measured in amperes/hours. The time during which the tool can work without recharging depends on the capacity. The larger this capacity, the better. On average, for household use you can take screwdrivers with a battery capacity of 1.2 A/hour.
Screwdriver battery voltage
determines electrical power and, accordingly, work productivity. Measured voltage in Volts. A more powerful screwdriver makes the job easier.
When choosing a household screwdriver, focus on a battery voltage of 12-14 V.
When buying a cordless screwdriver, also pay attention to the presence of a charger in the kit. Charger
for a screwdriver battery it works in a similar way to chargers for mobile phones.
Tools
One of the most popular home craftsman tools is a screwdriver. But, like any product, it breaks. What to do in this case? In some types of work, an electric drill can save the day, but only in some. You can take the tool to a service center and expect it to be repaired. But this will require time and money, which will have to be paid to repair the instrument. But, as a rule, a third option is also available - repairing a Makita screwdriver, and the design of a screwdriver is not that complicated.
Let's look at the main signs of screwdriver malfunctions and how you can fix them at home yourself.
Content
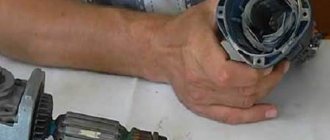
Screwdriver design
Before moving directly to the malfunctions of this tool, it would be good to briefly get acquainted with the design of the screwdriver and the purpose of its main components. Let's start with this. The photo below shows a disassembled screwdriver; based on it, we will consider the purpose of the parts.
Screwdriver repair: main tool malfunctions
A screwdriver belongs to the category of tools that are often used not only in construction and repair work, but also in everyday life. Over time, any mechanism tends to break down, which happens with screwdrivers. If such a thing happens, then there is no need to rush to throw away the tool, since you can repair the screwdriver yourself. From this article you will learn how to repair a screwdriver without the help of specialists.
DIY screwdriver repair
Like any other tool, a screwdriver sometimes requires repair. In such situations, some craftsmen replace this tool with a drill. But at the same time, you should understand that screwing in or unscrewing bolts and screws using a drill is quite inconvenient and has to be done with significant force. Therefore, it is very important for a home craftsman to learn how to troubleshoot a screwdriver with his own hands. To help home craftsmen in this matter, in this article we will talk about the design of a screwdriver, what malfunctions can arise in the operation of this tool, and also how they can be eliminated. Before approaching the issue of tool malfunctions, first of all, it is worth knowing what structural elements it consists of. It is also worth understanding that the basic design of screwdrivers from such popular brands as Makita Makita, Bosch Bosch, Hitachi Hitachi, Aeg does not have significant differences.
2. The structure of modern models and their operating principle
Drilling and screwing fasteners require short time intervals and relatively low power application. In such an intermittent mode, when phases of work and rest alternate, cordless drills and screwdrivers are preferable. Very small and easy to handle, they may differ slightly in design, namely in the location of the handle. The figure below shows a model with a handle located at the center of gravity - the most common for this tool. And the pistol-type handle, shifted back, is considered more ergonomic for drilling.
Batteries for screwdriver
The battery of a screwdriver consists of individual electrochemical elements, which, unlike primary elements, are capable of restoring their chemical composition of the electrolyte during the process of recharging them. How to repair a screwdriver battery if your screwdriver fails (broken). First of all, let's look at what the principle of generating electricity from such individual battery cells is based on. The example shows a manganese-zinc element (Fig. 1).
The zinc vessel in such an electrochemical battery is an electrode with a negative charge. The positive electrode here is a carbon rod. The carbon rod is in a medium of active material - manganese dioxide, and a condensed solution of ammonia is used as an electrolyte.
That is, the fundamental principle here is the use of reversible electrochemical systems. The substances of electrochemical batteries formed during the discharge process seem to return to their original state as a result of exposure to electric current (during the process of recharging the battery). The screwdriver is powered by a battery - a group of electrically interconnected elements located in a common housing, as can be seen in the photograph (photo 1).
Rotation adjustment clutch
It ensures that movement stops when work is completed, for example, at the moment of complete screwing.
This mechanism makes it possible to prevent the screw thread from breaking and the engine from overheating due to overload. Consists of a stopper, a washer and a spring, a threaded (adjusting) bushing.
The adjustment clutch is combined into a single mechanism with a cartridge. At maximum tension, the spring transfers the load to the fingers of the threaded bushing, which stops the cartridge case. After this, the rotational force stops. Depending on the design features of the screwdriver clutch, there are 5-25 adjustment steps.
What is the disassembly order?
To disassemble a screwdriver, you must perform the following sequential operations:
- disconnect the block containing the battery;
- Use a Phillips screwdriver to unscrew all the screws that connect the two parts of the instrument body;
- the electric motor, gearbox and all other structural parts are removed;
- the reverse switch button is removed;
- the force regulator is dismantled;
- the gearbox is disconnected from the engine.
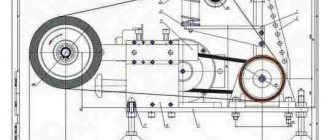
Screwdriver disassembly diagram, click on the picture to enlarge
Having completed the specified procedure, we can say with confidence that the screwdriver is disassembled.
How to choose a screwdriver?
You need to focus on the following criteria:
- View
. If you are not a builder, there is no need to purchase professional tools. If you need a screwdriver for home or occasional work, a household device will do. If you plan to use it often, even if you are not a specialist, you can purchase a powerful professional device. When buying a cordless mini-screwdriver, it is recommended to choose the option whose battery has maximum power. - The presence of reverse
(reverse). If available, fasteners can be removed from the surfaces. - Design
. The device should be comfortable. Before purchasing, check how tight or smooth the buttons are. It is desirable that the center of gravity is concentrated in the handle, then the hand will get less tired when working. - Availability of attachments
. Many manufacturers provide them, so you can save money on other tools.
Screwdriver power
The higher this indicator, the more convenient it is to work with the tool. Which screwdriver to choose depends on this criterion. The battery must match the power of the tool and be calculated taking into account the energy consumption of the device’s motor. If the ratio is not maintained, the battery will discharge quickly. If the type of screwdriver is corded, then the greater the power, the heavier it will be in weight. The higher this indicator, the higher the cost of the tool.
Screwdriver attachments
These add-ons help expand the functionality of the device. The best screwdriver is an option that contains attachments in the package, but if there are none, you can purchase them separately:
- Bits
. Such additions have a shape that resembles a screwdriver. They are necessary for loosening and tightening screws. - Disc shears
. They are used to cut thin sheet metal. - Nibblers
. This is a more maneuverable version of the disc shears and performs a similar function. - Turbo scissors
. Used for cutting metal, plastic, and other hard materials. - Sector scissors
. Thanks to this attachment, you can cut plastic pipes. - 90° angle attachment
. It can be used to tighten fasteners in hard-to-reach places. - Tape nozzle
. This addition is necessary for working with cassette screws. - Rivet nozzle
. Using this add-on, it is possible to tighten rivets without using a rivet gun. - Dust protector
. It is recommended to equip the tool with this attachment if it functions as a drill.
Screwdriver case
This accessory is a holster that protects the instrument from mechanical damage and contamination. When choosing a screwdriver, it is advisable to immediately select a cover for it. Consider the following selection criteria:
- Make sure that the accessory has a reliable buckle lock that secures the tool well in the holster.
- It is worth opting for the option with pockets for attachments.
- It is advisable that the case be equipped with a metal ring designed for storing hand tools.
- The material from which the accessory is made must be durable.
Source
Screwdriver and its design features
You should start repairing a screwdriver yourself by becoming familiar with its design. The main element of a screwdriver is an electric motor. Screwdrivers come in both corded and cordless types. The use of a corded screwdriver is used less frequently, due to such a disadvantage as the need to connect the tool to a 220V network. Battery-type tools are more popular, as they allow you to carry out not only repair work at home, but also outside it.
The main components of a cordless screwdriver are:
- Frame. Typically, all screwdrivers are made of durable plastic.
- Start button. It is designed in such a way that the number of revolutions of the cartridge depends on the force of pressing it.
- Electric motor. Battery-powered tools use single-phase commutator-type and DC motors. The motor consists of a rotor, a stator in the form of magnets, and a brush assembly.
- Gearbox.
- Force regulator.
- Reverse switch.
- Battery. As a rule, it is removable and is often supplied with the product in duplicate.
- Cartridge. As a rule, quick-release chucks are used.
Some models are additionally equipped with LED backlights, as well as battery charging indicators. Returning to the problems with the screwdriver, it should be noted that any of the above elements can cause the tool to malfunction. What is needed for repairs? The first step is to find the cause of the breakdown, and then make the appropriate decision to eliminate it. The tool can be divided into two parts: electrical and mechanical. Initially, you need to find out what the problem is with the screwdriver not working: mechanical or electrical. This won’t be difficult to do, so let’s look at the breakdowns in more detail.
Mechanical faults
Mechanical malfunctions of screwdrivers can be identified by such a sign as the audibility of the operation of the electric motor. When you press the start button, you can hear signs of the electric motor running, but the tool chuck does not rotate or characteristic sounds of a malfunction are heard when rotating.
The design of the screwdriver is quite simple, but a significant drawback is that all the elements are almost 2-3 times smaller than those of an electric drill. Possible mechanical failures of a screwdriver include the following malfunctions:
- Cartridge failure. Despite the fact that quick-release chucks are more versatile and easier to use, their significant drawback is their low service life. It is impossible to repair the keyless chuck, so if the tool refuses to hold the drill or bit, the chuck should be removed and replaced with a new one. This is one of the most common malfunctions of the tool, but it does not require disassembling the screwdriver.
- Gearbox failure. The screwdrivers are equipped with a planetary type gearbox. Typically, in order to save money, manufacturers make gearbox gears from low-quality plastic or metal. This affects not only the power of the tool, but also its service life. If the engine runs when you press the “Start” button, but the cartridge does not rotate, then the problem lies precisely in the planetary gearbox. To find out the cause of its malfunction, you need to disassemble the tool and then determine the breakdown. If one gear fails, the gearbox should be replaced.
- Bearing wear. The bearing is located in the planetary gearbox, so it is replaced along with the gears.
- The force regulator is broken. This device in screwdrivers is used not only to increase or decrease the traction force of the tool, but also to increase safety. If during work the working attachment becomes jammed, then instead of turning the tool, the regulator will turn. Thus, the master will not get a dislocated arm, and the electric motor will be protected from high loads, from which it can burn out.
It should be noted that the small size of the mechanical part of the instrument somewhat complicates the process of instrument repair, so be sure to be careful when carrying out repair work.
Electrical faults
Unlike drills, screwdrivers operate primarily on batteries. This means that different electric motors are used in the design of these tools. It is not difficult to determine the malfunction of the electrical part of the screwdriver. If the battery is charged, but when you press the “Start” button you cannot hear the sound of the electric motor, then the cause is an electrical failure. Let's look at the main types of electrical faults in screwdrivers.
- Battery fault. Initially, you should pay attention to the battery. As a rule, screwdrivers use low-quality nickel-cadmium batteries. They have a significant drawback, which is the need to charge it only when it is completely dead. Such batteries cannot be recharged, as this shortens their service life. If one day the screwdriver refuses to function, then do not rush to disassemble it, make sure that the battery is functional and provides a charge. You can check by connecting a second battery. The battery charge can also be checked using a tester, which should show the appropriate voltage value.
- Charger fault. There is a special charger for charging the battery. If the battery is discharged even after you have charged it, you should check the integrity of the charger. Chargers usually have indicator lights for these purposes. If they are not there, then you need to use a multimeter.
- The power button is faulty. It is necessary to check the start button, since often the reason for its inoperability is oxidation of the contacts or dust. The tool should be disassembled and then the contacts should be cleaned. The buttons on screwdrivers usually have the function of regulating the speed of rotation of the chuck, for which a transistor is installed. If the tool works, but the speed control function is missing, then the transistor needs to be replaced.
- If the reverse function does not function, the breakdown can be corrected by cleaning the contacts of the polarity switch button.
- Motor malfunction. The electric motor is one of the most expensive structural elements of a screwdriver. If everything is checked and it is determined that the problem lies in the electric motor, then the cause should be found out. Most often, the problem occurs with brushes, which simply wear out over time. The brushes cannot be repaired, so they must be replaced. The armature should be replaced if a break is detected when testing its winding terminals. No one will rewind such a small rotor, so it’s easier to purchase a new unit. The stator of a permanent electric motor is presented in the form of 2-3 magnetic plates that do not fail.