9e3377222f69609b
DIY power supply for an 18V screwdriver: from a light bulb, battery, computer power supply
Do-it-yourself construction, repair and landscaping
Menu
Building a house Tools and equipment Mechanized
A screwdriver is much more practical than a regular screwdriver. It can be used anywhere without much effort on the part of the owner. Plus - saving time. While a person unscrews 1 screw with a screwdriver, a power tool can handle ten! Tool chargers sometimes break: this happens due to voltage fluctuations, expiration of the shelf life (from 2 to 5 years), or contact with water or household chemicals. A new charger costs from 1 to 10 thousand rubles, depending on the model of the tool. Is it possible to make a power supply for an 18V screwdriver with your own hands so that the unit can work from the mains? Yes, you will need basic electronics knowledge and practical advice. You can make a power supply for a screwdriver from an energy-saving light bulb, computer or car battery.
Cordless screwdriver: understanding the design
Structurally, the cordless screwdriver consists of the following elements:
A screwdriver with a power supply will become an indispensable assistant for the homeowner. While a screwdriver unscrews one screw, a power tool can handle ten
- motor;
- batteries;
- start key;
- regulator;
- gearbox;
- a lever that changes the direction of movement of the device;
- charging.
Why convert a wireless device to a wired one? The batteries inside the unit last a limited amount of time (about a year with constant use). Changing batteries is an expensive undertaking (one battery will cost at least a thousand rubles and is not guaranteed to last long).
After only 3-4 months of use, the battery begins to quickly run out. Then the device needs to be constantly recharged, which, at a minimum, annoys the owner.
Preparation, materials and tools
My version of the alteration is quite simple, because a minimum of tools and materials were required.
Tool:
- Cutter or knife;
- Pliers;
- Soldering iron.
I will make a reservation that the alteration is quite domestic/handicraft, and real craftsmen will use a soldering station, a crimper for stripping and other devices here, but the manipulations performed in the kitchen are quite worthy of a basic household tool.
Materials:
- Electrical tape - where would we be without it;
- Wire - 0.5 mm2 is enough for this current;
- A drop of solder (if you solder at all, you can clamp it).
Before starting work, I insulated my place - I lined it with newspapers so as not to litter the living room and used a wooden backing for safe soldering.
Power supply for a screwdriver: preparation for conversion
Experienced repairmen advise placing the power supply for the screwdriver inside the product. This way, dust, dirt, and liquids will not get on it, which means the element will last longer. At this stage you need to open the collapsible housing. To open, take a penknife and go along the seam.
A knife will help you open the screwdriver housing to install the power supply. Run it along the connecting seams to loosen the fastenings
Why is an autopsy performed?
- to understand where to place the power supply;
- find out what voltage you will be working with (there is a marking inside, usually 12-18 volts);
- determine the installation method.
What to pay attention to:
- Dimensions. It is ideal when the finished power supply is placed in a plastic case from a standard battery. No problems while working with a screwdriver.
- Current limit. If this parameter is not taken into account, then the required torque will not be achieved. You can clarify the value using the screwdriver's data sheet. If it is missing, use the battery that came with it. As a rule, the current is selected to be approximately 1.6 (±0.2) times greater than the capacity (in A/h) of the battery.
- Output voltage. It is worth considering that when connecting a load, for some power supplies it may drop by 1 - 2 V. It is not important for using electric tools, but you should know.
- PSU type. According to experts and practitioners, the best power supply option for a screwdriver is pulsed. The absence of a power transformer in the circuit reduces the weight of the product and reduces its dimensions. These are the most compact of all power supplies.
Having purchased the unit, all that remains is to remake the “box” in which the battery was placed. This is the only thing that even an amateur can do with his own hands.
- First. Drill a hole in the plastic (as easy as pie), insert the power wire (cord) inside the case and connect (solder) to the power supply terminals. The best option.
- Second. In the “+” conductor, install a semiconductor diode of appropriate power, the cathode of which is towards the electric motor of the screwdriver.
For those who have the skills to work with a soldering iron and a multimeter, “traditional craftsmen” offer so many circuits that choosing something suitable will not be difficult. Here are just a few from the entire list, which is not difficult to compile:
- Universal power supplies.
- Based on two- and three-pole resistors.
- Pulse.
- With filters.
- Blocks with amplification circuit and a number of others.
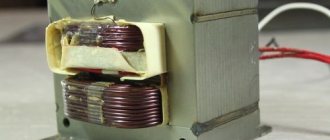
What do they overwhelmingly have in common? In addition to pulse modifications, there is a step-down transformer, since we are talking about a secondary (power supply for a screwdriver) voltage with a nominal value of 18 V. This is the main difficulty. It is possible to select Tr, but, unfortunately, not all parameters of radio components are indicated on the diagrams. If the resistance value is indicated, then the power is not indicated; not all types of semiconductors are designated and the like. And there is practically no information on the transformer - wire cross-section, number of turns, and so on. Therefore, you will have to do the calculations yourself.
But even a transformer can be made with your own hands, if you have the skill and desire. For example, take it from the power supply of an old PC. The main thing is that it meets the basic requirements listed above. There may be some differences depending on the modification of the computer. You can also use part of the LED lamp dimmer circuit. There are other options.
But all this is time + experience of independent design + theoretical knowledge. So it turns out that purchasing a power supply and/or remaking it, adapting it to work with a screwdriver, is much easier and faster. All other options for a person who is good at electrical/electronics are hardly acceptable, even if there is a diagram and its description. After all, you will also have to “etch” the board to accommodate all the radio components - how many people know how to do this?
There are ready-made power supplies (pulse) for 18 V available for sale, specifically for screwdrivers. Their price is low - from 846 rubles. Those who are not sure that they can assemble a power supply with their own hands should take this into account.
It remains to add that the decision to switch to power supply from a power supply has a significant drawback - “tying” to the outlet. But how relevant is this for a household screwdriver? And there are plenty of advantages - stability of torque, the ability to breathe “second life” into a tool for which it is impossible to find batteries, and no maintenance of the power source. And what it can be made from, what options there are, are described in some detail.
The decision is yours, dear reader!
Power supply 12-18 volts from an energy-saving light bulb
An energy-saving LED light bulb, the parts from which are suitable for creating a power supply, consists of:
- from a tube with an inert gas inside. The tube was treated with phosphor;
- plastic housings;
- electrical boards;
- fuse;
- parts where wires are placed;
- base, thanks to which the light bulb is connected to an electrical source.
Even a broken and used energy-saving light bulb can be used to create a power supply.
To create a power supply for a screwdriver from a light bulb, you need 2 parts: a base and a part with wires. The light bulb body itself may be broken
The main thing is that the base and the part with the wiring are not destroyed. To increase power, a winding of copper wire is added to the base. Next, a power cord with a plug is attached to it to be plugged into a socket at the end.
Observe polarity; to do this, study the markings of the wires. A blow torch is needed to make the connection. The updated base, together with the light bulb body, is placed inside the screwdriver, where the battery was previously located. The device body is then assembled. To make the tool durable, the joining seams are coated with superglue.
Conversion
Remodeling begins with soldering. The outputs of the power supply are securely fixed with solder to the contacts of the charging compartment. It is difficult to create a reliable connection between the copper wire and the brass contacts. To increase the strength and reliability of adhesion, surfaces are treated with a special acid.
Since the power supply produces constant voltage, it is important to observe polarity
The current supply cable is connected to the power supply inside the charger through a carefully made hole and is protected from bending by a special damping attachment. It is advisable to securely fix the cable and voltage converter inside the case. An adhesive that forms a viscous joint that is not afraid of shaking and shock is suitable. Sealing elements can also be used. With such fasteners, it is better to create point substrates that do not cover the surface area of the power supply and do not interfere with heat dissipation.
If the design of the screwdriver allows, you can remove the filling from the power supply housing and mount it directly inside. This will provide the best heat exchange conditions for equipment heating up during operation.
The proposed method of converting a cordless screwdriver into a corded one is simple and can be done by anyone who has ever made a flashlight or similar simple electrical appliance. This will breathe new life into a device that has been used for a long time, allowing you to use it even without a used battery.
Useful articles, news and reviews on our Yandex Zen channel
From car and computer batteries
It is recommended to use a car battery in extreme cases. It is not very powerful to operate a screwdriver, so the device will function slowly. The car battery has wires that connect to clamps inside the screwdriver. Why is this method not the most convenient?
A car battery cannot boast of modest dimensions; it is 5 times larger than the tool itself, it is inconvenient and difficult to operate, and you will have to carry it to where the power tool is needed.
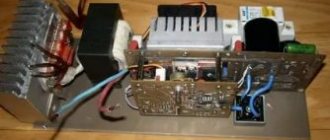
Computer power supplies are equipped with fans and emergency shutdown buttons that operate on the RCD principle. In the event of a network short circuit, the screwdriver will be saved from premature failure.
All computer power supplies are equipped with RCDs. In the future, the device will be able to protect the screwdriver from premature failure
You can use the computer unit according to the principle of a car battery or in the form built into the body of an electric screwdriver. In the latter case, you will have to disassemble the power supply, remove the transformer, solder the power cord to it, and install the system in the screwdriver housing.
Power Supply Options
Any screwdriver requires much less voltage than a regular socket produces. Therefore, for recharge you will definitely need a special converter, the output of which will produce the required voltage. All power sources are divided into two large groups: pulse and transformer. Let's consider each of them separately.
Pulse
The operating principle of pulse systems is that the voltage is first rectified and then converted into a special pulse signal
It is important to achieve stable voltage. A transformer winding or resistors can help with this.
Switching power supplies are quite efficient and can be used in different conditions. At the same time, they have a high level of protection against short circuits and similar effects. However, in terms of power, pulsed systems are clearly inferior to transformer systems. In addition, such blocks are very capricious in terms of input voltage. If it is lower than set, then the element may simply not work.
The disadvantages also include the complexity of repair work in the event of a malfunction.
Transformer
More common power supplies that have proven their reliability and efficiency in many areas. The device consists of a step-down transformer and a rectifier through which the reduced voltage passes. Rectifiers can be different, depending on the number of diodes used.
Such elements are easy to manufacture, cheap and reliable. Therefore, they are often preferred. They provide stable, noise-free voltage with high maximum power. But there are also several disadvantages. The main disadvantage is its bulkiness, with much lower efficiency than pulsed sources. This fact requires selecting a power supply for the screwdriver with a power greater than that required by the tool. Since part of the capacity will be spent on side processes.
Tips for using an electric screwdriver
When the 12-18 volt power supply is assembled, the screwdriver becomes mains-powered. It must be used according to the rules:
- every 20 minutes of work, take a break for 3-5 minutes to allow the block element to cool down;
- If you operate an external unit, make sure it is clean. It should not be dusty or dirty. This will cause the device to heat up faster and work less efficiently;
- the updated tool cannot be used at a height of more than 200 centimeters;
- equip the element with a residual current device. If there are problems with the network, the RCD will save the equipment from breakdown;
- All wires must be securely soldered.
Update from December 28, 2019
The power supply is very powerful and can cope with long drilling sessions. In an implementation without voltage feedback, the unit can be connected to the network for at least a whole day - there is no heating.
However, during operation at the facility, a significant drawback was revealed: when the motor shaft becomes jammed, the power switches can burn out. My “negative” transistor (the bottom one in the diagram) always flew out, but the second one remained intact.
Since shaft jamming is equivalent to a short circuit at the power supply output, measures must be taken to eliminate this phenomenon. Let's look at the operation of a cordless tool - due to the “soft” current-voltage characteristic (volt-ampere characteristic) of the battery, when the load is too heavy and jammed, the voltage drops, as a result of which the current decreases.
I have not conducted experiments yet, but I consider measures to “soften” the current-voltage characteristic useful: 1. The secondary winding of the power transformer needs to be wound “more closely”, without spreading it across the entire ring. 2. Reduce the rated output voltage (under a 30 W lamp load, for example) by several volts by reducing the number of turns of the secondary. That is, if the screwdriver is 14.4 V, then select the voltage at the power supply output 9-10. It is quite possible that there will be a drop in rotational power after such manipulations; the best option should be found here.
I consider it irrelevant to make protection in the “hot” part of the block, because under heavy loads the protection will often trip and the ease of use will be lost. Still, measures to “soften” the current-voltage characteristics seem more acceptable to me.
It will be very interesting to know your experience if you assemble a circuit and try to make the jamming of the shaft “soft”. Contacts are in the footer of the site.
Rate this publication:
- Currently 4.29
Rating: 4.3 (34 votes)
How to power a screwdriver while maintaining its autonomy
If the master works in a building that does not have electricity, and the batteries have already deteriorated, there are ways to power the screwdriver:
- replace old battery banks with new ones;
- connect the screwdriver to the car battery;
- connect the tool to another battery, for example, taken from an uninterruptible power supply.
Replacing old elements
Procedure:
- Open the battery housing.
You need to open the battery case
- Remove old elements from the housing. Place new batteries in place and solder them together.
It is necessary to solder the new batteries together and assemble the battery
- Reassemble the battery by closing the housing cover.
- Install the updated battery into the screwdriver. Charge the battery if necessary.
Connecting to a car battery
Instructions:
- Open the screwdriver body.
It is necessary to remove the top cover from the instrument
- Find the contacts through which power is supplied to the motor.
Power contacts
- Take car wires with alligator clips, which are used to charge batteries. Strip the wires and attach them directly to the power contacts with zip ties, or better yet, solder them.
You need to attach the wires to the contacts
- Wrap the connections with insulating tape and carefully lay the cable in the instrument body.
The cable must be insulated
- Assemble the screwdriver.
All that remains is to close the screwdriver body
- Connect the terminals. Try the tool in action.
Connecting to an external battery
Sequencing:
- Buy or find an external battery, for example, take it from an unnecessary uninterruptible power supply.
Need to find an external battery
- Take a wire with a cross-section of at least 2.5 square meters. mm. Remove the insulation and install clamp terminals suitable for mounting on the battery onto the copper ends.
Terminals on the cable
- Place the other end of the cable in the body of the old battery and solder it to the terminals that are inserted into the screwdriver.
The cable is connected to the terminals of the old battery
- Insert the battery case into the screwdriver, connect the cable with terminals to the battery.
Components need to be put together
- Test the restored tool in action.
A cordless electric tool lasts several times longer than the batteries that power it. Throwing a screwdriver with unusable elements into the trash is unwise. The real owner will be able to repair the device by switching it to another power source, thereby giving it a new life.