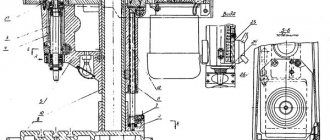
A drill in one version or another - a regular one, with an impact mechanism, a micro-drill (drill) - is familiar to almost everyone. During its normal operation, users do not think about how the device works and what parts it takes apart. But in the event of a breakdown, you have to find out what it is called and how to remove it for replacement or repair.
We will not talk here about the usual method of action called “scientific poking”, but turn to the point of recommendations “If all this does not help, finally read the instructions.”
The structure of a drill and types of cartridges for it
So, the drill consists of:
- an electric motor that creates rotational motion;
- a mechanism that transmits this rotation to the clamping device;
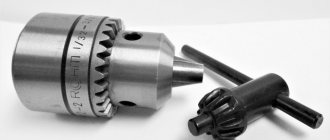
- and the actual clamping device for the drill. It is this device called “cartridge” that interests us.
Before figuring out how to remove the chuck from a drill, let’s find out what they are - the algorithm of actions depends on this.
The most common is the gear-crown type. To secure it, a special toothed wrench is used, inserted into the hole on the chuck. The teeth of the key engage with the teeth of the chuck crown and, when the key is rotated, they strengthen or weaken the clamping of the jaws (cams) of the chuck.
Otherwise, such a chuck is called a clamping drill chuck, and is considered one of the oldest among the drill clamping mechanisms currently in use.
Next come the quick-release chucks - with one or two couplings and a locking ring. They use collets - cone-shaped elements consisting of three or more parts. Moving along the axis of the collet, the coupling compresses the “petals,” thereby securing the drill in them.
Clutches (clips) are metal and plastic, regular or reinforced, with or without automatic locking.
In fact, the drill chuck is a separate unit connected to the main drill mechanism by a shaft. The connection is made using a thread or a tool cone (the so-called “Morse taper”).
An indication of this or that type of fastening can be found in the instructions and/or on the drill body. For example, the designation 1.5-15M13x1.2 - the first two digits mean the permissible diameter of the drill shank (or other tool inserted into the chuck), M13 is the diameter of the thread (metric) connecting the chuck to the shaft, and 1.2 is the pitch of this thread . If the designation looks like 1.5-15 UNF 1/2”, we are talking about an inch thread. Domestic drills use metric threads, while imported ones (not all, of course) use inch threads.
If a cone is used to connect the shaft to the chuck, the marking contains the letter B (for example, B10 - tool cone, shank diameter 10 mm).
Given that different companies label their products differently, it is worth taking this difference into account. So, for a Makita drill-driver the marking will look like this: BDF456. B is present, that is, the chuck is fixed to the cone, D is the type of tool, drill, and F is additional capabilities, in this case a screwdriver.
Let's look at the models of the most significant manufacturers on the market - Bosh, Makita, Interskol - what cartridges they use and how to remove these cartridges.
The role of the chuck in reliable fastening of the drill
Clamping drill chucks for household drills are available in three modifications:
The body of the key jaw chuck is made in the form of a hollow hardened cylindrical sleeve (collet), on the outer surface of which a rotating adjusting collar is installed. On one side the cylinder is mounted on the drive shaft of the drill, and on the other side there are cams (petals) for attaching cutting tools (drills, taps, reamers, etc.). When the adjusting ring rotates, the steel cams move along guides using special threads. If they come close to each other, the drill is clamped. If they diverge from each other, the tool is released. The approaching and moving away of the cams depends on the direction of rotation of the holder. Reliable fixation of the drill is ensured by tightening the chuck holder with great force. To do this, use a special key or a quick-clamping - on quick-release chucks - clutch.
How to remove a keyless chuck from a threaded drill
A feature of the threaded connection of the chuck with the shaft is the left-hand thread of the fixing screw. This is done so that, by rotating the drill and “biting” into the material, the shaft simultaneously tightens the chuck mount. Therefore, the answer to the question of how to remove a self-clamping chuck from a drill of this type is simple - you need to rotate the chuck, firmly holding the body, clockwise.
Usually, simple rotation is not enough; you have to tap the joint so that the tightly tightened thread opens up a little and makes it possible to rotate the connection freely.
The process of how to remove a self-clamping chuck from a drill is shown in more detail in the video.
- Since there is a retaining screw inside the chuck, it must be accessed. To do this, the jaws (cams) of the cartridge are spread as wide as possible, and a screwdriver is inserted inside. Using clockwise movements, it is unscrewed from the socket. It is impossible to immediately determine the type of head, so you must first illuminate the inside of the cartridge and, most likely, try two or three different screwdriver bits.
- After removing the screw, the cartridge is easily unscrewed from the shaft.
Some models do not have a locking screw. Then the cartridge simply screws together, but more effort will have to be made. It is necessary to secure a key or other part convenient for work in the jaws, and use an open-end wrench to fix the shaft.
What is the function of the chuck in a drill?
The drill chuck is one of the main components of the electric drill mechanism. It serves to transmit rotational motion from the electric motor to the working tool. Its task also includes fixing the drill in such a way that during operation the maximum accuracy of drilling holes, reliable fastening and quick replacement of the tool are observed.
In any drill, the tool is fixed in a chuck
Types of fastenings
Engineers have come up with various design solutions for fixing cartridges. Depending on the method of attachment to the rotating shaft, cartridges are:
- threaded - the cartridge is screwed onto the shaft thread;
- conical - a cartridge with a conical shank is inserted into a mating socket and held by friction;
- collet - the cartridge is put on the shaft and secured with a screw.
Photo gallery: types of tool mounts
Methods for fixing the working tool
All chucks clamp the tool between the jaws (jaws). Three cams evenly approach each other, the tool is fixed strictly along the axis of rotation. According to the method of fixing the drill, chucks are divided into:
- clamping In them, the jaws are tightened with a special key;
The chuck jaws are tightened with a wrench
The keyless chuck is screwed in by hand
Self-clamping chuck with ratchet mechanism
SDS chuck is used in powerful rotary hammers and drills
Video: what is the difference between the quick-clamping method of fastening and the self-clamping method?
How to remove a cone chuck from a drill
In such models, removing the cartridge is even easier than for a threaded connection. Lubrication won't hurt either, and the main algorithm of action is to tap the cartridge and try to turn it after each blow. First you need to unscrew the fixing screw (here it has a regular right-hand thread).
In some cases, the cartridge “grows” into the mount so much that it is not possible to remove it if it fails. Various removal options are offered - from heating a blowtorch until red and then attempting to remove it, to cutting the cartridge with a grinder or other cutting tool. After this, they are removed from the shaft in pieces.
For more information on how to remove the chuck from a Bosch drill and replace it after lubrication, see the video. Here are the differences in the dismantling process, namely, how to remove the cartridge from the Interskol drill.
Replacing and repairing a drill chuck
Symptoms of a problem
The most common external signs of a cartridge malfunction:
- the cartridge body flies off the gearbox shaft or the axis of rotation randomly shifts during operation;
- the chuck jaws jam or fall out of the body;
- The drill is not clamped in the chuck or cannot be removed from it.
In such cases, continuing to work with a drill becomes not only impossible, but also dangerous. It is necessary to find out the cause of the problem and eliminate it.
If for some reason the cartridge becomes unusable during operation, it should be replaced or repaired. You cannot operate a drill with a broken chuck.
How to change a part?
Threaded fastening of the cartridge to the gearbox shaft is carried out using threads with a short pitch and additional control fixation with a screw with reverse (left-hand thread) in the outer end of the shaft.
Since when switching speeds and modes, the chuck rotates in both directions, rigid fixation of its working position is provided.
To do this, when assembling the tool, an additional sealant is applied to all threaded connections, which, when dried, acts as an adhesive layer.
This should always be kept in mind when assembling and disassembling the electric drill. When repairing a cartridge, it is most advisable to use silicone-based sealants - this will allow you to carry out routine repairs with the least effort, and will also protect the metal from corrosion and oxidation when exposed to moisture.
In order to disconnect the cartridge from the rotation mechanism, you must:
- Open the jaw clamps inside the chuck as far as possible to gain access to the control fastening screw.
- Unscrew the fastening screw. As a rule, the slots of this screw are cross-shaped. Therefore, you should use a screwdriver of the appropriate configuration. Often during operation, under the influence of centrifugal forces, this screw is tightened in the seat beyond measure. Then you have to use considerable force to unscrew it from the socket.
You can use a mechanical impact screwdriver, but be very careful. If the splines on the screw are damaged, removing the cartridge will become much more difficult and you will have to change not only the cartridge, but also the gearbox shaft. Among other things, such “jamming” indicates that during the previous assembly no sealant was applied or it was not given time to dry.
Using counterclockwise rotational movements, unscrew the chuck body from the threads of the working shaft. To do this, you need to keep the shaft from rotating. This can be achieved in several ways:
- Hold the shaft with one hand using an adjustable wrench and unscrew the chuck with the other.
- Remove the gearbox housing and hold the gears with your hand from turning.
Video: how to easily remove a drill or screwdriver chuck
In some models, the shaft to which the chuck is attached has special grooves for an open-end wrench. In this case, unscrewing the cartridge is much easier. It is enough to insert the key into this groove and lock it in a stationary position.
If the chuck is mounted on a drill with a cone, then the procedure for disassembling changes as follows:
- Unscrew the fastening screw inside the cartridge.
- Secure the drill body in a vertical position (for example, using a vice), so that the chuck is at the bottom.
- Using an open-end wrench as a spacer, use a wooden or rubber mallet to knock the cartridge body out of its seat.
Read also How to make a pond aerator with your own hands
Strikes must be struck with caution so as not to damage the cartridge body and its structural elements.
Fastening the cartridge to the shaft after repair or replacement is carried out in the reverse order. When assembling, you need to pay attention to the degree of rigidity of the fit of the conical recess in the body of the cartridge onto the conical end of the leading element, as well as their axial relative position. The control screw inside the chuck can only be tightened if it is firmly seated and the longitudinal axes are completely aligned.
A silicone-based sealant is used to secure the internal control screw. It is not recommended to start working immediately after assembly. The sealant should dry and lock the screw in the desired position. The drying speed of the sealant is usually written on the packaging. Most often this is approximately 1 mm per day, but since the thread pitch is usually fractions of a millimeter, it is enough to wait 10–12 hours until it dries completely.
Silicone sealant is applied to the thread in a thin layer
There are cases when, after repairing and fitting the chuck onto the conical spindle of the drive shaft, the chuck begins to beat and vibrate during operation. This indicates that errors were made during assembly. You will have to disassemble the entire assembly again and seat the cartridge again. Experienced craftsmen advise in such a situation to heat the cartridge to a temperature of 100–110 degrees. This heating can be achieved by dipping the cartridge body in boiling water for several minutes.
When heated, metal tends to expand noticeably. The conical hole of the cartridge will increase and, as it cools, it will sit better on the shaft spindle. In modern household appliances, conical cartridges are used less and less. This is due to the fact that they have been supplanted by more convenient to use cartridges that are mounted on a thread.
Collet chucks are also not used in household appliances. Their area of “habitat” is high-precision drilling work with thin and ultra-thin tools.
When going to the store for a new cartridge, take the old part with you. When selecting a cartridge, not only the diameter of the thread is important, but also the direction of its cutting - right or left.
Is it possible to disassemble a removed cartridge for repair?
Not all types of cartridges are disassembled, but conical ones can usually be tried to disassemble.
There is an interesting way to disassemble a cone cartridge without barbaric methods such as sawing or cutting with a grinder.
- The jaws are brought together inside the cartridge.
- A plate of elastic material - polystyrene foam, polystyrene foam - with a thickness of at least 15...20 mm is pressed to the front surface of the cartridge using a board or thick metal sheet (bar).
- Press the drill itself tightly onto a flat surface (table) and turn on the impact mode. If such a mode is not provided in the tool, the chuck is first screwed (removed) from the drill and mounted on the hammer drill. After 10...15 seconds of operation of the device in impact mode, the cartridge can be disassembled for repair.
Taking into account the fact that after repair the performance of the cartridge is usually not fully restored, it is still better to replace the part with a new one with a similar marking. At the same time, it is important to remember: even if you manage to understand without problems how to remove a cartridge from a Soviet drill of a model from about 1950, you may not be able to install a new imported one on it - there is a mismatch both in the diameter of the thread and in the her pace and type.
As an example, it is shown how to remove the chuck from a Makita drill and what the thread looks like in the connection between the chuck and the shaft.
Disassembling the key chuck
The key cartridge can be disassembled in two ways: using a hammer drill and using a hammer.
Perforator method
In order to disassemble the cartridge in the easiest way, using a hammer drill, you must perform the following steps:
1. Spread the cams until they are completely hidden in the body.
2. Attach a blunt metal insert in the hammer drill of such a diameter that it fits freely into the threaded spindle hole of the chuck.
3. Rest the cartridge against a solid surface, having previously placed a shock-absorbing pad (for example, in the form of a rubber plate several centimeters thick). As a stop, you can use a thick metal plate held with your free hand, a table, a workbench, or the floor.
4. Start the hammer drill, and after two to three seconds the sleeve (shirt, adjusting sleeve) will be knocked off the chuck.
5. The cams can now be removed from the housing. Attention! When performing this operation, it is necessary to make appropriate marks on the body and on the cams so that they fall into place during assembly. Otherwise, the clamped drill will not be centered.
The disadvantage of this method: when knocking down the clip, some parts may fly apart (for example, a ring with teeth; it usually consists of two halves), and for an inexperienced user it will be more troublesome to put all the components together.
Having disassembled the cartridge, it is possible to clean it from dust, rust and dirt, as well as lubricate the parts.
The cartridge is assembled in the following sequence:
1. Manually extend the cams to maximum.
2. Place the two halves of the serrated ring into the corresponding groove in the housing.
3. Holding the ring with your fingers, you need to hide the jaws inside, turning the chuck body.
4. Put on the sleeve (shirt, adjusting sleeve) until it stops. This cannot be done completely. It must be pressed in with a hammer.
5. To do this, you need to install the cartridge vertically on a special washer so that the sleeve (shirt, adjusting sleeve) rests against it, and the body can freely pass into the hole. Instead of a washer, you can use a bench vise with jaws set to the required size or a piece of pipe of a suitable diameter.
6. Place a gasket on top of the chuck in the form of a thick plate of soft metal (aluminum or copper alloy), and use a hammer to press the body into the sleeve (jacket, adjusting sleeve). That's all. The chuck can be mounted on the spindle and operated.
Using a hammer
This disassembly method is very similar to the previous one, but not all users have a hammer drill, so you can use a hammer instead:
1. First you need to “hide” the fists inside, spreading them to the required position.
2. Install the cartridge vertically on an open bench vice to such a position that the body can pass between the jaws, and the sleeve (shirt, adjusting sleeve) rests against them.
3. Quickly heat the sleeve (shirt, adjusting sleeve) with a hair dryer. Instead of a hairdryer, you can use a blowtorch.
4. Place a shock absorber in the form of a soft metal plate (aluminum or copper alloy) on top of the cartridge.
5. Using a hammer, knock the body out of the sleeve (shirt, adjusting sleeve).
6. After this, clean and lubricate the parts and assemble in the order specified in the punching method. In this case, you can reheat the sleeve (shirt, adjusting coupling) using a hair dryer or a blowtorch.
The disadvantage of this method is the increased “traumatic” nature of the parts.
Also, it is advisable to use heating only in cases of extreme necessity, when it is impossible to knock down a sleeve (shirt, adjusting sleeve) without it. After all, exposure to high temperatures can lead to a change in the structure of the metal, which will make the parts soft.
What to do if the key is lost?
If the key is missing, removing the drill will be quite difficult. The easiest option is to deal with the problem with brute force. The parts of the clamping device are held by the right and left hands and rotated in opposite directions. However, if the chuck is tightened too tightly or the drill has been used for a long time, it is unlikely that you will be able to unscrew the thread.
During operation, parts of the power tool become hot and the metal expands. This leads to jamming. To make releasing the chuck easier, wait until the tool has cooled completely.
To enhance the applied impact, use various tools or homemade devices. Here are some ways:
- Experienced craftsmen loosen the cartridge with several tangential blows with the edge of the right palm. The drill is held with the left hand in a position with the drill facing away from you. The disadvantage of this method is that if you are not used to it, you can injure your palm. And even with a tightly tightened (and even more so misaligned or jammed) mechanism, this is not a way to deal with it.
Don't miss: Turning an Old Screwdriver into a Impact Wrench: It's Very Easy
- Select a metal shaft whose diameter allows it to be inserted into the hole on the chuck. For this purpose, you can use a nail, an old drill, or a hairpin. The main thing is that the metal is strong enough and does not bend from the applied force. The screwdriver is inserted into the slot of the cartridge and acts as a lever (the support goes to the shaft). It is enough to slightly loosen the thread, and you can pull out the drill by unscrewing the mechanism with your hands.
- The cartridge is clamped in a vice or held tightly with a gas wrench. The shaft is inserted into the hole, and then, applying muscular force, the mechanism is unscrewed or tightened.
The second method can help if the chuck is clogged with chips. Then its body is clamped in a vice, and the lever is lightly tapped with a hammer. Vibration causes parts to shift, and the mechanism becomes wedged.
The effectiveness of the described folk methods is significantly less than when using a factory turntable. But it is possible to tighten or loosen the locking mechanism once or twice in this way. After finishing the work, you need to purchase a new key from the store.
How to remove a chuck from a drill - instructions with description
Quite often, during the operation of drills, wear of various structural parts occurs. One of these parts is the cartridge, which wears out and causes a number of different problems. Chuck wear often manifests itself in the form of unreliable fixation of replaceable drill attachments. To eliminate such a malfunction, you will need to dismantle the product, as well as replace or repair it. It is advisable to consider in more detail how you can remove the chuck from a drill.
Why is this necessary?
Each drill has a very important part in its design that allows you to securely fix the attachments for the corresponding work. The principle of operation of the chuck is based on a cam mechanism, that is, the fixation of the working attachments is carried out by means of fixation between three/four cams. The cams are cone-shaped and move only in one longitudinal direction.
Dismantling and disassembling the drill chuck is required not only when a drill or bit jams in this device. Often craftsmen strive to expand the functionality of their drill, which is also a reason for dismantling the product. Chucks are divided into two main types: key and quick-release chucks. Quick-release devices cannot be repaired, so if they malfunction, replacement is required. Key or cam devices must be repaired depending on the type of failure.
Repair of the key chuck may be required if the drill is not securely fastened. To ensure reliable fixation, you will need to disassemble the cartridge and clean the jaws from dirt. If the cams do not show signs of damage, they should be lubricated with lubricant and then installed back on the drill.
How to remove and replace a threaded cartridge
Not all owners of such tools know how to replace the chuck on a drill. But sooner or later the time comes when the product fails, resulting in the need to unscrew the device to replace or repair it. We will find out how to do this further.
The cartridge is disassembled: what to do next
After disassembling the structure, it is important to study all fragments of the device. If they are not seriously damaged, repairs will be fairly simple. As a rule, malfunctions are associated with debris getting into adjacent elements. In such a situation, it is enough to blow them well and rinse them using oil.
If the failure is caused by damage to the threads or teeth, it is worth taking more serious measures. For minor problems, you can try sanding the affected fragments. In more serious situations, a complete replacement of the structure is required. At the same time, putting the part back together will not be difficult.
To ensure that your drill lasts as long as possible, it is important to use it correctly. The tool cannot be used for turning and milling work, as it can quickly break. The correct choice of drill and its sharpening is of no small importance. This has a significant impact on the cartridge itself.
Note! When using a drill frequently, it is important to protect the drill bits from contamination. This will help avoid jamming of elements.
After disassembling the device, it can be repaired
How to remove a chuck from a drill
For greater functionality, drills and screwdrivers are now equipped with a chuck. This device will allow you to clamp any tool that has a cylindrical or faceted shank, no matter whether it is a drill or a screwdriver bit. The most commonly used are three-jaw self-centering chucks.
But like any mechanical device, the jaw chuck can fail, and sometimes a situation arises when the chuck needs to be replaced to install other equipment. This situation often arises when using a hammer drill as a drill or when working with miniature drills, the shanks of which cannot be clamped with a conventional chuck.
In our article we will describe how the chuck is secured to the working shaft of the tool and how to properly dismantle it.
Disassembling a drill chuck with a quick-release nut
To clean the jaws and lubricate the moving parts and threads of the cartridge, it must be disassembled. Disassembly is necessary to repair and replace failed parts. Here is a short list and sequence of operations for disassembling the jaw chuck:
- The removed cartridge with the conical part up, lined with wooden spacers, is clamped by the coupling in a vice.
- Use a gas wrench to carefully unscrew the notched nut.
- The bearing is pulled out. The puck comes out.
- The cartridge is removed from the vice.
- The adjusting sleeve is twisted from the base by hand. If it does not give in (jammed), then the cartridge turns over and is again compressed by the clutch in a vice. A little machine oil is poured onto the threaded part of the coupling and base. Then, using a gas wrench, the base is skillfully unscrewed from the coupling.
- If there is a retaining ring or nut at the bottom, they are removed.
- The cams are pulled out of the guide rings and removed from the base cone.
- All parts of the drill chuck are carefully inspected. If worn, deformed or broken parts are identified, they are rejected and replaced.
- The jaw chuck is assembled in the reverse order. At the same time, all moving parts are lubricated with a special grease. It is best to use the lubricant recommended by the manufacturer.
Removing the chuck from the drill
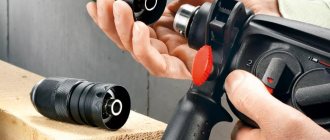
First of all, let's look at the quick-release chuck. To remove this device, simply clamp the upper ring of the clamping device and turn the lower ring until it clicks. Typically the rotation limits are shown on the chuck itself.
As can be seen in the photo, a cotter-type clamping device is installed on the drill to secure the drill. Below is a three-jaw chuck prepared for replacement.
Having fixed the upper ring with the marking, forcefully turn the lower ring with the line until the removed device is marked. After which the device is easily removed in the direction of the shaft axis. The jaw chuck is initially set to the open position. If not, then just turn the lower part in relation to the upper ring until it clicks.
We put the chuck on the shaft, clamp the upper ring and scroll the lower part until it clicks, the chuck is fixed on the shaft and is ready for use.
The photo clearly shows the boundary between the quick-release device and the cartridge itself. In order to remove the cartridge itself, we need a screwdriver or hex key.
Here you can see the chuck jaws lowered to the extreme position. And at the very bottom of the socket you can see an axial screw for a slotted screwdriver. This screw will need to be unscrewed in order to remove the clamping chuck fixed on the shaft. Here, for example, is a cartridge rigidly fixed on the shaft
In this case, you will need a Phillips screwdriver to remove it. It should be noted that hexagon screws are also often found.
Features of disassembling the keyless chuck
The specific design of quick-release chucks does not allow for their complete disassembly. To lubricate the device, do the following:
- Carefully pry the coupling around with a screwdriver.
- Remove the coupling by hand.
- Open your fists as much as possible.
- Insert a steel rod into the cartridge and knock the housing out of the plastic coupling.
After this, disassembly must be stopped, otherwise reassembly will be impossible. Removing both parts of the coupling is sufficient to allow lubricant access inside the device.
To assemble, you need to install the upper part of the coupling, hammer in the end lock washer (through a wooden plank) and install the lower part of the coupling by hand. After this, the cartridge is completely ready for use.
Removing a threaded cartridge with a reverse screw
In order to remove the cartridge from the axle, we first need to unscrew the central screw. In order to gain access to it, you need to push the cams all the way. Then insert a wrench or screwdriver inside and “pull” it off with a sharp movement. The screw thread is left-handed. The screw itself is filled with sealant and is very difficult to turn.
In addition, it should be noted that in the work it is worth using a high-quality tool. When working with a Chinese screwdriver, the slot simply broke off. At the same time, the screw itself remained in the untouched position. Only a blow to the screw helped, after which the head moved and the process began. After unscrewing the screw, you need to remove the cartridge body itself.
Then you need to unscrew the cartridge itself from the thread. In this case, the thread is right-handed, opposite to the screw. It is very difficult to break the thread, as it “sticks” during operation. A significant amount of effort is required, but the process can be sped up.
In this case, you can use a hex key clamped in the chuck. This will allow you to lengthen the lever, and if there is a “reverse”, use the tool itself. To use the tool, you either need to hold the hexagon in a vice and turn it on, or hit it on the table while rotating at low speeds.
Removing a Morse Taper Chuck
In this case, you will need a drift and a hammer. As a drift, you can use a U-shaped puller with wedge-shaped arms. It must be installed so that the axis of the cone passes between the paws, and then carefully drive it between the chuck and the drill. When going inside, the puller should squeeze the cartridge out of the cone.
The photo shows three-jaw chucks of various types and Morse cones of several sizes.
As a puller, you can use an open-end wrench or any other device that allows you to influence the cartridge in the axial direction.
It is worth noting that all actions to dismantle cartridges, especially with a Morse taper, should be carried out extremely carefully. Since excessive haste can lead to damage to the drill body or injury.