Welded mesh for fence
Unlike chain-link fencing, a fence made of welded mesh is made not only tensioned, but also in the form of sections.
The section consists of intersecting steel rods connected to each other by spot welding. The thickness of the horizontal rods is often made sufficient so that the section does not need additional supports in the form of crossbars or veins between the posts - the maximum diameter can be 10 mm. The cross-sectional diameter of vertical rods is at least 4 mm, and for suspended-strength fences they can be thicker - 5 or 6 mm.
There are different technologies for manufacturing and protective treatment of mesh.
The simplest and most inexpensive option is a mesh made of ordinary low-carbon steel without galvanizing for painting. It is rarely used as a fence for a private area due to its susceptibility to corrosion and short service life. But if you need a temporary fence at minimal cost, then this is the best choice. It is the “tension” type of fence that is made from thin rolled mesh, as a more durable option compared to chain-link.
The simplest fence made of welded meshSource chelyabmetprom.ru
Mesh with galvanized rods is highly resistant to corrosion, and its service life depends only on the thickness of the zinc layer. If you apply any metal paint for exterior use on top, the durability will be even higher, and in any case, at least 20 years. There are two ways to manufacture a section - welding a mesh from galvanized rod and applying a coating after welding.
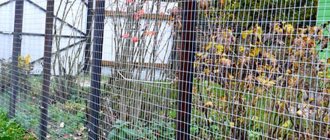
The next option is a galvanized fence mesh with a polymer coating (or powder coating based on film-forming polymer resins). This is the most common type of modern sectional fence made of welded mesh with high decorative properties. The metal is almost completely protected from corrosion, and the durability of the coating is determined solely by the properties of the polymer and its color. Typically, fence manufacturers offer several standard color options, but by paying a little more, you can order a different shade from the RAL palette.
Sectional fence made of welded mesh with polymer coatingSource yaofuli.me
What types of mesh are there?
Welded mesh fencing can have different mesh sizes, wires and overall section dimensions. There are several types of wire, and the method of making the mesh also varies.
Main settings
The strength of the fabric is determined by two characteristics: the dimensions of the cage and the diameter of the wire. The smaller the cell of the mesh material, the stronger the fence will be. But material with such parameters costs more. Standard cage: 50x50 mm, 100x100 mm (the most common), as well as 150x150 mm, 200x200 mm. Metal mesh can be light or heavy, which is determined by the thickness of the wire.
In the first case, the diameter varies between 3-6 mm. Heavy fencing is erected using mesh material with a wire thickness of 8 to 40 mm. Section dimensions (standard sizes): 1000x2000 mm, 1500x3000 mm, 2000x3000 mm.
Types of mesh
There are several types of mesh material made by contact welding:
- Non-galvanized - without coating, made using black steel wire;
- Galvanized - during production, wire without special protection or galvanized material is used, respectively, in the first case, the anti-corrosion coating is applied after the fabric is manufactured;
- Polymer mesh - the finished structure is coated with polymers; both galvanized and non-galvanized wire can be used as a base.
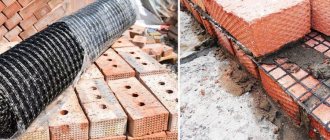
The scope of application of these varieties: strengthening the road surface and other structures, wall decoration, construction of fences. Polymer mesh has proven itself well in domestic conditions - it is used to build fences.
Galvanized material with a polymer coating has the best characteristics: a sectional fence will last longer thanks to double protection against corrosion, and it is more attractive in appearance.
Positive qualities of welded mesh fencing
It is necessary to highlight the light transmittance of the structure. This feature allows you to set up a garden or vegetable garden next to the fence, since the mesh eliminates the possibility of shading the area. Installing a fence yourself is faster and easier than most other analogues (made of decorative bricks, natural stone). And the cost of the fence is lower.
Welded mesh in sections
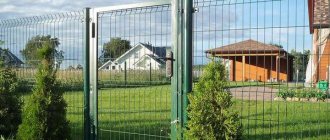
Welded mesh in sections is even easier to install. Sections are sold in sets and assembled as a construction kit. The sections are sold with poles with the same PVC coating, with a cover, and fasteners. For example, one 2.5 meter section comes with a 3 meter pole and 3 clamps with screws. The height of the mesh varies from 1.5 m to 2.5.
Welded mesh in sections.
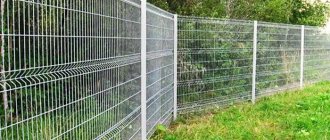
Sectional fences also include 3D welded mesh. A 3D fence looks like metal rods (vertical and horizontal) welded together. The standard section width is 2.5 m. The height may vary. To provide additional rigidity, the vertical rods have V-shaped bends. An additional horizontal rod runs along them across the entire width of the section.
Welded mesh 3D.
Profiling gives the fence high strength and rigidity. 3D fences have a long service life and do not require repairs. A polymer coating is applied to the surface of the welded mesh. The service life of the fence is up to 20 years or more.
Aesthetic and functional 3D fence with a characteristic curve.
Pillars
Wooden, metal or asbestos-cement supports are often used as supports, less often concrete or brick.
Tree
The weight of the chain-link mesh is small, the wind load is low. Wooden poles can handle it quite well. They are inexpensive, but less durable than metal or stone. They are made from sanded logs or timber. It is recommended to coat the lower part with heated bitumen and wrap it in roofing felt, and treat the upper part with an antiseptic.
Before installing the supports, prepare holes or holes with a diameter exceeding the cross-section of the pillar by 15-20 cm and a depth of 0.7-1.2 m. The installation step of the supports is 2.5 m.
The racks are fixed vertically. The pit is filled layer by layer with crushed stone and sand, spilled with water, and compacted. The mesh can be attached to wooden posts with ordinary nails, bent with a hammer.
Metal
The supports are made from profile pipes with a cross-section of 40x40 mm or more or round pipes with a diameter of 45 mm or more. The racks are installed by driving, backfilling or partial concreting.
The depth of immersion of the base of the pillar is 0.7-1.2 m, step 2-3 m. If concreting was carried out, you need to wait 1-2 days until the concrete has completely set, and then attach the mesh.
It is recommended to pre-treat the metal against rust and prime it. To prevent precipitation from entering, the holes must be welded or plugs placed on the posts.
Asbestos cement pipes
Asbestos cement posts are a popular material for making fences. They are not afraid of frost, fire and moisture
Due to their fragility, they must be handled with care.
To fasten the chain-link, posts with a diameter of 100 mm and a length of 2950 mm are used. They are dug in to a depth of 1-1.2 m, the base is covered with crushed stone or concreted. It is recommended to attach a cap on top to protect against water ingress. The chain-link fence posts themselves do not need to be filled with concrete. They stand for years without additional reinforcement. The load is small, so no destructive forces are created in the pipe walls. The material of the veins and the method of their fastening have a much greater influence. It is necessary to avoid rigid metal connections, where critical stresses can arise due to large differences in the coefficients of thermal expansion.
Concrete
Concrete pillars are strong, durable supports designed for high loads. They are made by pouring at the installation site, assembled from blocks, or purchased ready-made.
Installation of monolithic pillars is long and labor-intensive. Requires installation of formwork and reinforcement cage, preparation and pouring of concrete. Strengthening time is 3-5 days. After this, the structures are demolished and further installation is carried out.
Prefabricated pillars are laid out from concrete blocks. They are permanent formwork with ready-made decorative finishing. Installation also requires installation of a reinforced core and pouring concrete, but externally such pillars are much more attractive.
Brick or stone
Supports made from these materials look impressive, they are durable and reliable. Due to the large mass of the pillar, a solid reinforced concrete foundation is required. It is laid below the freezing point.
For columns, both facing brick and ordinary brick with subsequent finishing are used. Masonry is quite labor-intensive and requires highly qualified craftsmen. In areas where building stone is mined, it is also used for fences. Due to the irregular shape of the stones, laying out the column is not easy. Masters use various technologies. For example, a mass of stones and mortar is placed in formwork. After the cement has set, the formwork is removed and each stone located on the surface of the pillar is carefully cleaned with a chisel.
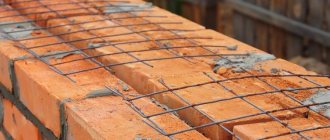
The main stages of building a fence
A fence made of welded mesh is built using the following materials: sections of fence cloth; metal pillars with embedded parts, but they can be secured with your own hands using a welding machine; concrete solution.
Scheme of sectional fencing made of welded mesh
Basic tools: welding machine, screwdriver (if the sections will be attached to the poles using a threaded connection), tape measure, building level, shovel/hand drill.
Step 1:Marking work
A fence made of welded mesh, like any other fencing, requires preparatory work: cleaning the area, checking the difference in soil surface levels, marking.
The construction of the fence begins with markings. To create the desired line, pegs, rope and tape are used.
First of all, you should outline the location of the fence. To do this, drive stakes into the corners with your own hands, and string a rope between them. Next, you need to determine the location of the fence posts. They are placed at a distance that is 15-20 cm greater than the length of the section. The reserve is allocated for the embedded parts with which the fence is attached.
Step 2: Installation of support posts
A fence made of welded mesh is usually erected using metal posts. They are strong enough to support the structure of a section made of frame and mesh. In addition, in most cases, the fence is fastened by welding. Another nuance: a metal fence lasts much longer. And if the wooden posts fail, you will have to repair the fence ahead of time.
To prepare cement mortar, one part cement, one part water and three parts sand are used.
A sufficient cross-section of pillars for a sheet of wire 3-5 mm thick is 60x60 mm. The depth of the holes for the support posts is determined based on data on the structure of the soil and the depth of its freezing. On average, a columnar foundation 0.8-1 m deep is installed for a mesh fence.
It is important that the support is recessed to a level equal to a third of its length. The holes are dug with a shovel, but you can use a hand drill. This will speed up the work. The diameter of the holes in the soil should be several centimeters larger than the posts.
Welded mesh fences are most often installed by completely concreting the supports. This will further strengthen the structure. To make the solution, sand and cement (3:1) are used. Then the hole is filled with cement mixture with your own hands, a pillar is installed there and leveled. Spacers are used to secure the support. After a few days, you can continue building the fence.
Step 3: Attaching the fence cloth
The use of rolled mesh requires the use of special clamps or brackets. In this case, a continuous fence sheet is attached. If you plan to use a more durable mesh, prepare a frame made from a corner or profile pipe.
Each post is equipped with 4 fastening elements that secure the mesh.
The base material is welded to it with your own hands. The finished section is attached to the embedded parts using a welding machine or using a threaded connection method (bolts, nuts).
Wire diameter and cell shape
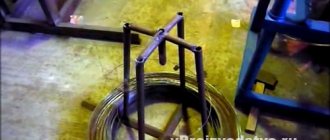
Welded mesh is made from steel wire. The latter is first leveled and then cut into pieces of the required length, after which bends are formed using a bending machine, which will eventually become stiffeners. The final stage is spot welding, after which it is possible to apply a protective zinc layer, and possibly a polymer one.
The diameter of the wire in a welded mesh does not exceed 4 mm, and products made from wire with a diameter of 5-6 mm are usually called welded panels. Naturally, the thicker the wire, the stronger the structure.
Cells of different shapes can be formed from wire, but the following options are usually used:
- square and rectangle;
- rhombus;
- trapezoid (usually made to order).
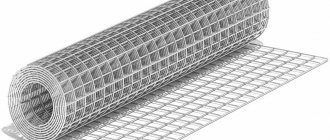
Welded mesh (diameter up to 4 mm) is transported in rolls. At the installation site, the roll unrolls easily, and the mesh itself quickly comes into shape. Welded profiles are made from thicker and stronger wire, so it cannot be bent into a roll - such products are transported by cards, i.e. ready-made sheets that remain secured to the support.
Recommendations for arranging a fence
The use of galvanized mesh does not require coating with paints and varnishes. But if the section is made by hand, the protective coating can be damaged during welding. Then it is necessary to provide additional protection with paints and varnishes.
The use of welded rolled mesh involves two solutions: cutting the material yourself to make sections; installation of the fence sheet using clamps, no need to cut it.
If galvanized mesh is used for the second option, the installation process will take less time, since there is no need to prepare sections. But in this case, the fence will lose strength.
But the thicker the wire used in the production of the material, the stronger the structure will be. The cell sizes of the rolled mesh are also responsible for this quality.
Option #2 - fence with longitudinal veins
Longitudinal veins are metal corners or wooden slats (beams) that are attached to fence posts and serve for hanging a chain-link mesh. This design differs from the previous hinged version in that the mesh is fixed not on supports, but on veins.
Scheme of a fence made from a chain-link mesh with horizontal veins from a metal corner
Algorithm for making a fence from a chain-link mesh with veins:
1. Marking the area and driving in pillars
Should be done in the same way as when constructing a tension fence
2. Attaching the veins to the posts
Secure the metal corners to the top and bottom of the posts by welding or bolting. Use screws to secure wooden beams.
3. Attaching hooks to veins
Weld hooks to the metal veins - pieces of wire or nails bent upward. Drive nails into the wooden veins and bend them too.
4. Hanging the mesh
Unwind the roll of mesh and begin hanging it on the hooks of the veins at the top and bottom. A little below the upper hooks, through the mesh cells, stretch a steel rod horizontally. Lift the mesh fabric, remove it from the hooks and hang it again, but this time by the rod, and not by the cells.
Fastening the mesh to corners and wooden legs using hooks and a metal rod
Now do the same with the bottom of the mesh. Thread a rod above the lower hooks and use it to hang the net on the hooks. Bend the hooks with several blows of the hammer.
The veins of a mesh fence are most often made from a metal corner, less often - from wooden beams or boards
Peculiarities
Galvanized welded mesh is designed for areas where strength is primarily important
Previously, chain-link mesh was used for fences of this design. Considering that the metal wire from which it was made is susceptible to corrosion and is short-lived, it was first used as temporary fencing. However, over time, the technology for manufacturing durable mesh was mastered. Mechanical stability was achieved by using welded rather than woven mesh. Galvanized wire was chosen as the starting material. The mesh elements are spot welded, providing a rigid overall profile of the mesh fabric. Thus, welded mesh fences today represent a strong, durable fence.
Features of welded fences
- Reinforced fence
. It is considered an economical option. It is made from rods of various thicknesses. The structure of rods with a diameter of up to 1 cm is not reliable and is considered a temporary structure. Her appearance is not very attractive. To strengthen the fence, thicker rods or profiled pipes are used. Instead of reinforcement, steel strips are sometimes used. They are inferior in strength to reinforcement, so they act as decorative elements. - Welded mesh fence
. Also applies to budget options. It is not considered a serious obstacle, but is indispensable in cases where it is necessary to fence off an area from small animals or birds. - Welded sectional fence
. It is being built in parts. First, a frame is assembled to which fence elements are welded - reinforcement, metal strips or mesh. Sections can be made standard (rectangular in shape with standard dimensions) or made to order. The last option will be more expensive. The finished fragment is fixed to the supports. This design has a more aesthetic appearance than a mesh without a base.
Product benefits
Galvanized mesh has significant advantages over similar products:
- it is not susceptible to corrosion processes that occur due to mechanical damage or aggressive environmental influences;
- has sufficient durability and strength, does not lose its structure;
- the absence of corrosion damage gives the fence a neat and aesthetic appearance;
- does not leave traces of rust on contacting surfaces, clothing and hands;
- long service life.
For decorative use, the fence is covered with polymer material.
Installation of pillars
Pole installation methods
To ensure that the supports are on the same line, the installation order must be followed:
- Corner pillars. Since they will experience maximum load when the mesh is pulled, the corner supports are reinforced with spacers
- Posts at breaks in the fence contour (if the area has a complex geometric shape)
- Gate and gate supports (must be concreted for reinforcement)
- Intermediate supports with the same installation spacing on straight sections
Before installation, the lower part of wooden poles is treated with an antiseptic and waterproofed. To protect wood from moisture and decay, you can use used machine oil, heated bitumen, and bitumen-polymer mastic. You can burn wood at a fire - this also protects it from rotting.
When building a fence on a site with a strong slope, terracing of the terrain is required. Supports of greater height are used, to which the mesh (or sections) are attached at different levels so that the fence runs in steps.
For metal supports, the lower part is cleaned of traces of rust and treated with a composition that protects against corrosion, covered with a primer or a layer of bitumen is applied. A plastic plug is put on the upper end or a metal plate is welded.
Work progress
In places where the location of the pillars is marked, pits are prepared using a drill or shovel. The depth depends on the level of soil freezing in the area, but it should be about a meter so that the fence does not sag under loads. The exception is dense clay soil that is not prone to heaving; supports can be immersed in it to 80-90 cm. For heaving and loose soils, the bottom of the hole should be 15-20 cm below the freezing point - this will protect the supports from being pushed up.
Butting and concreting
A 10 cm layer of sand and a 10 cm layer of gravel are poured onto the bottom of the pit; both layers are well compacted - this is drainage, facilitating water drainage. Then the prepared post is installed in the pit.
The free space between the support and the walls of the pit is filled with crushed stone and small stones, alternating with layers of soil, and each layer is compacted well. If a sectional fence is being erected, the weight of which is noticeably higher than the tension one due to the welded frames, the supports are additionally concreted to 40 cm of the pit height or completely filled with concrete instead of backfilling.
A temporary fence on metal supports can be erected without concreting. The posts are driven into the ground with a sledgehammer through a piece of thick board (to protect against deformation). To make it easier to maintain vertical installation, dig a pit to half the required installation depth and finish the support to the required level.
Construction and arrangement of a summer kitchen at the dacha with your own hands: projects, design, arrangement, with barbecue and barbecue (60+ Photos & Videos) + Reviews
Installation features
The hole for the support should be 2-3 cm larger than the diameter of the pillar. In an area with clay soil, it is recommended to fill the hole with crushed stone after installing the support to 1/2 depth; in sandy soil, you can do without a deformation cushion. The upper part of the recess is filled with concrete.
The mesh rolls are pre-unwound and sewn into a web of the required length. To do this, unscrew the outer spring stitch, overlap the edges of the rolls and fasten them with a stitch woven back in.
- Pool finishing: description of all types and features of modern finishing
- How an independent examination of construction work is carried out: an overview of all stages
Fasteners for the construction of frame houses: features of the right choice
Next, the canvas is stretched along the pillars and attached to them using wire. If everything is done correctly, your site will be fairly well protected for the next 15-20 years.
DIY plastic mesh fence
Not so long ago there was no talk about plastic fences in Russia, but recently such fences can be seen in some summer cottages. One of the advantages of plastic fences is ease of installation. The owner of the property is quite capable of putting up such a fence himself; this article will help him. Types The enclosing fabric itself is made in the form of a mesh. There are the following types of plastic mesh: garden, facade and chain-link mesh. Sadovaya is produced by extruding the polymer mass with an extruder in two axes. At the same time, certain values of the main parameters of the technological process are maintained - pressure and...
Types of mesh fences
In this regard, metal fencing structures made of mesh are used everywhere. Because they have high technical and operational characteristics. Today, two types of mesh are used for fencing: chain-link and welded.
They differ from each other in manufacturing technology. The first is made by weaving with the formation of cells, the second by spot welding, in which metal rods are connected.
It cannot be said that welded mesh is better than chain-link. Both have fairly high strength characteristics and almost identical advantages and disadvantages.
Advantages and disadvantages of welded mesh
The main advantage of fences made of welded mesh is low price with high technical characteristics. Next we note:
- the ability to dismantle the mesh and use it in another place for the construction of fences or other needs;
- ease of installation;
- a huge variety of sizes offered, which makes it possible to build fences of different heights;
- easily tolerates natural stress;
- transparency of the structure, allowing air and sunlight to pass through, which is an important factor for some areas.
Regarding the shortcomings, many regard the last plus as a minus. Not everyone likes having their personal life wide open. And the transparent design contributes to this. The second negative is that the appearance is not entirely presentable when compared with other fencing structures, for example, brick, stone or wood.
Not the most presentable appearance
Varieties
The classification of welded mesh is based on the source material. There are three categories:
- Made from carbon steel without protective coatings. It is welded from metal rods with a diameter of 1.2-10 mm. Such products are susceptible to metal corrosion, so they become rusty over time. This type of metal mesh must be painted to reduce wear. Painting is carried out with enviable frequency, which increases the cost of maintaining the enclosing structure.
- Galvanized. It is welded from galvanized wire, which practically does not rust under the influence of natural loads. It has a fairly long service life; there is no need to paint such a product. Still, it's not the best material.
- Not galvanized with polymer coating. In fact, this is the first option that is coated with a polymer layer. The finished mesh is simply dipped into the polymer mass and then dried. To give the product a more presentable appearance, it is coated with paint using powder technology. This further increases the protective qualities.
- Galvanized with a polymer layer. This is the pinnacle of metal mesh quality, but also the pinnacle of price. Welded mesh of this type can be classified as materials in the category with an unlimited service life, although manufacturers guarantee 65 years. At the same time, this type of material can easily withstand temperatures ranging from -55C to +65C and humidity not exceeding 97%.
Note that welded meshes are processed with zinc using two technologies. The first is the production of a mesh product from galvanized wire, the second is from carbon steel, and the finished mesh is galvanized. The latter option is better because in the first technology, welding heats the zinc layer of the two rods, which reduces the protective characteristics of the material. Often the zinc layer simply peels off from the base metal body.
In the construction market, welded mesh is presented in two positions: rolled and in the form of layers. The second option is easier to install, because it is a ready-made product with its own dimensions, under which you simply need to install support posts in increments equal to the width of the layer.
Main types and their characteristics
There are several options for welded fencing, differing in quality, appearance and strength. A welded fence can be made from the following types of mesh.
- Non-galvanized. The product is made from black steel wire with a cross-section of 1.2-10 mm. This fencing option has the lowest price. This metal blank does not have any additional protective coatings, so it can rust and deteriorate. Service life is short. After a little time, it will lose its original appearance under the influence of rain, snow and other external factors.
- Galvanized. The material is more durable due to special processing. There are two types of galvanized wire. In the first case, production is characterized by applying a layer of zinc to the surface of the wire. In the second option, galvanization is carried out using an electrolytic reaction or using a hot method. Galvanized fencing is an ideal option for a country fence. A high-quality fence is obtained at a very affordable price.
- With polyvinyl chloride coating. Welded mesh with PVC is protected by a special layer of polymers, so it is not subject to corrosion and does not lose its appearance and attractiveness for a long time. The coating is applied to the material only after welding, which provides additional protection to welded joints. The basis for applying polymers can be galvanized or non-galvanized wire. The fences on the site are made of welded mesh with a polymer coating and fit perfectly into the overall picture of the landscape. The blank is most often green and harmonizes with any country landscape without additional decoration of the fence. Galvanized material with PVC has the best characteristics, as it has double protection against corrosion and an attractive appearance. Polymer-coated mesh, which initially has color, is an ideal option for a country fence and becomes a full-fledged element of the overall design.
- Coated with polymers and zinc. The double coating ideally protects the material, it is practically not subject to corrosion and looks attractive, but is too expensive. Therefore, such fabric is rarely used for fences.
All types of welded mesh are used in road construction, wall decoration, and building construction, but the material is most widely used in the design of fences in summer cottages. A metal fence around a private property made of welded mesh reliably protects the territory, lasts a long time and looks beautiful.
Tips you should know
When installing a fence made of galvanized or non-galvanized mesh, the following nuances should be taken into account:
- It is recommended to use metal posts as supporting elements, since wooden products will not be able to support a mesh with a large weight;
- it is better to install the structure in the autumn or spring, when the ground is still loose and easy to dig;
- if you plan to use the mesh in rolls, you will need to unfold it and leave it in this position for approximately 24-48 hours so that the material straightens and can be easily installed and secured in the future;
- The cement solution should be prepared for each hole separately so that it does not harden.
https://youtube.com/watch?v=NzbmeCXJTiA
Installing a mesh fence is not difficult, you just need to take into account all the nuances and follow the installation rules.
Technology for installing chain-link mesh on poles for various types of fences
After the concrete solution has hardened, installation of the chain-link mesh begins. The order of work depends on the design features of the selected fence. We offer you to get acquainted with the technology of performing work in each specific case.
The order of installation of the chain-link mesh may vary
Simple tension fence
When installing a chain-link fence yourself, most often a simple tension structure is chosen. The work is performed in the following sequence:
| Illustration | Description of action |
| The grid is unpacked. One end is attached to the first support post. The method of fastening depends on the design of the support. You can use wire or clamps. | |
| Carefully unwinding the roll, the chain-link mesh is extended to the next post. Trying to stretch the canvas as much as possible, screw it to the second support. The material is attached to the remaining supports in the same way. |
Fencing with guy wires
A simple tension fence does not have sufficient rigidity and may sag over time. The use of stretch marks made from wire with a diameter of 4–6 mm helps to correct the situation.
The wire must pass through all cells
Strings are tensioned using a variety of methods, including ties and tensioners. However, in this case, it must be taken into account that the outer and corner pillars will be subject to maximum load, which should be taken into account when choosing the diameter of the pillars.
Tensioners increase the load on the supports
Ideally, the mesh should be stretched with wire along its entire length. However, given the laboriousness of the process, the strings are first tensioned, then a chain-link is mounted, which is tied to the strings every 20–30 cm.
Chain-link fence reinforced with joists
If you decide to give preference to a fence with a reinforced frame, you should pay attention to a structure with logs. As the latter, a profile pipe is most often used
However, if desired, you can use reinforcement rods that have sufficient rigidity. Installation work is carried out in the following sequence:
| Illustration | Procedure |
| The unpacked mesh is pre-fixed with hooks welded to the posts. If you don't have any, you can use regular wire. | |
| Reinforcement with a diameter of 10 mm is pulled through a pre-installed mesh. The number of broaches depends on the height of the mounted fence. | |
| The reinforcement stretched through the cells is welded to the posts, thus ensuring its reliable fixation in a tense position. |
Sectional fence
It is quite difficult to properly stretch rolled material. Sectional fencing involves the installation of ready-made spans. We invite you to get acquainted with the intricacies of the process.
Sectional fencing
Assembly of sections
Before assembling the frame, its geometric parameters should be accurately calculated. It should be 100–150 mm less than the span width. For its manufacture, a corner with a shelf of 40–50 mm is used.
The sections are assembled in the following sequence:
| Illustration | Description of action |
| We cut the necessary elements to size using a grinder. At the same time, be sure to ensure the perpendicularity of the cutting line. We lay out the prepared elements on a flat surface, check their relative position and weld them together. Welding should begin from opposite corners. Clean the seams in the finished frame. When welding the frame, we ensure that the diagonals are equal and the corners are perpendicular. | |
| We stretch a reinforcement rod through the outermost cells of the chain-link mesh. We unwind a mesh equal to the width of the section and lay it on the frame. We align the edges of the sections if they have shifted during transportation. | |
| We weld the rod cut to size to the frame frame. We make welds every 15–20 cm. | |
| Remove the extra mesh. Through the outer cells we stretch the second reinforcement rod, cut to size. We weld the rod to the frame. | |
| We twist the ends of the wire to prevent it from moving during operation. | |
| We stretch the rods through the sides and then weld them to the frame. To make it easier to attach the section to the posts, we additionally weld dies measuring 6x60x250 mm. |
Watch this video on YouTube
Installation of sections
Installation of sections consists of welding them to support posts. In this case, it is imperative to ensure the required spatial position of each element.
Sections should be welded to supports
Installation technology
You can easily install a welded mesh fence with your own hands. But first you need to carry out preparatory work: purchase the necessary materials and parts, as well as prepare tools and accessories. The choice of materials and necessary tools depends on the type of fence: tension or sectional. A sample list of materials is as follows:
- for tension fences - rolled mesh;
- for sectional fences – ready-made sections;
- for tension and sectional fences - posts, embedded parts, concrete or cement mixture.
Tools and accessories: welding machine, screwdriver (for sectional fences), marking tool (tape measure, level or plumb line), shovel (scoop and bayonet), hole drill, container for preparing mortar. It is recommended to construct the fence in the following sequence.
Site layout
First, you should clear the area of debris, growth or stones. Plan it so that it is level, without holes or bumps.
Perimeter marking
First, you should mark the territorial perimeter line. This is done using wooden stakes and a rope stretched between them. Next, the installation points of the pillars are determined. Marking is best done using a tape measure. If a sectional fence is being built, then the distance between the installed posts must be increased by 15-20 cm. The margin is necessary for the purpose of using special section fasteners. The penetration points of the pillars are marked with wooden stakes.
Installation of support posts
To make it easier to level the pillars in height, fill the bottom of the holes with sand, gravel or small crushed stone.
The strength of the fence depends on the quality of the supports; pipe supports are considered the best. Support pillars can be reinforced concrete or wooden. The cross-section of the post for mesh products with a rod thickness of 4 mm or more can be 60 * 60 mm. Before installing the pillars, you first need to dig foundation pits, holes or holes in the ground. In this case, the depth of soil freezing is taken into account. After this, a support post is installed in each hole. Using a plumb line or level, it is given a vertical position, in which it is secured with spacers. Then a cement mortar is prepared, consisting of 3 parts sand and 1 part cement, which is used to pour the foundations under each pillar. After installing the pillars, you can begin installing the mesh fabric.
Stage three. Installing support pillars
There are several ways to install poles, and the choice of one or another depends on the rigidity of the structure and the specific characteristics of the soil.
- By concreting into a shallow strip foundation (reinforced concrete strip on top of a “cushion” of sand and gravel 0.5 meters thick).
- Through separate concreting (a simpler and cheaper option). Make separate recesses for each pillar with a depth of 1/3 of the total length.
We will use the second method. So, having made preliminary measurements, hammer in the corner posts using a sledgehammer, reaching the required depth. After this, check them with a level to ensure they are vertical.
Mix the concrete solution (“four hundredth” cement and sand in a ratio of 1:3), you can use gravel as a filler (3/4 of the total volume). Pour the mixture into the holes, then check the verticality of the support posts again. When the mixture has hardened, stretch the twine between them to install intermediate posts. Do this using the technology described above.
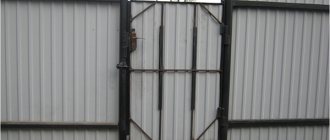
By the way, you will also need a gate for such a fence. To choose the appropriate option, we recommend looking at samples of metal gates at https://sitka.com.ua/uk/vorota/. But let's get back to work.
The procedure for installing the fence
Like most construction work, fence installation is carried out in several successive stages:
Territory preparation and marking
Before you stretch the chain-link mesh onto the fence, you should clear the strip along which it will be mounted. In addition, at the preparatory stage, the necessary materials and tools are collected.
To mark the installation locations of the posts on each straight section of the fence, drive pegs at the mounting points of the two outer supports. After this, pull the cord between them and, measuring the required distance, mark with pegs the installation locations of the remaining pillars.
Digging holes, installing and concreting pillars
Digging holes for installing pillars can be done using a regular bayonet shovel, but it is much more convenient to use a special hole drill. It can be manual or mechanically driven. This will be especially relevant if there are a large number of pillars being installed.
The diameter of the hole must be no less than the cross-sectional dimensions of the pipe with an addition of 100-150 mm in each direction. The depth of the excavated holes is 400-500 mm for ordinary stable soils or 800-1000 mm for heaving, heavily moistened and other unstable soils.
The procedure for installing the pillars is similar to marking. On each straight section of the fence, the two outer supports are first installed. After the concrete has hardened, you need to pull a cord between them and install all the other pillars along it, be sure to check the vertical using a building level. The concrete mixture for pouring pits with installed supports is prepared from cement, sand and crushed stone in a ratio of 1:3:4.
General procedure for installing a fence.
Mesh installation
As mentioned above, the design of a chain-link fence can be different. Each option has its own advantages and disadvantages, usually associated with the level of reliability of the fence and ease of installation.
Tension method
The simplest method involves fastening the mesh to installed supports without the use of additional elements and fasteners. To do this, roll out the mesh on the ground to a distance of about one and a half spans between the posts. Bend the edges of the wire spirals with pliers if this has not been done by the material manufacturer. This will prevent possible injuries during work and improve the appearance of the fence.
The mesh laid out on the ground must be lifted and secured to the posts using wire or clamps. You will need an assistant or two to complete the job. It is almost impossible to ensure the tension of the mesh while working alone.
Strengthening the structure with lags
To more securely fasten the mesh and prevent possible sagging over time, you can weld horizontal logs from a thin profile pipe or even a metal rod with a diameter of 6-8 mm to the installed racks.
If you use a rod, before welding it can be passed through the cells of the mesh, which then does not need to be tied. If a profile pipe is used, the fence is fixed using plastic self-clamping clamps.
The presence of logs will not only strengthen the structure, but also place various decorations on the surface of the mesh for the final design of the fence. In addition, the logs will pull the entire system into a single whole, i.e. you do not need to install special slopes to stabilize the corner posts.
Sectional fence
This design is a fence in which rectangular sections welded from a corner are fixed between installed posts, inside which a chain-link mesh is stretched.
It is somewhat more difficult to manufacture, but it has a number of advantages over simple tension systems. To install a sectional chain-link fence:
- on a flat, hard surface, draw a rectangle corresponding to the section configuration;
- place a corner on the line and weld the frame;
- inside the corner shelves, in increments of 150-200 mm, weld small pins made of wire or rod with a diameter of 6-8 mm;
- lay the mesh inside the section and pass its edges through the pins;
- bend the pins with a hammer, fixing the position of the mesh;
- the sections are secured to the supports by welding lengths of steel strip to the post and frame.
After installation is completed, all unpainted surfaces must be covered with a layer of paint.
Advantages and disadvantages
A welded fence in all its variants is actively used by owners of private houses and summer residents, as well as enterprises and organizations, as it has a number of undoubted advantages:
- affordable price;
- simplicity and high speed of installation. Possibility of building with your own hands;
- light weight, which allows you to do without a foundation;
- no sagging;
- good visibility, unobstructed air circulation and penetration of sunlight. This property plays an important role in gardening and horticulture;
- installation does not require preliminary preparation. Sections or canvas can be immediately attached to the supports;
- allows for land surveying where blind barriers are not allowed;
- can be a base for climbing plants (hedge);
- galvanized polymer fencing mesh is durable, cannot be broken or eaten, has a beautiful appearance and is appropriate for any design;
- A galvanized fence does not require painting or additional maintenance.
Which pillars to use
There are several options:
Wooden pillars - made of timber or logs. The cheapest, but also the most “perishable” option. Antibacterial treatment is required before installation. The best option is a special protective impregnation. To save money, you can paint the above-ground part, and it is better to impregnate the part that will be buried with mining: immerse the pillars in a container for several hours. Before installation in the hole, you can additionally wrap this part with roofing felt. Chain-link fence on wooden posts Metal posts. They can be made from a round or square pipe or a metal corner. The wall thickness is 2-3 mm, the pipe diameter is on average 50 mm, the profile section is 40-50 mm, the angle flange is 50-60 mm. Concrete pillars. The most inconvenient installation option: it is too difficult to attach the mesh to them, and it is difficult to install. In addition, the strength resource of reinforced concrete will not be in demand: too small loads are created by a chain-link fence.
The most convenient option of all those mentioned is a profile pipe, and preferably a rectangular one. It is easy to attach the mesh to it, and you can weld hooks or wire if necessary. If possible, install these. The optimal cross-section for a pillar is 25*40 mm or so. There is no need to take a larger cross-section - the fence is light.
Self-attachment of chain-link mesh to a metal pole
Before attaching the chain-link mesh, you need to drill a hole in the pipe and cut the thread. To do this you will need a steel strip 4X20 mm.
Before thoroughly attaching the chain-link mesh using a hacksaw or grinder, it is necessary to prepare sections of 150-200 mm. With their help we will attach the chain-link mesh. We drill 2 holes in them with dimensions similar to those in the pipes.
Recommendation! Drilling iron structures is best done at reduced drill speeds.
Next, threads are cut for the bolts. Then we unfold the chain-link mesh and press it with plates to the post, fixing it at the top and bottom. Tighten the bolt nuts until they stop.
Ideally, they can be riveted at the finish. The work can be completed by 2 people, but installation will be more fun and faster if 3 people work.
If this option seems labor-intensive, you can attach the mesh by welding. The plates are fixed at the corners to the pipes, then the mesh is attached.
It is important to ensure tension across these posts, minimizing sagging.
For these purposes, a 6 mm cable, which is attached to the corner posts, is ideal. The tension is adjusted using bolts. It is clear that through holes must first be made in the pillars themselves.
Note! Using welding is the most effective way to attach chain-link mesh to supports.
The result of the “labor feat” will be clearly visible in winter, when snow falls on the fence. Nature itself will check the reliability of fastening the chain-link mesh.
About mounting options
There are many mounting options. But when using chain-link mesh, it is best to install individual sections. For this purpose, frames from a metal corner are made in advance. The mesh is attached to them (welded).
Mesh fence diagram
As a result, all that remains is to fix the individual sections on the poles. In this case, you do not need to worry about the structure (fence) sagging. If repairs are required, you can easily dismantle the damaged element: section.
Please note! When fastening a chain-link mesh sectionally, the main thing is to comply with the dimensions of the frames.
Failure to maintain identical dimensions will result in the fence becoming lopsided; pay special attention to this.
To understand how to secure the mesh yourself, we recommend that you watch this video: