DIY wheel bearing puller
Homemade wheel bearing puller: drawings, photos, videos of a homemade device.
The author decided to make a homemade version of a tool for pressing out wheel bearings, an analogue of the one sold in stores.
Steel plates with a thickness of 8 mm and a pipe with a wall thickness of 7 mm were found as materials for manufacturing.
FakeHeader
Comments 66
Can you just remove the hub with 2 bolts?
Yes. You just need to put washers under the nuts so that they don’t bite and you can moisten them with oil.
Hello, could you please tell me the inner diameter of the mandrel (the one into which the bearing fits)
I have a piece of 2 1/2 pipe, internal diameter 70mm, length 40mm. Outer diameter of the bearing 64mm.
Thank you! I’ll do it for myself according to your principle!
You're welcome. It is better to take a bolt with a fine thread and so that the threads are longer, otherwise putting washers in is a pain. The nut is also longer so that the load on the thread is less.
hmm, beautiful! the brain actually works as it should))))) I especially liked the device for removing the hub
long live the brain, ingenuity and GARAZhistochnyk of all the cool tools and adventurous craftsmanship hurray hurray
how complicated it is)))) the most necessary tool for repairing a car is a chisel and a sledgehammer.
The chisel and sledgehammer are already the last century, nanotechnology rules)))
Yes, an interesting solution that can be adopted. Well done, clever idea
+5 for consistency! You can immediately see the hands grow from where they need to be! And the head is in the right place! Well done!
Wouldn't it be easier to just remove the entire rack? All that remains is to remove the tip and unscrew the two nuts on top
Not easier. what the hell is this crap? And even when removing the hub assembly. (as they do at service stations) there is a chance to change the camber settings. And with the stand it’s a pain in the ass. )))
How can you reset the non-adjustable camber settings?
If it's easier for you to remove the entire rack. flag in hand. ) do.
You didn't answer) I remove stands every day according to the specifics of my work. It takes me no more than 20 minutes to remove, replace the bearing and install the strut in place from/to a Nexia/Lanos car. Of course it’s easier for me to take it off))) And respect to you for your efforts!
Should I answer you? I said everything I wanted.
You said: - "when removing the hub assembly. (as they do at service stations) there is a chance to change the camber settings.” I asked: “How can you reset the non-adjustable camber settings?”
Again. I say what is a hundred percent. remove the hub by disconnecting the steering knuckle (complete with hub) from the strut. And naturally the camber settings get lost. If you knock down the marks. I haven’t done this myself and that’s why I don’t recommend it to others... Same with the assembled stand. I didn’t do it, I don’t recommend it. What I advise is written above in the text.
Are you satisfied with my answer?
No) How can it be disconnected if it is welded? I have changed more than one thousand bearings on such a suspension and NOT ONE! I didn't do the collapse. And I didn’t unscrew the stabilizer links. And the bolts on the ball are placed with the nuts facing down.
"Again. I say what is a hundred percent. remove the hub by disconnecting the steering knuckle (complete with hub) from the strut. "
One of the bolts is elliptical. they adjust the camber. How did you not know this?! Because of your specialty, you should know how to adjust wheel alignment))
Which car's hub is in your photos? By chance, not this ca.d-cd.net/c974118s-960.jpg where did you see the eccentric? I'm talking to you specifically about the suspension that is in your photos, and these are Daewoo Lanos, Sens, Nexia, Chevrolet Lanos, Zaz Chance cars. Where is the camber on them? Don't mislead people!
In my photos, photos of my car. )) www.drive2.ru/r/lada/735604/ “Please, shave! ))" Meet our auto industry. )) Don't you know each other? ))
Do not lie! I already recognize the pendant from 1977))
In my photos, photos of my car. )) www.drive2.ru/r/lada/735604/ “Please, shave! ))" Meet our auto industry. )) Don't you know each other? ))
It's clear! I asked the topicstarter, but then you came in.
Wouldn't it be easier to just remove the entire rack? All that remains is to remove the tip and unscrew the two nuts on top
These are two extra nuts + a ball nut.
The ball is unscrewed in any case to pull the grenade out of the hub. All that remains is the tip and two small nuts from the support, but doing it on a workbench will be much more convenient.
Read also: Making an antenna for digital television with your own hands
Weak design for wheel bearings. It may be enough for 1 time, and only if you’re lucky and everything turns out well. Just the other day I was just changing the rear hub www.drive2.ru/l/3856310/ It’s unlikely that it would be possible to develop the required force with an ordinary bolt, and even with a regular thread. When pressing out the bearing, the 10-ton press worked at its limit.
I’ve already changed about a dozen bearings with this puller and everything is intact. I work in a service department, so even a 100-ton press can’t always handle it, I have to cut.
fag is a good company, I use it myself and recommend it to others
Yes, the puller is normal, what are you). In general, I use a vice, like a press, and a normal one.
5 points for the idea, but a solid score for the implementation. Sorry brother, but for me this is complete nonsense.
I bought myself a normal puller. It cost 850 rubles a couple of years ago. With a bearing costing 400 rubles and replacing it at a service station for 1500 rubles, the puller has already paid for itself 7 times. Everything is included there: a screw, two cups, stops, a stopper and claws for the clip. There is no need to saw anything with a grinder or beat it with a chisel. After the 7th bearing has been replaced, the whole process takes me 20-30 minutes at most.
Throw away this G... and buy a normal one. Enough for 4 lives, your great-grandchildren will still use it
Yes, I rent for half an hour with smoke breaks. Why then pay more? I don’t go to the service station and I have nothing to recoup.
Why pay more is a rhetorical question. I see several reasons here: 1. The branded puller is compact. There are no studs, strips or other scraps in it. Everything is folded into the outer casing and clamped with a bolt. Nothing is ever lost. I have it in an old mitten. 2. The branded puller is intuitive to use. There is no need to saw or knock anything down with a chisel. 3. It is ABSOLUTELY injury-proof. The mere fact that you can damage the hub if you cut it carelessly with a grinder, and then you will need to hit the hardened holder with a chisel, relegates your invention to the category of garbage.
Apparently, you never broke bearings in childhood and didn’t get hit on the forehead by fragments of a clip. Because otherwise you wouldn't be hitting the clip with a hammer.
What branded puller is this? Topicstarter has ZAZ, you have Chevrolet. Why are there bearings everywhere and all the diameters are the same?
Yes, you will be completely shocked now. Ready? We have front bearings from the VAZ Nine. The most common double row angular contact ball bearings
Why pay more is a rhetorical question. I see several reasons here: 1. The branded puller is compact. There are no studs, strips or other scraps in it. Everything is folded into the outer casing and clamped with a bolt. Nothing is ever lost. I have it in an old mitten. 2. The branded puller is intuitive to use. There is no need to saw or knock anything down with a chisel. 3. It is ABSOLUTELY injury-proof. The mere fact that you can damage the hub if you cut it carelessly with a grinder, and then you will need to hit the hardened holder with a chisel, relegates your invention to the category of garbage.
Apparently, you never broke bearings in childhood and didn’t get hit on the forehead by fragments of a clip. Because otherwise you wouldn't be hitting the clip with a hammer.
Have you forgotten what site you are on?! Yes, our people don’t need anything, just let them do something of their own with their own hands.
Yes, rather not on the site, but in the community.
By the way, do you happen to have an old 65mm concrete bit in your garage? I don’t have it, I don’t think you have it either, and it’s unlikely to be lying around behind the garage. So if you are going to repeat this wonderful puller, you will at least have to buy it. I bought one for myself for 450 rubles.
I guessed it right. there is no old one. there is a new one. but someday it may become unusable... he said that he assembled it from scrap metal... What he collected, well done. What about me? I bought myself a factory puller a long time ago. and I don’t really worry about this... but if only there were problems with him and with money. Perhaps I would have done it myself... What's wrong with that. A person can work with his hands and does what is convenient for him... I have knocked down rings before as he described. It's not that scary. You are intimidating people now...
Why pay more is a rhetorical question. I see several reasons here: 1. The branded puller is compact. There are no studs, strips or other scraps in it. Everything is folded into the outer casing and clamped with a bolt. Nothing is ever lost. I have it in an old mitten. 2. The branded puller is intuitive to use. There is no need to saw or knock anything down with a chisel. 3. It is ABSOLUTELY injury-proof. The mere fact that you can damage the hub if you cut it carelessly with a grinder, and then you will need to hit the hardened holder with a chisel, relegates your invention to the category of garbage.
Read also: How to make a tire changing machine with your own hands
Apparently, you never broke bearings in childhood and didn’t get hit on the forehead by fragments of a clip. Because otherwise you wouldn't be hitting the clip with a hammer.
1. I don’t need to fold anything compactly. I’m not afraid of losing something, there’s a lot of such stuff. 2. If I made a bullet out of shit, then I don’t even need intuition. With a chisel I can remove something that no puller will take. 3. Even with a puller you can break everything and the puller too. I have broken bearings since childhood and always wrapped them in burlap. I don’t recommend throwing out the branded puller, but there is a way out.
Homemade wheel bearing puller: drawings, photos, videos of a homemade device.
The author decided to make a homemade version of a tool for pressing out wheel bearings, an analogue of the one sold in stores.
Steel plates with a thickness of 8 mm and a pipe with a wall thickness of 7 mm were found as materials for manufacturing.
Wheel bearing puller drawings.
A 320 mm long stud was also needed and a nut was welded to it. I also pressed the ball from the bearing into the center of the stud.
According to the drawings, they made these:
Cup with mate.
Also two washers measuring 74 mm and 62 mm.
This is what the entire set of tools for pressing out wheel bearings looks like.
In this video, the author shows in detail a wheel bearing puller.
How exactly to make a homemade product is shown in these photographs.
The wrenches will be used for the following blanks.
Type of bearing grips.
You need to drill holes in the keys for the bolts.
The plates will be used for blanks with holes.
You need to weld a knob on one ring of the stud and assemble the structure.
View of the assembled puller.
Using the tool is very simple - to do this, we engage the bearing using grips, press the pin in the center, perform rotational movements and remove the bearing from the axis of the part.
This device is also suitable for removing the inner bearing. Here you need to insert the stud into the bearing and screw on the nut.
Here you need to put stops and rotate the pin. In this method, the internal bearing is removed from the part.
Homemade wheel bearing puller: drawings, photos, videos of a homemade device.
How to make a universal wheel bearing puller with your own hands? Read and craft
Most car enthusiasts are interested in how to make a universal wheel bearing puller with their own hands. After all, buying such a tool in a store is not a cheap pleasure. In addition, factory products are often made for a specific model. Therefore, if you buy a puller for one car, you are unlikely to be able to use it on another model. By making a universal puller, you are guaranteed to be able to change bearings on different machines. And almost every driver is faced with replacing this element of the hub, and repairs cannot be delayed. The wheel may become stuck while driving, causing a serious accident.
How to make a universal wheel bearing puller with your own hands? First, you need to understand the types and features of these bearings. Nowadays, only double-row bearings are used in passenger cars. They are more reliable and efficient. They are divided into the following varieties:
- Ball;
- Roller;
- Roller cones.
On passenger cars, ball or cone types are usually used. They are more compact and much more reliable. Depending on the installation method, they can be external or internal. Now, there are bearings with the ability to control the speed of rotation of the wheel. And depending on this, the operation of the bearing is regulated.
Assembly drawing of a universal generator pulley puller
Fixtures are auxiliary devices used to perform machining, disassembly-assembly or inspection operations. The usefulness of the device lies in the fact that its use will increase labor productivity, reduce the cost and improve the quality of work, simplify and speed up production, improve working conditions and safety precautions. Work on carrying out maintenance and current repairs in ATP is still little mechanized, the proportion of manual work is still very large. In many cases, performing work without special devices leads to preliminary failure of parts, a reduction in their service life, and deterioration in the operation of the unit or assembly. Depending on the purpose, devices can be divided into the following groups: - machine tools - designed for installing and securing parts on various machines; — disassembly and assembly – designed for disassembling components, mechanisms, and assemblies of automobiles; — devices for installing and securing working tools; — control – designed to control parts after or during machining, as well as to control the correct assembly of components, mechanisms and assemblies; — devices for capturing and moving parts, assemblies and assemblies. For example, various contactors for turning and transporting engines during disassembly. According to the degree of specialization, devices are divided into universal, specialized and special. Universal devices include devices designed for installing and securing parts of different shapes and sizes. Specialized devices are made on the basis of universal devices. They have additional or mixed adjustment devices, consisting of installed elements and clamping units. These devices can be easily adjusted to perform operations and therefore are advisable for use in mass production conditions. Based on the degree of mechanization and automation, devices are divided into manual, mechanized, semi-automatic and automatic. In the auto repair industry, various types of devices are used: - manual-screw; — pneumatic; — hydraulic; — pneumohydraulic; — electromagnetic; - magnetic;
— vacuum.
Often, when cars are operating on the line, various malfunctions of certain parts occur. These faults are eliminated at posts in zones TO-1, TO-2, as well as in the TR zone or in production departments. When repairing components and devices of electrical equipment, their disassembly is sometimes required. Disassembling by hand is a very labor-intensive job, so different devices are used. In particular, when repairing the ZIL-130 generator, various devices are also needed. One of such devices when disassembling a generator is a puller. It is used to remove the generator pulley G130 of the ZIL-130 car. It is very convenient and practical to use, small in size. This puller can eliminate all difficulties in removing the generator pulley. This specialized device based on a universal one with a manual screw drive is always irreplaceable in this work. The puller consists of the following main parts: 1) grips; 2) screeds; 3) nozzles; 4) traverses; 5) puller screw; 6) collar; 12) tie screw. The principle of operation of this puller is as follows: 1) unscrew the tie screw 12 until the grip 1 reaches a free position; 2) turning knob 6 to the left, unscrew screw 5 and attach nozzle 3 to it; 3) install the grips 1 of the puller behind the generator pulley between the partitions and, holding grip 1 with your hand, tighten the screw 12 of the coupler 2 until it stops so that the grip 1 fits tightly to the generator pulley; 4) turn the puller screw 5 to the right against the end of the armature shaft; 5) when the puller screw 5 rotates, the nozzle 3 will press against the end of the armature shaft and create the opposite force, and under the influence of this force the pulley will be removed.
Since the puller screw, the movement of which is carried out by turning it manually, the force with which it is necessary to tighten it should not exceed standard values (2-5 kg; ≈ 20-50 N).
Contents: Assembly drawing, Specification
Software: Compass v12
Making a puller
To work, you will need a grinder, as well as a welding machine. You will need to drill a hole, so be sure to use a drill. To create such a device, you will need a metal profile and a corner. The device is assembled as follows:
This completes the assembly of the puller. It remains to be tested. To do this, we take the hub in which we are planning to change the bearing. We put a puller on it. To do this, the legs with hooks are inserted behind the hub, and the cylinder is screwed close to the bearing. Make sure that it fits completely onto the bearing race. Next, by tightening the bolt, we squeeze out the bearing.
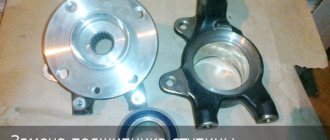
Replacement features
The main symptom of a malfunction is a whine from the wheel, which intensifies when cornering. An additional symptom will be heating of the hub. Delaying repairs may result in wheel jamming. In some cases, the heating can be so intense that the inner race of the bearing is welded to the steering knuckle axis. In this case, you will have to install a new fist.
When replacing, do not skimp on lubricant. The excess will simply be squeezed out of the hub. It is much worse if there is not enough lubrication. This will lead to rapid wear of the bearing. Therefore, experienced mechanics recommend periodically checking the presence of lubricant in the hub. If necessary, it is added. Most often, Litol 24 is used as a lubricant; this material is best suited for use in wheel bearings.
Conclusion
. There are a large number of different devices available for high-quality car repairs. Separately, there are pullers that allow you to remove bearings and seals. At the same time, drivers often wonder how to make a universal wheel bearing puller with their own hands. In fact, this is not difficult to do; all you need is straight arms and some tools. The puller will be comparable in characteristics to factory analogues. And such a design will cost significantly less.
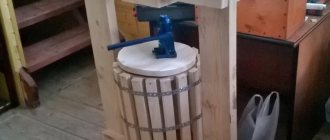
Reliable simple do-it-yourself bearing puller
In this instruction you will learn how to make a simple, powerful puller that will always help you out in a difficult situation. To assemble it you will need a piece of thick-walled pipe and a thick steel plate. If you wish, you can make yourself several pieces of these pullers for products of various sizes. Let's consider in order how to make such a device.
Materials and tools used by the author: List of materials:
- thick-walled pipe; - thick steel plate; - bolt and nut (larger); - a metal rod (a handle is made from it); - dye.
List of tools:
— welding; — grinder (cutting disc, metal brush, and grinding disc); — a drill with large bits or a drilling machine; - lathe, cutting machine (optional).
Puller manufacturing process:
Step one. Preparing the main part
The main part of the puller is a piece of thick-walled steel pipe; it acts as a frame. If the pipe is not strong enough and the loads are large. It can easily bend. The thickness of the pipe walls must be at least 3 mm.
We cut off the required piece from the pipe; the author uses a cutting machine for this, but everything can be done with a grinder. Now comes the hard part, you need to cut a window in the pipe. This can be done using a grinder; it takes a long time, but is quite doable.
Step two. We make the upper and lower supports
For the upper support, the author decided to use the thickest sheet steel possible. Cut out a circle of the required diameter. The author uses a grinder for work, first we cut out the “polygon”, and then using a grinding wheel we bring it to perfection.
Cut out the other circle in the same way. Here the author used slightly thinner steel, but it’s better not to risk this, since the loads on both supports are approximately the same.
Finally, you need to finalize the supports. You need to drill a hole in the top support for the bolt. First we drill a small hole with a drill, and then drill it out to the desired diameter. The author used a lathe for these purposes.
As for the lower support, we also drill a hole in the center; its diameter should be slightly larger than the diameter of the axles from which you are thinking of removing the bearings. Then cut out a triangle shape for this hole. The supports are ready, let's move on!
Having welded the supports, you now need to secure the nut. We wrap the bolt in it and insert it into the hole. We weld the nut well, but try not to overheat, as the metal may become soft. The author attaches the nut from above, but I would recommend fastening it from the inside, so it will rest on the support, and the tensile weld may not be very reliable.
Finally, all you have to do is secure the handle; for this, the author used a threaded rod. Using a handle will make it convenient to remove bearings that are not too rigid. Otherwise, you can always use a wrench.
Well, let's check it out? As a test, the author tried to remove the bearings from the drill armature and so on. Now everything is done easily and at the same time it is guaranteed that you will not damage the product. In addition to bearings, this device can also remove various bushings and other similar parts. If the axle turns out to be too thin, you can come up with a spacer for the bearing to be removed that will rest against the base of the puller. Well, or you can make a separate puller for small parts, it’s easy to assemble.
Before removing, it is recommended to lubricate the axle with oil or WD-40, this will make things go faster. That's all, good luck and take care of yourself! Source
Receive a selection of new homemade products by email. No spam, only useful ideas!
*By filling out the form you agree to the processing of personal data
DIY wheel bearing puller
It's been a long time since it was time to change the front wheel bearing. There is no puller, not all stores have them, the market is a bit far away, but there is a bunch of scrap metal. I turned on my BRAIN, picked up the barbell and off I went. The only thing I bought was a puller for ball balls, it was annoying and inconvenient to pick them out with a pry bar.
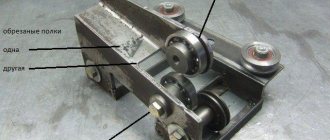
Here's the whole set.
A piece of 75mm pipe 50mm long, two strips 70x30x5 fastened with 6 bolts, a very thick-walled washer D45mm, an M16 bolt and most importantly a crown for 65mm sockets. The pobedit teeth need to be removed from the crown, I was lucky and the reinforcement in the concrete wall did it for me)) )
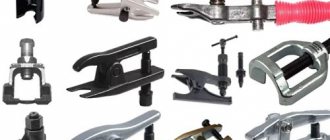
Which wheel bearing puller to choose or how to make it yourself
- ✅ Contents of the article:
- 1. Types of puller
- 1.1 Selecting a puller for removing and pressing bearings
- 2. Overview of wheel bearing pullers
- 2.1 Cup Force 9T0311
- 2.2 Three-jaw KS TOOLS 630.3002
- 2.3 Two-jaw Kukko K-2030
- 2.4 Hydraulic puller
- 3. Review of pullers for VAZ and LADA
- 4. Recommendations for choosing a tool
- 5. Making a puller with your own hands
- 5.1. Three-jaw tool - manufacturing instructions
- 5.2 Do-it-yourself cup puller
- 5.3 Self-production of two gripping removal tools
- 5.4 Instructions for removable traverse
- 5.5 Drawings for self-production
- 6. Operating principle of cup puller
- 7. How to work with a three-jaw puller
- 8. Operating procedure on a hydraulic press
- 9. Using a bench vise instead of a puller
- 10. Impact method instead of a puller
- 11. Conclusions and additional useful materials
A wheel bearing puller is a specialized tool designed for pressing and pressing parts into vehicle hub units.
Since the bearings are installed on the seating surfaces with interference, pressing or pressing them requires a lot of force to be applied to a limited area of the unit. Conclusion - for this operation you need a reliable and also universal tool.
A wide range of size ranges for hub units correspond to various types of wheel bearing pullers (HBP). Choosing the right puller for replacing bearings is not easy. You will learn what parameters to follow by reading the article. We will also touch on the topic of making the device yourself and how to operate the tool.
A quick overview of wheel ball bearing pullers
It is impossible to choose a universal kit for all types of car repairs, since the range of actions is limited:
- a variety of shapes, sizes for charging to the starting position;
- limited work space.
Cup – “Forse 9T0311”
- Internal mandrels 34-80 mm.
- External mandrels 44-90 mm.
- The dimensions of the outer diameter of the cups are 44-90 mm.
- Rod (stud) with nuts.
- The plates fit a wide range of sizes.
- The steering knuckle remains in place.
- The set is included in the workshop press kit.
- Pressing-pressing takes place in one step.
Three-jaw – “KS TOOLS 630.3002”
Garage tool. Suitable for use in restricted access work areas.
- Long life if you follow the manual.
- The articulated design of the paws engages securely.
- Removing stuck parts from shafts and machine axles.
- Wide grip range - 20-230 mm.
- Maximum force - 4.5 tons.
- Screw rod dimensions: M18 x1.5 x 240.
- The dimensions of the bolts for the hinges are 19 mm.
Two-grip universal – “Kukko K-2030”
The tools from the set of the German manufacturer Kukko are well-thought-out forms of gripping mechanisms. On the traverse, the paws move along guides, and the suspension screws fix the specified position.
- Grasp the paws at an angle parallel to the axis of the tension force.
- Reliability of engagement.
- Maximum tension - 5.5 tons.
- The legs rotate 180 degrees.
- Wide grip range.
- Double acting.
- Suitable for use in confined spaces.
Read also: Working with an angle grinder on wood video
Hydraulic pullers
You can also find hydraulic pullers on the market. The operating principle of hydraulic SSPs is similar to jacks. Designed for repair shop mechanics, no muscle power required, speeding up the repair time. Pay attention to the quality of the metal, the rotation of the screw rod, and the condition of the hinges.
- the force of influence on the pressed-in unit reaches 20 tons,
- operation time is reduced,
- the share of physical costs is reduced.
- limitation of the working area of application,
- the price is higher than a mechanical tool.
Types of wheel bearing pullers
Study the summary table, which presents several main types of BSC, as well as specific recommended models.
What pullers are needed to remove and press in wheel bearings?
For the front and rear wheels, it is recommended to use two types of tools: with three or two legs and a cup puller - this is the minimum set of removable tools for the correct and safe removal and pressing of parts of hub units.
Making the base
Cut a square metal plate. We drill mounting holes in the corners. You need to cut a groove in the front.
We weld a fastener to this plate to fix the stand in a vertical position, and drill two holes in it.
Wheel and bearing puller for VAZ and LADA cars
To replace the front and rear hub units on VAZs, according to the manufacturer’s recommendations, two types of removable devices are needed.
- Gripping tools are used to remove the ball bearing from the rear wheel.
- For pressing and pressing the bearing at the front wheel, cup types are used.
You can select models of these tools from the overview presented above. To select a cup puller, focus on the outer and inner diameters of your bearings, but as a rule, it is enough to read reviews and get advice from the seller.
vazoved
I drive a LADA VESTA CROSS, Moscow
Then there will simply be no one to pay the fines! This is a Korean 7 in 1 car tablet video recorder for Android..
I forgot about fines and Yandex Navigator.
There is FULL HD shooting, radar detector and GPS with 32 satellites. I got it at a reasonable price for just a few thousand here >>>> MORE...
Do-it-yourself universal wheel bearing puller
Buying a puller is not always justified, since it is not used so often when operating and repairing a car, so if you want, you can make the tool yourself.
Homemade tools also have advantages:
- Proven material.
- Possibility to make it to your own size.
- The cost is lower than that of a purchased device.
- Possibility of finishing or alteration.
Homemade three-grip tool
This type of tool is the most difficult to manufacture, since the parts have a unique shape and require precise dimensions to mate them.
Required tools and materials:
- Grinder with cutting disc for metal;
- Sheet 1 m2 10-20 mm thick;
- Hairpin M18x1.5x 400 mm;
- Two nuts M18x1.5 height 20 mm;
- Pipe section outer diameter 89 mm, wall thickness 7 mm;
- M10 bolts for hanging the legs in the eyes;
- Welding machine.
The legs are cut from a sheet of 10-20 mm, L = 200-220 mm, the cross is made from an M18x1.5 nut, or cut out of a solid sheet with a grinder. Mark the contours of the crosspiece, cut it out, drill a hole in the center, then use an M18x1.5 tap to cut the thread.
Second option: weld a nut to the sheet instead of threading it. Holes are made in the eyes for M8 or M10 bolts.
Video: “Making three grippers”
Cup puller
The main part of the tool: M18 pin, cup and replaceable disks. A threaded bolt and nut can be picked up in a store, but the remaining parts will have to be ordered from a turner based on a sketch or drawing.
For VAZ 2108, 2109, 2110, 2111 washers are suitable - 30, 34, 37, 77 mm, bowl (ring) - 77 mm. For other car brands, find the original part number and its dimensions, and then cut out the appropriate washers and cups.
Video: “Do-it-yourself cup puller”
Double jaw wheel hub puller
Having amateur welding skills, two gripping devices are made from plates, nuts, and studs.
Not the easiest way to make a SSP in a garage; to assemble it you will need:
- Sheet 5 mm;
- Bolt M 14x1.5x 240;
- Bolts with nuts M6;
- Nuts M14.
Video: “Do-it-yourself two-grip device”
Removable traverse for pressing out
This option is suitable for pressing and pressing the ball bearing out of the hub without removing it from the knuckle. The photo shows an example of such a design.
- One or two strong steel plates are taken, a hole for the bolt is drilled on top and a nut is welded.
- A second nut is welded coaxially from below.
- Next, holes are made for M10 bolts at equal intervals. The legs are cut from a 10 mm plate.
- The two plates are bolted together. Between them there is a long M16 bolt.
The only purchase is a crown to match the size of the ball bearing race. Cut the required washers from a 10 mm strip.
Tools and materials required:
- Bulgarian;
- Welding and drilling machine;
- Internal pipe section D 75 mm;
- Strip 70x30x5, 2 pieces;
- M6 bolts with nuts 4 pieces, lock nuts 8 pieces
- Thick-walled washer D 45mm.
Drawings of tools and accessories for engine repair, body
When maintaining and repairing passenger cars, as a rule, a two-post electromechanical or manual lift and inspection ditches are used. When working with a car on a ditch, you have to go down into it and up from it; an overpass is a bulky structure, usually located outdoors. In these cases, you cannot do without a jack. Read more Manual lift for maintenance and repair of passenger cars, design, dimensions, drawings.
To carry out car repairs on a lift-tilter, you must complete a list of mandatory preparatory operations. First, remove the battery. It is better to drain the gasoline from the tank, especially if it is more than half the volume. When the tank is at the top when the vehicle is turned on a lift, gasoline may end up in the crankcase. If you need to remove the wheels, you must loosen the bolts that secure them before lifting the car. Read more Preparing a car for repair on a lift-tilter, a device for lifting, removing and installing the engine.
The lift-tipper is mainly intended for VAZ cars, but can be used for any other car weighing about 1000 kg. Such a lift-tipper allows you to lift the car and turn it in any direction by 30, 60, 90 degrees when performing welding work, processing the bottom, removing and installing the driveshaft, rear axle gearbox, etc. Read more Lift-tipper for lifting and turning a vehicle when performing welding work, processing the bottom, removing, installing and replacing parts.
A frame hydraulic press with a jack is not uncommon; it is produced by a number of companies. Below is a frame hydraulic press of the original design and given drawings and dimensions of all its parts. This is a stationary press on which you can perform almost any repair and pressing work found in a car service center. Read more Frame hydraulic press with jack 12 tf, drawing and dimensions, examples of work carried out on it for pressing and pressing parts.