Without a chuck, the drill will not hold well in the structure of the tool and perform the task. This element differs in design and characteristics, and in order to choose it correctly, you will need to understand both.
What is it needed for?
The drill chuck is an important part that is responsible for reliable fastening of the equipment. Its design is designed to hold the drill tightly without letting go even with high torque. The chuck can be used to rotate a screwdriver or any other tool.
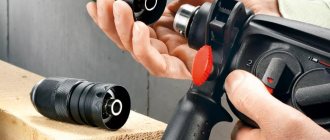
A keyed item assumes that an additional component is used for replacement. The key is made in a T-shape and is located next to the chuck. When turned, it moves the gear, which causes the collar to rotate around the lock, which is responsible for opening or closing.
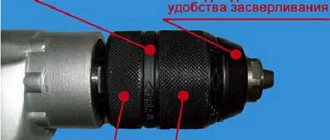
Sometimes in a chuck design, the user turns a sleeve at the end of the drill to open and close the locking jaws. This fastening holds the working tool better and is easy to tighten by hand, using less force.
On some locks in the chuck design, the number of cams reaches up to six, and the more there are, the tighter the drill sits in its place. Of these, 4 are needed to hold the square bit. If the tool is used to solve household problems, then there are 3 cams and they are self-centering.
Characteristics
A user who frequently uses a drill should know and understand the sizes of chucks that are on the market. In addition to the difference in shank diameter, some require the purchase of a separate adapter or adapter.
By the maximum diameter of the shank you can understand how widely the clamping blades diverge.
In this case it is:
The first sizes are rare, the others are much more common. Based on the power and size of the drill, the manufacturer selects the optimally accessible shank diameter. If this is a small tool, the power of which is only 300 W, there is no point in putting a 0.16 cm chuck on it. If the user cannot clamp the required attachment with the existing chuck because the sizes do not match, then it becomes necessary to choose another one with a larger diameter.
It is worth taking into account the minimum permissible value of the shank diameter, which can be 0.5, 0.8, 1, 1.5, 2, 3 millimeters. It is worth noting that the value of 0.5 mm is found on cartridges that have a maximum value of 6.5 mm, and so on in increasing order.
Another characteristic that you definitely pay attention to when choosing a suitable cartridge is the seat. It can be of two types: threaded and conical.
Modern manufacturers prefer to use the first option in the design of the tool; the second is used on those drills where the maximum shank diameter is 16 mm.
The threaded connection plays an equally important role. It could be:
The most popular sizes are 3*8 and 1*2. They are used on shank diameters of 0.10 and 0.13 cm.
There is only one type of metric thread - M12, it is used for cartridges with a shank diameter of 0.1, 0.13, 0.16 cm.
Among the characteristics of cartridges, you can also select a seat, which is designated as:
In this case, the numbers are the diameter, which is written in millimeters.
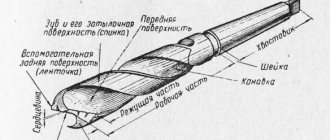
The honing head also plays an important role, the design of which depends on the length and diameter of the hole.
They are available for holes:
Last but not least is the shaft, which can be fixed or flexible. The first is located in the drill body, the second is screwed on, its design contains a flexible hose, it allows you to use the tool in hard-to-reach places.
Methods for attaching a drill chuck
In order to answer the question of how to remove a drill chuck, you need to understand the existing methods of attaching chucks to the shafts of drills and screwdrivers.
There are two ways to secure the chuck to a power tool. The first method was proposed back in 1864 by Stephen Morse using a cone. Morse, by the way, is also the inventor of the twist drill. The essence of the method is to pair two surfaces in the form of a shaft and a part with a hole, having the same taper with an angle in the range from 1°25'43″ to 1°30'26″. In honor of the inventor, this fastening method was called the Morse cone, which is shown in the photo below. The cone in the photo has a larger angle for clarity.
The Morse taper mounting method is widespread, as it is simple and quite reliable under loads along the axis, as in drills and screwdrivers. To attach the drill chuck, it is enough to put it with a little effort on the back side of the shaft with a Morse taper. Removing the cartridge is also simple; just hit its body along the axis in the direction of the drill installation location with a hammer. The ability to quickly install and remove a tool while working is the main advantage of mounting using a Morse taper.
The second, more common nowadays for attaching a drill chuck to the shafts of a power tool, is a threaded chuck.
At the end of the shaft coming out of the drill or screwdriver, a metric or inch thread is cut and the drill chuck, like a nut, is screwed onto this shaft until it touches the flange. Since the thread is right-handed, and when performing work the chuck mainly rotates clockwise, it is constantly tightened and thereby ensures its reliable fastening to the tool.
Design features
The design of the cartridge is based on the use of a cam or collet mechanism in its design. Thanks to the element on the tool, you can easily clamp attachments of different shapes and diameters.
The cartridge consists of several parts:
- cylindrical body;
- sleeve rotating on the outside;
- 3 clamping tabs.
The last element plays a very important role in the design of the cartridge, so it is made of high-quality and high-strength steel. All petals are the same size and shape; when the sleeve rotates, they close, fixing the nozzle being used.
This mechanism is simply irreplaceable when using round drills, as it prevents them from turning inside the chuck.
There are several types of collet chucks with jaws inside:
- quick-release;
- key (gear-crown);
- mini-cartridges.
Quick-clamping ones are used without an additional key, which is their main advantage. The user has the opportunity to replace the cartridge quickly and without additional tools. Clamping is done automatically, which allows you to significantly reduce the time for changing attachments.
Choice
Most portable drills have chucks screwed onto a threaded spindle that is connected to the drill and then held in place with a locking screw. To understand which element you need to buy to replace the old one, you need to open the petals to the widest point and look into the base with a flashlight. If you can see the screw at the bottom of the chuck, you should pay attention to the type of head. If it is missing, then it is probably a tapered spindle.
When purchasing, it is also worth considering that the element must provide the proper rigidity of the fastening, taking into account the number of revolutions. More expensive models reduce radial runout.
Last but not least is the ease of use of the chuck ; in this case, quick-release ones are in the first position, but when it comes to durability, it is better to buy one with a key.
If carbide drills are used, then the chuck must be self-centering, since such equipment has poor resistance to longitudinal bending. It is important to know that the rigidity of the fastening is always compared with the length of the nozzle and the material from which it is made.
How to remove an old cartridge
Typically, chucks mounted on a spindle using a thread are additionally secured with a screw with a left-hand thread for reliability. For this reason, the cartridge must be removed by unscrewing this screw. Before turning it out, the path to it should be cleared. To do this, the chuck jaws must be moved as deep as possible.
If you now look into the cartridge, you can see a screw head in the center of the bottom for a Phillips or torx screwdriver. To prevent this screw from coming loose, it is made with a left-handed thread. This means that you should unscrew it by rotating the screwdriver to the right, after first clamping the assembly in a bench vice.
It is possible that the screw slots have become clogged over the years of use and in order for them to grip the broken screwdriver while rotating it, you should at the same time lightly tap it with pliers or a hammer until you feel a catch.
After removing the left-hand threaded screw, insert a hex key into the chuck and tighten it.
We clamp the free side of the hexagon in the jaws of the vice and, using a suitable open-end wrench, tear off the nut on the drill, which secures the chuck to the tool spindle.
After this, you can release the L-shaped hexagon from the vice and by rotating it to the left, completely unscrew the clamping unit from the spindle shaft.
How to remove a keyless chuck from a threaded drill
A feature of the threaded connection of the chuck with the shaft is the left-hand thread of the fixing screw. This is done so that, by rotating the drill and “biting” into the material, the shaft simultaneously tightens the chuck mount. Therefore, the answer to the question of how to remove a self-clamping chuck from a drill of this type is simple - you need to rotate the chuck, firmly holding the body, clockwise.
Usually, simple rotation is not enough; you have to tap the joint so that the tightly tightened thread opens up a little and makes it possible to rotate the connection freely.
Tips for use
During operation, breakdowns often occur; for example, parts may fall out of conical types. If an element falls off the tool, you can easily correct the situation. To do this, it will need to be heated in oil to a temperature of 110 C. After this, it is put on the cone.
If the clamping tabs become jammed, the user will be required to remove the chuck, disassemble it, clean it and lubricate it well.
But if a runout occurs, it is better to replace the part with a new one than to look for the cause of the breakdown, since it is often not possible to restore the previous functionality.
It is worth remembering that it depends on the user how long the cartridge will last.
In addition, it plays a role:
- quality;
- operating features;
- how the user works with the tool.
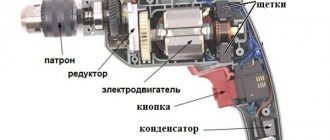
Knowledgeable craftsmen use a tool such as a drill with the following types of chucks: key and quick-release chucks. A drill chuck is a mandatory device designed for fixing drills and other types of drill attachments. Torque from the tool's electric motor is transmitted through gears to the chuck shaft, which is driven into rotation. The product in question plays an important role, so it is important that the device is of proper quality.
How to remove and disassemble an electric drill chuck
Even small, minor repairs will require proper disassembly of the structure. Today, there are only two mounting mechanisms on the working shaft, so the process of dismantling work may vary.
With the threaded fastening method, the structure must be disassembled in the following order:
- deepen the cams inside the body and spread them as far apart as possible;
- Unscrew the fixing screw located in the central bottom part of the device. Fasteners with left-hand threads must be turned clockwise;
- Using an open-end wrench placed on the shaft, the device is unscrewed.
If there are no flats, the housing is disassembled, as well as the rotor shaft is subsequently fixed in a vice. It is advisable to unscrew the element using a gas wrench.
The most popular and frequently used in modern instruments is the cone connection. In addition to the exceptional strength of the cone connection, this option, with the right approach, can be quite easily disconnected on its own. For this purpose, the housing is first tapped in a circle , after which the element is knocked off the shaft using a sharp and precise blow to the rear of the shaft.
After the cartridge is removed, it is necessary to correctly determine the type of malfunction. You can carry out repairs yourself if there is no significant damage to the parts and jamming caused by metal shavings trapped inside adjacent parts. As a rule, restoring functionality in the event of such a breakdown can be achieved by washing the elements in oil or kerosene using a soft, medium-sized brush. After this cleaning method, assembly is carried out in the reverse order.
Most often, owners of actively used tools are faced with a number of malfunctions caused by wear, as well as damage to threaded or gear parts. Minor local damage of this type can be easily eliminated by grinding. For this purpose, it is recommended to use a needle file or a standard sanding cloth. In the most complex cases of breakdowns, a complete replacement of the failed cartridge is most often required.
Types of drill chucks
The following types of chucks are used for drills:
- Gear-crown or they are also called key. The main feature of this device is the use of a special clamping key to secure the nozzle.
- Quick-clamping. Clamping of the nozzle is carried out by manual rotation of the clamping sleeve. In turn, quick-release fasteners are divided into several types: double-clutch, single-clutch, and with a special retaining ring.
Gear-crown types are found quite often on electric drills, since a significant advantage of such a product is the quality of the clamping of the fixing nozzle. Such drill chucks allow you to install attachments with a diameter ranging from 1 to 16 mm.
Drill chuck 1-13mm (size 13) for Morse taper-2
Today is a review of a product that is not quite usual for Mysku. But I know that there are people here who work with their hands and have some machine tools, I think they will be interested. Anticipating cries that you can buy an old Soviet cartridge from your grandfather at the market and it will be wow! — I made a comparison and am 110% sure that a random cartridge from the USSR will be no better. Perhaps there will be a comparable one, but you'll have to look. The chuck is supplied in two boxes: the chuck itself with a key and the shank.
Let's start with the shank. A beautiful, well-polished shank for a Morse taper-2 on one side and a shortened tool Morse taper B16 on the other (you can read more in detail, for example, here). There are some small imperfections on the flat part, but it doesn't affect anything. Supplied in a plastic box.
Now the actual cartridge. The cartridge is in a cardboard box with high-quality printing. Chuck and key in different packages. There are instructions in English and Chinese.
The cartridge has the inscription BRIED B16 0.5-13mm. Everything in the photo glares, I couldn’t really take a good picture.
Maximum closed and separated lips
I must say that in the description on the website the numbers are more correct - from 1 to 13mm. that is, a 0.5mm drill fits into the chuck with a slight tension; it won’t be able to drill. 0.7mm - it already seems to be tightening, but really confidently perhaps only from 1mm. However, I did not try to drill 0.7. The maximum diameter is 13.5mm.
This is what the cartridge looks like assembled with a shank:
And so in comparison with the analogue “originally from the USSR”
As you can see, the analogue is noticeably smaller in diameter with the same declared drill sizes. But! These cartridges are INCOMPARABLE in accuracy.
We will compare on such a drilling and milling machine made in Gomel
The shaft from the fuel pump is clamped into the cartridges. Hardened, polished, smooth, 6mm in diameter. During the checks, the position of the machine components did not change, with the exception of moving the table to replace the chuck.
old cartridge:
new cartridge:
As you can see, the beat is no more than one and a half hundred, which I think is simply a phenomenal result. In fact, it can be used instead of a collet chuck for milling something that is not particularly hard and with small cutter diameters.
To summarize: the cartridge is of excellent quality both in performance and accuracy. The only relative disadvantage can be considered the rather large size, but I’m already getting to the bottom of this, to be honest. That is, even according to GOST, a 1-13mm cartridge has an outer diameter of 52mm
Undoubtedly, if you have access to warehouses with decommissioned or decommissioned equipment, and in this “fixed price” “all for a bottle” there is a wide selection of new tools from spare parts and spare parts, then you need to buy them on the spot. What if it doesn't get any worse? If the enterprises collapsed a long time ago and there are no freebies, I strongly recommend purchasing. really a very high quality cartridge. And I’m not practicing point 18, this is completely sincere.
The product was provided for writing a review by the store. The review was published in accordance with clause 18 of the Site Rules.
Types of drill chucks
For household and professional drilling equipment, a keyless keyless drill chuck is used.
With such a clamp, you can change the drill in a couple of seconds without resorting to the help of a handy wrench. By pressing firmly with your palms, you loosen the mechanism, which will allow you to release the cutting tool from the chuck. The drill is fixed in the same way for further work. This type of chuck works due to a corrugated metal sleeve and a locking spindle.
The disadvantages of a quick-release chuck include unstable clamping. An already worn quick-release chuck does not properly fix large-diameter drills, which leads to turning. Typical for a round shank.
The key jaw chuck must be loosened and clamped with a special key, which can easily be lost over time in work situations. It is interesting that more experienced users of drilling tools prefer a chuck with a key, since a drill or cutter can be clamped “tightly”, for example, even in a vice.
When purchasing a drill, screwdriver or hammer drill with a key jaw chuck, immediately secure the key from the kit to the wire with insulating tape or tie it to a strong cord. There will never be any problems changing the drill.
Mini drill cartridges are very popular among radio amateurs. Such elements are sometimes placed on a drill or mini drill. Can be installed on any tool suitable for drilling. For example, jewelry makers will not be able to perform work without this fastener.
Most often, mini chucks are used for a light drill or household screwdriver. The optimal drill diameter for a mini chuck is from 0.1 to 4.5 millimeters.
It is very convenient to drill microcircuits, mini models and jewelry.
The mini chuck has the simplest design of a quick-release collet chuck. Most often made of brass.
Fast-acting self-clamping drill chuck
The mechanism of standard chucks does not guarantee good centering and strong fastening of the clamped cutting device, which, of course, costs time when the tool is frequently changed during operation.
The drill chuck consists of the following elements: a housing, in which, thanks to the nut, there is a cage, as well as a screw shank with a left-hand thread. There is a ball bearing between the nut and the shank. In the frame, 3 grooves are milled at equal intervals from each other, and cams are placed in them. There are 3 radial L-shaped grooves cut on the top of the screw, provided for a movable radial connection of the cams with the screw.
When the shank rotates relative to the chuck body, the screw is unscrewed or screwed in and transmits axial as well as radial movement to the cams, forcing them to slide both inside the body cone and along the side of the holder. This method carries out combined axial and radial movement of the cams and clamps or releases the device.
When drilling, the shank rotates clockwise in the drill chuck body and unscrews the screw, which displaces the cams and strengthens the clamping of the drill. When changing the drill, you need to support the shank and rotate the core counterclockwise, while the screw moves the cams and opens them. Using a ball bearing, you can quickly release the part, even when the part is tightly tightened.
How to remove and change a cartridge with a threaded connection
A threaded drill chuck is installed on the shaft of a power tool and secured by the left-hand thread of the screw. You need to remove the damaged cartridge from this mount, but take into account the non-standard threaded connection.
The above-mentioned screw is located inside the cartridge; logically, you need to unscrew the cams as much as possible, in other words, “drown” them to the limit. This is what the action looks like in the photo:
How to further disassemble the drill chuck? Inside you can see the same screw that can be removed with a Phillips screwdriver. Having gained access to it, you need to unscrew it strictly clockwise with a good screwdriver. There are models of instruments where this screw is not installed. In this case, the cartridge is completely unscrewed from the shaft without any preparatory work.
A screw with a left-hand thread loses the clarity of its groove over time due to inaccurate changes in cutting tools. For convenience, you can hit the screw through the inserted screwdriver with a hammer. This action will deepen the groove without harming the tool.
When unscrewing, you can use a 14 key for convenience.
How then to remove the chuck from the drill? Everything is very simple: unscrew the screw or spindle with a left-hand thread and unscrew the cartridge itself by hand for replacement or repair.
How to replace the chuck in a drill with your own hands?
To attach the chuck to the drive shaft of the drill, a threaded connection or Morse taper is used. A visual inspection of an electric drill will not always help indicate how to secure the drill chuck. This can be indicated by the marking on the cartridge: it is stamped on its surface.
Replacing the conical type of part
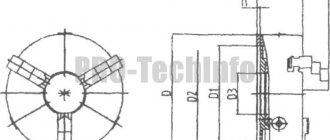
The standard size of the Morse cone (according to GOST 9953–82) consists of 9 values: from B7 to B45. The larger the number after the letter B, the larger the diameter of the cone.
The marking on the cartridge indicates the type of fastening
Thus, having found the marking “B” on the surface of the cartridge, we can conclude that this is a device with a conical mounting base. With this method of attachment, the cartridge can be easily removed. It is enough to use a drift and a plumber's hammer.
Video: how to remove a chuck with a cone from an electric drill?
Replacing the reversible threaded chuck
To secure the drill clamp to an electric household drill using a threaded joint, two types of threads are used:
- inch (for foreign models);
- metric (from Russian manufacturers).
On an electric household drill, two types of threads are used using a threaded joint
The following marking is applied to the surface of the threaded clamping chuck body: 1.5–13 1/2 – 20UNF or 1.5–13 M12x1.25.
The reversible threaded cartridge for fixation has a screw with a left-hand thread. You need to know this nuance when removing a broken cartridge. In order to get to the screw head, it is necessary to recess the cams into the collet completely. As soon as the head of the screw is visible, use a hardened Phillips screwdriver to unscrew it to the right clockwise. Then hold the hex key in your fists and hit it sharply in a counterclockwise direction. After the cartridge is torn from its place, it can be easily unscrewed.
Further replacement of the drill chuck
It’s not difficult - purchase a chuck suitable for the drill and install it along the threads in the same sequence.
How to quickly remove the chuck from a drill is shown in this short video:
When replacing, take into account the type of connection. There are two of them:
The threaded chuck is installed on the tool according to the above diagram.
It is important to know that the threaded cartridge is marked with two types:
1.5 – 13 - marking of the minimum and maximum diameter for the cutting tool installed in the chuck.
When replacing, observe this marking. If the chuck from your drill shows a value, for example, 1.5 -13 M12, then you should change it to a chuck with the same marking.
The cone type of connection is a little simpler. When replacing the cartridge, simply push it in. The following varieties exist:
It is interesting that any cartridge in the tool store marked “B” means exactly the conical mounting base. The numbers on the marking (from 10 to 18) are the diameter of the lower hole.
How to remove a flare chuck from a drill? The easiest way. The cartridge is dismantled using a regular hammer, knocking it off the pin.
What else is useful to know about drill chucks - what does the marking of all types mean?
Before changing the chuck on a drill, you need to decide on the design of the seat. In addition to the fact that devices are divided into threaded and cone connectors, they also differ in thread diameter. If you are going to buy a new cartridge, then before doing so it is recommended to remove the old one and buy a new one in its likeness. There is another way that will help make it easier to select a new element - this is labeling.
The markings make it clear what the cartridge is intended for, as well as what power tools it is suitable for. Knowing the markings, which you can photograph before going to the store, you can purchase a similar clamping element for an electric drill. What is indicated in the markings of cartridges, we will find out further.
This is interesting!
Markings are indicated on all types of drill chucks, both quick-release and key-type.
The only difference is the location of this marking. Let's take two types of markings, having the following form:
- 1.5-13 mm M12x1.25
- 0.8-10 mm 3.8-24 UNF
According to the first option, everything is clear, but to avoid any questions, let’s consider what each number and letter in the marking of drill cartridges means.
- The interval from 1.5 to 13 mm and 0.8 to 10 mm are the minimum and maximum diameters of the shanks of working attachments that can be fixed in chucks. It is worth noting that the above markings are found on both types of chucks, both key and quick-release chucks. When purchasing a new device for a drill or screwdriver, the first marking values must be taken into account, otherwise it will no longer be possible to drill a hole with a drill over 11 mm, as in the second case.
- In the first case, the second part of the designation M12x1.25 is the metric thread diameter of 12 mm, as well as the pitch, which is 1.25. This means that the tool uses metric threads, and we can say that this is a chuck from a Soviet drill
- In the third case, the marking is very different from the first option. The designation 3.8 means a 3/8 inch thread. The designation 24UNF is the value of the fine thread pitch according to the unified nomenclature. The letter designation indicates that the cartridge uses a fine thread. The number 24 indicates that this is the number of threads per inch. Below is a table with all sizes, as well as their explanation
As a brief conclusion, it should be noted that it will not be possible to screw a chuck with markings onto the shaft of a Soviet drill, as in the second case. Not only does it not fit in size, but also in thread.
The markings for threaded types of connections on cartridges are described above. To avoid having to think about which device connection method is used on a particular drill model, you should look at the markings. Cone types of connectors differ from threaded ones. Let's look at an example of the designation of a conical cartridge: 1-13 mm B16 2015.
From the value “1-13 mm” it is clear that these are the minimum and maximum diameters of the shanks of the nozzles that can be fixed in the tool chuck. Marking B16 is the designation of the conical cartridge. The letter “B” means that the cartridge has a conical type of fastening, but the number 16 is the diameter of the lower part of the mounting hole. It should be noted that cone devices are of the following types:
- B10
- B12
- B16
- B18
The last numbers “2015” are the year of manufacture of the cartridge, which are not always indicated.