Drill stand. buy or make it yourself? — Tool Master
Is it possible to make such a device yourself? Before answering in detail, it is recommended to find out what elements this device consists of and how they work on it. If you like to do homemade crafts, then this machine will be very useful. But sometimes it is not possible to install it due to installation difficulties.
Advantages and disadvantages
This device has certain advantages:
- its production does not require serious financial expenses;
- all parts used in the assembly are available;
- There is an opportunity to create your own design.
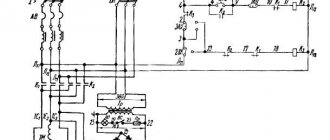
However, there are also some negative points:
- assembly often requires elements that can only be produced in factory
- conditions that affect the cost;
- incorrect fitting leads to the formation of backlash, which causes inaccuracies in operation;
- a stand prepared independently does not allow drilling at an angle.
Still, let’s figure out how to make a stand for a drill with your own hands, drawings and photos of which are presented below.
Universal stand option
With this option, it becomes possible to perform a variety of operations that will not damage the drill motor.
If you need to make a stand in order to drill holes with it, then all the main elements can be made of wood. For more complex types of work, the device is assembled using metal rods.
The main part is the bed. A stand is used to secure the carriage; an electric drill is fixed to it. Control is performed using the handle. Additional devices are used to increase the functionality of the device.
Preparing the bed
To produce this part, you can use a thick plate of metal (50 x 50 x 1.5 cm) or wood (60 x 60 x 3 cm). It can be used if only drilling work is intended. For a more multifunctional device, the dimensions should be increased, bringing them to 100 x 50(60) x 2(3) cm.
To save money, many people make a frame from hardwood trees. The main stand with clamps is attached to it. All connections are made using screws and are mounted vertically in relation to the frame.
It is reasonable to use a metal base if it is installed on a table with a magnetic surface.
Installation
It is recommended to use a 35 mm board or a metal plate (2 cm). The length of this part can be adjusted from sixty to eighty centimeters, it depends on the size of the drill itself. The optimal width is 20 – 25 cm.
Holders and a mechanism are attached to it so that the drill can move longitudinally. A support is attached to the frame, to which the stand is attached. Install a pair of rails vertically; furniture rails are best suited for this.
A carriage is attached to their moving part, on which the drill is mounted.
For everything to work properly, you need to make sure that there is no play in the guides. The drill can be mounted in two ways - on blocks or on clamps.
Movement mechanism
It will require a handle and springs. There are two ways to arrange everything: secure the return mechanism near the handle, or insert two springs into the carriage grooves.
Milling and turning types of work
For milling, it is enough to connect this stand with a vice to the machine, securing it horizontally. To ensure that the self-created mechanism functions smoothly, many people use an extended printer screw. This will allow you to achieve high-precision processing when choosing a groove.
To perform drilling at angles, a rotary device is used, the manufacture of which requires an additional plate. Holes are drilled in it along an arc. The use of such a device instead of a lathe allows you to process only those parts that can fit in the chuck of an electric drill.
If you have skillful hands that work well with your head, then you can make such a frame without any problems. With its help, using a drill, you can perform more operations.
Author angor58
DIY drill stand drawings
Racks designed for fixing the drill are stationary devices. If desired, you can install a hammer drill, screwdriver and any other tool here.
If we are talking about a device created with your own hands, then it will be possible to attach units of almost any size to it.
Thanks to the use of racks, you can make really precise holes, as well as accurately process products made from various materials, including plastic and wood.
If we talk about factory products, the kit usually includes a yew with a release mechanism, which ensures quick fixation. Moreover, this makes working on the machine truly safe. Standard devices are lightweight and small in size, which means they can be safely used at home.
Most racks are collapsible, and some models, if necessary, can be modified with your own hands, which will allow you to change the mounting dimensions . as well as drilling depth. However, it should be remembered that such a device is not capable of completely replacing a drilling machine. This is only possible if a truly powerful electric motor is installed.
Some people prefer to buy ready-made equipment. They know firsthand that in such racks there can be backlashes, due to which the accuracy of the work is significantly reduced. Such a defect can be eliminated with your own hands. To do this, just carefully tighten the nuts or use gaskets.
Pros and cons of a homemade product
Many craftsmen decide to make a stand with their own hands, because it has many advantages:
- affordable price;
- the ability to create equipment from simple available materials;
- large selection of designs;
- possibility of combining several functions.
Naturally, machines may have their disadvantages:
- during the assembly process, loose installation will lead to play, which will make processing inaccurate;
- due to the use of a tripod, it will not be possible to drill the workpiece at an angle;
- Some models may require expensive parts to assemble.
Making a device yourself
If you decide to make a device for fixing a drill yourself, remember that this is a labor-intensive task that will take a lot of time. However, in any case, this is more profitable than buying a ready-made device.
It is important to decide on the type of product. So, you can make a stand or something like a drilling machine. These varieties have their own design features, which should be taken into account.
Making a Drill Stand
To make a simple stand for a small tool, MDF or chipboard is suitable . Such a base must be rectangular. Here it is important to prepare several holes to fix the product to the work surface.
The guide is usually an aluminum pipe. If desired, you can take a steel product or an aluminum profile. A guide 0.5 m high is carefully fixed to the surface. To do this, it is worth welding a sheet of metal. To make the whole structure simpler, it is recommended to use a pair of guides.
To ensure that the drill can move freely in the required direction, it is important to use limiting clamps. For the same purpose, other clamps, under which non-slip material is placed, are fixed on a chipboard platform. Many craftsmen additionally install springs. Thanks to them, after making a hole, the drill rises automatically.
The prepared stand is mounted on guides . It is important to make sure that the connection is really strong. The drill itself is fixed using clamps and a gasket. The last element provides vibration damping.
It is important to attach a handle to the platform, which is responsible for moving the drill. It is also worth taking care of the presence of a console. It is this that will make the fixation truly reliable. This will indeed be the case if the shape and dimensions of the stand coincide with the identical parameters of a drill or other tool.
When all the elements are ready, you can begin assembling the rack. The parts are fixed tightly and carefully to avoid possible backlash. You can additionally place clamps on the surface, as well as a protractor and several rulers.
Construction of a drilling machine
Not all craftsmen decide to create with their own hands something like a drilling machine for the stationary installation of a drill or other tool. It's actually not difficult. It is enough to first prepare the stand according to the description indicated earlier, after which it remains to make a few changes to the design.
Many experts say that using a drill mounted on a drilling machine is not very convenient due to the size of the tool. It is for this reason that the unit can be disassembled and only its main internal elements can be installed.
- You need to carefully remove the motor and the starting device from the drill.
- The engine is mounted on a stand, which will help avoid vibrations and displacement during operation. For this purpose, use gaskets and tighten all clamps tightly. Naturally, as a result of such actions, the size of the stand will decrease slightly.
- The starting device is placed in an insulated box, after which the wires should be extended. Thanks to this solution, it will be possible to secure the box with the launcher not on the stand itself, but on the base.
- Then you need to put the cartridge on the shaft and carefully fix it.
When all actions are completed, the machine is considered ready. It turns out simple, compact and lightweight . which makes it really convenient to use. By the way, it is not necessary to disassemble the drill for these purposes. You can install a working motor that was previously installed on any old household appliance, after which all you have to do is purchase an additional cartridge.
Many craftsmen who are forced to frequently work with a drill use special stands. Such equipment simplifies the drilling process and makes the processing of parts as accurate as possible. Moreover, if you wish, you can make an entire drilling machine with your own hands, which will take an important place in any workshop.
Homemade drill stand
For home craftsmen who actively use hand tools, additional accessories only help simplify the work process.
We will tell you how to make a drill stand with your own hands using the provided drawings. This stand diversifies the working capabilities of this toolkit.
Its creation will not take a lot of time and money, but the result will be noticeable immediately.
DIY drill stand
Advantages and nuances of the rack
By placing the drill on such a structure (can be of the same type or with the ability to rotate), you can easily turn an ordinary drill into a functional drilling machine. And this, in turn, will allow you to perform many new technological actions, for example, creating a gazebo in the country.
A DIY drill stand has many advantages. But despite this, it is worth learning about its features in advance in order to operate with it competently in the future.
The advantages include.
- Creating such a design will cost several times less than buying a ready-made model for drilling in a store.
- To construct a drilling machine, you can use ordinary materials that you have on hand. Components can be parts of broken or unnecessary equipment. There is always plenty of this stuff in the garage or workshop.
- Schemes and practical videos are easy to find on the Internet, so the basis for creating a machine will always be available to you.
- If you have a great desire, you can always supplement the design or create drawings according to your own characteristics. Perhaps such a model will be more convenient to use and will have more functionality.
Designs based on photo enlargers
The stand and carriage for a homemade machine can be made on the basis of a Soviet photo magnifier. The photo enlarger already resembles a drilling machine in appearance. It is enough to equip it with a motor from a drill, screwdriver or mixer of the required power to start working.
Before assembly, it is necessary to remove all unnecessary parts: lamps, covers, etc. If desired, you can install a homemade table on the base for more convenient drilling of parts.
Advantages of a base made from a photo enlarger:
- the ability to move the future carriage with an electric drill in a vertical plane, implemented at the factory;
- the ability to easily clamp the bracket at the required height;
- the stand ensures that the drill is perpendicular to the table;
- a drilling machine made from a photo enlarger is completely dismountable and can be easily transported;
- the design turns out to be cheap; most of the materials for the machine are collected from junk accumulated in the garage.
Making your own home drilling machines not only allows you to save on the purchase of equipment, but also develops engineering and creative thinking.
If you find an error, please select a piece of text and press Ctrl+Enter.
The most common drilling machine can be considered the one made from an ordinary or electric drill. In such a machine, the drill can be placed either permanently or made removable. In the first case, the power button can be moved to the drilling machine for greater convenience; in the second, the drill can be removed and used as a separate tool.
Homemade drill stand with your own hands - Metalworker's Guide
A stand for a drill allows you to significantly expand the functionality of hand tools, which is not difficult to make with your own hands.
Placing a drill on such a stand (it can also be made rotary) allows you to turn an ordinary hand tool into an effective drilling machine that can be successfully used to perform various technological operations.
Homemade drill stand made from wooden elements
Advantages and disadvantages of a homemade stand
A homemade drill stand has a number of advantages, the most significant of which include the following:
- manufacturing such a drilling machine costs much less than purchasing a serial model of such a device;
- You can make such a tripod for a drill from improvised materials, using components from old and unused equipment, which can always be found in any garage or home workshop;
- drawings of similar devices of various designs and even video instructions for their manufacture are in the public domain, finding them will not be difficult;
- If you wish, you can always create a machine from a drill of your own design, which in its characteristics and ease of use will surpass all existing models.
The simplest factory rack made in China can be bought very inexpensively (from 1,200 rubles), but its functionality and quality will not satisfy all craftsmen - too often there are complaints about significant play in budget models
But, of course, making your own device for securing a drill also has its disadvantages, which include the following:
- in order to produce some parts of such racks, the use of lathes, welding and other equipment is required, which naturally increases their cost;
- due to the fact that the structural elements of such drilling devices are not fitted very well, play often occurs in them, and this negatively affects the accuracy and quality of the processing performed with their help;
- a homemade stand for a drill is quite limited in its functionality; for example, it cannot be used to make holes located at an angle.
Drill stand made of wood: option No. 1
A stand option with fairly detailed assembly instructions in the format of a photo selection illustrating the manufacturing stages.
To create this model, you will need boards with a thickness of at least 20 mm, a small box with furniture guides and a threaded rod for the moving part of the stand, a couple of dozen short and three dozen long screws, wood glue plus a standard tool in such cases, such as a saw, a clamp , screwdriver, drill and sandpaper for finishing.
Wood stand assembly: general view
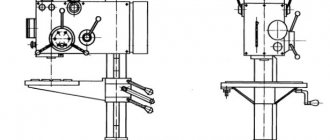
Metal drill stand: option No. 2
If you don’t have time to study drawings and various options for rack designs, then we invite you to watch an informative video about creating a very functional mechanism that can satisfy the needs of most home craftsmen.
The result of the work will be a stand like this with an original cable drive of the carriage
Main elements of the rack
A stand for a drill, which is not at all difficult to make with your own hands, allows you to use this hand tool to perform various technological operations. The functionality that such a drill machine has is limited only by the power of the hand tools used to equip it.
Diagram of one of the options for drilling stand design
If a homemade stand for a drill is made only in order to perform only drilling operations with its help, then its structural elements can be made from wooden blocks.
If you are interested in a mobile drill stand, which is highly versatile, then for its manufacture you must use structural elements made of steel.
Such drill stands consist of the following structural parts:
- a supporting frame on which all the necessary elements of the machine are mounted;
- racks are a guide for the drill, on which it is fixed and moves together with the carriage in the vertical direction; This movement is controlled by a special handle and a number of additional elements;
- handle - an element that controls the vertical movement (feed) of the drill and the tool fixed in it;
- additional components designed to make the drill attachment more functional.
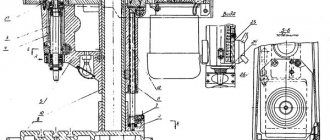
According to the drawings below, you can assemble a rack like this:
Drawings of rack parts (click to enlarge)
A homemade drill holder is an easy-to-install device, and equipping it with additional components allows you to turn such a drill holder into universal equipment with which you can perform various technological operations. Before you start making such a holder for a drill with your own hands, you need to understand its design features.
Device bed
The frame for the drilling device from the drill is made of metal (10 mm thick) or wooden (more than 20 mm thick) sheet.
The massiveness of the bed that you will use as a base directly depends on the power of the drill used. The dimensions of the frame for a drill machine depend on the specifics of the work performed on such equipment.
You can use the following recommendations for choosing frame dimensions:
- machines for vertical drilling - 500x500 mm;
- equipment for performing various technological operations - 1000x500 mm.
The metal frame is a thick plate with welded corners
The frame, made of metal or wooden sheets, is a very simple structure. A stand is placed vertically on it, the stable position of which is ensured by a special support. Such structural elements can be secured to each other using screw connections.
Equipment rack
The stand where the guides for the drill will be located can also be made from a metal or wooden plate.
In addition to guides for moving the drill in a vertical plane, a clamp is mounted on the stand, with which the tool is fixed to it.
https://www.youtube.com/watch?v=TlbOyVqKdu4
The procedure for assembling the rack can be seen in the training video, and you must adhere to the following sequence of actions:
- a support is fixed on the stand-frame;
- the machine stand is secured to the base using screw connections, which is then connected to the support;
- guides are fixed on the rack, which can be used as telescopic furniture devices;
- a carriage is mounted on the moving part of the guides, where a fastener is placed for fixing the drill.
You can select suitable profile pipes for the rack
When choosing guides for your homemade machine, you should pay attention to ensuring that there is no lateral play in them.
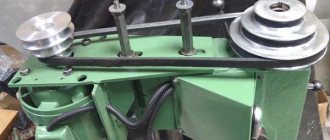
The length of the carriage, also made of metal or wood, depends on the size of the drill that you will use to equip your machine. This structural unit, which is equipped with a mobile drill stand, can be made in the following two options.
With the drill secured using clamps. The clamps used in this design are threaded into holes pre-drilled in the carriage. Clamping of the drill and its reliable fixation on the carriage is ensured by tightening the clamps.
Steel pipe stand
Below in the video you can see the details of making this version of the drill stand. The author talks in detail about the process of creating his homemade drilling equipment.
A special block is used to attach the drill. This block is a bracket where the drill is secured.
The bracket is made from a wooden plate, which is attached to the carriage at an angle of 90 degrees, for which metal corners are used.
To fix the drill, a hole is drilled in the block, the diameter of which is 0.5 mm smaller than the diameter of the tool itself, and a slot is made to allow the tool to be inserted into the mounting hole.
The hole in the block on the machine, intended for installing a drill, is made according to the following algorithm:
- a circle is drawn on the surface of the block, the diameter of which corresponds to the diameter of the drill being installed;
- in the inner part of the circle, trying to adhere to the line that limits it, drill a series of holes of small diameter;
- the partitions that have formed between the drilled holes are cut using a hacksaw or any other tool;
- Using a file or needle file with a semicircular shape of the working surface, the edges of the resulting hole for the drill are processed, making them smooth.
Wooden stand with carriage on furniture rails
Mechanism for moving the drill in the vertical direction
A homemade drilling machine must be equipped with a mechanism that will ensure the movement of the drill in the vertical direction. The structural elements of such a unit are:
- a handle with which the carriage with a drill attached to it is brought to the surface of the workpiece;
- a spring necessary to return the carriage with the drill to its original position.
Spring mechanism for moving the drill
You can make such a mechanism using two design schemes:
- the spring is connected directly to the handle of the machine;
- the springs are located at the bottom of the carriage - in special grooves.
According to the first option, the design is carried out according to the following scheme:
- two metal plates are fixed on the machine stand using screws, between which an axis is installed, where the installation handle will be placed;
- on the other side of the rack, plates and an axis are also installed, on which one end of the spring is fixed, and its second end is connected to the handle;
- the pin with which the handle is connected to the installation carriage is placed in a longitudinal groove made in it.
Steering rack machine
A design solution is to use the steering rack from a machine to make a drilling machine at home in order to create a compact machine with good technical capabilities.
The peculiarity of this design is that the movement of the handle turns into a precise progressive mechanical movement of the rod, which raises and lowers the working head of the machine, withstanding all loads. The positive point is that the operation of most steering racks is adjustable, which makes it possible to maximally select the parameters of the rack for the drilling machine.
Manufacturing
- A frame is produced, and legs are welded to it for reliable installation.
- In the upper part of the base of the frame, in the sheet of metal, grooves are created for attaching the clamps.
- A support post is welded to the base of the frame. The stand is reinforced with stiffening ribs at the joints.
- The steering rack is fixed to a support post. A handle for rotation is mounted on the rack and its stroke is adjusted.
- A tool mount is created. With its help, the drill, in the places of the mounting bolts, is connected to the steering rack.
- After connecting the drill to the rack, check the correct placement of the tool relative to the working plane of the table.
- The last stage is to check the reliability of the connection of all parts of the device and test its operation.
Creating a homemade drill stand allows you to show your creativity in making a unique device.
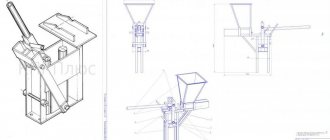
DIY stand for a drill from a photo enlarger
The hand drill, firmly fixed to the stand, allows you to drill a perfectly straight hole in the workpiece at any angle. You can buy a Chinese machine for 1.3 thousand rubles. For craftsmen who are accustomed to doing everything with their own hands, this option is not suitable. Moreover, cheap racks have a lot of play.
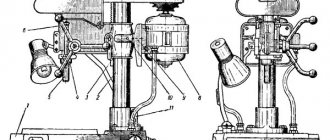
Machine device
Before you figure out how to make a stand for a drill with your own hands, you need to know the structure of the structure. The machine consists of the following components:
- The basis of a homemade machine is the bed. The part is a platform on which the stand is fixed.
- The carriage acts as a holder for a hand drill. The unit is fixed on the stand and moves along it using a mechanism made of furniture guides.
- The handle is necessary to control the operation of the mechanism. The handle lowers the carriage with the drill along the stand while drilling and returns it up to its original position.
- Additional components allow you to expand the functionality of the machine. It becomes possible to drill at different angles and mill small parts.
You can assemble a drilling machine from wood, metal, or use a frame from an old photographic enlarger. In any case, you need to understand an important requirement: the more powerful the hand drill, the stronger the stand is needed.
Making a wooden machine: instructions with step-by-step photos
The easiest machine to manufacture is considered to be made of wood. The disadvantage of the design is the weak strength of the material. Wood becomes deformed due to changes in humidity. Over time, play appears on the rack. It is advisable to use a wooden machine only for vertical drilling of holes.
The procedure for assembling a wooden structure is as follows:
- A plate will be required for the bed.
It is made from edged boards 20 mm thick. You can sew plywood on top to get a perfectly flat area. The size of the plate is selected individually. If the machine is intended only for vertical drilling, then a frame with dimensions of 50x50 cm will be sufficient. To perform milling work and drilling at an angle, the dimensions of the plate are increased to 100x50 cm. - A 20 cm wide stand is installed vertically on the bed. Its height depends on the dimensions of the drill.
Usually, boards 50–70 cm long are enough for a stand. The part is fixed to the side of the bed or on the plate itself. In the second case, the rack is reinforced with a support.
- The carriage is made from a board. The length of the workpiece varies from 50 to 70 cm, but usually the dimensions are selected to match the drill model. On the back side of the carriage and the front side of the stand, telescopic furniture guides are fixed, serving as a movement mechanism.
- The drill can be secured to the front side of the carriage with clamps, which is not very reliable.
- To firmly fix the drill, it is better to make a block. The unit consists of a piece of plate, perpendicularly fixed to the carriage with steel corners. For the block, take a square piece of board. A circle is drawn in the center. Its diameter should be 0.5 mm less than the thickness of the front part of the drill.
- The circle is cut out with a jigsaw. The socket is given ideal smoothness using a round file. The finished block is fixed to the carriage. A cut is made in the front and a screw clamp is installed.
The carriage with the block is installed on the rack, connecting with elements of furniture guides. All that remains is to make the control handle, but more on that later.
Making a steel machine: instructions with step-by-step photos
A metal machine consists of similar units, but they are more difficult to make due to the complexity of processing the material. The advantage of the design is its reliability and lack of play, which is ideal for installing additional components that expand the functionality of the machine.
The general structure of the metal machine is shown in the drawing, and the procedure for manufacturing the structure is as follows:
- For the frame you will need a steel plate 1 cm thick. The dimensions can be taken similar to those of the wooden model.
- The stand is welded from a square or round pipe with a cross section of 32–40 mm. You can weld a sleeve of a larger diameter onto the plate, and insert a pipe into it and tighten it with a bolt.
- The carriage is made from a larger diameter pipe. It should fit freely onto the stand. A steel clamp for a drill is fixed to the carriage.
Now all that remains is to put all the units into one structure and try to secure the drill with clamps.
Manufacturing of control mechanism
The main working unit of a wooden and metal machine is the carriage movement mechanism. It consists of a control handle and a spring. The last element is necessary to return the carriage to its original position.
Depending on the location of the spring installation, two options for the return mechanism can be made:
- The first version of the mechanism involves installing a spring near the control handle. Two metal plates are welded from the top to the end of the rack from one and the other edge. A hole is drilled in the first two plates. An axle is made from a bolt with a diameter of 10 mm, and the end of the handle is secured. A spring is placed between the other two plates. To prevent it from jumping off, pins are welded on the stand and handle. On the side of the handle, at the point of fixation to the carriage pin, a longitudinal groove is cut, which is necessary for the correct operation of the mechanism.
Manufacturing
Regardless of the modification of the rack and the material of its manufacture, the basic design algorithm for assembling the device is the same. The production process consists of preparatory work and the main process - assembly.
Preparatory work includes:
- rack design planning;
- transferring the plan to the drawing;
- compiling a list of necessary materials from stock and those that need to be purchased. Drawing up a work estimate.
Step-by-step algorithm
- Bed production. The main support member must be strong enough to support the weight of the workpiece and the additional stress of drilling. This indicator is calculated individually depending on the type of work. The recommended minimum thickness of a wood frame is 300 mm, a metal frame is 200 mm.
- Installation of supports and racks on the frame. The elements are made of the same material as the frame. The parts are fastened perpendicular to the frame using screws. The height of the support depends on the height of the instrument.
- Cutting the block - its size should be identical to the dimensions of the tool. A cavity for the tool is cut out in the block. If the block is wooden, use a drill, cutting tools, and sandpaper. If the block is metal, you need a grinder to create the hole. A metal strip curved around the circumference of the drill and secured with a screw can be used as a block. It is also attached to the stand with a screw. In this case, such a part of the assembly must withstand the weight of the tool in operation. The use of metal in the production of a machine increases the cost of the device, as it requires the use of additional equipment.
- Installation of the carriage and guides. The carriage is used to install the tool, the guides ensure the vertical movement of the drill during drilling. The most durable way to secure the block is with iron corners. Fastening the drill to the carriage using clamps is less reliable.
- Fixation of a moving element, which consists of a handle and springs. This structural unit can be installed using top and bottom methods. Mounting near the handle is more practical, but the second option can also be implemented.
- Installing additional rack parts. If it is necessary to perform work other than drilling, parts of the machine are attached to the machine according to the drawing. For example, for corner drilling, the stand is modified with an additional plate with holes that will help fix the stand at different angles. Milling requires the installation of a horizontal stand with a vice, which is attached to the bed.
When you need a homemade drilling machine
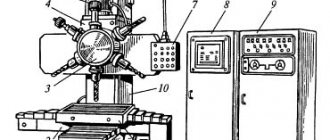
In production or repair enterprises, where the drilling operation is considered the most common, a special device is used to perform it, the models of which may have different functionality. So, it can be a compact desktop drilling machine, characterized by a simple design, or equipment equipped with several working spindles and numerical control.
Basic design elements of a homemade machine
To drill holes in various materials, which is done in a home workshop or garage, you can use homemade equipment. Naturally, for use at home you need a simple device that can be made from components and materials found in almost any garage or home workshop.
And in this article we will not leave unanswered the question of how to make a drilling machine at home, while spending a minimum of money. The drawings and experience of many craftsmen who have already walked this path will help us with this.
The need for such mini drilling equipment for metal, wood or plastic most often arises among those who are used to independently performing various repair work in their house or apartment. Also, quite often radio amateurs are puzzled by the construction of miniature drilling machines.
It would seem that a conventional drill can be used to perform such an operation, but such a tool is not always able to provide the required quality and accuracy of drilling operations. A homemade drilling machine, in addition to its compactness, has another important quality: it can install drills of various types.
Simple mini drilling machine for small jobs