Specifications
This laser engraver is equipped with a 1.8W 445nm laser module, of course, this is nothing compared to industrial laser cutters that use lasers over 50W. But this laser will be enough for us. It can cut paper and cardboard, and can engrave all kinds of wood or plywood products. I haven't tested other materials yet, but I'm sure it can engrave on many other surfaces. I’ll go ahead and say that it has a large working field measuring about 500x380 mm.
Who can make such a laser machine? Everyone, it doesn’t matter if you are an engineer, a lawyer, a teacher or a student like me! All you need is patience and a great desire to get a really high-quality machine.
It took me about three months to design and build this engraving machine, including about a month of waiting for parts. Of course, this kind of work can be done faster, but I am only 16 years old, so I could only work on weekends.
How to make a laser cutter for wood with your own hands
Benefits of Using a Laser Cutter in Woodworking
Laser cutting devices are very economical, as they consume a minimum of energy during operation. In addition, this equipment has a number of other advantages:
- high efficiency;
- absence of dust and chips during the cutting process; the tree simply evaporates, leaving no traces behind;
- light weight of laser systems; Thanks to this, the transportation of equipment is greatly facilitated, and it becomes possible to use it in different areas of production;
- almost complete absence of noise during operation; if you have heard the sounds a sawmill makes, then be sure to appreciate this advantage of a laser cutter;
- possibility of using a cutter for engraving;
- high cutting precision; it is ensured by the use of numerical software control of laser equipment;
- no vibration.
You can cut more than just wood with a laser. Depending on the power, the device can process glass, plastic, ceramics and even metal sheets, profiles, and pipes.
The disadvantages of a laser cutter include the inability to process laminated particle boards, as well as the release of harmful toxic substances into the atmosphere when working with polymer materials.
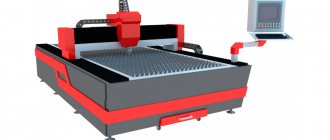
Laser cutter design
To make a laser cutter yourself, you need to know the design of this device. It consists of several key elements:
- An emitter, which can be solid-state, gas or fiber. You can make only the first option with your own hands.
- A mechanism that generates radiation and transmits it to the workpiece. He is also responsible for cooling the equipment.
- A work table on which wood processing is carried out. Included in the design of only powerful stationary devices.
- A control system that allows you to adjust the operating parameters of the equipment.
The handheld cutter uses only an emitter, collimator and power supplies. Therefore, this device can be made independently.
How to make a wood cutter
Below we will give two ways to make a homemade laser cutter. To implement any of the options, you will need an old DVD with a recording head, a pointer and a metal case from a rechargeable flashlight.
First way
It allows you to make a very simple cutter, which will be quite enough for cutting thin pieces of wood or creating engravings. The device is manufactured in this way:
- Carefully disassemble the optical drive and pointer. You need to remove the red diode from the DVD-rom, which is then installed in the upper part of the pointer.
- We insert the upgraded laser into the flashlight housing. First you need to remove the glass and the lamp from it.
- We connect the wires, insert the batteries and check the functionality of the device.
Second way
Using it, you can create more powerful equipment that is suitable for cutting wood, plastic and metal. It is made as follows:
- We disassemble the pre-prepared flashlight, laser pointer and DVD drive.
- We create a printed circuit board with capacitors whose capacitance is 100 μF and 100 pF, as well as a resistor. A fairly simple circuit will allow you to regulate the power of the device.
- Instead of the flashlight glass, we install a lens that will act as a collimator - collecting light rays into a narrowly directed beam.
- We connect the wires and install the batteries.
- We check our homemade laser, measure the current strength with an ammeter or multimeter, and then adjust it depending on the materials being processed.
During the manufacturing process of both the first and second wood laser cutters, it is important to securely fasten all components - diode, batteries, lens, etc.
The wires are connected to the battery compartment with strict polarity to prevent short circuits. In addition, when working with a ready-made device, be sure to follow safety regulations.
Do not expose your hands to the laser beam to avoid burns, and try not to let the device fall or hit it hard.
Source: https://SpecInstrumenta.ru/poleznye-sovety/kak-sdelat-lazernyj-rezak-po-derevu-svoimi-rukami.html
Required materials for assembly
It's clear that you can't make a laser engraver without the right parts, so I've put together a specification sheet with almost everything you need to make one. Almost all parts are purchased from Aliexpress because it is cheap and there is free shipping on most items. Other parts such as machined rods and MDF sheets (can be made from plywood) were purchased from a local hardware store. The laser and laser driver were ordered from ebay. I tried to find the lowest prices for all parts (not including shipping).
It took a lot of time before I came up with this design. I made a few others first, but this one was truly the most beautiful of all the others. First of all, I drew all the details in a graphics editor and printed them in natural size. I assemble the entire engraver from MDF sheets 18 mm and 12 mm thick. We also chose this design because we could easily attach a Z axis and tool, turning our machine into a milling machine.
Of course, I could have made a different, simpler design... But no! I wanted something special!
Design and principles of operation
Any laser device consists of the following components:
- energy source;
- working body that produces energy;
- an optical amplifier, a fiber-optic laser, a system of mirrors that amplify the radiation of the working element.
The laser beam produces precise heating and melting of the material, and after prolonged exposure, it evaporates. As a result, the seam comes out with an uneven edge, evaporating material is deposited on the optics, which reduces its service life.
To obtain smooth thin seams and remove vapors, the technique of blowing melt products from the laser impact zone with inert gases or compressed air is used.
Factory laser models equipped with high-grade materials can provide good indentation rates. But for household use they are too expensive.
Models made at home are capable of cutting into metal to a depth of 1-3 cm. This is enough to make, for example, parts for decorating gates or fences.
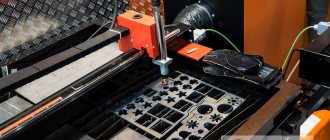
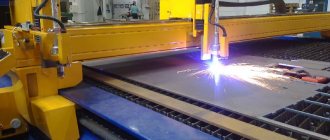
Laser cutting of metal
Depending on the technology used, there are 3 types of cutters:
- Solid state. Compact and easy to use. The active element is a semiconductor crystal. Low-power models have quite affordable prices.
- Fiber. Glass fiber is used as the radiation and pumping element. The advantages of fiber laser cutters are high efficiency (up to 40%), long service life and compactness. Since little heat is generated during operation, there is no need to install a cooling system. It is possible to produce modular designs that allow you to combine the power of several heads. The radiation is transmitted via flexible optical fiber. The performance of such models is higher than solid-state ones, but their cost is higher.
- Gas. These are inexpensive but powerful emitters based on the use of the chemical properties of gas (nitrogen, carbon dioxide, helium). With their help you can weld and cut glass, rubber, polymers and metals with a very high level of thermal conductivity.
This is interesting: Homemade grinder - making a belt grinder with your own hands
Build process
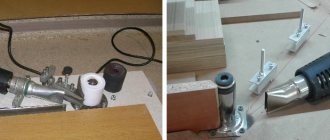
After printing out the drawings, I had parts that needed to be put together. The first thing I did was install the electronics housing door on the left side and the hinge lock (the door installed without difficulty, so I did that first. To assemble the electronics housing, I used a lot of L-shaped iron brackets with holes for self-tapping screws If the body is planned to be made of plywood, then you must first drill holes in it for self-tapping screws.
Principle of operation
The layout, the workpiece is processed using a beam, which on the surface of the material looks like a spot, the diameter of which is several microns. The beam is formed thanks to a lens, which is installed at a short distance from the base part of the part. The beam moves thanks to a drive that is pre-programmed for the technical parameters of the element being processed. Most often used in wood processing:
- Gas, with a beam diameter of 10 microns, formed using a gas tube.
- Solid state laser. The beam diameter of 1 micron is created using neodymium glass.
conclusions
This is, perhaps, all the information that he conveyed to us, but this is a pretty good instruction for those who have a dream of assembling with their own hands a good homemade laser machine for home and hobby purposes.
The assembly of the laser engraver itself is not particularly expensive, since the number of parts is minimal, and their cost is not particularly high. The most expensive parts are probably stepper motors, guides and, of course, parts of the laser head itself with a cooling system.
This particular machine deserves special attention, since not every laser engraver allows you to quickly install a milling machine on the 3rd axis and turn the machine into a full-fledged CNC milling machine.
In conclusion, I would like to say: if you really want to assemble a high-quality CNC machine with your own hands, which will serve faithfully for many years, you do not need to save on every detail and try to make the guides smoother than the factory ones or replace the ball screw with a stud and nut. Although such a machine will work, the quality of its work and the constant adjustment of mechanics and software will simply frustrate you, making you regret the time and money spent on it.
Electronics for a homemade laser CNC machine
Electronic components play a vital role in CNC machines. It must provide control of the device from a computer by issuing commands to stepper motors and guiding the trajectory of movement of the working element. To do this, you need a control program that will provide the necessary commands to the controller in the form of G-codes. An LPT port must be installed.
Important! To receive commands and distribute them to stepper motors, a control board is located in the controller. The standard board KY-2012 (5 Axis CNC Breakout Board for Stepper Motor Driver with DB25 Cable) is popular. Often machines are made on the basis of Arduino.