9e3377222f69609b
Drill chuck for a drill - understand the device, change it
Do-it-yourself construction, repair and landscaping
Menu
Building a house Hand tools
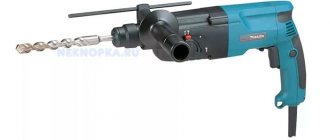
Almost every person has a drill. The tool will help you drill a hole on any surface. This means that we cannot replace it in construction and finishing work, or any type of room renovation. Reliable and uninterrupted operation of the device is ensured by the chuck in which the drill, drill or chisel is attached. It is this element that most often fails during prolonged use of the tool. Accordingly, it is important to choose the right chuck for a hammer drill and be able to remove and replace the clamping device.
Chuck: simple design – the key to long service life
The first hammer drill was produced by the German company Bosh in the 1930s. The device immediately appealed to skilled men; they appreciated its versatility and irreplaceability. After all, the tool allows you to do more than just drill a hole. The pulse chiselling it provides speeds up and simplifies the work being done.
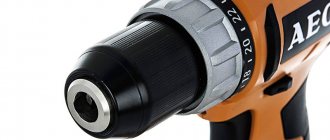
Using a chuck, the drill is secured to the hammer drill
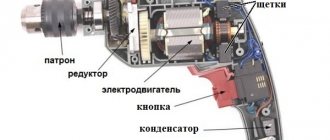
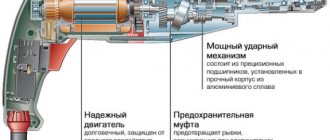
In the design of the tool, an important role is played by the clamping device, which secures the drill or drill. However, it is the hammer drill cartridge that turns out to be an unreliable design element. It quickly fails due to the fact that it accounts for the bulk of the impact force.
After some experiments, manufacturers realized: a simple design of a hammer drill chuck is the key to long-term operation of the element and is less subject to destruction during operation. Therefore, experimentally we came to the creation of three main types of this part.
How to disassemble a drill chuck
Not all varieties require disassembly; most often they are conical. There is an interesting method of access without sawing into pieces. Process:
- The fists move inward.
- An elastic material (foam plastic, expanded polystyrene - 10-20 mm thick) is pressed against the front side with a board or metal sheet.
- The drill is leaned against a flat surface and the hammer action is started. If the model does not provide for this mode, then the cartridge is first dismantled and fixed on the hammer drill. After 20 seconds of operation, the part can be disassembled for repair and cleaning.
Even after repair, performance is not fully restored, so it is recommended to replace the part.
Useful articles, news and reviews on our Yandex Zen channel
Subscribe
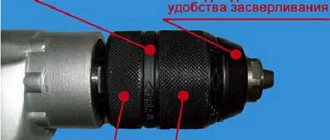
Tooth-crown appearance
Considered a classic type. This type is also called key. And it’s not called by chance. To use it, you need a key that helps secure the working attachment. This key compresses and releases the fastening mechanism inside the part. Like fingers in a fist, they open and close, which is why this type is sometimes called a fist type. These fingers clamp the drill rod. This clamping method is considered very reliable.
The drill is secured to the chuck using a chuck wrench
To change a drill, drill, chisel in this type of hammer drill chuck, you will need not only a special key, but also a certain period of time. You will have to tinker with this type of clamping element. Cam clamps work with cylindrical or hex shank drills.
Tip: Attach the chuck wrench to the tool cord. This way the key will not be lost and will always be at hand.
The cost of this type of element ranges from hundreds of rubles to several thousand. The price depends on the diameter of the element (10, 13, 16 millimeters).
These German-made parts have proven themselves well. Some of them are labeled “Pro” - intended for professionals.
Another German company produces toothed clamping devices. True, they are supplied to the Russian market by Chinese factories. The “ATKA” clamping device is suitable for various types of drills. These are domestic products, although they are often produced by the Chinese.
How to remove?
Now let's talk about how to remove the part in question. This may be necessary for routine cleaning and lubrication, which will increase the life of the tool. First, let's look at the case of disconnecting a cartridge with a fixing bolt. You will need a hexagon of the appropriate size:
- First of all, the screw is unscrewed clockwise if the part has a left-hand thread;
- before this, you need to unclench your fists as much as possible to see it;
- insert the key into your fists and quickly turn it counterclockwise;
- We unscrew the cartridge.
If we are talking about dismantling a cartridge with a Morse taper, then you will need to have a hammer on hand. Using it, you can knock the shank out of the housing socket. First, the screwdriver is disassembled, after which we pull out the shaft with the chuck and gearbox located on it. Using a pipe wrench, unscrew the clamp cylinder.
Now let's move on to dismantling the cartridge with a threaded connection. The procedure will be as follows:
- We unscrew the threaded type fastening using an L-shaped hexagon;
- insert a 10 mm key into the cylinder with the short side, then firmly fix it with cams;
- We start the screwdriver at low speeds, and immediately turn it off so that the free part of the hexagon hits the support.
As a result of all the actions taken, the thread fixation should loosen, after which the clamping cylinder can be pulled out from the spindle without much difficulty.
It happens that withdrawal cannot be carried out using any of the above methods. Then the device should be disassembled, and depending on the manufacturer and model, certain actions should be carried out. Let's show the disassembly process using a Makita screwdriver as an example.
Owners of such models need to unscrew the cartridge, which uses a threaded fixation with a screw-type fastening that performs an auxiliary function.
Then you will need to unscrew the screw and then press the shaft stop button. After this, wrap the screwdriver body in a rag and secure it in a vice. We press the hex key in our fists and hit it with a hammer so that we can remove the cylinder.
Related Posts
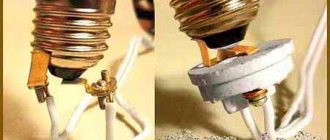
- How to connect the wires to the lamp socket?
- Making a stand for a drill with your own hands: instructions, drawings, video
- An adapter for attaching a drill to a hammer drill
- Bosch hammer drill disassembly instructions
- What and how to drill into the tiles so that they don’t crack?
- How to replace an outlet in an apartment yourself
- How to update old tiles in the bathroom
- How to check grounding
- How to cut metal using a grinder
- The door handle creaks: causes of the problem and solutions
- How to glue fiberglass correctly?
- How to clean a dried out foam gun. how to clean a foam gun and remove stains from surfaces. which foam guns can be cleaned
- How to seal the joint between the bathtub and the wall? 8 popular options
- Why does the air conditioner gurgle when not working when there is wind?
- Restoring the handle of a plastic window
- What could be the reason for the malfunction of the socket in one room, and why does it not work, but there is light?
- How to change a light bulb in a suspended ceiling?
- Caring for matte and glossy stretch ceilings
- Making a drilling rig with your own hands
- How to paint wood with stain and varnish it
- How to check the serviceability of the heating element on a washing machine at home
- Hammer lubricant: why you need to lubricate the tool
- Why does a water heater shock and what to do?
- How to repair a plastic window with your own hands at home: advice from a professional technician
- DIY repair instructions for a 220V LED lamp
Read with this
- How to connect the wires to the lamp socket?
- Making a stand for a drill with your own hands: instructions, drawings, video
- An adapter for attaching a drill to a hammer drill
- Bosch hammer drill disassembly instructions
- What and how to drill into the tiles so that they don’t crack?
- How to replace an outlet in an apartment yourself
- How to update old tiles in the bathroom
- How to check grounding
- How to cut metal using a grinder
- The door handle creaks: causes of the problem and solutions
Quick-clamping elements
This hammer drill chuck is easy to use. And you don't need a special key to work with it. It is enough to press the mechanism of the device with your hands, and the nozzle is ready for use. The keyless chuck for rotary hammers is available in two types: single- or double-clutch.
The keyless chuck is installed on the hammer drill very easily
One hand - and no additional effort. Single-sleeve clamping devices operate on this principle. They can only be installed on those drills where automatic locking of the working shaft is technically implemented . The principle of operation of the device is simple. The shank of the nozzle is clamped by manual rotation of the adjusting sleeve. Turn it a few times and it's done.
It will be more difficult for a master to cope with a two-clutch analogue. Both hands will be used - depending on the number of couplings. When rotating the front clutch clockwise, the rear clutch must be kept stationary.
Video: types of chucks for rotary hammers
The disadvantage of this type of fastening element is that during long-term use it does not securely fix large-diameter drills. Accordingly, during drilling the tool can rotate, which affects the quality and speed of work. The quick-clamping element perfectly fixes nozzles with a diameter from 1 to 25 mm.
The leading manufacturers of quick-release devices are HAMMER, DREMEL, and FIT.
The choice of a specific clamping fixture model depends on the types of work that will be carried out using a drill, as well as on the model and capabilities of the tool itself.
Common problems and ways to solve them
The chuck vibrates or flies off the spindle axis
The most common problem is related to the unstable position of the cartridge body. If the chuck begins to vibrate during operation or flies off the spindle axis, this means that it needs to be urgently repaired.
First of all, it is necessary to find out the reason for the cartridge jumping off the shaft. Most likely, it will be the wear of the fastening screw inside the cartridge. From frequent sharp impacts or lateral loads, the head of this screw may break off. And then the cartridge can be easily unscrewed during operation, especially if you hold it with your hand.
The best solution to the problem is to replace the cartridge with a new one, but it is also possible to replace only the control screw. To do this, you need to completely disassemble the cartridge, and then try to drill out the broken bolt and replace it with a new one. It's not always as easy as it seems.
Clamping jaws jam
The second common problem with the chuck is jamming of the clamping jaws. Most often this happens when drills whose diameter exceeds the recommended one are inserted into the chuck. Or when during repairs, the working part of the cams is generously lubricated with lubricant. Over time, dust and debris that get inside the cartridge are cemented with a lubricant and break the thread rims or jam the movement of the cams themselves.
This can be corrected by disassembling the cartridge and thoroughly cleaning the jaws from accumulated debris. If the threads inside the mechanism are intact, the cartridge can be assembled and used for a long time.
Many experienced craftsmen, when drilling in particularly dusty conditions, protect the chuck from debris by placing half a tennis ball on the drill.
The long life of a tool depends on its proper use and regular maintenance. If the tool is broken, you cannot work with it. This is especially true for household electric drills with chucks - a flying drill can cause injury. A DIYer can easily remove a faulty cartridge and install a new one. Cartridges for household appliances cannot always be repaired, so it is recommended to scrap them or contact a professional.
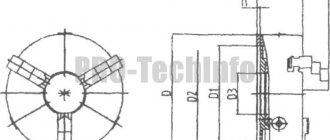
SDS mount: insert, turn, secure
This type of clamping device appeared relatively recently - in the 80s of the last century. And it is considered the optimal mount for rotary hammers. Accordingly, most of the instruments are equipped with it.
The sds hammer drill chuck is reliable and easy to use
The sds hammer drill chuck has a number of advantages. Reliable fastening of the drill, which is fixed using two guide wedges and two locking balls. Easy and safe work with clamping device. Ideal combination of torque and impact force.
Disassembling the Hammer Interskol P 30 900er
The procedure for disassembling Interskol rotary hammers
In recent years, Interskol hammer drills have become especially popular. They are reliable in operation and easy to repair. It's easy to get spare parts there.
Interskol rotary hammers have a wide selection. The tools are conditionally divided into two sectors: hammer drills equipped with an SDS-plus type chuck, and non- hammer drills with an SDS-max type chuck.
Repair of the Interskol rotary hammer can be carried out both in service centers and with the help of others. To repair Interskol rotary hammers without the help of others, you need to have the skills of a mechanic and no knowledge of electrical engineering at the level of high school.
Do not always remember to comply with safety regulations.
Whoever has a tool with a corresponding marking plate. Nettle: hammer drill Interskol P-18/450Er. Stands for:
- the letter P indicates that the tool belongs to the family of hammer drills;
- the number 18 shows that with this hammer drill a drill with a diameter of up to 18 mm is used;
- the number 450 shows the power of the rotary hammer in watts.
The line of Interskol rotary hammers with SDS-plus cartridges is represented by 13 models: P-18/450ER, P-20/550ER, P-22/620ER, P-24/700ER, P-24/700ER-2, P-26/ 750EV, P-26/800ER, P-26/800ER-2, P-28/800EV, P-30/900ER, P-30/ 900ER
-2, P32/1000E, P-32/1000EV-2.
Rotary hammers Interskol
with SDS-max cartridges are represented by the following models: Interskol P-35/1100E, P-35/1100EV-2, P-40/110EV-2, P-45/1100E, P-50/1200E.
In the field of trade, other models of Interskol rotary hammers are considered: Interskol P-600 ER and Interskol P-710 ER. These models were produced at the beginning of the development of Interskol production.
Among household users, the most common models are Interskol rotary hammers P26/800ER, P30/900ER, P710/ER.
Disassembling Interskol rotary hammers models P18, P22, P26, P28, P30, P600, P710
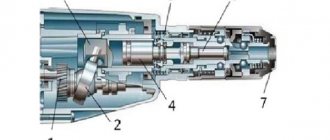
The operating principle of all rotary hammers is the same.
The rotational moment from the rotor is transmitted to the barrel shaft and the working tool attached to it. At the same time, with the help of a swinging bearing, popularly called a “drunk bearing”, the torque is converted into a reciprocating motion, transmitting the shock impulse to the working tool.
All Interskol rotary hammers are assembled according to one general scheme and consist of the same blocks.
Conventionally, Interskol rotary hammers consist of three blocks:
- Impact unit gearbox unit.
- Stator block.
- Power and control circuit block.
Repair of Interskol rotary hammers should begin with studying the tool diagram, preparing the tools and the workplace.
The indicated blocks for the listed models have their own design features.
For ease of consideration, we will divide the presented rotary hammers into groups.
- In the first group we will include Interskol P-18, P-22, P-24, P-26, P-30 rotary hammers.
- In the second group, we will consider disassembling the Interskol P-600 and P710 hammer drills.
Replacing the clamp: a few simple steps
If the drill malfunctions during operation, the drill rotates, the clamping element on the tool must be replaced. To do this, it is important to determine its type. After all, the method of fastening the element depends on this. Typically, the device is mounted on a spindle or on a screw rod. In this case, replacing the cartridge on a rotary hammer is not a difficult task. Turn it and it's done.
If a strong fixation of the part is used, additional tools will be needed. They tap the head of the screw with a hammer. This simple action weakens the strong hold. The screw rod is unscrewed using a screwdriver. If the element is mounted on a spindle, clamp the element with a key and turn the spindle. Here is the answer to the question of how to remove the cartridge from a hammer drill.
Video: how to replace a cartridge on a hammer drill
If there is a problem, you need to understand what happened to the part. Accordingly, you need to know how to disassemble a hammer drill cartridge. First you need to move the plastic part of the part and remove the rubber seal. The next step is the fixing ring. It can be easily removed if you pry it off with a screwdriver. After this you will need to remove the locking washer. And one more ring.
If the part uses an SDS mount, it can be easily disconnected. Pull out the ball, washer, and spring. Exactly in this sequence. To assemble the clamping device, all of the above steps should be repeated in reverse order.
The process of disassembling a hammer drill chuck
The part can only be assembled if the device is working properly. Otherwise, you need to know how to change the cartridge on a hammer drill. The version of the part depends on how often the tool is used and what type of work is primarily performed.
If you often have to change drill bits on a drill, a quick-release element is ideal. The toothed or classic type is ideal for large sized attachments.
The hammer blow has disappeared - what to do?
As you know, nothing lasts forever. And reliable equipment breaks down. Somehow, in the midst of work, he stopped hammering. The machine was working in rotation mode, but the shock suddenly disappeared.
The gearbox was disassembled and the cause of the breakdown was identified. The bushing in the barrel body, in which the firing pin directly carries out the impact work, was broken. As a result, the striker became jammed in the fragments of the collapsed bushing.
The service center advised to replace the barrel completely. It turned out that the bushing is pressed into the barrel at the manufacturer and is not supplied separately. I had to buy a whole new barrel.
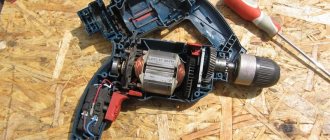
In this article we will tell you how to put the hammer drill into working condition yourself after this, in general, simple breakdown. If you have the skills to repair power tools and the desire not to pay someone your hard-earned money, then we take the tool and start disassembling the machine.
Tools
You will need two ordinary flathead screwdrivers and one Phillips head screwdriver. One of the flat-head screwdrivers should be thin and narrow, no more than 4 mm wide. You will also need a wire hook to remove the retaining ring. It can be made from a bicycle spoke, the main thing is that the wire is rigid and does not bend easily. You will also need a rubber mallet or wooden mallet.
Work process
Disassembling the hammer drill should begin by removing the protective rubber cap - boot. It can be easily removed, just grab it with your fingers and pull it off the barrel.
Then, by pressing on the plastic cover and squeezing the spring of the SDS + mechanism, remove the retaining ring with a screwdriver.
Using a screwdriver, remove the stopper
The cover is removed from the barrel, and behind it, compressing the spring again, we pull out the retaining ball along with the spring and the figured washer.
Disassembling the SDS mechanism
After which the operating mode switch is disassembled. Under the cover that holds the red locking button, there is a special slot for a screwdriver. By inserting a screwdriver into this groove and prying the cover slightly, first from one edge and then from the other, carefully remove it. You should not apply significant effort here; the lid is still plastic and may break. The red button along with the spring is removed from the switch body, and it is moved to the left all the way, just beyond the drilling mode. It is from this position that it is removed from the gearbox. For this operation, the switch must be lightly picked up with thin screwdrivers on both sides and removed along with the rubber o-ring.
Removing the rotary hammer mode switch
Now the gear box is removed. Using a Phillips screwdriver, unscrew the four bolts connecting the box to the stator housing. Then, holding it with your hand, you need to lightly hit the end of the barrel with a mallet so that the box comes off the gearbox.
Removing the gearbox
After removing the box, remove the barrel from the gearbox. It comes off easily.
Pull the barrel out of the gearbox
Use a rag to remove old grease, wash the barrel with gasoline or kerosene and wipe dry.
So, as mentioned above, it was necessary to completely change the entire barrel. However, this item purchased at the service center turned out to be “as naked as a falcon.” That is, there was absolutely nothing on it and all the parts from the old barrel had to be moved to a new “blank”.
The most difficult operation was removing the firing pin from the barrel body. There are special holes in the barrel body through which the locking ring can be seen. This ring holds the firing pin with rings and rubber dampers in the body seat. Inserting a thin screwdriver into the hole, bend the ring slightly. We do this first on one side and then on the other. The stopper should come out of the groove.
Using two screwdrivers, compress the stopper
Then, from the inside, using a homemade wire hook, we pull the stopper out into the light of day.
Using a wire hook, remove the stopper from the inside.
Next, remove the striker with washers and rubber rings. For assembly, it is necessary to remember or sketch the location of all rings and washers. If something goes wrong, photographs and drawings from the article will help.
Now you need to remove the gear from the shaft. After pressing on the washer and compressing the spring, use a thin screwdriver to remove the retaining ring from the groove. After removing it, remove the washer, spring and gear from the barrel.
Removing the gear wheel
The gear wheel is put on the new barrel and engaged with the splines. Next, a spring with a washer and a stopper are installed on it. You need to insert the locking ring and fix the mechanism in the working position.
To do this, take the barrel in both hands and, resting it in your palms, forcefully compress the spring with your fingers, while simultaneously moving the washer and stopper down. You need to squeeze until the stopper fits into the groove.
Then a firing pin with washers and rubber rings is installed inside the barrel in the order in which it was disassembled. But first you need to pay attention to the condition of the drummer, his appearance.
If the firing pin has gouges and pits after a long period of work or because it was scratched by a broken bushing, then it should be sanded a little. To do this, it is clamped into the drill chuck and processed with fine-grained emery cloth. But if the irregularities are too large, then the striker will be easier to replace.
Assemble the impact mechanism
It is necessary to lubricate the striker with a special lubricant before installation and then use the lubricant during operation. When inserting a drill into a hammer drill, you need to apply a little lubricant to its shank. This extends the service life of the machine.
Having installed the firing pin mechanism into the barrel, we fix it with a locking ring. Using a screwdriver, we try to move the firing pin on both sides inside the barrel. It should move easily in the channel and not jam.
Assembling a new trunk
We install the assembled barrel into the gearbox housing. Putting it on the cylinder with the piston, we engage it with the drive gear and insert it into the body. All parts should be well lubricated during assembly.