How to build a forge yourself?
Independent production of decorative forged products will require a special room for forging and welding. Traditionally, this room is called a forge or blacksmith's workshop.
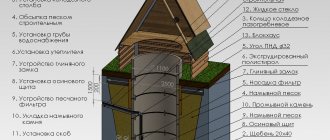
Placement of equipment in the forge: 1—emery machine; 2 - forging machine; 3. pipe bender; 4 — cabinets for tools; 6 — vice; 6 - workbench; 7 - fan; 8 - water tank; 9 - forge; 10 — hangers for tools; 11- table for tools; 12—anvil; 13 - boxes with coal.
Work in a forge involves working metal parts, usually while they are hot. Welding using an electric or gas machine also involves working with an open flame and metal heated to a high temperature.
This places special demands on setting up a forge at home.
How to build a blacksmith shop with your own hands?
It is best to build a forge from materials that are not susceptible to easy fire:
Layout of equipment in a rural forge.
- bricks;
- cinder block;
- asbestos cement sheets.
If the forge is forced to be located in a building with wooden walls, they must be plastered.
The floor in the forge is paved with brick, poured with concrete, or made from a mixture of clay and sand, wetting it and thoroughly compacting it. A garage, shed or utility room in the house is suitable for a locksmith workshop.
Cold forging machines can also be placed there, since this method of metal processing does not require the use of open fire.
The area of the room for forging decorative elements can be relatively small and dictated only by the convenience and freedom of movement of the blacksmith.
For the production of small-sized products, the optimal forge area can be considered 16 sq.m.
Tools in the forge: hammers, vices, tongs, sharpening.
Such a workshop makes it possible to place all the necessary equipment under one roof. Welding work should only be carried out outdoors.
When carrying out forging work indoors, it is necessary to ensure sufficient ventilation. A supply and exhaust type forced ventilation device would be ideal.
In this case, exhaust equipment is placed above the furnace. The ceiling height should not be less than 2.5 m.
A forge under a canopy does not require ventilation, but working in it in winter will be quite uncomfortable.
Internal arrangement of the forge, main fixtures
The specifics of a blacksmith’s work involve the placement of characteristic devices in the workshop:
Construction of a blacksmith's forge.
- blacksmith's forge;
- anvils and speraks;
- correct slab;
- bending plate;
- vice;
- hammers, handbrake, sledgehammer;
- tools for cutting, sharpening, drilling, chopping;
- locksmith's workbench.
In addition, it is imperative to equip the forge with a container of water to cool the forging, which will always be at hand, and a fuel box with a poker and scoop. Ensuring fire safety dictates the placement of a fire extinguisher in an accessible place.
The most necessary tools
Heating metal blanks to a high temperature before processing requires the presence of a forge in the workshop.
This is a type of open-type furnace, on the hearth of which high-temperature fuel is burned - charcoal or coal. The forge is usually located on the wall farthest from the entrance so that the blacksmith can have access to it from 3 sides.
This allows you to heat both long workpieces and small parts for the manufacture of decorative metal elements.
Anvil with a device for clamping workpieces.
For a small workshop or for making small parts, a portable forge is well suited, which can be made from sheet metal or from a cut-off gas cylinder.
Processing larger workpieces (parts of railings, fences, etc.) will require the installation of stationary equipment. Traditionally, such a furnace is made of brick: the base is laid out from brick or cinder block, leaving space in the center for an ash pan and air flow to the grates.
You can also weld the base from a steel corner by making an ash pan from sheet metal. For forced blasting in order to increase the combustion temperature of the fuel, a pipe is laid. You can use a vacuum cleaner to pump air.
A grate is installed on top of the ash pit, and the walls around it are laid out from refractory bricks, forming a furnace nest where the burning fuel is located.
The hot workpiece is processed on an anvil. For this purpose, you can adapt a piece of rail, one end of which is ground into the shape of a cone. If possible, it is better to purchase a professional anvil, but a piece of thick (2-3 cm) steel plate with a smooth surface is also suitable for making decorative parts.
You can install the anvil:
- on a wooden block (“chair”);
- on a monolithic concrete base;
- in a barrel of sand.
With any installation method, the height above the floor of the working surface of the anvil (platband) is determined individually and should approximately correspond to the level of the thumb on the hand of the blacksmith standing next to it.
https://moyakoa.ru/youtu.be/L100hBoKE5s
Accessories (bending and leveling plates, vices, clamps) are used to secure and process workpieces.
The bending plate has holes into which, if necessary, pieces of rod are inserted according to the pattern; between them, identical elements are bent in large numbers (curls, snails, etc.). On the right plate, long workpieces can be bent at right angles or straightened.
Shperaks are mini-anvils for small elements. In a vice, the ends of the part are clamped when twisting, bending, or some tools (shperaks, lowers) for processing workpieces.
Impact tools should be represented by a set of hammers and sledgehammers of various weights (4-16 kg) for striking when forging large products.
For final processing of the workpiece, handbrake tools weighing 800-2000 g with a handle length of about 35 cm are used. The handbrake is used to deliver precise blows and correct the shape of the product.
Hammers with shaped strikers are used for forgings of a special configuration. These hammers are usually purchased or made for a specific task.
Various power tools for metal working must have cables with a cross-section appropriate for the load.
https://moyakoa.ru/youtu.be/G9s3dT_pad0?list=PLalk8mNX9wXQ16qyhOcisNE7l7YAgrZKn
A mechanic's workbench is a table at a convenient height for the owner, on which you can install power tools, lay out blanks and finished parts, and perform cold operations on processing products: sharpening, grinding, cutting, etc.
All forge equipment must be placed taking into account the individual requirements of the master for ease of work and unhindered access to the main workplaces: forge, anvil, workbench. Making a forge at home is quite affordable, and working in it will bring pleasure and allow you to independently make various things from metal.
Sales of blacksmith products
The forge business plan should include a section in which possible options for selling finished products will be identified. It should be noted that problems in this regard should not arise, since artistic forging is valued and is in considerable demand. There are practically no serious competitors in this market; very few companies are engaged in hot forging.
Therefore, a small advertising campaign in print and on the Internet will provide you with a stable flow of customers. And, of course, the quality of manufactured products plays a huge role. If customers like your blacksmith products, then the most effective advertising will work - word of mouth. Some entrepreneurs prefer to look for their clients among connoisseurs at specialized exhibitions.
Forge in the garage
Blacksmith is one of the oldest professions, traditionally shrouded in secrets and legends. The simplest forge can be equipped in your garage. This will not require particularly complex equipment or high costs. A home craftsman will be able to create both household items and artistic objects in it.
Forge in the garage
How to build a forging workshop with your own hands
It is recommended to locate a mini forge, built with your own hands, no closer than 10 meters from residential buildings. This is explained by the increased fire hazard of traditional forging technology.
The area required for convenient and safe placement of all necessary equipment is from 15 sq.m. The height of the ceiling above the forge and anvil should be at least 2.5 m. It is best for the building to be brick and stone.
The floor must be made of non-combustible material - concrete or laid with bricks or tiles. Clay coating is allowed, regularly moistened with water. If the walls and ceiling are wooden, they should be covered with a thick layer of lime whitewash.
Products made in a forge at home
In the garage space allocated for the forge, exhaust ventilation should be installed and good lighting should be provided. The wiring must be hidden in metal pipes or sleeves.
There is another option - the forge can be placed under a canopy attached to the wall of the garage. The problem with ventilation disappears, but it will be possible to work comfortably in such a workshop only in the warm season.
Blacksmithing technology requires placing the following basic pieces of equipment in the garage compartment allocated for the forge:
- Forge with combustion equipment (scoop, poker, etc.).
- Locker with fuel.
- Fan.
- Anvil.
- Barrel for hardening.
- Vise.
Hand tools - hammers, pliers, notches, etc. will require a shelf, or better yet, a full-fledged, durable workbench.
The forge and anvil are positioned so that they can be accessed from all sides. Lighting is best done with incandescent lamps or LED “warm light” lamps (with a color temperature of 2700 K) - they do not distort the color of the workpiece.
Setting up a forge with your own hands
If possible, the door (or gate) of the forge should be directed away from the house.
A high-quality tool in good condition will be pleasant and safe to work with. In addition, a good tool allows you to achieve high quality products.
The selection of instruments begins with percussion equipment. It includes:
- Handbrake. A small hammer weighing 500-2000 g, with a handle 35-60 cm. The handle should be made from deciduous trees and sanded smooth.
- Sledgehammer. Heavy hammer, weighing 8-16 kg. The sledgehammer’s strikers are flat; its long (up to 120 cm) handle is held with both hands and used for blows of large amplitude and weight.
- War hammer. Hammer weighing up to 10 kg, held with two hands. One striker is flat, the other is wedge-shaped, used to accelerate the workpiece along the axis.
HandbrakeSledgehammer
Long-handled pliers are designed for:
- removing the hot part from the furnace;
- holding it in the position required for forging.
The pliers must be able to hold both large and small parts, preventing them from turning under impacts. To do this, they must have elongated jaws.
Measuring tools - steel rulers, squares, measuring gauges, calipers, protractors, etc.
Ticks
The forge in the garage next to the house should also have a capacity for cooling and hardening the forged products. You can use a cut metal barrel.
Blacksmith anvil
When choosing an anvil for a garage workshop, it is important to pay attention to the condition of the working surface and especially the edges. They should not have chips or gouges. If you hit a surface with a hammer, it should ring and the hammer should bounce back.
Install the anvil on a powerful welded frame. Such a structure, if necessary, can be quickly moved from place to place by one person. If you manage to get a large stump (not rotten!), then in addition to a reliable, stable fastening you will also get a shock absorber. But it will no longer be possible to move it alone.
Blacksmith anvil
The height of the installation is calculated based on the height and length of the blacksmith’s arms so that the plane of the striker when striking with both hands is parallel to the working plane.
Forge
A forge for a forge in a garage is welded from sheet metal with a thickness of 5 mm or a gas cylinder is cut. It is mounted on a welded frame (made of 12 mm rod or reinforcement). The height of the top edge should be at the level of the master's belt.
A grate is welded to the bottom of the hearth to accommodate pieces of coal.
To prevent coal particles from spilling downwards, the grate bars should be made with small intervals.
The supply pipe from the blower fan is positioned with a slight downward slope. This is done to avoid sparks being blown upward.
Read more about how to make a homemade forge in the article “Do-it-yourself blacksmith forge.”
Forge
Hammer and old vacuum cleaner
To pressurize the forge, use a duct fan or an old but efficient vacuum cleaner. Filters should be removed from the vacuum cleaner.
https://www.youtube.com/watch?v=MVDDjbvza6k
When choosing a forging hammer, you need to pay attention to the quality of the metal. An old Soviet hammer made of good tool steel will last much longer than a Chinese one.
It will be enough to make a good handle, fit the hammer tightly and regularly check the fastening. The weight of the hammer is selected based on the level of physical development of the master. The weight should allow long hours of work without fatigue.
Using a vacuum cleaner to pressurize the forge
Forging vices and pliers
For a forge in the garage, it’s worth getting a chair vice. They are made from high quality tool steel and can withstand thousands of impacts. It will not be possible to split them.
Forging vices and pliers
The pliers should have long handles, which will allow you to snatch workpieces from the forge without fear of getting burned.
The tool kit should also include flares with elongated flat jaws for gripping small parts. A special ring that allows you to clamp the handles together will be of great help. This makes work easier by reducing gripping force.
Financial plan
To open a small forge you need:
- preparation of the premises - 100 thousand rubles;
- purchase of equipment – 300 thousand rubles;
- paperwork – 5 thousand rubles.
Monthly costs:
- rent – 20 thousand rubles;
- tax, utility and transport payments – 20 thousand rubles.
Let's calculate the cost of manufacturing 1 m² of grating:
- purchase of metal – 500 rubles;
- treatment with anti-corrosion mixture – 15 rubles;
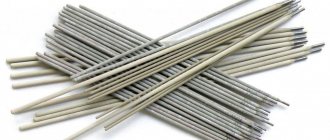
- electrodes – 50 rub.;
- utility costs - 100 rubles;
- other costs - 400 rubles.
As can be seen from the calculations, the cost of 1 m² of grating will be 1065 rubles. You can sell it for an average of 3,000 rubles.
If you sell about 40-50 m² of products per month, the revenue will be 80-100 thousand rubles.
The project can be repaid in an average year.
How to make a forge with your own hands: forge structure
The word “forge” is usually associated with a dark room with anvils, forges, hammers and blacksmith’s tongs. However, creating a forge with your own hands is much simpler than it seems at first glance. In addition, the forge can be made quite compact without adapting special premises for it.
The forge itself is a room with equipment for blacksmithing. In the forge, metal blanks are heated and processed using hammers and other forging tools. Less commonly, melting metals and alloys for casting some elements.
In fact, the forge does not necessarily have to be located indoors. In our case, the forge is an open space (or a space under a canopy).
The forge contains a forge - a source of open fire. Small particles of coal are often blown out of it. In addition, the metal is processed hot at about 800-900ºС. Therefore, the floor in the forge should not be made of flammable materials and there should be no electrical wires in the vicinity of the forge and anvil, since hot workpieces often drop onto the floor.
Blacksmith anvil
It can be almost any one that can be found. The main thing is that the edges and working surface of the anvil are not knocked down (the edges must be smooth). When you hit a real blacksmith's anvil with a hammer, it should bounce off it, and the anvil itself should ring loudly.
The anvil can be installed either on a large wooden stump or on a frame welded from a corner. The second option is more functional; in addition, it allows you to turn the anvil and install it anywhere in the yard or room without any problems.
Installation on a stump, as a rule, secures the anvil in one place “forever”.
The height of installation of the anvil is determined by the level of extension of the blacksmith’s arm: so that when struck with a hammer, its surface is approximately parallel to the ground.
Old vacuum cleaner
Necessary for blowing air into the forge during blowing work.
Hammer
This is an ordinary hammer. But not like a locksmith's, which has one end that is thinner. A hammer is a hammer that has both ends equally flat. Unlike a sledgehammer, the hammer has a lighter weight (from 800 grams to 2 kg) and a short handle for working with one hand.
You should choose a hammer based on your own physical capabilities in order to work with it for a long time and not get tired. It is very important that the hammer is made of good steel; it is better to use an old Soviet one.
Chinese hammers can crack after several blows, and some develop grooves on the working surface during use, which indicates the low quality of the metal.
Chair forging vice
The main difference between a blacksmith's vice and a metalworker's vice is the metal from which they are made. The forging vise is made of tool steel and can be struck without fear of splitting the vise.
Blacksmith pliers with long handles
Long handles are necessary for working with small workpieces. A plus will be a locking ring that fastens the handles into a lock, which allows you to avoid squeezing them with force when working with a workpiece.
Other tools are non-specialized or ordinary plumbing tools.
Recommendations for setting up a forge
This equipment for a full-fledged forge can be placed in a corner, in an area of less than 1 square meter, since the anvil and forge can be moved.
If you plan to work indoors, then an additional hood should also be made at the place where the forge is installed.
If the forge is located in the yard or under a canopy, then an exhaust hood is not needed; during active combustion, the forge emits little smoke.
Coal for forging needs “fiery” coal. You can distinguish it by its weight. Pieces of this coal, even very large, are very light. It flares up strongly, burns quickly and gives the high temperature necessary to heat the workpieces to forging temperature. You should choose large and medium pieces. Small ones burn out quickly and do not give the desired temperature.
Equipment and tools
Any blacksmith's workshop, even a fully mechanized one, must have the main element of the craft - a forge. After all, it is when heated that steel and iron become soft and plastic, which makes them pliable when processed.
The design of a forge is quite simple - in fact, it is a furnace in which fuel burns. But to increase the combustion temperature, additional air supply must be provided. Previously, furs were used for this, which pumped oxygen into the hearth.
The simplest gas mini-forge for small forgings can even be made from a tin can. How this is done is shown in the provided video:
Such a device will allow you to produce forged items even in a garage or shed in the country.
The main condition when operating a forge is that sufficient heating temperature must be provided. It is best to have a solid fuel fireplace that burns coal. Also a good option is a gas forge.
It is important to take care of a high-quality hood that will remove fuel combustion products!
The second device for a forge is the presence of an anvil. This is the “worktable” of any blacksmith. Anvils come in various sizes and dimensions.
But for full-fledged forging, additional holes in the surface and the ability to attach additional equipment (for example, crimpers and smoothers) will be required. Also, for bending elements, there is a rounded horn on the anvil. It is used as a kind of mandrel. However, a homemade anvil made from a massive piece of metal, such as a rail, will also work.
After this, you need to take care and purchase a blacksmith tool.
Handbrake hammers are small hammers with which the master does the main work. Their weight ranges from 500 grams to two kilograms. The hammer itself is mounted on a wooden handle, usually made of rowan (smoothes out the recoil upon impact).
The sledgehammer is intended for rough work, for example, crimping large and massive workpieces. Its weight is 2-8 kilograms, the handle, like the handbrake, is wooden.
Pliers are needed to manipulate heated metal elements during forging. They must be long enough and also durable. The grip must be strong so that the part does not slip out with every blow and movement.
A vice, or a metalworker's vice, may be suitable. Quite often, a vice is mounted on an anvil for more convenient work. The main thing is that they provide reliable fastening of parts during forging.
Crimpers and ironers are special devices that are mounted on an anvil during hand forging. Their task is akin to a factory stamp - to give the desired shape to the workpiece and smooth out its front parts.
They use wrenches when it is necessary to twist metal parts, and chisels are used to cut metal. Also, for cold working, you can mount a manual machine, where it will be more convenient to twist and bend the metal.
However, in a modern workshop, chopping is completely replaced by cutting using a grinder. The same applies to various punches. They can easily be replaced with a drilling workbench or even an electric drill.
However, even the presence of a simple device can easily replace electric forging machines with your own hands.
If you plan to engage in forging at a more serious level, then you will need the appropriate equipment.
How to make a forge with your own hands at home
It is possible to create a forge with your own hands. This work will take a minimum of time, money and effort. We will reveal the subtleties of manufacturing, based on different price categories.
Forging is an activity chosen by hardworking and creative men. Such a workshop can become a place of work that brings serious income. A forge with your own hands is a dream that can easily be realized, and today we will tell you how to do it.
Basic Rules
There are many men who equipped a small room in a residential building as a forge. Most often they used the bathroom for this, which is completely wrong! A forge is a place where basic fire safety rules must be observed.
Before you start talking about how to make a forge yourself, you should determine a place for it. To do this, the following conditions must be met:
- Premises: separate, located away from a residential building.
- Room area: from 15 m2 and above, depending on the purpose of the work.
- Forge walls: built of wood or brick, covered with plaster.
- Forge floor: any non-combustible material.
- Door opening: outward.
- Additionally: good lighting with insulated electrical wiring, ventilation.
A forge located at home may interfere with the sleep of household members, which should be taken into account before constructing or allocating premises. If the work is planned to be carried out only in the warm season, you should think about equipping a canopy. All the recommendations described above are followed regardless of the type of forge.
Necessary equipment
Building your own forge at home requires certain knowledge. The heart of the workshop is the equipment; without it, the master cannot work. Below is a list of required equipment.
- The forge is the most important element. It is in it that the fire burns, and the metal reaches a certain temperature. Place it opposite the front door against the wall.
- Racks for metal workpieces and tools are installed on the right or left wall. Their size depends on the owner’s requirements.
- Containers in the form of metal barrels are installed next to the forge. They are designed for storing coal, slag, oils and water.
- A welding station that won't take up much space.
- A metal cutting machine is one of the main elements of the workshop.
- An anvil that is placed closer to the forge.
- A workbench with a steel vice is equipment without which it is difficult to imagine a forge.
- The molding machine is indispensable in work.
If it is possible to install a mechanical hammer, this will speed up the work process.
Fuel for the forge
The main difference between forge hearths and each other is the use of different fuels. It happens:
- gaseous;
- liquid;
- hard.
The most common option is solid fuel in the form of coal. Professional blacksmiths use shiny charcoal in the shape of a walnut. Charcoal is the most expensive type of fuel. It is in short supply in some areas. We recommend using pulverized coal, the temperature and duration of combustion of which are optimal for forging work.
The optimal liquid fuel, corresponding in price and quality, is fuel oil. A gas forge should be equipped only where this type of fuel has a low cost. Compliance with fire safety rules is a top priority.
Required materials and tools
A homemade forge is equipped with tools that are available to its owner. Gradually, the old tools are being replaced with professional ones. The list of required devices includes:
- hammer or mallet;
- sledgehammer;
- pliers with long handles;
- fan for blowing;
- cast iron grate;
- flexible aluminum sheet;
- steel rulers of three types (30, 50, 100 cm);
- poker;
- metal scoop;
- broom;
- peak.
The materials you will need are brick (preferably heat-resistant), sand, cement, a large stump, and a pallet. Now you can start construction. Let's take a mini-forge on a small budget as an example.
Mini forge device
A mini forge with your own hands is an excellent option for a novice creator. Having tried yourself in business, after a year you can expand the space, purchase additional equipment and shelving.
We'll tell you step by step how to build a forge yourself.
- Away from home, directly in the open air, a cement mortar is prepared by mixing cement, sand and water. It should have a creamy consistency. Mortar is required for brickwork of the furnace.
- The forge is assembled in the simplest way, based on the principles of its operation: the blowing comes from below, as a result of which the coals flare up. The brickwork is fastened in the form of a rectangle with ready-made cement mortar. The result should be three brick walls in the shape of the letter “P”. Provide space for cast iron grates.
- Having laid out 4-5 layers of brick, you need to install cast iron gratings, and then raise three more layers of masonry. They will protect the coal from the wind during operation.
- An old pipe with a diameter of 15 cm, but without mechanical damage, is placed down under the grilles. This is an element of the blowing system.
- Away from the finished furnace, on a pallet, a structure from an aluminum pipe and a fan is assembled. This system will be connected to an air supply pipe. Many homemade products of this type are assembled from a pipe and a vacuum cleaner; everyone chooses the best option for themselves.
- The stump is installed next to the forge. If it wobbles, it is fixed and an anvil is placed on top of it. If it is not possible to purchase it, use a channel, part of a rail or other device.
Note that this mini design is suitable for forging small-sized products, for example, knives and decorative elements.
If you have a separate room, and also a desire to build a professional workshop, you should take the matter more seriously. The forge is the main, central element of the forge, it consists of:
- air supply tuyeres;
- cast iron grates.
Previously, bellows were used to supply air; today, almost any device can be used for this. Car blowers are a great option. The walls of the forge are raised from any material available to the master (brick, concrete, metal).
An umbrella is provided above the forge, in a closed room, to remove smoke. It is made of metal, 0.5 cm thick, in the shape of a pyramidal hood.
When purchasing an anvil, make sure it is made of carbon steel. The form that is considered universal is with two horns.
Making a forge with your own hands is quite simple. It is available to every master, and the progress of work depends on the final goal. A professional approach involves significant costs, but a mini forge in the open air will be an ideal solution for men who value their hobby.
Concept Summary
When choosing a legal form for a forge, you should choose individual entrepreneurs. As for the form of taxation, in this case the example of the classical simplified tax system with a tax rate of 15% of the difference between the income and expenses of an enterprise for a certain period is the best fit. There is no need to hire a professional accountant, since anyone with basic reading and arithmetic skills can complete tax reporting.
During the forge registration procedure, you should select the correct OKVED codes, namely the following:
- 25.99 “Production of other finished metal products not included in other groups.”
- 25.99.29 “Production of other products from base metals, not included in other groups.”
- 25.99.3 “Manufacture of finished metal products for household purposes according to individual orders of the population.”
The range of services that a forge can provide to its clients is extremely diverse and largely depends on the professional skills of the forge workers. Below is a list of the most common blacksmith shop services:
- Production of household metal “consumables” – nails, staples.
- Artistic forging of decorative items.
- Cold forging of metal fences, gates and window bars.
- Repair of metal tools.
- Production of exclusive metal products according to individual orders.
What distinguishes a good forge is not the length of the list of services provided, but the quality and speed of the work. For most clients, it is important to receive the highest quality product in the shortest possible time.
DIY mini forge – Do it yourself
Blacksmith is one of the oldest professions, traditionally shrouded in secrets and legends. The simplest forge can be equipped in your garage. This will not require particularly complex equipment or high costs. A home craftsman will be able to create both household items and artistic objects in it.
Forge in the garage
How to make a forge at home: dream and reality
Passionate people often look for areas of activity where they can find application for their dormant talents. And some of them have the idea of trying themselves as a blacksmith.
This idea is feasible if you do not live in an apartment in a multi-storey building: no one is stopping property owners in the private sector from developing vigorous activity to set up a new workshop for an interesting hobby.
How to make a forge at home, what you need for it and what points you need to pay attention to - this is a list of questions to which we will look for answers.
Setting up a forge: particularly important points
First you need to decide what products you are going to create, because what your future workshop will look like will depend on their size. If there is no need to make fairly large “masterpieces,” then you can build a forge by spending quite modest funds.
- The premises are the first important point to stop at, because there are strict restrictions, and fire safety rules require compliance with them. The fact is that the blacksmith's workshop should be remote from both residential and commercial buildings. The required room area is at least 16 m2, and the door must open exclusively outward.
- The floor of the forge requires special attention, because flammable materials are strictly contraindicated here. If in ancient times in such workshops the role of floor covering was played by thoroughly compacted earth, now the best option will be concrete or something similar.
- Providing ventilation and soundproofing are also important. If it is simply impossible to work without the first one being forced, then the second one will make you a common enemy - both household members and neighbors.
If the necessary premises are not yet available, you can set up a forge either in the garage, or even in the open air, but in this case you will have to build a fire-resistant floor, a rain shelter and create when everyone around you has gone on business. When the question about the premises has found an appropriate answer, you can move on to a new “headache” - taking care of tools and equipment.
A “naked” forge - without a forge - is the height of indecency
To put it pompously, we can say that the forge is the heart of the forge, only there “the steel submits obediently,” turning almost into plasticine.
The device is simple: coal burns in the furnace of such a furnace, and a metal billet is placed there, which is heated to the required temperature. The smallest forge can even be built from a tin can.
And he will allow you to make forged things as successfully as his respectable “colleague” in the craft. True, their sizes will be appropriate.
The task assigned to the operation of this equipment is to provide a fairly high temperature for heating the steel. The best option would be a solid fuel fireplace that uses coal. He also has a competitor - the Kuznetsk gas forge.
Dream come true: building a forge
This working tool consists of a table, hearth, tuyere and umbrella.
The table is a reliable foundation
If you decide to make a solid stationary forge, then you need to start by building a table on which the hearth is located. Usually its height is 700-800 mm, but it depends more on the height of the master.
Tips for keeping things organized
After completing the installation of shelving and panels, hanging all the tools and appliances, it’s time to think about maintaining this ideal order for a long time.
After all, after a week, a month or more, you still want to enjoy a systematic and neat environment. To adhere to this order and not confuse your devices, we recommend using hint marks.
After hanging it as compactly as possible, you need to stick stickers with the image of the device on their locations
The second way to organize your storage system is to use numbers. It is necessary to mark the instrument itself and the place where it should hang with the same number.
To make it comfortable to work in the garage at any time of the year, you should take care of organizing ventilation and heating.
How to make a forge at home: dream and reality
Passionate people often look for areas of activity where they can find application for their dormant talents. And some of them have the idea of trying themselves as a blacksmith.
This idea is feasible if you do not live in an apartment in a multi-storey building: no one is stopping property owners in the private sector from developing vigorous activity to set up a new workshop for an interesting hobby.
How to make a forge at home, what you need for it and what points you need to pay attention to - this is a list of questions to which we will look for answers.
Hearth for the forge - crucible
The hearth on the table occupies a central place; it consists of a grate and a tuyere, they are responsible for supplying the air necessary for combustion. The size and shape of the hearth can be different, it all depends on its purpose: the recess can be either round or square, with sides of 200x200 or 400x400 mm, the depth being from 100 to 150 mm.
To make a grate, a frying pan with thick walls, the diameter of which should be approximately 300 mm, is suitable. In this case, you will have to cut out a number of holes (1 cm). The best option would be a steel car wheel. It is necessary that the homemade grill fits tightly into the hole cut in the surface of the table.
Forge tuyere: replacement for leather furs
The lance can be considered the main mechanism of this equipment. The choice of fan for air supply is wide - even old Soviet vacuum cleaners or car blowers can become such a device.
Air is supplied through the pipe to the tuyere body, then it penetrates into the combustion area through the grate. Its quantity is successfully regulated by a damper.
A lid must be provided at the bottom of the tuyere to “evacuate” accumulated ash.
Umbrella: forge hood
This umbrella actually looks like a pyramid hood. The material used is iron sheets, the thickness of which can reach 1.5 mm. The lower section of such a structure should be similar to the dimensions of the table.
Its lower part should be at a distance of 500-600 mm above the table surface. An iron umbrella has a disadvantage - it will quickly burn out.
If you want to avoid problems, you will have to use a structure made of refractory bricks, but it will require supports due to its impressive weight.
The anvil is the forge's faithful partner
Therefore, it should be located close to him. The best is its two-horned variety. The horizontal platform is called the “face”, so it must be protected from any flaws - only a perfectly polished surface guarantees the quality of the work.
On one side of the anvil there is a cone-shaped horn; here the rings are welded and rolled out. Not far from the base of the cone there is a round hole (15 mm), with the help of which the products are given a round shape. On the opposite side, where the “chin” of our face is located, closed rectangular parts are bent. There is also a hole here, but it is square, its dimensions are 30x30 mm.
At the bottom of the anvil there are 4 paws, which are intended for attaching it to the base. This is done with staples. This instrument also requires a special chair made of oak or birch, its diameter should be about 600 mm. In order to make something like a foundation for an anvil, the block of wood needs to be deepened into the ground by 50 mm, even deeper is better. This will avoid vibration of the tool.
Blacksmith chair vise: neighbors with an anvil
It is impossible to do without a vice in a forge, because workpieces have to be clamped in them. They must be adjacent to the anvil, so a wooden base for them is dug near it.
This must be done so that the working plane of the anvil is at the same level as the jaws of the vice.
If it is not possible to purchase a chair tool, you can temporarily replace it with ordinary ones, but you must “get it right” that ordinary cast iron is not able to withstand such hard work.
The rest of the blacksmith's assistants
Without a suitable tool, any blacksmith cannot be called such. Mandatory equipment includes:
- The war hammer can weigh up to 12 kg, so it requires both hands to operate it. The head is suitable for basic work, while the rear takes part in accelerating the steel along the axis.
- The sledgehammer is a heavyweight, its weight reaches 16 kg. Used when greater strength is needed.
- Handbrake. This is a small hammer (from 500 g to 2 kg) for basic work. Rowan is used for the handle, as this wood is able to neutralize the recoil from an impact.
- Pliers are a fascinating tool in every sense. Only with its help can you pull future products out of the forge and hold them during forging.
It is better to ask about how to make a forge at home on special forums, where they will answer you in detail and professionally. Or you can go the other way - watch the video and take action. The choice is yours.
Possible risks
The risk factors associated with opening a forge in a small town are quite varied. And some of them can seriously affect the development of the case or even lead to its closure. Below is a list of such factors:
- The risk of hiring low-skilled workers who will not cope well with the production of complex products, which may lead to the loss of “profitable” customers.
- Violation of safety regulations that could result in serious injury to forge workers.
- Increase in utility costs.
- Problems with the supply of quality metal.
- An unexpected decrease in demand for forge products due to a drop in the standard of living of potential customers.
Own production of forge products is a type of business that requires vigilant control in literally all aspects. If an entrepreneur always “keeps his finger on the pulse” and strives to bring the necessary innovation to the work of his forge shop, then clients will quickly appreciate this, and profits will begin to grow permanently.