Choice
Most portable drills have chucks screwed onto a threaded spindle that is connected to the drill and then held in place with a locking screw.
To understand which element you need to buy to replace the old one, you need to open the petals to the widest point and look into the base with a flashlight. If the screw is visible at the bottom of the socket, you should pay attention to the type of head. If it's missing, it's probably a tapered spindle.
When purchasing, it is also worth considering that the element must provide the proper rigidity of the fastening, taking into account the number of revolutions. More expensive models reduce radial runout.
Ease of use of the chuck is not in last place; in this case, quick-release ones are in the first position, but when it comes to durability, it is better to buy one with a key.
If carbide drills are used, then the chuck must be self-centering, since such equipment has poor resistance to longitudinal bending
It is important to know that the rigidity of the fastening is always compared with the length of the nozzle and the material from which it is made
The structure of a drill and types of cartridges for it
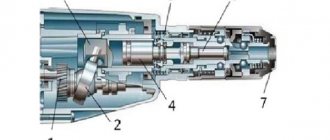
So, the drill consists of:
- an electric motor that creates rotational motion;
- a mechanism that transmits this rotation to the clamping device;
- and the actual clamping device for the drill. It is this device called “cartridge” that interests us.
Before figuring out how to remove the chuck from a drill, let’s find out what they are - the algorithm of actions depends on this.
The most common is the gear-crown type. To secure it, a special toothed wrench is used, inserted into the hole on the chuck. The teeth of the key engage with the teeth of the chuck crown and, when the key is rotated, they strengthen or weaken the clamping of the jaws (cams) of the chuck.
Otherwise, such a chuck is called a clamping drill chuck, and is considered one of the oldest among the drill clamping mechanisms currently in use.
Next come the quick-release chucks - with one or two couplings and a locking ring. They use collets - cone-shaped elements consisting of three or more parts. Moving along the axis of the collet, the coupling compresses the “petals,” thereby securing the drill in them.
Clutches (clips) are metal and plastic, regular or reinforced, with or without automatic locking.
In fact, the drill chuck is a separate unit connected to the main drill mechanism by a shaft. The connection is made using a thread or a tool cone (the so-called “Morse taper”).
An indication of this or that type of fastening can be found in the instructions and/or on the drill body. For example, the designation 1.5-15M13x1.2 - the first two digits mean the permissible diameter of the drill shank (or other tool inserted into the chuck), M13 is the diameter of the thread (metric) connecting the chuck to the shaft, and 1.2 is the pitch of this thread . If the designation looks like 1.5-15 UNF 1/2”, we are talking about an inch thread. Domestic drills use metric threads, while imported ones (not all, of course) use inch threads.
If a cone is used to connect the shaft to the chuck, the marking contains the letter B (for example, B10 - tool cone, shank diameter 10 mm).
Given that different companies label their products differently, it is worth taking this difference into account. So, for a Makita drill-driver the marking will look like this: BDF456. B is present, that is, the chuck is fixed to the cone, D is the type of tool, drill, and F is additional capabilities, in this case a screwdriver.
Let's look at the models of the most significant manufacturers on the market - Bosh, Makita, Interskol - what cartridges they use and how to remove these cartridges.
Drill chucks: varieties (video)
If the mini drill or screwdriver model is equipped with a special type of lock, then it is necessary to use a single-socket clamping element. On tools without a blocker, a two-clutch element or a mini-chuck is used. As a rule, the body of such a device is made of plastic, and a steel alloy is used to make the mechanism and cams.
Any option for performing repair work yourself requires knowledge of the device and its main components:
- cone-shaped gripping lips;
- inner part with lips;
- external clamping part.
Design and features of the toothed chuck
The classic drill chuck is a collet or cam type clamping device. They can hold not only various tools with a round shank, but also cylindrical workpieces for further processing. The main design elements of jaw chucks are:
- cylindrical body;
- an adjusting ring or sleeve rotating on the outer surface of the housing;
- a cam mechanism or collet installed in the inside of the device body.
Design of a jaw (gear-ring) chuck with a key
In turn, the collet mechanism, the elements of which are made of hardened steel, consists of three absolutely identical cams, which, when rotating the adjusting ring or sleeve, simultaneously approach each other, thereby ensuring reliable clamping of the tool shank. In the first models of chucks for mechanical drills, the collet jaws converged due to the rotation of the adjusting wheel; now an adjusting sleeve is used for this.
On one side, the drill chucks are installed on the shaft of the equipment used, and on the other, the tool with which the processing will be performed is inserted into them. Jaw chucks are primarily used to hold the following tools:
- drill;
- cutters;
- taps with small diameter shanks.
Methods for attaching cartridges
Hand drills use two types of drill chuck mounting:
- Morse taper - a conical shaft shank and a corresponding hole in the chuck.
- Threaded fastening - a thread on a shaft onto which the cartridge is screwed like a nut.
Take a close look at the metal rod between the body and the cartridge. In the case of a threaded fit, the slots for the open-end wrench are usually visible, and the tapered shaft is always smooth.
The method of fastening is also indicated by the markings stamped on the cartridge:
- The Morse cone is designated by the abbreviation B10, B12, etc. (B is the cone, the number is the maximum drill size).
- The marking of the threaded cartridge contains the designation of the type and diameter of the thread: M13 (metric by 13 mm) or UNF-1/2 (inch by half inch).
Analysis of a drill with a Morse taper
There are drill models that use a chuck not with jaws (jaw chuck), but with a threaded connection (or Morse taper). You can choose an adapter for it, or continue to work with this cone - it all depends on preference. In order to repair a drill or screwdriver, it is important to decide which cartridge. They have a similar appearance, so you need to look at the markings that are stamped on the surface of the part. If the cartridge is marked with the letter B, it is a device with a Morse taper. In this case, you can remove the cartridge using a drift and a plumber's hammer.
Not everyone can disassemble a drill with a Morse taper
It is also important to know about the threaded cartridge that there are 2 types: inch (typical for foreign-made models) and metric (produced by Russian manufacturers).
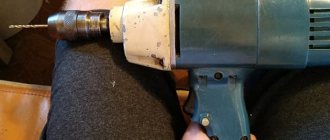
Every Soviet electric drill and screwdriver has a clamping drill chuck with a left-hand thread; sometimes disassembly is necessary if the self-clamping cone shaft is jammed, or you need to remove the machine attachment, change the screw, repair or the fastener is stuck. Including the drill requires proper use and timely prevention.
With this tool you can drill:
- Plastic;
- Tile;
- Tree;
- Concrete;
- Metal;
- Brick and other materials.
Most often, in everyday life, a rotary impact drill is used. It includes a cartridge of the SDS system, which was invented by Bosch. Such a system is not characterized by particular accuracy. For more precise drilling, there are adapters that consist of jaw chucks.
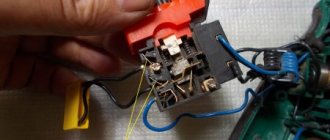
The edges of the cartridge fixing screw are licked, what should I do?
What to do if the edges of the screw head are licked off inside the cartridge? A very common problem, which is quite possible to solve. First, let's look at the reasons why the edges on a screw lick off:
- Without reading the instructions, the owner tries to unscrew the screw counterclockwise. If there is a screw inside, then you should twist it clockwise to unscrew it, that is, vice versa
- Incorrectly selected tool, that is, a screwdriver with slots is used that licks the edges of the screw. Before use, you should select the correct screwdriver
- Poor quality screw. This usually occurs on cheap Chinese devices
However, if the edges of the screw are licked off, then do not rush to change the tool. There are different ways to unscrew it:
- If the screw head is cross-shaped, but the edges are smooth, then you can use a flat-head screwdriver. Manufacturers have provided for the possibility of the edges licking off, so you can unscrew the screw not only with a Phillips screwdriver, but also with a slotted screwdriver. Usually this method helps solve the problem
- Use a blow gun to try to clean out any dirt inside the head slots. Often a large amount of dirt accumulates in the cap, which interferes with a quality connection to the screw.
- Take a screwdriver and apply it to the screw head, apply several light but sharp blows. The screwdriver will go deeper into the head of the cartridge screw, which will increase the likelihood of it being unscrewed.
- Cut off a piece of rubber and place it on top of the cap, try to use a screwdriver to catch onto the remaining edges through it, and unscrew it
- If all the methods have been tried, then all that remains is to either disassemble the screwdriver or drill and then replace the executive body together with the shaft from the gearbox or cut the chuck with a grinder. Having opened access to the screw head, you can grab it with a hand vice and unscrew it. The cartridge must be replaced after this method
In this case, there is no need to replace the entire tool.
Tips: how to change the chuck on a drill
There is a bolt inside the cartridge; you need to unscrew it using a screwdriver. There is a peculiarity here - you need to unscrew it in the opposite direction from the usual - to the right. If the bolt is difficult to unscrew, you can try to fill it with liquid key - it is quite possible that rust has appeared inside over time. After this, use a jerk to unscrew the cartridge directly. There are options when it is necessary to fix the axis on which the part is attached.
For this:
- It has special grooves;
- In this case, the axis will have to be secured with a key;
- And then with a sharp movement unscrew and remove;
- Next, you need to secure the new cartridge.
Before replacing, it is advisable to lubricate the axle so that problems do not arise next time. There should be no inconvenience during assembly. The main thing is not to forget to screw the bolt back in - we remind you that it is also screwed in an unusual direction - to the left. You can now continue using the drill.
It is important to compare drill chucks in the store before purchasing, as they may differ slightly in thread.
Sometimes situations arise when the breakdown of a drill is not related to the chuck connector, but something has gotten into it or is jammed. In this case, it is necessary to remove the cartridge (this process is described above), and then disassemble it for cleaning.
Removing the threaded cartridge
For drills with a reverse function, the drill chuck is additionally secured with a locking screw, visible through the open jaws.
Threaded chuck locking screw.
The slots on the screw head can be cross-shaped, hexagonal or even star-shaped. Prepare the required screwdriver, wrench or bit. Use a tool with complete splines that fit exactly.
Unscrew the cartridge locking screw.
Measure the size of the wrench space on the drill shaft. Most likely, it will be 14 mm for a mid-range tool or 17 mm for a more powerful device.
We select the key to the cartridge.
Prepare an open-end wrench with thin jaws. You can take a suitable one from a bicycle repair kit or grind off the edges of a regular key using sandpaper.
Prepare the open-end wrench.
Hold the drill shaft with a wrench and try using a screwdriver to unscrew the screw clockwise (left-hand thread).
Try not to tear off the splines.
If the thread does not work, secure the electric drill chuck in a vice and hit the screw head several times with a hammer through a steel rod.
Now the thread will become more pliable and the screw will come loose.
The locking screw has been removed.
Next, unscrew the cartridge itself counterclockwise (right-hand thread), using two keys - an open-end and a cartridge.
Unscrew the cartridge.
Difficulties may arise. Try increasing the leverage by holding a hex wrench in the chuck.
As a last resort, use a vice, placing a drill in it as in the photo below.
Move the cartridge from its place by striking the driver secured through the square head.
This method makes it possible to unscrew fairly strongly stuck cartridges.
The threaded chuck removed from the drill.
After cleaning, reinstall the chuck in reverse order, keeping in mind the different thread directions.
Apply a little paint to the threads before tightening the locking screw.
How to remove a cone chuck from a drill
In such models, removing the cartridge is even easier than for a threaded connection. Lubrication won't hurt either, and the main algorithm of action is to tap the cartridge and try to turn it after each blow. First you need to unscrew the fixing screw (here it has a regular right-hand thread).
Important: in any case, when working, it is better to secure the drill (screwdriver) in a vice. This makes work easier and frees up your hands.
In some cases, the cartridge “grows” into the mount so much that it is not possible to remove it if it fails. Various removal options are offered - from heating a blowtorch until red and then attempting to remove it, to cutting the cartridge with a grinder or other cutting tool. After this, they are removed from the shaft in pieces.
For more information on how to remove the chuck from a Bosch drill and replace it after lubrication, see the video. Here are the differences in the dismantling process, namely, how to remove the cartridge from the Interskol drill.
Replacing a drill chuck with your own hands
There are several most common problems that can be observed during the operation of the tool and will require replacing the chuck:
quite often a fixed element falls. This problem occurs not only on old tools, but also on completely new models, which are characterized by a conical fastening of the cam part. As a rule, the fall of a part accompanies the process of drilling deep holes. In this case, when lifting the drill and freeing it from accumulated chips, the cartridge falls off the cone. This problem can be solved by increasing the tension of the cone joint. For this purpose, you need to heat the cartridge in oil to a temperature of 110 ° C, and then place it on the fixing part of the cold tool;
If, when performing work accompanied by the release of a significant amount of dust, chips or dirt, the clamping lips jam, then you need to properly disassemble the chuck, and then carefully, but as thoroughly as possible, clean and rinse all moving, working elements
Before assembling the part, it is very important to lubricate the internal parts with a brush and lithol. A good result is obtained by using a homemade protective casing that prevents clogging of the working parts; If during drilling there is a beating of the chuck, then the cause may be significant wear of the seat cone
An equally common cause of this phenomenon can be uneven wear of the cams, which must be replaced. If necessary, the broken cartridge is completely replaced.
Reassembling the disassembled part is carried out in the reverse order of disassembly, observing the rules for fastening to the tool.
Learning how to properly care for collet chucks for drills
After replacing the device in question, it is recommended to lubricate it with grease or lithol. Why is it better to use these lubricants rather than liquid motor oil? To extend the life of internal parts and mechanisms, thick lubricants should be used. The reasons for this are:
- Drill chucks do not have such reliable protection from dust and small particles as devices on hammer drills. That is why there is a high probability that small particles can get inside, which reduce the service life of the threaded mechanism. Thick lubricant not only reduces the friction of movement along the threads, but also protects against corrosion and also prevents dust from entering. Oil, on the contrary, attracts dust, which gets onto the threaded part, thereby reducing the service life of the mechanism.
- Lubricant must be applied as often as possible, and if concrete drilling work is being carried out, it is advisable to disassemble the cartridge after completion of the work, clean it and lubricate it
- Keyless chucks are classified as non-separable, therefore, if they fail, they must be replaced
With proper use and care of chucks for drills and screwdrivers, you can achieve a long service life. On average, key ones last at least 20 years, and the service life of quick-clamping ones is up to 5 years, which depends on the quality and features of the application.
Specifics of cone fastening
In modern hand-held electric drills, the Morse taper is rarely found. Such models are equipped with special pullers, and the dismantling process is displayed in the technical description.
In old Soviet drills, the design of the gearbox made it possible to remove the chuck using rather crude methods. One could try to separate the conical surfaces with a wedge-shaped object, lightly knocking it from different sides.
Another option was to take the drill with one hand with the chuck facing down, and with the other to apply light blows to the end with a hammer. If that didn’t help, we lubricated the landing site with a penetrating compound (kerosene or WD-40), let it sit for several hours, and tried to knock the cartridge off again.
This method can be used if the shaft bearing is installed inside the housing. For most drills used today, this method is unacceptable, as it can lead to damage to the bearings or gearbox.
When selecting a new chuck, pay attention to the type of fastening, bore diameter and the ability to operate in impact mode, if your drill has this option.
DISASSEMBLY AND REPAIR OF THE DRILL CHUCK
radioskot.ru
| Currently, I am intensively engaged in repair and maintenance work around the house. There's a lot of drilling to do. Using one electric drill is more than difficult because you constantly have to change drills. Therefore, at work there were always two electric drills and a brace for delicate drilling of holes to large diameters. And so I decided to add a hand drill to this arsenal for countersinking holes, even if it is old, but it works. But the cartridge needs to be put in order - it rotates heavily, and there is a fair amount of runout. So, the cartridge needs to be disassembled. I looked at what the virtual space of the Internet offers in such cases - everything is very clear but somewhat complicated, because for example, it is proposed to perform the disassembly operation using an electric hammer drill. What if you just pick up the cartridge and use a hammer and metal striker to disassemble it? |
How to choose a new cartridge
A screwdriver chuck is selected based on a number of aspects. When choosing a suitable part, you should be guided by the following recommendations:
- if bits have to be changed frequently, it is better to prefer quick- or self-clamping cylinders; otherwise the work will go slower;
- gear-rim design - the choice of those who strive for maximum cartridge reliability; if 100% fixation of the bit is a priority, it is better to purchase a key cartridge;
- when choosing a part, it is necessary to take into account its characteristics; parameters are regulated by relevant GOSTs; the larger the clamping cone, the larger the number with which it is marked;
- it is necessary to take into account the country of origin - the alphanumeric designations of foreign models differ from domestic ones.
If it is difficult to decide on the type of “clamp” on your own, it is better to seek advice from a specialist.
An incorrect choice is tantamount, at a minimum, to incorrect operation of the tool.
In the worst case, it is possible not only to re-spend on a new cylinder, but also to replace the entire screwdriver.
Instructions: how to disassemble a drill chuck
The instruments are popular in Russia and the countries of the former Soviet Union due to their good quality and inexpensive price. The Russian manufacturer, which produces both a drill-mixer and a screwdriver, distinguishes between impact and non-impact drills. The percussion is distinguished by the presence of an additional function - percussion movement.
Depending on the chosen model, it varies:
- Electric motor power;
- Chuck diameter;
- Rotational speed.
The simplest and most effective way to parse is as follows. You need to take a hammer drill, remove the boot from it, install the adapter and put the chuck on it, which was previously removed from the drill, press the chuck against the wall, not forgetting to put a rubber shock absorber between them.
Be sure to hide the cams located in the chuck (elements directly involved in clamping the parts) inside - screw them in.
Next, press it against the wall and turn on the hammer drill in impact mode. That's it, the cartridge is disassembled. We clear it of debris with which it was clogged - it is optimal to lubricate all the insides before assembly. An important point is not to confuse the jaws in the chuck; each jaw must be in its place.
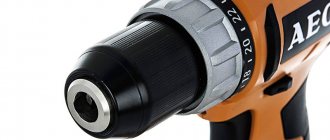
Characteristics of the drill keyless chuck
The standard keyless chuck does not have a very complicated design. Tightening and loosening will require the use of a special metal sleeve that is knurled or grooved. Quite often, a plastic sleeve with ribs is used for this purpose.
The main difference of this element is the absence of a clamping key and the use of an outer shell that allows clamping of the drill lips. Most often, the use of BZP is accompanied by the following problems and difficulties:
- insufficient quality of drill clamping;
- lack of sufficient resistance to dust;
- breakdown of the clamping mechanism.
Types of cartridges
Drill chucks differ in barrel size. The designs of individual models themselves are also different. In total, there are 7 types of fittings for drilling tools.
Cam type
The collet design is highly efficient. Chucks can be used to secure hex or cylindrical shank versions. The rotation of the clamping sleeve or sleeve is carried out on the surface. The cams are threaded together. Steel for the manufacture of spare parts must undergo heat treatment. Inside the mechanisms, cams move clamping couplings. Toe-in is accomplished by moving the adjusting wheel.
Key
A common type of clamp. Tightened with a separate key. It is quite durable. It's inexpensive. The key clip lasts much longer than other types. Disadvantages of this type:
- longer drill replacement procedure;
- the key is often lost.
Helpful advice. It is recommended to attach the key to the tool cord. Thanks to this, the part will no longer get lost often.
Threaded
It differs in that it can be removed very easily. Wrapped in a non-standard way.
Step-by-step instructions on how to properly remove a threaded cartridge:
- Open the inside of the element.
- When unscrewing, turn the screw to the left.
- Turn on the lamp to accurately determine what shape the cap is.
- Change the regulator indicator to the most final mode.
- Disconnect the fitting from the drill.
Quick-release
The second name is self-clamping. Quite a common type. Installed in rotary hammers of the Zubr, Makita, Diold brands. The absence of teeth reduces the likelihood of injury. You can clamp or open the part using palm pressure. Disadvantages of the quick-release type:
- more expensive price;
- low durability;
Frequent replacement of drills or prolonged use cause loosening of the fasteners. The result from using the device ceases to be effective. The work is often dangerous.
Keyless chuck
Single coupling
These chucks must have a spindle lock feature. The fastener is screwed onto the part with one hand. This type of pressure provides quite powerful pressure. Single-coupling products are made from metal or hard plastic.
Note. Metal single-sleeve chucks are manufactured for drilling devices of high-end models.
Double coupling
Accommodates two couplings. Tighten with both hands. They are considered less convenient to use. Gives less effort. Cartridges of this type are made of metal or plastic.
Type SDS
Most often found in the design of various modifications of the Metabo company. Fixation with the tool is more reliable. 90% of all rotary hammers are equipped with these products. The design of the spare part is simple. The tool must be lubricated every time after use.