Owners of screwdrivers sometimes need to remove the chuck from a power tool. This can be caused by various circumstances:
- Repair, lubrication and cleaning of this unit.
- The desire to replace this cartridge with another model (of a different design, size).
This operation does not require any special tools, skills or abilities. But when performing it, you need to remember some features that complicate disassembly actions. Most three-jaw self-centering chucks mounted on screwdrivers are quick-clamping. That is, they have several differences from the usual (key types):
- The unit has a plastic surface that can be destroyed even with minimal mechanical impact on it with metal tools.
- The chuck is located very close to the drill body, with a small gap that will not allow you to fix the spindle with a pipe wrench or a vice.
Another factor that can complicate disassembly in the easiest way is the relative low power of the screwdriver (when compared with drills).
Design and main types of cartridges
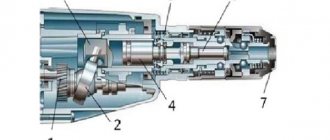
A chuck or head is a metal cylinder that is attached to the screwdriver shaft. Its task is to reliably fix the working bits under the fasteners. The cartridge is fixed to the shaft using a thread or a special cone. According to the type of fastening, clamping elements are divided into:
- quick-clamping;
- self-clamping;
- gear-crown, they are also cam.
The difference between the first two types is only in the way the bit is clamped. In a quick-release chuck, the shank is twisted and clamped manually. Modern drills and screwdrivers use clamps to fix shanks with a diameter of 0.8-25 mm.
Quick-release
A BZP type device consists of the following parts:
- nut with teeth;
- clamping bearing;
- washer;
- sleeve;
- sponges;
- sleeve.
BZP heads are divided into single-coupling and double-coupling. The first type is used in screwdrivers with a locking device. Thanks to it, the clamping device can be rotated with one hand, since the second part of the housing is fixed motionless. With double-clutch cylinders, both hands are used.
In a self-clamping sleeve, the bit with the drill is automatically clamped while turning. The risk of turning the drill when working with such a screwdriver is almost zero. When the cams are loosened and tightened, the device makes a clicking sound.
Self-clamping
You cannot tighten the jaw chuck by hand - you need an L-shaped wrench. It is inserted into the groove perpendicularly. The ZVP type, that is, a toothed chuck, is considered less convenient to install, but provides a more reliable clamping of the bit. This is a type of cam type clamping cylinder. This head consists of three main elements - a cylindrical body, a rotating outer ring and an internal cam mechanism. The mechanism, made of durable steel, consists of 3 cams, which close together when the ring rotates.
Cam
Principles for choosing a new product
If the old cartridge requires replacement, it's time to choose a new one. It is worth remembering that the design can use different types of key chucks, in which the tool is clamped with a key, and keyless or quick-clamping ones.
The advantage of the key product is that the clamping on it is performed with better quality; however, quick-clamping ones are also not inferior in this parameter, but they have to be changed more often due to wear of the clamping mechanism.
If you have to frequently change equipment while performing the task, then it is better to choose a quick-clamping option, which will significantly save time. But when using large-diameter equipment, preference should be given to key chucks.
The chucks, which are attached to the screwdriver using a cone, can be made with quick-release or key-type chucks; the choice is always up to the consumer.
If, after all of the above, you still have questions, then we advise you to watch the video, everything is the same there, only a little more clearly.
Options for attaching to the screwdriver shaft
The chuck is attached to the tool shaft by:
- thread. To do this, the threads of the cylinder and shaft must match. A metal cylinder is screwed onto a shaft.
- fixing screw. The fastening also requires tightening, and the screw itself only strengthens the contact between the cartridge sleeve and the shaft. It has notches for a Phillips screwdriver and a left-hand thread.
- Morse cone. One of the oldest fastening methods. The screwdriver shaft has a cone shape, and the same groove is made inside the sleeve. When the outer and inner cones fit together, the head is securely seated on the shaft.
Morse taper devices
Removing the chuck: Bosch screwdriver
Bosch brand screwdrivers are usually equipped with a fixing screw.
- We place the key in the cams and tighten it a couple of clicks.
- The tool is placed on the edge of the table.
- By pressing the stop button, remove the cartridge lock on the shaft.
- The cartridge is removed counterclockwise.
All actions require special attention and consistency during disassembly/assembly.
Having acquired theoretical knowledge about the types of cartridges, it will be easier for you to independently repair screwdrivers from Interskol, Hitachi, and other manufacturers.
Standard sizes and markings
Before disassembling the screwdriver, it is necessary to determine the type of cylinder mounting. The marking will tell you this. An inscription of the form 1-6В14 indicates the type of fixation Morse taper, where the numbers before the letter are the diameter of the bit shank in millimeters, and after that the size of the conical hole. There are 9 articles – from B7 to B45.
For cartridges with threaded fastening, markings of the form 1.5-13 M12x1.25 are provided. Here the numbers before the letter also show the permissible diameter of the tail of the bit, and after the letter there are thread sizes in millimeters.
Important! Foreign screwdrivers use markings in inches - it looks like this: 2-13 1/2 - 20 UNF. 1/2 means inch, and 20 means the number of threads per inch.
Threaded cylinder
How to choose a new one
You need to choose according to the product model and type of components. If the screwdriver is branded, then you should contact a service center. Specialists will provide the necessary details. Here are some recommendations for choosing a new cartridge:
- if bits are changed frequently, it is better to choose a quick-release type to increase productivity;
- a key type of part is necessary if the diameter of the drills used is large;
- when choosing a cone, it is important to remember: the larger the part, the higher its number in accordance with GOST 9953-82;
- if a foreign-made part is selected, then the dimensions on it are indicated in inches.
If additional questions arise, you should ask the sales manager. He will tell you what part needs to be purchased in a particular case.
to remove the chuck from the screwdriver in various cases. This is usually due to problems during operation (bits falling out, backlash, etc.). The part is replaced every 1.5 - 2 years with active use of the tool. If it is used rarely, the part can work for several years.
How to remove the head from a screwdriver
It is recommended that the cylinder be removed periodically for routine cleaning and lubrication of parts to extend the life of the power tool. The removal method depends on the type of attachment to the shaft and the model of the screwdriver. Read more about how to remove the chuck of different types of fastening from Makita, Metabo, Bosch screwdrivers.
Removed head
On a note! You only need to disconnect the cylinder from the shaft with a screwdriver that has cooled down after work.
With fixing screw
Removing the head with the fixing screw is carried out in the following order:
- The screw is located between the clamping jaws. You need to open them completely and unscrew the screw clockwise with a Phillips screwdriver.
- After this, a suitable size hex wrench is placed in the cams. It must be turned sharply and strongly counterclockwise.
- If the clutch of the cylinder with the shaft is very strong and the key does not help to separate it, you will have to additionally help with gentle blows of the hammer.
The screw is here
With Morse taper
Sleeves of this type are disconnected from the screwdriver by knocking the shank out of the conical socket with a hammer. But this standard method may not give results. Then you need to disassemble the screwdriver. The shaft with gearbox and chuck is removed, and then the clamping cylinder should be unscrewed with a pipe wrench. Nuts on a sleeve with a Morse taper are an extremely rare phenomenon.
With threaded fastening
You will need a 10mm L-shaped hex key. It must be placed between the cams, securely fastened and rotated. Next, you should start the screwdriver at low speed and immediately turn it off, pressed against a support - for example, a table or wall. It is against the support that the free part of the L-shaped hexagon should hit a couple of moments after starting the power tool. As a rule, after this the fastening is loosened and the cylinder is carefully removed.
Removing the head with a threaded fastening is shown in the video:
Advice! If none of the three options helps, the screwdriver must be disassembled.
Removal from a disassembled gearbox
If the screwdriver gearbox fails, you will need to remove the cylinder to get to it. This is done like this:
- Unscrew the fixing bolt inside the sleeve.
- Find the gearbox, put the head on the back side of it, and securely fix it. The head diameter is usually 19 mm.
- With your other hand, carefully unscrew the cylinder counterclockwise.
Fastening methods
There are several different methods by which you can securely fasten an element to a product. The most common options are:
- Morse Cone type. This method is considered the most popular and well-known; it has been used since the 19th century. The shaft is sharpened so that it fits the data of the cone located in the inner part. This creates a reliable and high-quality fastening.
- Threaded fastening. The option implies that a special thread is machined on the shaft and chuck, so to secure it you only need to screw both elements onto each other.
- Fixing screw. The part is used for more reliable fixation. The screw head is made in the form of a cross, and the thread is cut with the direction to the left. You will need to disassemble the chuck jaws so you can see the screw.
Which way to turn the cartridge for disassembly?
The cartridge is unscrewed according to a pattern that may vary depending on the model of the device.
How to disassemble a cartridge
Once the cylinder is removed from the screwdriver, you can begin disassembly. The first step is to remove the plug in the base. For a plug made of plastic, careful prying with a knife is enough, but the metal part must be knocked out by hitting the base of the cartridge and turning it by hand.
You need to hit here
This requires a large bolt. It is placed in the sleeve and lightly clamped with fists to fix it in the center. At the same time, he should not get stuck, but move freely back and forth. The head of the bolt should protrude 2-3 cm from the cylinder. Then a gentle but pointed blow is applied to the bolt with a hammer, and then the metal plug is removed.
Next, the actual disassembly of the screwdriver chuck begins. The design of any cylinder consists of unchanged main parts:
- sleeves;
- grounds;
- washers;
- bearing;
- nuts
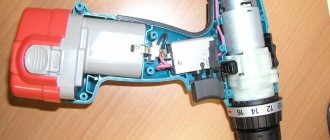
Malfunctions of the Makita screwdriver
The most common screwdriver breakdowns are as follows:
- The screwdriver does not turn on. Everything is clear here. The first thing you need to do is inspect the battery, as well as the contacts and connections in the case, and the wiring. A multimeter will help you check.
- The reverse button does not work. This means that you will not be able to either tighten or remove screws and bolts. Here you should check the resistance of the button with a multimeter by placing test leads on the input and output wires of the button.
- The speed controller does not work. In this case, the speed will be either constantly reduced or constantly increased. The regulating transistor or brushes may be to blame here. A visual inspection of the parts is required.
Second parsing option
If it was not possible to disassemble the cylinder using the indicated method, it is worth trying another one. Many models of screwdrivers are not designed for unwinding, so this option will not work and will only harm the chuck. One of the disassembly methods involves the use of a hammer drill or drill. The action instructions are as follows:
- Take a hammer drill or impact drill, insert a bolt or broken drill with a diameter of up to 12 mm into the tool.
- Place the head on the bolt or drill with the side opposite the jaws.
- Unclench your cams, rest the cylinder against a solid, stable base - a wall, floor, etc. Between the cartridge and the support there must be a shock-absorbing layer - rubber or foam.
Disassembly using a hammer drill
- Start the hammer drill or drill in impact mode.
The vibrations will cause the sleeve to fly off the sleeve, revealing the remaining parts. After cleaning or replacing elements, the head can be easily reassembled.
Important! When assembling, it is important not to confuse the location of the cams.
If jammed
Chuck in screwdrivers Elitech, Flex PD 2G 18 volt, Bort, Whirlwind, Patriot, AEG BS D, Dexter, Makita DF 331 D, etc. can jam if the user has to unclench the cams to the maximum, and then they cannot be returned to their place, no matter how much effort is applied. In this case, a drill of the maximum size allowed is inserted.
The jaws cannot be opened in order to remove a bit or drill clamped in the chuck if they are unevenly compressed . Because of this, the attachments may dangle and the fastening will be unreliable.
Rarely do the jaws jam during their free movement , when compression or expansion occurs. The reason is that chips, scale or debris have gotten under the figured part of the cams. To wedge it all, you need to remove and clean it all.
Regardless of the cause of the jamming, the first step is to lubricate the internal cavity of the cartridge. To do this, use the correct, special lubricant . WD-40 works well . This universal lubricant is also introduced onto the surface of the cams. They stand for 15 minutes, so they gently tap the chuck and jaws without excessive effort. If you tap with a simple hammer, then it must be done through a fabric pad, but it is better to use a rubber one.
When a bit jams in the chuck of a screwdriver of some brands, for example, Bosch, the problem is solved using 2 adjustable wrenches . But first, be sure to lubricate the parts. Use one key to grab the base of the cartridge, and use the other to carefully twist the top part. To avoid damaging anything, the procedure is performed through dense, soft tissue pads.
Disassembling the quick-release head
BZP or self-clamping cartridges can only be disassembled up to a certain stage, since beyond that, irreversible damage can be caused to the device. The analysis proceeds according to the following algorithm:
- The groove between the two halves of the plastic coupling must be pushed apart along the entire circumference using a knife or flat-head screwdriver using gentle prying movements. The main thing is not to damage the case.
- Once the coupling is in place, the lower part can be easily removed by hand.
- After this, the cams are moved apart until they stop, and a long bolt is inserted into the cylinder.
- You need to hit it with a hammer until the upper half of the coupling falls off.
- There is no need to disassemble further. The cartridge does not have a body; it can be coated in all places.
Reassembly proceeds in the following sequence:
- Upper part of the coupling.
- Using a hammer, press the corkscrew washer into the groove between the coupling and the cylinder through a wooden board.
Groove for corkscrew washer
- Manually put on the lower part of the coupling - the cartridge is assembled.
A detailed analysis of the quick-clamping cylinder is shown in the video:
Makita quick release chuck
This chuck is used to clamp bits with a cylindrical shank. This cartridge is easy to install. It is installed literally with one movement of the hand. Used for drills with a diameter of one to ten millimeters. This is a movable structural element in the tool, so it breaks frequently. To disassemble it, you need to read the tips described at the beginning of the article on disassembling the cartridge using a hex key and a Phillips screwdriver. The price of this product is about 20 USD. e.
The material in this article turned out to be voluminous. Here we described all possible problems that arise during the operation of screwdrivers, told how to eliminate them on your own, and separately talked about the various structural elements that form the basis of any screwdriver. The article contains diagrams of the gearbox and the general design of the screwdriver. We hope that the information will be useful to you.
The nuances of removing, disassembling and replacing heads on screwdrivers from different manufacturers
The design of the screwdriver chuck is such that the procedure for its removal, disassembly and replacement is generally the same and standard for all models. The differences are only in the subtleties for each company.
- Makita
Household tools from this manufacturer are often equipped with a plastic head. It should be removed carefully, because the risk of damage is higher than that of a metal sleeve. Quick-clamping devices on Makita screwdrivers are usually single-socket.
- Bosch
The cylinders on Bosch screwdrivers are designed similarly to Makita and are removed and disassembled in the same way. The only difference is that Bosch has a fixing screw in the cylinder. It must be unscrewed clockwise.
- Bison
To replace the cartridge, you need to unscrew it clockwise from the shaft.
Removing the head on screwdrivers of the Interskol, Hitachi, DeWalt, Metabo, and Vikhr models is not very diverse. The procedure is:
- Unscrew the fixing screw using a Phillips screwdriver. It is recommended to lightly lubricate the pre-unscrewed element with WD-40. This will not only loosen the strong clamp, but will also dissolve any rust if there is any.
- Clamp an L-shaped hex key of 10 mm or more with the short side into the chuck.
- On the long side of the hexagon, it is worth applying one pointed blow with a hammer in a clockwise direction. It is necessary to hit the hexagon, and not the cylinder itself: this can break the clamping device and deform the screwdriver shaft.
- After the impact, you can unscrew the cartridge by hand.
You only need to hit the hexagon
Do-it-yourself repair of a Zubr screwdriver
In this paragraph we will briefly look at the main screwdriver malfunctions that arise both in the structural elements and in the electrical part.
You will have to check the contacts and electrical circuits of the tool if:
- it is impossible to turn on the screwdriver;
- there is no possibility of switching reverse mode;
- it is impossible to regulate the number of revolutions of the tool’s working body per minute.
Having discovered these malfunctions in the device, the first thing you should pay attention to is such an important element as the battery. In the simplest case, you will get away with simply charging the battery. In the rest, you will have to use a multimeter to more accurately detect the problem. The voltage on the battery is measured. If the values do not match those indicated on the case, either the battery or the charger may be faulty. The charging unit is checked using a multimeter. Each battery included in the battery must be tested. If faulty batteries are found, they must be replaced with new ones of similar capacity.
When repairing the start button, you will need some knowledge in the field of electronics and radio engineering, namely: the ability to read circuit diagrams and soldering skills. When disassembling this element, close attention should be paid to darkened or charred contacts and terminals, and if necessary, clean them with sandpaper. A complete replacement of the starting system is possible if it is impossible to regulate the speed of the working element with a button. This can be observed if, with different pressures on the button, the speed does not change synchronously with this force.
If a switch or reverse button breaks, you can repair it yourself. The process of repairing it is similar to repairing the start button. You should pay attention to the condition of the contacts and terminals of the structure.
How to repair a clamping cylinder
Often the reason for removing and disassembling the screwdriver head is to repair individual parts and eliminate defects. Read more about how to do it yourself at home.
With backlash
If the deviation of the sleeve during operation does not exceed 1 mm, then this is not critical. If there is more play, you will need to disassemble the device. Repairing a screwdriver chuck for this case is performed as follows:
- Unscrew the fasteners on the top cover of the tool and remove it.
- Disconnect the engine from the gearbox and carefully check all fastenings.
- Disassemble the gearbox. If the bushing fails, then it is the cause of the strong play. This part must be removed manually and replaced with a new one.
Disassembled gearbox
- Next, you need to lubricate all the rubbing elements and assemble the gearbox back in a clear sequence: bushing - shaft - bearings - retaining ring.
- The gearbox is attached in place to the engine.
- The top cover of the screwdriver is screwed back.
When the cylinder runs out
If there is beating of the chuck in the screwdriver, the reason also lies in the gearbox. It must be dismantled, disconnected from the electric motor, disassembled, and carefully inspect all the parts. A broken cartridge case is a consequence:
- violations of shaft geometry;
- wear of gears, pins;
- failure of the shaft bearing.
After identifying the broken elements, you need to purchase new ones, install everything correctly, assemble the gearbox back and attach it to the engine.
When jammed
Another common problem is that the cartridge begins to jam. This is caused by the jaws losing full clamping over time. To repair the head, there are several methods:
- Carefully lubricate the cylinder in all places - perhaps this is the only reason.
- Squeeze the cartridge in your hand and hit it hard 1-2 times on a hard wooden object - a beam or a stable table.
- Compress the body with a vice and the cylinder with a gas wrench. Place the screwdriver against the table with the chuck and turn it on.
Often the head jams after it becomes clogged with sawdust and other small debris. If there is a suspicion of clogging, the cylinder should be thoroughly heated with a hair dryer, or even better, held over an open fire for several minutes. The part is then thoroughly lubricated.
When scrolling
If the cartridge rotates, then the problem is most likely due to the abrasion of the teeth on the locking coupling. The problem is solved like this:
- Remove the coupling.
- In place of the ground teeth you need to drill small holes.
On the left is the coupling and its teeth.
- Insert screws into the holes. Their protruding parts are removed with pliers.
- Return the coupling to its place and check how the cylinder now moves.
Rules for using a screwdriver
It is possible to ensure long-term operation of the tool if you adhere to simple operating rules:
- protect the unit from moisture;
- Be sure to adjust the tool before use;
- disconnect the battery when changing attachments;
- If not used for a long time, periodically run the screwdriver to discharge the battery;
- have several spare batteries.
Replacing a chuck in a screwdriver in a home workshop can be done by any man. By using the methods described above, you are guaranteed to complete this operation quickly and with a minimum of effort.
In our country, screwdrivers, as a household and industrial tool, appeared not so long ago. They were first used in the space industry, and then screwdrivers found application in ordinary human life.
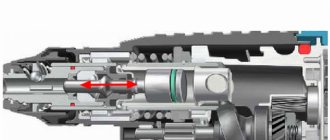
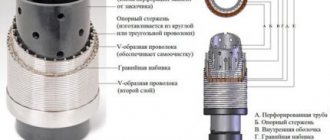
Among the main parts of this equipment is a mechanism consisting of a hollow cylinder, an adjusting sleeve and clamping cams. This mechanism is called a cartridge.
disassembled cartridge
The first mandatory stage! Unscrewing the fixing screw
The first, mandatory step when removing the chuck from most household screwdrivers is to unscrew the fixing screw located at the end of the spindle between the cams. This fastener is designed to protect the quick-release assembly from self-screwing when working with a load in reverse mode (counterclockwise).
For example, when unscrewing old fasteners, when it is necessary to increase the torque. In this case, the cartridge can remain motionless, fixed with a bit in the surface being processed, and the spindle will rotate “to the left” (counterclockwise) and will independently unscrew from the screwdriver mounting unit.
To avoid such situations, manufacturers use a control screw with a “left-hand” thread. It is this that must first be removed by performing the following steps:
- Spread the cams so that the tip of the screwdriver can pass between them freely.
- Unscrew the screw, turning to the right, since it has a “left-hand” thread.
Attention! Grooves on screw heads can be of different sizes and shapes (straight or cross-shaped). Therefore, it is necessary to have screwdrivers with different tips.
Unscrewing the keyless chuck from the screwdriver spindle After the fixing screw with a “left-hand thread” has been unscrewed from the end of the spindle, you can remove the keyless chuck from the screwdriver.
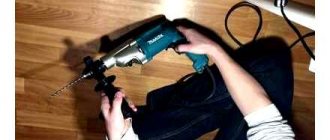
Due to the fact that the gap between the coupling and the body is several millimeters, it is not possible to fix the spindle with a vice or a pipe wrench. Therefore, there are several other ways to remove the cartridge.
Holding the cartridge with your hand
The easiest way is to hold the cartridge with your hand. To do this you need to do the following:
- Put a protective glove on the hand that will hold the cartridge.
- Set the torque regulator to maximum or switch the screwdriver to drilling mode.
- Make sure that the fixing screw is removed from the end of the spindle.
- Bring the chuck jaws to the minimum clearance.
- Holding the chuck with one gloved hand, start rotating the screwdriver in the reverse direction (counterclockwise). While the cams are moving apart, the electric motor will pick up speed, and at the moment they are fully opened, a kind of blow will be produced, which should move the threaded connection. Now screwing the cartridge will not be difficult.
Attention! This is not a safe method! It is prohibited to use it if at least one point is confirmed:
- Lack of special gloves.
- The power of the screwdriver exceeds 500 watts.
- Lack of self-confidence.
- Lack of good physical fitness (teenagers, women, elderly people).
If this method is not suitable for the prohibiting reasons stated above or is ineffective, then the following must be applied.
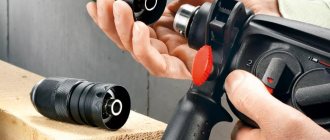
Using an L-shaped tool
This method is quite simple and safe, so it is a priority. The actions must be performed in the following sequence:
- Make sure that the fixing screw is removed from the end of the spindle.
- Attach the L-shaped tool to the cams. A hex wrench is best.
- Set the torque control to the maximum value or switch it to drilling mode.
- Switch the direction of spindle rotation to reverse mode (counterclockwise).
- Start the engine and allow it to reach maximum speed.
- Bring the rotating L-shaped tool fixed between the cams to a rigid stop. For example, a bench vise, a gymnastic weight.
- At the moment of impact of the fixed L-shaped tool, the chuck will quickly screw off the spindle.
Read also: DIY press machine
Attention! The cartridge unscrews very quickly, in less than one second. Therefore, it is necessary to ensure that it falls from a minimum height, that is, the stop against which the L-shaped tool will be struck should be as close to the floor as possible.
A second option for this method is also possible:
- After unscrewing the screw and securing a faceted key (three-, four-, five-, hexagonal) between the cams, hold the screwdriver in one hand, and with the other hand, hit the shoulder of the protruding tool with a hammer (mallet) so that the rotation occurs counterclockwise.
- Having thus “torn” the cartridge from its place, you can continue to unscrew it by hand.
This subtype of unscrewing is especially effective in cases where there is no voltage in the network (corded screwdriver), the battery is low, or the power tool is inoperative.