General design of sockets for lighting equipment
The product consists of the following parts:
- cylindrical body;
- sleeve;
- ceramic liner;
- bottom of the product;
- brass contacts;
- fasteners.
For your information! The housing is designed not only to secure the sleeve, but also to protect against electric shock. The central contacts are located inside it.
The sleeve has an internal thread, which is called an Edison thread. The light bulb is screwed into the socket thanks to the thread cut into it. Models of sleeves are available with special sockets on springs, into which the lamp is simply inserted and fixed using additionally equipped pins (their number may vary for different models).
After the contacts of the sleeve and the base of the light source come into contact, the electrical circuit is closed, and when mains voltage is applied, the lamp begins to emit a luminous flux. The current from the conductors is supplied through brass contacts
To connect electrical wires, sockets can be equipped with different devices:
- contact connection clamps with screws;
- contact connection terminals for which screws are not provided;
- wire connecting terminals;
- connecting terminals to which wires can be soldered;
- special connecting tips.
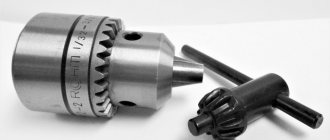
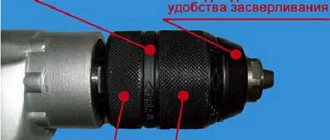
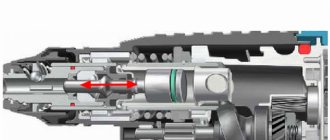
How to remove chucks from electric drills
First, the drill is removed. The keys can be unlocked if the shank is inserted correctly inside. The key itself is not used for this.
Dismantling with conical mating
There are no difficulties in disassembling. The first step is to unscrew the existing fixing screw. The drill must be turned with the drill down. Remove the cartridge with light blows of a hammer on the body.
Note. The easiest option is to use a special bearing removal tool.
If there is a threaded connection
Disassembly instructions:
- Place your fists as low as possible.
- Use a screwdriver clockwise to unscrew the screw from the spindle.
- Remove the part.
Advice. Two keys can be used. The horn fixes the spindle. The gas guy unscrews the spare part. It is also quite acceptable to use a hexagon.
Unscrewing direction
Before changing the chuck on a damaged drill, unscrew it from the tool strictly clockwise.
Design options for cartridges, their features
Types of products by design:
- screw;
- pin.
Their main difference is in the technology of fixing the light source. Filament lamps are usually equipped with a screw base. Accordingly, they are suitable for lighting equipment with screw sockets.
Expert opinion
Ivan Zaitsev
Lighting specialist, consultant in the building materials department of a large chain of stores
For your information! Modern energy-saving light sources (halogen, fluorescent, LED lamps) are produced with both screw and pin bases.
Product type by material
Most models are made of special heat-resistant plastic. But there are also ceramic versions of products.
Main distinctive characteristics of ceramic products
- On screw-type products, at high temperatures, the fastening nut sticks. Therefore, it must be made of metal.
- During prolonged continuous operation, exposure to high temperatures also causes the sleeve to stick to the base of the product. In such situations, when replacing a light bulb, the sleeve is also unscrewed along with it.
- The advantage is that they can withstand higher temperatures.
- Disadvantage - they cost much more.
The main distinctive characteristics of products made of heat-resistant plastic
- During use, white products darken.
- Possibility of using incandescent bulbs up to 60 W.
- The advantage is low cost.
- The disadvantage is a fairly short operational period. Products dry out quickly under constant exposure to high temperatures.
Different models of cartridges differ in their dimensions. For ceiling chandeliers, products marked E27, E14 are usually used. It is easiest to select a light bulb for products of this design. That is, you can safely screw into such sockets not only standard incandescent light bulbs, but also energy-saving LED ones.
Products marked E27, E14 have the same design. They differ only in the inner diameter, sometimes equipped with a built-in switch. Also on the market are product options with E40 and E10 bases. The internal diameter of such products is 40 and 10 mm, respectively.
For your information! E14 models are designed for low power. To organize lighting in a room, you need to use several of them at once.
Type G sockets are designed for fluorescent and halogen lamps. The most common on the market are G4, G9, GU10, R7S. Therefore, when purchasing, you should carefully look at the labeling. The number after G indicates the distance between the legs.
Expert opinion
Ivan Zaitsev
Lighting specialist, consultant in the building materials department of a large chain of stores
Important! For lighting equipment that uses low-voltage sockets, for example with a G4 socket, a transformer must be used.
Product marking
Depending on the diameter of the threaded part of the assembly, the products have several varieties:
- Cartridge E14. The product is called minion. The diameter of the screwed part is 14 m. It is used not only in chandeliers, but also in microwaves or refrigerators.
- E27. The classic and most common chandelier socket. Installed in most lamps.
- E40. These are large incandescent lamps. They are needed for street lighting.
- Bayonet element. It does not have a thread, but is fixed in a special way. The reason is that it is resistant to strong vibrations. With its help, vehicles are illuminated where a threaded connection is not applicable.
Selecting a cartridge for a ceiling chandelier
The design of the product must correspond exactly to the factory one installed on the lighting fixture. Otherwise, there may be problems with its fixation.
What else you need to pay attention to when purchasing:
- labeling;
- dimensions;
- power;
- voltage.
Recommendations:
- It is better to buy products with a ceramic body. They have a much longer service life.
- It is worth choosing products from well-known manufacturers on the market.
For your information! Products E27, E14 are of the same quality.
Chuck selection
When choosing this product, first of all, you should give preference to a well-known and trusted brand.
To avoid difficulties with fastening, the design of the new socket must correspond to the type of product previously used in the chandelier. It is better to give preference to a ceramic product due to its reliability during operation.
Basic selection requirements:
- the power of the lamp that is planned to be connected;
- diameter corresponding to the type of cartridge;
- marking;
- parameters: dimensions, power;
- the price should not be too low.
The cost depends on many factors, in particular the type of product and its manufacturer. Today the market provides consumers with a wide choice of both Russian and imported brands.
The price range is quite large:
- Type E27:
- domestic production – 25 rubles;
- China – 45 rubles;
- Italy – 130 rubles.
- Type E14:
- domestic production – 20 rubles;
- China – 20 rubles;
- Italy – 90 rubles.
- For halogen lamps:
- domestic production – 15 rubles;
- China – 30 rubles;
- Italy – 150 rubles.
Marking
Each product must indicate all the main technical and operational parameters:
- type;
- manufacturer;
- rated current (A), sometimes power (W);
- type of current (for cartridges equipped with an additional switch);
- rated voltage (V);
- normalized impulse voltage (kV);
- maximum operating temperature;
- IP protection class.
For your information! Products marked E27, E14 can be used for a rated voltage of 250 V. Models E27 - for rated current up to 4 A (880 W), E14 - up to 2 A (440 W).
Types and markings of chandelier sockets
Threaded electrical sockets are marked with the letter “E”. The marking also indicates the diameter of the base (millimeters). Indication of technical characteristics can be seen on all product bodies.
The operating principle of all cartridges is the same. They differ only in that they have different overall dimensions and different designs. The enterprises produce three types of cartridges, which are designed for 220 V in the electrical network, and are in full compliance with the state standard:
- E14. This type of cartridge is used to ensure that the backlight works in a microwave oven, refrigerator or table lamp. Typically, the maximum current consumption for them is 2A (440 W).
- E27. Used for many lamps. Maximum current consumption is 4A (880 W).
- E40. Cartridges of this type are used in street lighting and are rated at 16 A (3500 W).
Replacing the cartridge
When do you need to change the cartridge in a lighting device?
- The product does not operate when the switch is turned on, that is, the light bulb does not light up. The main reason is that the surface of the central contact of the sleeve is covered with rust. As a rule, cleaning them is ineffective.
- Cracks and other mechanical damage appeared on the surface of the case, which are visible to the naked eye.
- As a result of contact of internal parts, a short circuit occurs.
- The base and sleeve are “soldered” into one.
- The terminals have failed.
For your information! Planned replacement of the device is carried out every 5 years.
To perform this operation, you do not need to have any special knowledge in the field of electricity. After carefully studying the recommendations of specialists, you can make the replacement yourself.
Tools, materials for replacing the device:
- indicator screwdriver;
- assembly knife;
- electrical wire (small pieces may be needed);
- a new socket that matches the lighting fixture;
- terminal blocks;
- insulating tape.
How to replace a socket in a lamp with your own hands: description and procedure in pictures
It happens that one of the light bulbs in a chandelier on the ceiling stops shining. However, if you replace the light bulb, the light still does not appear.
The reason may not be the light bulb, but the lamp socket. This is where contacts can most often melt and burn. Sometimes the cartridge body becomes deformed and cracks, in which case it needs to be completely replaced.
You can change the cartridge yourself, having carefully studied exactly how to do this. We will talk about this in our article.
To replace the cartridge, you need to consistently and carefully follow the steps that we will write about below. So, getting started, you must:
- Disconnect the electrical network. This must be done by turning off the electricity at the circuit breakers in the panel. Please note this point: carrying out work of this kind while current is flowing through the network is strictly prohibited. This can lead to serious consequences, such as electric shock.
- Remove the chandelier. In some cases, experts advise replacing the damaged cartridge without touching the chandelier, but this requires special skills. In addition, in this case it will be much more difficult to replace. To remove the chandelier, disconnect the conductor connections. Conductors are usually connected by twisting or terminals. The lamp itself usually weighs on a bar or hook.
- After this, disassemble the lamp. The lampshades need to be removed and the lamps unscrewed. Thanks to this, important elements of the lighting device will not break or break.
- Unscrew the part that can be clearly seen. The wires need to be disconnected. Sometimes the contact is on the grounds. In such a situation, you need to unscrew the clamps.
- The part of the product consisting of ceramics must be removed.
- Next, replace the cartridge in the chandelier. The phase must be connected to the base contact in the center. Zero needs to be connected to another contact. This can be easily figured out if you first familiarize yourself with the color markings of the conductors. Do this in advance to avoid mistakes when connecting.
After this, reassemble the lamp and return it to its place. - Return power to the grid to ensure everything is working and the repair was successful. If you did something wrong, the light bulb will not light (sometimes, if the wires are mixed up, the light bulb can quickly burn out).
In addition to this information, you can expand your knowledge with visual videos from the Internet. We recommend watching the following video, which will help you understand more clearly how exactly you need to change the cartridge:
Sometimes it does not need to be replaced, it can be subjected to minor repairs. Approximately such a solution to the problem can be found in the video below.
In it, the expert repaired the lighting system without removing the lamp or changing the entire device part:
If the lamp contains halogen lamps, replacing the socket may differ slightly.
In this case, watch the following video, which explains all the nuances of such installation:
These are the main points you need to know if your lamp suddenly stops working and replacing the light bulb does not produce results.
Remember that thanks to the methods described above for replacing elements in lamps, you can repair not only chandeliers. Using the same principle, sockets can be changed in a floor lamp, table or wall lamp.
Don’t be afraid to carry out the replacement yourself after careful preparation and don’t forget to turn off the electricity before working on lighting systems!
Replacement instructions
- First of all, you need to de-energize the room.
- Next, the fastening elements that hold the chandelier to the ceiling base are detached.
- The bolts holding the terminals are unscrewed. The wiring is removed from their cavity.
- When the lamp is already lying on the desktop, you can unscrew the socket for the ceiling lamp itself, fixed in the housing.
- Now you need to insert the base of the new product and secure it.
- Next, a conductive ceiling cable is passed through the hole in the housing. Be sure to clean the end of the wire.
- We connect the cores of the electrical cable. To do this, unscrew the bolts on the terminals located on the removable ceramic liner, insert the wires and tighten them.
- We insert the insert with terminals into special grooves and secure the housing.
- We fix the chandelier back to the base of the ceiling.
This completes the electrical installation work. All that remains is to screw in the light bulb and check the functionality of the lighting device!
Disassembling an obsolete cartridge
Not every type can be analyzed in detail. It is easiest to unwind a cone sample. Step-by-step guide on how to disassemble a cartridge without sawing with a grinder:
- Bring the side walls inward.
- The front side is clamped with a polystyrene foam sheet.
- Place a strong board on the sheet.
- The hand should firmly press the board with the polystyrene foam sheet underneath.
- Place the drill level on a workbench or table.
- Turn on shock mode for 15 seconds.
- Start directly disassembling the spare part - unscrew it clockwise.