How to make a collet clamp with your own hands - Metalworker's Guide
A collet chuck is a clamping device for fastening workpieces and parts with a smooth shank surface.
The clamp is designed for all types of machines, including those with computer numerical control (CNC). The main element of the part is a sleeve with longitudinal cuts, between which there are locking petals. They securely hold the workpiece during compression. The cartridges are sold with a set of collets of the most common diameters.
Device, types
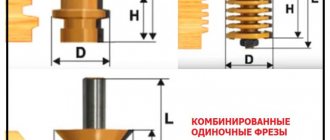
Collet clamping equipment for a milling machine includes three main elements in its design:
- frame;
- collet or replaceable sleeve;
- clamping nut.
Longitudinal axial slots on the bushing form movable petals. Their number depends on the diameter of the part. The elements are connected to each other by a lock nut, which transmits pressure to the cone formed by the petals - the device is tightened by radial force.
On the construction equipment market, there are replaceable collets with which cylindrical tools are secured . There are blanks in the shape of a polyhedron.
The collet clamp is installed on the machine shaft, after which the master performs milling, sharpening or straightening of the parts.
Depending on the function, collets are divided into three types:
- Serving. The sleeve, made of hardened steel, is equipped with three partial cuts with spring tabs directed towards the center of the cartridge. The diameter of the hole in such a clamp is selected with the following condition: the workpiece must be tightly fixed in a stationary position, because in such a case every millimeter is important. The feed collet is equipped with replaceable inserts of different diameters . Then you can work with different-sized workpieces of any configuration.
- Clamping. It differs from the previous sample in that it has a through technological hole with two seats along the axis of the bushing. During processing, the workpiece is tightly clamped in the collet without the risk of falling out. If the master plans to process square parts, he will need a clamp with four slots, and for round and multi-faceted parts, he will need a chuck with three slots. A set of collets for any workpiece will ensure the processing of parts of any shape . The advantage of such a tool is low radial runout.
- Detachable (unclosing) secures parts of small diameter. The design of the expanding collet has springs for spreading the petals.
Each collet is designed for only one diameter, so they are suitable for working with long metal rods mounted on the router.
Thanks to the high precision of fasteners, taps, a turning cutter or replaceable tips for screwing nuts can be attached to the collet.
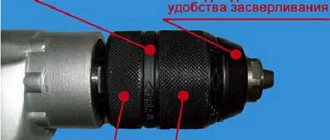
The chuck is indispensable if you need to secure a drill in a manual hammer drill or drilling machine. The clamp has a polished inner surface; at the moment of fixation, deformation of the workpiece is eliminated.
In addition to machine tools, collets are used to secure replaceable parts on hand tools. Along with standard devices, there are analogues for installation on mini-drills. In carpentry workshops you can find mechanical tools with collets connecting the working part to the handle.
The miniature chuck allows, if necessary, to change the shafts of files or screwdrivers . This principle is inherent in the manufacture of mechanical pencils with replaceable graphite rods.
By pressing a button, the user extends a small collet, the petals open, and the rod extends to the specified length.
Advantages and disadvantages
Among the advantages of the device are:
- ease of fixation of the workpiece and its equally easy dismantling;
- possibility of securing miniature workpieces;
- long service life, which depends on the material (hardened or cementitious steel);
- no scrolling of the workpiece due to the large contact area;
- zero radial runout, ensured by good alignment of the part in the bushing. In this way, it is possible to achieve high precision of the process.
- Its versatility makes it possible to use the collet mount on all types of machines.
The only drawback of the collet is that each individual sample fixes a part of the same diameter . For example, a 12 mm collet will only fit a drill of the same size. This problem can be solved by purchasing a set of replacement clamps to match them to workpieces of all diameters and configurations.
There is an adapter cylindrical sleeve that is installed in a chuck of the required size, and the workpiece is inserted into it. The clamping nut secures the collet, and it clamps the adapter sleeve to the part.
A self-clamping chuck with a set of replaceable clamps or adapter sleeves guarantees high-quality and safe operation on any machine.
Self-production
When using a clamping chuck, you cannot do without a milling machine: you will have to grind out the body, collet and clamping locknut. The best material to use is steel 50 HFGA.
The body is made from a steel blank of the required size, in the center of which a hole with internal thread is made for installation on the machine spindle.
The housing is mounted on a turning shaft to turn the internal cavity for the collet and form an external thread for the clamping nut.
The locknut is made from a suitable blank, in which a through hole is drilled, bored and threaded with the same diameter as on the body. The workpiece for the collet is ground, a hole is drilled, then a cone is made and cuts are made along it.
To ensure that the part meets quality requirements, its internal surfaces are carefully polished . To extend the service life of the homemade product, the metal parts are hardened.
Brass or bronze collets have proven themselves to be quite good, but the price of the starting material is higher.
Collet chucks
A collet chuck is a special device used for clamping a tool when performing turning, milling, drilling and other operations related to the processing of metal workpieces based on the technical specifications (sequence of operations, processing technology, attached sketch of the product).
Collets
Types and principles of operation of chucks
Collet chucks are used mainly when processing cold-rolled rods or other metal products that have an already machined surface.
Structurally, cartridges can be classified according to functionality:
- with a fixed mechanism;
- with retractable mechanism;
- with retractable mechanism.
Each design has its own characteristics. The feeding type is made in the form of a steel sleeve with 3 cuts forming petals that have a springing effect.
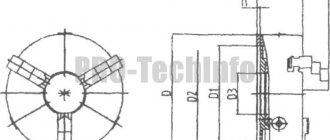
Drawing No. 1 of the main spindle collet
Type F
Collets type F - clamping the main spindle are used to secure the workpiece.
Drawing No. 2 of the counter-spindle collet
Type LN
Collets type LN - counter spindle are produced elongated, size E depends on the standard size.
Drawing No. 3 collet type R
Type R
Type R – are pull-type collets.
Drawing No. 5 collet BF
Type BF
BF type feed collet - designed for bar feeding.
When installed on the machine, the feed collet is threaded onto the pipe with the help of which it is fed into the working area. It is necessary to take into account the design feature - the size and shape of the collet, which must necessarily correspond to the profile of the bar being processed.
In preparation for processing, the rod moves through the petals, which, due to their design features, tightly hold the workpiece. During processing, when feeding the workpiece, the adhesion force between the petals and the product increases due to rotation.
The principle of operation of the clamping elements is based on strengthening the adhesion of the petals to the workpiece during rotation of the working mechanism. Bushings with 3 petals are used for processing products up to 3 mm, four – up to 80 mm, six – over 80 mm.
Typically, collets have an angle at the apex of the cone equal to 30º.
Collets for shaft 2 mm (0.1-3 mm) for micro drill
When processing thin rods, collets equipped with springs are used to increase the clamping force of the jaws. When increasing the diameter of the workpiece being processed, designs are used that are equipped with special inserts selected according to the dimensions of the product.
Collet clamps are also used when machining with a drill, cutter or tap. The sleeve is fixed in the chuck with a nut, and the cutting tool is fixed directly in the collet.
When fixed with a nut, the internal volume of the hole where the workpiece is installed is reduced, thereby increasing the force holding the rod stationary.
Cartridges of this design also have their drawbacks. First of all, the requirement that the shanks of the tool used must match the characteristics of the collets used. At enterprises, the most widely used collets are the ER type, which constitute the largest number in the total volume of tools used.
Collet chuck design
The chuck consists of a clamping nut and a set of collets. Available with retractable, retractable or fixed collet. According to their purpose, collets can be clamping or feeding.
Read also: Do-it-yourself water level sensor in a well
The feed collet is a hardened steel sleeve with 3 cuts that form a kind of petals with ends directed towards the center and springy. The opening of the feed collet should be such that the workpiece is clamped tightly. The feed collet is screwed onto a rotating feed rod, which feeds the workpiece using a hydromechanical or cam mechanism. When installing the workpiece into the chuck, its Morse end moves between the petals, spreading them apart. Under the influence of elasticity, the petals are pressed tightly against the workpiece. The adhesion increases during processing due to frictional forces.
A solid collet is a sleeve with petals that spring back when impacted. To work parts with a diameter of less than 3 mm, three-lobe collets are used, from 3 to 80 mm - four-lobe collets, and more than 80 mm - six-lobe collets. The grip is increased by reducing the clearance of the slots as the collet is pulled into the chuck.
Split collet - used for fastening parts of the smallest diameter. The jaws of such a cartridge are moved apart using springs. Split collets can be equipped with replacement inserts; their type and dimensions depend on the characteristics of the workpiece.
Collet chucks also hold metalworking tools (drills, taps, cutters) with a small diameter Morse shank. The cutter is secured with a replaceable collet, additionally reinforced with a nut. When screwing the nut, the collet is recessed inside, and being elastic, it firmly clamps the Morse shank. The disadvantage of this type of chuck is that each cutter diameter requires its own collet.
In longitudinal turning machines, a self-clamping chuck is used to secure the mini-workpiece being processed. The design of such collets is somewhat different from conventional ones. Together with them, conventional tools for clamping a Morse taper can also be used to secure the workpiece.
DIY collet for micro drill
Everyone knows that a drill is a very useful and versatile tool on the farm.
If you have a drill at home, you can hang a picture on the wall, straighten furniture, and repair a number of necessary items.
But what should you do if you don’t have a drill at home, and constantly asking your neighbors is somehow inconvenient?
You can buy it in a store, but this device is very expensive.
Or you can assemble a mini-drill with your own hands using scrap materials that are found in almost every home.
We will tell you how to do this in this material, presenting to your attention several simple ways to assemble a mini-drill with your own hands at home.
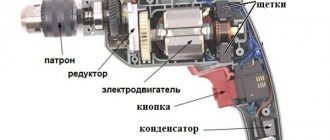
Mini drill made from an electric chuck
The first option for assembling this device with your own hands is based on the use of an electric socket , which can be purchased separately, or taken from a light bulb. If you buy it, it is very inexpensive, but the cost will be justified.
Also, to assemble a mini-drill with your own hands from a chuck, you will need the following things:
- motor;
- a jar of soap bubbles;
- construction knife;
- insulating tape;
- hot glue;
- blowtorch;
- household switch.
Mini drill body and core
Work must begin by preparing the body of the mini-drill, which will serve as a soap bubble jar . This is done like this:
- Prepare a jar lid. To do this, heat up the soldering iron and use it to make a small hole in the lid of the jar.
- The diameter of this hole should be slightly larger than the diameter of the drill base.
- The bottom of the jar must be completely cut out.
Let's start working with the core:
- We connect the cartridge with the motor. Most often, motors are taken from different tools that have already been used.
- Before the bonding process, the motor must be completely degreased using acetone.
- The cartridge can also be degreased, but there is no need to water it like a motor with acetone. Regular wiping will be sufficient.
The fastening method occurs through cold welding .
If this method does not suit you, you can also use hot glue.
Remember that the more complex your future mini-drill, the more materials you will need to assemble it yourself.
When planting with welding or glue, you need to work extremely carefully so that everything turns out as smooth as possible. It will not be possible to redo the work later, keep this point in mind.
You also need to consider the following:
- at the mounting location on the cartridge there is a hole that needs to be covered before connecting the parts;
- putty is carried out using simple plasticine;
- Only the holes should be filled with plasticine; there should not be any left on top of the cartridge.
Manufacturing process
When you have prepared the body and core, you can begin directly assembling the drill with your own hands:
- Place the cartridge with the motor connected to each other in the jar. This must be done so that the wires that stick out from the socket are then placed in the lid of the jar.
- When the cartridge fits completely into the jar, lock it. To do this, fill the voids on the sides with hot glue and wait until it sets completely.
- Attach the switch to the cover and connect the power wires to it. It can also be placed on glue.
- We connect all the wires to the switch; the connection diagram is standard. You can use an ammeter for accuracy.
- After connecting the wires, they need to be insulated using electrical tape or hot melt adhesive.
- Screw the lid onto the jar and attach the drill to the other side.
The good thing about a ready-made mini-drill is that it can run on both batteries and electric power. We considered the option of assembling a universal model .
Naturally, without having the skills to work with electricity, it will be extremely difficult to assemble such a drill with your own hands. Below we suggest you consider options for assembling simpler drills for small household needs.
How to assemble a drill with your own hands based on the handle body
One of the options for the simplest drill is a homemade device based on a regular ballpoint pen.
To make it you will need the following materials: ballpoint pen ; drill with the required diameter; hot glue; a durable stick with handles at the end that can be used to rotate it.
Pay special attention to the choice of handle for the manufacture of a future drill, and specifically to its body, since during operation the main load will fall on the body.
The requirements for the handle body are:
- it must be as strong as possible to withstand loads;
- the best option is a body made of high-quality metals;
- If there is no pen with a metal body, choose a pen with a thick plastic base.
The build process looks like this:
- Disassemble the handle until only one body remains.
- The lower part of the body, where the writing rod usually sticks out, needs to be unscrewed.
- Instead of this part, insert a drill into the body in such a way that its working part sticks out from under the lower part, and the second part is inserted into the hole that is in the stick.
- The stick is inserted into the body at the same time as the drill.
- To ensure that the structure of the drill is complete, it is fixed to the wall of the housing using hot-melt adhesive.
- When you twist the mechanism using the special handles, the drill will rotate, providing the desired work by pressing the handle body.
Making a drill using a toothbrush
Electric toothbrushes are very convenient to use, but impractical in the sense that the bristles on them cannot be changed and after use, this expensive device, like a simple brush, has to be thrown away.
But you don’t have to do this, using the body of an electric brush to make a drill with your own hands.
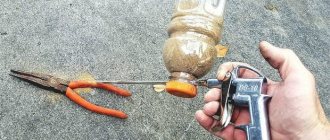
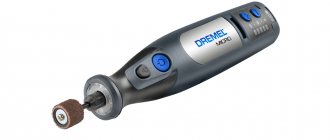
We take an old electric brush and cut everything down to the body. Next, you need to connect the motor shaft to the drill using a collet clamp, which must be purchased separately.
When purchasing a collet clamp (or chuck), be sure to find out in advance what the diameter of the motor shaft in the brush is. The motors differ from each other in the diameter of the mounted shaft.
The collet clamp is inexpensive and can be purchased on the radio market or in a specialized online store. It includes a chuck and interchangeable drill bits with different diameters that are inserted into the chuck.
The most difficult thing in this case is to put a collet clamp on the brush motor. The cartridge is designed for a shaft of 2 mm, but the motor here has a smaller one.
To do this, each screw for fastening must first be sharpened until it is given a cone-shaped shape so that the minimum diameter of the cartridge mount can be adjusted to the diameter of the motor shaft.
Of course, you can assemble a mini-drill with your own hands not only using brushes or old handles , but also other devices; folk craftsmen come up with new ways to assemble them every day. However, the options discussed above are suitable even for those who have never encountered anything like this and are assembling such devices for the first time in their lives.
- Alexander Romanovich Chernyshov
Do-it-yourself collet chuck: components and manufacturing procedure
The question of how to make a collet clamp with your own hands is relevant for those who are engaged in jewelry making, engraving or printed circuit board manufacturing and use such equipment. It is specialists in these categories who most often encounter breakage of the collet clamp, which can be replaced with a new production model or made with their own hands.
Homemade collet chuck turned on a lathe
There are several options for making a collet chuck with your own hands, each of which has certain nuances.
How to make a chuck for a mini drill
Everyone knows that a drill is a very useful and versatile tool on the farm. If you have a drill at home, you can hang a picture on the wall, straighten furniture, and repair a number of necessary items. But what should you do if you don’t have a drill at home, and constantly asking your neighbors is somehow inconvenient?
You can buy it in a store, but this device is very expensive. Or you can assemble a mini-drill with your own hands using scrap materials that are found in almost every home. We will tell you how to do this in this material, presenting to your attention several simple ways to assemble a mini-drill with your own hands at home.
Homemade collet coupling of the simplest design
The simplest collet, operating on the principle of a coupling, can be made of steel wire with a diameter of 1 mm.
It should be borne in mind that the collet of the proposed design is not a universal clamping device and can only be used for drills of the same diameter.
It is important that the transverse size of the drills used corresponds as closely as possible to the diameter of the output shaft of the drive motor. In addition, it is important to consider that such a collet can only be used when drilling materials with low viscosity.
Self-production
For working on wood, metal and plastics and for making a variety of printed circuit boards, a small drill is best. It should be equipped with a ready-made mini-clamp- type mount. But if you don’t have one at hand, you can easily make it yourself. Here you will need a soldering iron, millimeter-thick steel wire and solder. Next, the manufacturing process proceeds according to the following scheme:
- We roll the wire into a spiral. Its diameter must be equal to the diameter of the electric motor shaft and the drill with which it will be necessary to work;
- Solder the spiral. High quality is ensured by soldering flux or similar options;
- Then we put the spiral on the shaft - and the mini-chuck for our drill is completely ready.
Homemade collet chucks are perfect if there are no ready-made clamps for drills and if you have the appropriate skills to make such mechanisms yourself. They will also become indispensable in the household, when work with specific parts is required, and ready-made clamps may not be suitable for any specifications.
The collet is an important element in lathes of various modifications. With its help, you can carry out work on processing and milling metal and plastic parts. In addition, you can easily make it yourself using available materials . The variety of such mechanisms available today allows you to choose the optimal clamp model for your personal needs. It is also very important to take into account the method of attaching it to the spindle and the dimensions of the flange, since without them it will be impossible to select a collet. Have fun working with different types of clamps!
Collet: types of chuck, do-it-yourself production
[hide]
- Device and types
- Advantages and disadvantages
- Self-production
A collet chuck is a clamping device for fastening workpieces and parts with a smooth shank surface. The clamp is designed for all types of machines, including those with computer numerical control (CNC).
The main element of the part is a sleeve with longitudinal cuts, between which there are locking petals. They securely hold the workpiece during compression.
The cartridges are sold with a set of collets of the most common diameters.
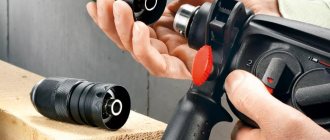
Special jaw: a modern replacement for any collet chuck
Today, anyone can easily purchase a special cam for any type of drill. This can be done both in construction boutiques that offer equipment for sale, and on the Internet (at auctions such as Ebay or Amazon).
Such a cam will be screwed onto the threaded connection of the shaft of the rotating device. The more tightly the cam is twisted, the more firmly it compresses the drill placed in it.
The price of such a device does not exceed sixty rubles. Purchasing a cam will forever save you from searching for suitable collets for using various drills.
Of course, it is better to purchase a cam made of high-carbon, durable steel. To tighten it, it is recommended to use a special wrench, which is included in the kit.
- Find out how to connect a photo relay to lighting fixtures in an apartment.
- Recommendations regarding the choice of a construction lamp, without which an electrician will not be able to carry out effective work at the site - https://euroelectrica.ru/kak-vyibrat-stroitelnyiy-fonar/
Read also: Hilti dowel for concrete
Technical consultant Anton Pankratov will demonstrate the technique described above for making a homemade collet chuck in a video:
A collet chuck is a type of lathe chuck. They hold the part while it is processed at high speed. There are several types for different part shapes, types of processing and purpose. A collet chuck, unlike quick-release chucks, does not require additional devices: pins, screws or stoppers. Therefore, its second name is self-clamping. This simple and reliable device is widely used in lathe equipment. The most common type of collet is ER.