Varieties
Types of cartridges
Drills are divided into those used according to:
Types of drills
Drills are:
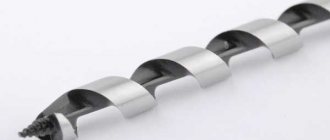
- Spiral. They are universal and are not used for drilling different materials.
- Crowned. If depth adjustment is needed, then this drill is used, which will make the hole larger.
- Perov. These drills are used to make holes in wood products.
- Stepped. They are used for drilling in ondulin, iron and metal tiles.
- Milling.
- Armed and so on.
Also, drills do not differ in their tip. They are specially made for an impact drill, not an ordinary drill, but are shaped like a cylinder.
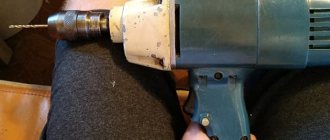
As for the cartridges themselves, there are also differences. How to insert a drill into a hammer drill: safety precautions. Nettle, some are used for, while others are used for a conventional drill or hammer drill. In each individual case, the drill can be secured differently.
There are chucks on which you can insert drills for both a hammer drill and a drill. Unfortunately, for safety reasons, it is better not to do this. The operating principles of a rotary hammer drill are very different.
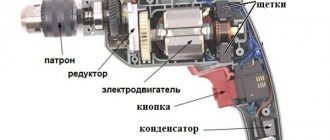
Drill chuck
Cartridges will usually also be of two types:
The key chuck requires a special key to install the drill. The cartridge is clamped with a key, which is inserted into its hole and does not rotate clockwise. This way, the drill is securely fastened. How to change a drill bit in a drill - different approaches As for the quick-clamping drill, it is divided into two types: single-clutch and double-clutch.
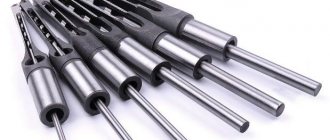
Concrete accessories
The drill bit sizes for concrete hammer drills may vary. This indicator depends on the diameter of the hole you need to get. But all drills for stone, brick and similar coatings have a hard tip. It is made from a special alloy, which gives it higher characteristics. Drilling of such coatings occurs through impact-rotational motion.
If conventional bits have a cylinder-shaped shank, then the drill bit for a hammer drill comes in other shapes. To drill a small hole in a concrete surface, use an auger drill with a carbide tip. Large holes are cut using a crown with carbide teeth along the edges. Diamond-coated tools are also popular due to their durability.
For granite surfaces, it is customary to use nozzles based on Pobedit. This tool has different softness and is therefore suitable for different surfaces. For ceramic tiles, an excellent solution would be a spear-shaped drill with a tungsten or pobedit tip. For glass, it is recommended to use a crown with a special coating around the edges.
How to insert a drill bit into a drill?
In the video
- the video shows
how to insert a drill into a drill
without securing it with a keyless chuck
The technique is presented in the video:
A double-clutch chuck has two clutches, one of them is clamped, and the other clutch is turned with the other hand. Speaking of single-socket chucks, the chuck is clamped with one hand. Replacing drills in such a chuck is much faster than in a key chuck. However, as for fixing the drill, it holds much weaker with this option.
Chuck device
The drill is always fastened vertically, otherwise there is a risk of breaking not only the drill, but also the tool itself.
What is needed, how to insert
drill into a hammer drill or
a drill,
correct?
What kind of work are the drills intended for?
To improve performance, the product is lubricated with machine oil. Before work, you need to perform the so-called core, i.e. mark a point with special equipment called a core. This is done so that there is no displacement at start. This product cannot be used for concrete: the drill will become dull and will have to be thrown away.
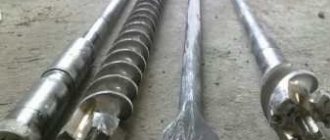
Shapes of the drill tail: a – cylindrical, b – conical, c – pyramidal.
Special wood blades can be used for drilling plasterboard sheets, plastic and other not too hard surfaces. The diameter can be different, its maximum value is 10-15 cm. To obtain holes with a diameter greater than 5 cm, you need to use crowns. This is a special product made in the form of a cylinder, its edges have teeth. There is a drill in the center of the crown.
The specified models are used to create holes in plasterboard sheets. Typically, holes are prepared for installing sockets and switches. Crowns can be used to prepare a place for installing hinges, locks, and for working with ceramic tiles.
For concrete, special crowns and drills are used . They can be produced for a conventional drill, for a drill with an impact effect, for a hammer drill. They can drill concrete, brick, porcelain stoneware, ceramic tiles. For tiles, only a conventional drill is used, since the impact effect can split the plates during operation. Average speeds are used, maximum speeds are not allowed.
Schematic diagram of the clamping chuck.
If you are using a drill with an impact effect, you will have to purchase drill bits. They have a triangular tip, which is great for working on difficult surfaces. On the reverse side the blade has a punch cartridge. During installation, you must use a key with a toothed wheel to clamp it (usually included in the kit).
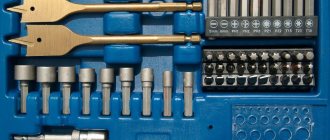
It is allowed to use screwdrivers and hammers to remove stuck products. Such products are intended only for working with brick or concrete; they are not recommended for use with other materials. The diameters are varied, there are products for working with dowels. Products are available in the following diameters: 4 mm, 5 mm, 6 mm, 8 mm, 10 mm, 12 mm.
When replacing a drill, you must pay attention to its compatibility with the equipment used. For convenience, you need to have a set of keys; they are usually included in the kit. If the manufacturer did not provide them or the keys were lost, then today they are easy to buy in the store.
How to insert a drill
Drill lubricant
In order for this process to go smoothly, it is important to follow some sequential steps:
- Before you install the drill bit into the drill, make sure that the drill is unplugged.
- Then insert the drill into the chuck. For this purpose, you must first make sure that the drill you are using is intended for a specific tool.
- To reduce wear on the chuck on a hammer drill, you can lubricate the drill with a special lubricant. There is an option to apply it to the cartridge hole.
- Next, secure the drill.
- After installing the drill into the chuck, it is important to make sure that it does not wobble.
While drilling, do not touch the rotating elements of the drill or hammer drill. As you can see, installing the drill is not particularly problematic.
It all depends on the cartridge you use. However, what should you do if after work you cannot remove the drill from the chuck?
How to avoid losing your key?
To avoid being left empty-handed with unfinished work, it is important to properly organize your workspace. This organization will allow you not to lose sight of the key every time you change a tool.
The easiest way to protect against loss is in your own workshop. Here you need to create a permanent place to store the turntable and always put it there. In this case, the storage location should be quite convenient and at hand:
- Many manufacturers provide their instruments with an eyelet for attaching a turntable. It is placed either under the handle or close to the fork. By inserting the key into this hole, you can rest assured that it will not get lost. The only drawback is that over time the fastening wears out and breaks.
- The eyelet for the key is made from insulating tape. It is attached to the power cord. The attachment point is usually located 50–60 cm from the handle. This way the turntable will not interfere with your work and will always remain at hand.
- Having attached a ring to the key, you can hang it on a hook next to the workbench.
If during the work it turns out that the pinwheel from the clamping mechanism has been lost, the main thing is not to panic. Using traditional methods, it is quite possible to release the chuck, remove or change the drill, and finish the job.
What to do if the drill gets stuck
Drill stuck
Typically, removing the drill from the chuck is not particularly problematic. Nettle, in the key cartridge it is enough to turn the key counterclockwise. In the quick-release chuck, what remains for our client to do is just as simple. For this purpose, you rotate the clutch counterclockwise. Drills are pulled out from other types of chucks using this principle. Alas, what should you do if the drill is firmly stuck in the chuck? Most often, this problem occurs with quick-release chucks. How to change a drill bit in a drill - different video approaches. It will take a lot of effort to remove the drill.
Nettle, the drill can be held in your left hand without casually hitting the bottom of the cartridge with the inside of your palm. Usually after such actions the drill is easily removed.
If the cartridge is metal, you can also lightly tap the cartridge with a hammer. It is necessary to tap until the tail appears from the cartridge. If this doesn’t work, then use a gas wrench.
If the manipulation data carriers do not help you, you will have to remove the chuck from the drill/hammer without disassembling it.
There are other times when a drill gets stuck in a wall. Then the drill rotates in the chuck. To remove it, you will need to open the cartridge and not remove the drill from the wall.
What is needed, as we have discussed with you, our client is left with possible situations that occur when working with a hammer drill not a drill when changing the drill.
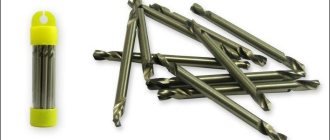
Types of drill bits for drills
All blades that are used to work with a drill can be divided into the following groups:
- Special ones for working with metal are most often used. Today, models are produced that can work with metal surfaces that differ in hardness and other characteristics.
- Special wood blades available in various variations. These can be regular products or feather ones.
- For concrete walls, drill bits are used. In some cases they are used if there is no hammer drill at hand. But this does not mean at all that a drill, even with an impact effect, can completely replace a hammer drill, since this equipment is not intended for such work.
- To work with wooden surfaces, special crowns are used that allow you to perform various types of work.
- For working with concrete, special crowns are produced that have jagged edges.
Drill device diagram.
When deciding how to replace a drill or chuck on a drill, it is necessary to take into account the model of the equipment. Today, manufacturers offer a wide range of models, differing not only in purpose, but also in diameter. The most commonly used diameters are from 0.5 mm to 10-15 cm.
Blades designed for working with metal usually have a diameter of up to 2 cm. They all have a special, well-recognized cone-shaped tip. They can be used to work with drywall and wooden surfaces. Working blades for metal should always be carefully sharpened.
It is important to ensure that the temperature is maintained. If the blade gets hot during operation, the drill must be turned off. When the drill becomes dull, it needs to be replaced, otherwise working with metal will be impossible.
Types of screwdriver chucks
Before inserting a new bit into a screwdriver, you need to know which chuck the tool is equipped with. The method of removing the old cutting element and installing a new one directly depends on this. There are two main types:
- key gear;
- with quick clamping system.
Key gear
The serrated drill bit is installed in the key using a suitable key. The nozzle has a hole with a thread that matches the teeth on the key wheel. Compressing and unclenching the “cams” of the mechanism is done as follows: the key rod is inserted into the hole, the gear is put on the teeth of the crown, and the handle is turned.
Toothed attachment
With quick clamp
In screwdrivers with quick clamping, you can change the bit without using keys. Looseness and clamping are adjusted manually. Such nozzles have 1 or 2 couplings. You need to open the “cams”, place the drill there, and then twist the clutch to tighten it. On a two-coupling chuck, the clutch closest to the body is held with one hand, and the second is tightened with the other.
Clamp attachment
Preparing for work
The readiness of the drill for operation is determined by the following conditions:
- the device is connected to an outlet (for drills powered by an electrical network);
- the battery is charged and installed in the compartment (for cordless tools);
- a drill is installed in the chuck.
Attention! To make the hole smooth, the cutting edge of the drill must be sharpened. Take a new drill or sharpen an old one using a whetstone.
You can press the start button to check the power. If the chuck rotates quickly, then electric current is supplied to the motor and the tool is ready for use. If the cordless drill chuck rotates slowly, the battery is discharged and needs to be charged.
Selection and types of sharpening attachments
For each model of electric drill there is a certain form of sharpening attachment . According to manufacturers' recommendations, when choosing a product, you should take into account the neck size of suitable drills; in addition, it is important to know the long size of the turbine adapter. Without these values, it is impossible to choose a nozzle that will fit perfectly. If the choice was made incorrectly, this will lead to it dangling and not being securely fastened to the instrument. Working with such a nozzle is quite dangerous and inconvenient, since you need to hold it with your hands while working. This mainly applies to models that belong to the economy class.
When choosing, you should pay attention to such parameters as:
- number of sockets for sharpening drills;
- possibility of sharpening at an angle of 118 degrees;
- The kit includes an additional sharpening stone.
Speaking about which drill attachment is worth buying, according to the reviews of most craftsmen, we can note such brands of devices as Bosch, KWB 5032 00, Leroy Merlin, etc. Moreover, some of them can be used not only for drills, but also knives .
Reasons for replacement
The main function of the clamping mechanism is to ensure maximum precision in the hole drilling process. As the drill is used, the seats and steel jaws wear out. The following signs indicate this:
- The cartridge flies off the shaft.
- The axis of rotation shifts during drilling.
- The drill does not lock or cannot be removed.
Each of these situations is unsafe, so if it occurs, you should stop working with the drill and repair or change the chuck.
The drill has a special threaded short-pitch fastening that holds the clamping mechanism. In addition to it is a screw with a left-hand thread, located at the outer end of the shaft and acting as a control clamp. To securely fasten parts when assembling drills in production, all connections are treated with a sealing compound, which serves as an adhesive layer and protects the metal from corrosion and oxidation after exposure to moisture. This must be taken into account before disassembling the drill chuck.
Safety precautions
Like any other type of work, working with grinding attachments on a drill requires compliance with safety precautions. First of all, you need to follow safety rules when working with power tools. The most basic of them are indicated by the manufacturer in the drill passport. In addition, you must follow safety rules when carrying out construction and finishing work. The following protective equipment is used:
- Eye protection – goggles, shields, masks.
- Respiratory organs - use fabric masks or respirators.
- Hands and skin – use of protective clothing and mittens or gloves.
When working with rotating parts, you must also ensure that there are no dangling or dangling clothing that could get into the work area.
Once there, the lace, belt or sleeve will very quickly wrap around the working organ and pull the person or his hand towards it.
Making a device at home
Many users complain about the flimsy design of Chinese-made stands. Accuracy is very difficult to achieve with this right angle drilling jig. Therefore, craftsmen design drill guides with their own hands, relying on reliability and accuracy of drilling.
Like standard products, the homemade product consists of a table, a stand, a traverse and a steering wheel. The base is made of metal, and at the same time it serves as a work table. For manufacturing, metal sheets with a thickness of 10 or more millimeters are used. In the proposed design, the base is made of two channels, electrically welded into a single unit. Table size - 400x320x64 mm. The column is made of a square profile pipe measuring 25x25 mm and a wall thickness of 1 mm. Column length - 600 mm.
The traverse is made from the same pipe, but 30x30 mm in size, to which a 15 mm thick plate with a hole for the drill neck and a 4 mm slot for fixation with a clamping device is welded.
The lifting device is designed on the basis of a cable, one end of which is attached to the traverse, the other to the upper end of the rack. The cable is wound around an axle fixed to the traverse. A steering wheel is installed at one end of the axis. The traverse is put on the column and strengthened by a cable.
Design and features of the toothed chuck
The classic drill chuck is a collet or cam type clamping device. They can hold not only various tools with a round shank, but also cylindrical workpieces for further processing. The main design elements of jaw chucks are:
- cylindrical body;
- an adjusting ring or sleeve rotating on the outer surface of the housing;
- a cam mechanism or collet installed in the inside of the device body.
Design of a jaw (gear-ring) chuck with a key
In turn, the collet mechanism, the elements of which are made of hardened steel, consists of three absolutely identical cams, which, when rotating the adjusting ring or sleeve, simultaneously approach each other, thereby ensuring reliable clamping of the tool shank. In the first models of chucks for mechanical drills, the collet jaws converged due to the rotation of the adjusting wheel; now an adjusting sleeve is used for this.
On one side, the drill chucks are installed on the shaft of the equipment used, and on the other, the tool with which the processing will be performed is inserted into them. Jaw chucks are primarily used to hold the following tools:
- drill;
- cutters;
- taps with small diameter shanks.
The drill chuck is designed to clamp bits with a cylindrical or hex shank