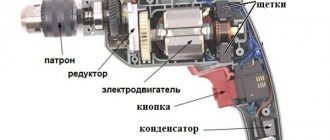
An angle grinder, or grinder, is a universal tool with which you can perform a wide range of actions. It has a simple mechanism of action based on shaft rotation by an electric motor. Necessary for cutting metal parts, polishing surfaces and grinding various materials. One of the common problems when using an angle grinder is the nut that holds the disc getting stuck. This does not allow you to replace the nozzle, and with strong impact you can damage its threads, break the key or break the case.
What to do if the nut is stuck?
A common problem when operating an angle grinder is a jammed nut. The first thing to do in such a situation is to determine the direction of rotation of the disk. It is recommended to unscrew the jammed nut in the same direction. There are several most effective ways to solve this problem.
- Use an open-end wrench and a socket head. To do this, it is necessary to grind off the surface of the open-end wrench by 4 millimeters, which is 17 millimeters. On the head of the 24 mm end, grind four protrusions that will align with the holes of the flange nut. The open-end wrench is then positioned under the disc and the socket head is placed on the nut of the angle grinder. After this, the ratchet should be turned in the direction of rotation of the disk.
- Use the gas key. Knowing the laws of physics and using a gas wrench, you can increase the moment of force, as the length of the arm increases.
But you shouldn’t use too much force, as you can dent the flange and damage the spindle rotation lock.
- Use a hammer drill. If you set the hammer drill to the chiselling mode without the rotation function, it will work on the principle of a jackhammer. A six-millimeter drill is placed on the flange end and work begins. After the nut moves, it can be easily unscrewed with a special wrench for an angle grinder.
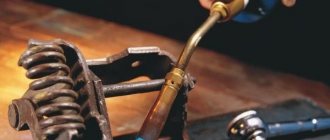
- Warming up. If you heat the nut with a technical hair dryer or a gas torch, the metal will become more pliable. All you have to do is unscrew the nut with a wrench. But during the heating process, you need to be careful not to damage the plastic parts and gearbox.
- Disc breaking is an easy and quick way to unscrew a stuck nut without a wrench. It involves complete crumbling of the disk. For this purpose, you should use a hacksaw or pliers. When only the inner ring remains of the abrasive wheel, clamp the unnecessary metal plate in a vice (its thickness should not exceed the thickness of the disk). Next, you need to start the angle grinder and grind the abrasive down to the landing sleeve. Remember to use safety glasses and gloves when doing this. Then all that remains is to unscrew the flange nut by hand.
Which way does the hub nut unscrew?
Yes, you may very well be one of the lucky ones who won't need any extra effort as the problem with unscrewing the hub nut may simply be a matter of going in the wrong direction.
So, we take the wrench and, when your car is far from new, try, if the nut does not lock, on the left wheel, unscrew the nut counterclockwise, and on the right wheel, unscrew it clockwise. In modern brands, it is usually necessary to unscrew the hub counterclockwise both on the left and on the right.
Before you start unscrewing the hub nut, do not forget that it comes off when the car is standing on the wheels and the stops are placed under them. On the side from which the nut will be unscrewed, a stop is securely installed.
Although if the nut is located deep and the brake disc is ventilated, then you can try to unscrew it (fixing it with a powerful screwdriver) and only after making sure that the car is securely secured. Remember about personal safety precautions: protect your eyes, do not overdo it, because in the spirit of enthusiasm you can accidentally get hurt or damage the car body.
Unfortunately, in most cases, it is not enough to use a wrench with a large lever; you have to use additional tools and special mixtures. Let's consider the other options.
What should I use to install the disk?
In fact, the process of installing a disc into an angle grinder is not that complicated. However, in order to carry out such work, it is necessary to take into account certain rules and use certain tools.
In particular, for installation you may need:
- A wrench used to unscrew the nut.
- Next you need the disk itself.
- You may need a hole or a chisel. These tools must be used when the disk is jammed and will have to be removed by opening it, which means that the residue in the gap can be removed with a chisel. These tools may not be needed, but it's better to have them on hand.
Cutting wheels for grinders, in turn, have their own subtypes, such as:
- Cutting wheels for metal work;
- Abrasive wheels for working with stone;
- Circles for woodworking;
- Diamond blades (mentioned above).
The purpose of each type of disk usually corresponds to its name.
Among grinding discs, there are four main subtypes - flap, wire, diamond and bakelite-based grinding discs (straight, profile T41 and disc, profile T27).
- The petal disc is made of sandpaper. Its main purpose. This is the removal of an existing coating, such as old paint, primer or a layer of paintwork. Also, discs of this type are used for polishing wood products.
- Wire discs are used by craftsmen to remove rust. They can also remove other types of stubborn stains.
- Diamond discs are used for polishing stone.
- Disc discs are made of plastic or rubber and are used for polishing iron surfaces.
Nuts for angle grinders
The design of the clamping nuts depends on the type of grinder on which they are used. On ordinary, inexpensive household angle grinders, they mainly use standard nuts with a special open-end wrench included or floating ones, which can be unscrewed/tightened with a regular wrench. On more expensive professional angle grinders, where efficiency is required when replacing consumables, nuts of a special design with self-clamping elements, flange type with a freely rotating internal part, and nuts with additional automatic balancing to eliminate vibrations are used.
Quick-release nut for angle grinder Makita 115125150230. Photo 220Volt
Methods for removing a disk when the nut is jammed
If your nut is stuck, you can try to unscrew it with an open-end wrench. You need to make 4 protrusions on the socket head. This will match the flange hole structure. Then we place the open-end wrench under the disk and begin to rotate it in the direction of the circle.
Another popular method is heat treatment. As the clamping nut heats up, the metal softens and becomes more “obedient.” After this, you can try to unscrew the nut manually or use a wrench. The disadvantage of this method is the risk of deformation of the gearbox. If there are plastic elements on the grinder, they may melt.
If you use a gas wrench, the force on the nut increases. Here it is important to control the force of the stop, since otherwise there is a risk of bending the flange or breaking the lock responsible for spindle rotation. You can also move the nut from one point using a hammer drill.
The most drastic way is to deliberately destroy the disk. If it is slightly cracked, we simply break it off and remove the remnants of the circle from the grinder. As a result, only the central metal ring remains. The metal part itself is removed using a vice, pressing the ring tightly into it.
Regardless of the chosen method of solving the jamming problem, it is important to remember the safety system and not endanger your health.
What is the cause of the problem?
Before asking how to remove a disc from an angle grinder, experts recommend understanding why the nut on an angle grinder bites. It has been noticed that this problem is mainly observed in angle grinders that have a significant disc size. A disc over 18 cm is considered large. During operation, torque is generated. Next, when the master begins cutting, a small impact occurs. In other words, a force is exerted on the disk. If the size of the nozzle is no more than 12 cm, then this impact will be insignificant. If the disk is large, then the nut is tightened more by inertia. As a result, it is not possible to dismantle it in the usual way. Read more about how to remove a disc from an angle grinder below.
What to do if the disc on the grinder is jammed (bitten)?
Anyone who has extensive experience working with an angle grinder has probably encountered such a situation at least once.
As a rule, this happens if the disk is clamped between parts, it stops or breaks, and the grinder engine continues to rotate and thus finally tightens the nut.
So what can you do if you bite the disc on your grinder?
Each master has his own secrets. We learned a few of them especially for you and at the moment we will share the most common methods of getting out of the situation.
remove the disc from the grinder
This method is used in the latter cases.
Reasons for snacking
As a rule, this problem occurs on angle grinders with a working surface diameter in the range of 150-180 mm. When a strong torque occurs, the disc bites. This leads to the fact that the nozzle cannot be removed using a regular wrench, even with serious physical effort.
The second common reason is the use of a grinder disc that does not correspond to the factory parameters of the tool. This leads to disruption of the entire mechanism and jamming. In rare cases, a nut cannot be unscrewed when rust appears on its thread. This most often occurs when the tool is used for a long time or stored without changing the attachment.
Important ! Discs for angle grinders are available in standard sizes, the diameter varies from 115 to 230 mm. The landing shaft itself is available with a diameter of 22.2 mm; when using older models, an adapter is required.
CV joint nut, how to unscrew, in which direction and why it does not unscrew, overview of types and types of nuts
We are looking for two authors for our site who are VERY well versed in the structure of modern cars. Contact by mail
The spline connection of the outer CV joint is a critical unit. It is this part that bears the torque load.
It is no wonder that the grenade nut, which holds the floating axle shaft in the drive wheel hub, should not unscrew on its own.
There are many ways to fix threads:
Before unscrewing the hub nut, it is advisable to read the instructions for routine maintenance of your car. It indicates the method of fixation, the direction of the thread and other nuances.
- Changing the geometry of the nut (one side is oval). Anyone who has repeatedly unscrewed such a nut has seen that the threads gradually become unusable;
- Punching after tightening. This solution is not suitable for replaceable units, since this will damage the screw part. However, many car manufacturers fix the hub nut in this way so that it does not unscrew while driving;
- Hairpin. The most reliable method of fixation. The nut does not unscrew on its own, and the thread does not deteriorate. For some reason, not all car designers use this simple method;
- The retainer is a “shoulder-groove”. A common method, more reliable than core punching, but detrimental to carvings. Longitudinal grooves (one or two) are made on the threaded connection of the axle shaft. The CV joint nut has the same number of collars, which bend into grooves after tightening. It is almost impossible to unscrew the nut without damaging the thread;
- A variety of fixing paints and adhesives. Not used on hub connections.
Since the connection is in unfavorable conditions (especially if the boot cap is lost), the nut does not unscrew the first time. An inexperienced driver panics, starts turning the nut in the wrong direction, uses attachments on the wrench in the form of a meter-long pipe, and as a result breaks the thread. The consequences are a forced replacement of a still-living CV joint.
How to unscrew the hub nut without ruining the threaded connection
First of all, stock up on quality tools. An ordinary wrench is not suitable for plumbing work, although many car owners stubbornly use them to repair CV joints (the size is the same, but the cost of the tool is lower). An open-end wrench can only be used to unscrew an already “undermined” nut, this is really more convenient.
For the hub (CV joint), only a union head is used. The end cap can be cast or stamped (the second option is cheaper), and exactly match the size of the nut. If you “lick” the edges using a tool with backlash, you will be working with an angle grinder, and you will have to say goodbye to the CV joint.
Important! Reuse of nuts is not permitted. Before unscrewing the old nut, make sure you have a new one.
- Thoroughly clean the surface from corrosion and dirt. If a spline-shoulder pair is used, you need to pick out everything that is in the holes;
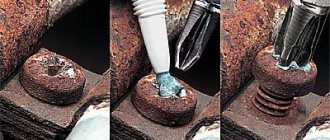
- Treat the joint with a penetrating compound for soured threads. For example, WD-40 liquid, or regular kerosene. You may need to "soak" the thread for several hours;
- Remove all fixing devices;
- Place the socket on the nut and try to turn it using the lever. At this stage, it is better not to use handles with ratchets, as the mechanism may be damaged;
- After “undermining”, the nut can be unscrewed with any wrench that is more convenient.
Throw away the old nut and stud. Clean the threaded connection from rust and traces of fixing compounds.
How to unscrew the CV joint nut if a fixing collar is used
It is this method of fixation that most often leads to “licking” of the thread. VAZ drivers know what they are talking about. An inexperienced master, delighted at the easy movement of the nut, will ruin your grenade in 2-3 turns of the key.
For proper release, you need a special punch that exactly matches the size of the spline collar. You won’t find them during the day with a fire, so it’s wise to make a useful tool yourself. For example, from an old file. With its help, you can unscrew the nut while maintaining the threads on the axle shaft.
After disassembly, it is necessary to slightly grind the shoulder to remove burrs.
What to do if the nuts do not unscrew?
Have you removed the clamps, “soaked off” the rust, bought a wrench with a 1 meter lever, but it still doesn’t work? There are proven ways to unscrew a nut without a grinder.
- Reverse rotation. Sometimes it is enough to first move the nut in the direction of tightening, and the process will begin;
- Tap the nut. Use a small hammer (preferably brass or copper) to tap the edges;
- Heat. A gas torch or blowtorch is an almost 100% guarantee of success due to the expansion of the metal. In an electrified garage you can use a hair dryer. Heat for at least 5 minutes.
Don’t panic, hit the key with a sledgehammer, or cut the hub with a grinder. Rust on the threads is not welding. The connection is still removable, it just requires a little patience.
Source: https://SwapMotor.ru/tehnicheskoe-obsluzhivanie/gajka-shrusa.html
Modifications of clamping nuts
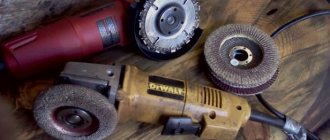
Some manufacturers have paid serious attention to the issue of a tight fastener on an angle grinder and have eliminated it. For example, the DeWALT sander has an improved mechanism and a clamping fastener that can be easily and quickly unscrewed even after prolonged use of the device. Like the manufacturers of angle grinders, the creators of clamping nuts are also in constant search. The famous German company AEG has improved the clamping fastener.
As a result, using a fastener from this company, you can forget about discomfort; the fastener turns away quickly and without much effort, at any moment. And now you don’t have to think about how to free the jammed circle or what’s left of it. Everything is quite simple: a special thrust bearing is mounted into the quick-release nut from AEG, which will not allow the fastener to tighten spontaneously and jam the circle.
In addition to AEG, there are a number of brands that produce and practice specialized quick-release fasteners. Such fasteners are divided into 2 types:
- which under any conditions must be unscrewed with a key, but now it is not so long and difficult;
- improved, which, even if the circle jams, will make it possible to unscrew them with your fingers.
How to install correctly?
Installing a disk on a UMS is not that difficult. You can change it simply by following the instructions, although there are some nuances here.
First of all, you need to install the disk with the correct side
This is especially important if it is cut-off. Typically, the side of the disk with the label, which indicates the marking and, accordingly, the area of its application, is slightly different from the opposite side
This may not be apparent immediately, but with prolonged intensive work the difference will not only be noticeable - it will be obvious.
On the side on which the label is glued, a wide pressure washer is placed, and the moving nut acts on it when tightening (installing the disk). The nut slides along the polished surface of the washer; without it, tightening or unscrewing will become more difficult, since the abrasive will firmly hold the nut and more force will be required
This is especially important if a quick replacement of the disk is required or if it breaks (jammed)
With circular saws or other products that have teeth or a significant difference between the two sides, problems with installation usually do not arise. For example, attaching a grinding disc in reverse will not work: it will simply be impossible for it to work.
Stone discs, including diamond ones, have a special rotation indicator in the form of an arrow: when installing them, you need to fasten them taking into account where the rod will rotate.
It is also important to consider the size of the drive during installation. In no case should you neglect safety and remove the protective casing - it is better to choose a disk of the appropriate diameter
Sometimes a worn-out disc from a large unit is installed on a smaller grinder. However, a worn-out disk, as a rule, cuts worse, the working surface is limited to approximately half the radius of the disk, and the structure is slightly different. The disk burns faster and produces less work. This operation may be justified if the rod diameter matches. But you won’t be able to change it back.
When installing, no debris should get under the disk. Of course, the clamping nut can easily squeeze small objects, and some will be pressed into the surface of the circle. But a distortion invisible to the eye will cause a displacement of the plane of rotation and, as a result, strong vibration of the entire mechanism; it can cause destruction of the disk and, of course, you should not hope for an accurate cut in this case.
The clamping nut must be unscrewed with the wrench supplied with the tool. To prevent the rod from turning, it must be locked by pressing a special button. You need to unscrew the nut while simultaneously holding the button pressed.
After twisting the nut, a disk is put on the freed rod, face outward, and you need to make sure that it is installed exactly in the seat.
The kit for a new grinder always includes a certain number of cardboard spacers - when installing the disk, they need to be laid so that they are between the disk and the clamping elements. Such gaskets will help unscrew a broken or jammed disk.
Next, the nut is manually tightened until it stops and tightened with a special wrench. That's it, the grinder is ready for work.
What is causing the problem?
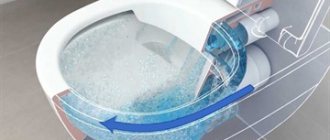
When rotating at idle, it is difficult to encounter a similar problem. Especially when working with light wheels and tools with a soft start function. However, after increasing speed and contact with the surface being cut, the following occurs:
- When material resistance occurs at the wheel, the angular speed of rotation sharply decreases and it slows down.
- The engine, by inertia, continues to operate for several moments at the same speed, dragging the gearbox and spindle with it.
- The locking nut is tightened by inertia more strongly along the threads of the spindle head, thereby pressing in the cutting disc.
That's it, the process of tightening the fixing flange is completed - an emergency situation is obvious. The following factors influence its occurrence:
- Large circle size.
- High power of the tool.
- Massiveness of the rotor.
- A sharp increase in cutting depth, i.e. increase in resistance.
In this case, removing the disc from the grinder can be very difficult. Additional measures need to be taken.
Replacing a disk in normal mode
When operating an angle grinder regularly, you need to constantly change the wheels, which are consumables. If the tool is no longer comfortable to work with, then the worn abrasive wheel should be replaced.
Important! Be sure to check the electrical disconnection to avoid personal injury.
Step-by-step algorithm of actions
The circle is secured to the spindle head with a locking nut having an M14 thread. The standard configuration includes an open-end wrench with special protrusions for engaging with the holes of the fixing flange.
To unscrew the nut, you need to fix the spindle. For these purposes, there is a special lock located on the back of the angle grinder. By pressing the button, you will secure the gearbox with a cotter pin, eliminating the possibility of its rotation.
Insert the key into the holes. Hold the latch with one hand, and with the other turn the wrench counterclockwise, moving the nut.
The direction of movement of the disk is usually clockwise. However, there are models that may have something different. In any case, unscrewing occurs in the opposite direction to rotation.
Once the nut is in place, it can be unscrewed by hand without any effort.
Remove the retainer and the old circle.
Remove the bottom flange.
After intensive work with a tool with metal inside the casing, you can find a layer of burnt scale with abrasive. Use a steel brush to remove residue.
After cleaning, install the lower flange in place, aligning the grooves of the spindle with the grooves of the flange. A gasket is placed on top.
If your model does not have additional spacers, then such washers can be prepared from plastic or thick cardboard. Next, you need to correctly place the disc on the grinder and cover it with a similar gasket.
Important! Installed spacers allow you to easily unscrew the nut, even if the disc is pinched or broken.
Use your hand to tighten the top clamp counterclockwise (counter-rotation), supporting the cutting wheel. In this case, you also need to tighten the spindle lock and tighten the flange until there is noticeable resistance. Use the open-end wrench to tighten it with a little more effort. Do not over-tighten the fastener, otherwise you can overtighten the circle and it will warp.
Now you can continue to work. However, problems arise from time to time and it is simply impossible to unscrew the disc on an angle grinder. Let's see below how to change the disc on an angle grinder in such cases.
Grinder discs differ from each other according to the following main characteristics:
- Outside diameter;
- Disc thickness;
- The material from which the disc itself is made;
- Characteristics of maximum rotation speed;
- And, of course, the area of proposed work.
For a better understanding, let's look at the main types of grinder wheels and define their use:
- Cutting wheels. These are the most widely used consumables for an angle grinder. Their main purpose is to work with metal, stone and wood. Diamond discs are a type of cutting wheels for grinders. This is heavy-duty equipment for processing high-strength materials such as reinforced concrete, tiles, porcelain stoneware, marble.
- Grinding and roughing wheels. As the name implies, this type of disc is used for grinding various materials, for example, polishing products made of stone, or for removing (scraping) the top layer, for example, eliminating a layer of rust or an old paint coating.
Main uses of angle grinders
- Cleaning surfaces, stripping off old paint. It is performed with brushes with steel rods or sandpaper petals. There are no difficulties in operation, except that brushes with sandpaper require compliance with the direction of rotation.
- Sanding with sandpaper. A concentric attachment with Velcro is screwed onto the grinder, onto which the abrasive in turn is attached. Before use, check that the direction of the threaded fastening and the rotation of the tool shaft are consistent.
- Grinding with abrasive wheels. These attachments require careful handling, as under high load, the abrasive may break. You cannot cut material with such discs; shock loads are unacceptable.
- Cutting metals, stone, gating concrete. Performed using cutting discs.
It is with such attachments that emergency situations most often occur.
The nail will help you
Another effective way to unscrew a jammed nut on an angle grinder if you don’t have a key. To do this, you will need a nail 100 mm long, the head of which needs to be bitten off, and then given a U-shape. The distance between the ends of the nail must correspond to the holes in the clamping flange of the angle grinder. Insert the resulting structure into the holes of the nut and turn it. If the flange does not give in, you can use a screwdriver as a lever or pliers.
PHOTO: i.ytimg.comYou can use a nail if you don’t have a key at hand
What solution to the problem is offered by specialists and amateurs?
- Install a newspaper gasket under the nut;
- Place a gasket from a plastic bottle under the nut;
- Replace the nut with a nut of a different design.
What is a newspaper gasket? This is a cardboard washer the size of a nut. It is put on the installed disk, and a nut is screwed on top. This piece of paper was a stumbling point, since the safety inspection always spoke about the harmfulness of such a decision.
Representatives of safety authorities treat the installation of gaskets made of all other materials in the same way:
- Cardboard;
- Paronitis;
- Gaskets made of different plastics;
- Rubber gaskets of various thicknesses.
But there is a solution that does not contradict safety requirements and allows you to install and remove the disk normally. This is a special nut that consists of two parts - a nut and a pressure washer. The use of such a nut does not require any shims, since the disk does not jam with it.
If you don’t have a special key at hand, then craftsmen suggest doing without a key. This does not mean that it is possible to do without a key completely, but to use a “gas key” or other device. To do this, you need to tighten the latch, tighten the nut with a gas wrench and unscrew it. This is how you can change a jammed disk, but this is a very awkward operation for one person.
READ How to restore a petal disc for an angle grinder
There are also suggestions to hold the disk with your hand and unscrew it. Maybe, but it’s unlikely that you’ll be able to change broken disks this way. It is better to use wrenches that are designed for removing and installing disks.
Some foreign power tool manufacturers, such as Bosh, produce grinders with easily removable nuts. They firmly fix the disc on the tool shaft and can be easily and quickly removed to replace the disc.
How to unscrew it if it's tight?
First, let’s answer a common question: “In which direction does the nut on an angle grinder unscrew?”
Remember! You need to unscrew in the direction of rotation of the disk. Those. If the disk rotates clockwise, then you need to unscrew the nut clockwise.
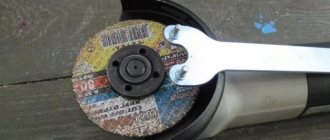
The easiest way to unscrew the disk mount is to place a key and then hit it with a hammer several times with medium force.
If this does not help, there are alternative methods to solve the problem:
- heat the fastening mechanism with a torch, which will cause the metal to expand. As a result, the structure will become movable;
- Using a small metal plate, grind the disc down to the nut. Continue grinding until its surface comes into contact with the nut and begins to turn it;
- insert the steel pipe into the holes of the nut, use it as a lever to unscrew the tightened nut. Do not apply too much force so as not to break the thread;
- Lubricate the threads with machine oil, such as WD-40. Wait 3-5 minutes and then try to unscrew the fastener using a key. Using this method, you can also get rid of rust inside the landing shaft;
- If you need to remove a circle that has not been used for a long time, you can start tightening the fasteners even more tightly. After that, try to weaken it again;
- Boiled or rusted threads on angle grinders can be treated with turpentine, vinegar, white spirit or rust solvent. After processing, you need to wait at least 30 minutes and then try to unscrew the nut again.
If a situation arises where you are left without a key, you can cut off the stuck fastener with a chisel or grind it off with a second grinder with a metal disc. After this, you will have to restore the threads and also look for a spare nut. If the circle still doesn’t give in, you can try combining different methods. For example, treat the shaft with machine oil, and then begin to unscrew the nozzle using a lever or tap the mechanism with a hammer.
Important! Do not unscrew the fastener with great force. This can lead not only to thread failure, but also to breakdown of the angle grinder body itself.
How to unscrew the hub nut - the main 5 ways
To solve the problem of how to unscrew the hub nut, it is necessary to determine the dismantling method. This can be done in one of two main ways:
- With the wheel removed.
- The car is on wheels.
It is important to know:
When unscrewing the hub locknut, it is important to ensure compliance with safety precautions. Under high load, the vehicle may move and injure the technician.
To prevent this from happening, we use stops. They are installed under the wheels on both sides. The parking brake must also be applied. This way we will ensure that the car body is held in a given position.
If the nut does not unscrew, we make a choice taking into account the following possible methods:
| Name | Description | What tools are needed? | When to use |
| "Barbarian" option | Provides for dismantling and subsequent replacement. | Drill with metal drills (of different diameters), chisel, hammer (small sledgehammer). | It is used if there is no chance to unscrew it in the usual way. |
| "Hot" method | Heating the metal at the joint. | Burner. | Bearings and hubs must be replaced. |
| "Delicate" work | Carefully unscrew the stuck part, gradually increasing the force with the lever while simultaneously tapping on the body. | Tubular socket wrench, heavy-duty screwdriver, hammer, extension pipe, deep penetration lubricant. | If necessary, perform the work as carefully as possible |
| Maximum force | A powerful wrench and a long pipe can significantly increase the force, thereby increasing the chances of stripping the thread. | Heavy duty socket wrench, long pipe. Heads for licked nuts. Key with hydraulic or electric drive. | A strongly stuck nut. |
| Using chemicals | A soaked rag will gradually relieve the problem. | Kerosene and (or) white spirit, hammer, rags. | If you have time. |
You can quickly unscrew a stuck element if you provide a lever. It is installed on the ratchet wrench using a small pry bar. You can use a piece of pipe of suitable diameter with a length of at least 1 meter.
How to remove a bitten disc from an angle grinder + (Video)
The use of new nuts solves the problem of removing the disk, but what to do with an already bitten disk? Even if the disk was installed correctly, it is not always possible to remove it. Practice suggests different ways to solve a problem. You can clamp the clamp and hit the nut holes through the extension in the direction of unwinding. This option is only possible with a working latch. But the latch may not withstand such a solution to the problem and break.
The second method is more logical. Under the clamping nut and lower support washer there is a gearbox shaft with machined chamfers. The lower support washer is put on them. A standard wrench cannot be installed there - it is very narrow. But you can take a regular open-end wrench set to “17” and sharpen it on both sides.
The turned key will fit into the gap, fit onto the chamfer of the shaft and secure it. Now, using any wrench, any nut will be unscrewed, and the disk or its remains will be removed from the angle grinder.
How to unscrew the nut of an angle grinder (angle grinder) if it is stuck
So, if the key doesn’t work, even if you insert it and hit it lightly with a hammer, then we start using something more serious.
The first thing you can try, but again without fanaticism, is to take a rod, insert it into the holes on the nut and, using a hammer, move the nut in the direction of unscrewing it. The main thing here is not to break the button or tear off the holes, as here
The second thing many people advise is to warm the nut. Warm up the nut. As a result, it is slightly, but physically still obliged to expand. Resizing may or may not help...
There is no need to pull as hard as possible until the lock on the anti-rotation button or the button itself breaks. In this case, it is not the tool you use to unscrew that breaks, but often it is the body of the angle grinder.
The third method is the most effective, and, oddly enough, one of the safest for the grinder herself. Take and break off the edges of the disk along the nut.
Next, we use a thin metal plate or another disk (thinner), and perhaps a second grinder with a disk. In this case, the broken disk must be turned either with a plate or a disk. We try to sharpen the disk so as not to damage the nuts holding this disk, because they will be useful to us later. We sharpen the entire broken circle in this way until we grind it down and the nut comes off.
This is a matter of 4-5 minutes, no more.
If you use a second disk or metal plate, it is better to insert it into a vice to hold it. Since holding such objects with your hands is dangerous. This method is the most effective!
How to prevent re-clamping?
To avoid getting into a similar situation in the future, carefully read the following recommendations from experienced professionals:
- when tightening the disk nut, do not apply excessive force by pressing the key, since at the moment of rotation the nut will tighten itself to the desired level;
- Before installing a new disk, place a cardboard or plastic washer under the nut; it can be cut from any available material;
- the side of the abrasive disc with the label pasted should touch the support flange, not the nut; if this condition is met, the metal ring of the circle will protect it from jamming;
- Weld a regular hex nut onto the flange, which can be unscrewed with a simple wrench.
Cutting stones or discs for grinders are not always of good quality and exact size. This can lead to a situation where the nut gets stuck. But if this happens to you, do not despair. Useful advice from experienced craftsmen and your own ingenuity will always help you out in difficult times and tell you what to do in a given situation.
To learn how to unscrew the nut on an angle grinder without much effort, watch the video below.
How to prevent the nut and disc from biting on an angle grinder
And a few words about preventing such unpleasant precedents again. You can use small cardboard spacers, inserting them between the disc and the nut. As a last resort, we use a disk with a smaller diameter, unless, of course, the nut is tightened from above. As a result, you can unscrew such a nut without any problems. It won’t pinch, it won’t bite on the thread...
And another small video on a topic that I learned from my own experience.
The disk is bitten, how to remove the clamp
You can loosen a clamped threaded connection by heating the clamping nut by friction against the wooden surface of a thick beam or the stump of a tree cut down at the dacha. Unlike heating with a blowtorch or gas torch, here it is possible to regulate the force of pressing the nut against the wood. More uniform heating of the threaded connection for several minutes makes this method less safe in terms of maintaining the functionality of the angle grinder. In practice, as shown in the following video, the clamping nut will easily unscrew when it reaches a temperature at which a drop of water will instantly evaporate after it hits the surface of the angle grinder’s clamping nut, heated by friction.
How to install the disk correctly, do you need to tighten it?
While the grinder is working, the clamping device pressing the disc tends to tighten even more. Therefore, when installing a new consumable, you only need to lightly tighten it. Further, the laws of physics will provide him with a reliable clamping of the tool.
The main question: How to choose the right disc for an angle grinder?
When choosing equipment for an angle grinder, first, you should decide on the type of work you intend to do. The choice of disk type will depend on this. We would also like to mention that when choosing a consumable, be sure to take into account the power properties of each specific model. Study the labeling. Often, it is printed on the disk itself and contains a set of signs by which you can find the relevance of a given consumable for performing the intended work.
Also, focus your attention on such a parameter as the diameter of the disk. Under no circumstances should it exceed the size of the guard on a particular tool model. The size range of disks is usually represented by the following diameters: 115, 125, 150, 180 and 230 mm. The most common diameters are 125 mm. and 230 mm. They are optimal for most types of work and the capabilities of the tool itself.
Among bakelite-based sanding discs, 6.00 mm wide discs are more popular. This parameter depends on the total diameter of the disk. The dependence is the following: the larger the diameter of the disk, the greater its thickness and vice versa.
READ How to Cut Wood with a Grinder
remove the disc from the grinder
This method involves the introduction of the well-known VD-40 lubricant.
It’s probably like electrical tape, applicable in all cases of life.
You need to spray the flange, wait about 5 minutes and try to unscrew it with a key.
Rotary hammer or impact drill
To be honest, it is not the best or easiest option to unscrew a jammed nut on an angle grinder, but it is used if other methods do not work. As an attachment for a drill or hammer drill, you need a drill of a suitable diameter, most often 6 mm. If you are using a drill, you need to set it to jackhammer mode in advance. It is better to fix the grinder in a vice, clamp the spindle stopper, insert the drill into one of the holes of the clamping nut with emphasis in the direction of unscrewing, and briefly press the “Start” button. This method allows you to move even a tightly clamped flange. The disadvantage is that this can break the mounting holes for a standard key.
PHOTO: i.ytimg.com Insert the drill into one of the holes in the nut and turn on the drill in impact mode
What about large caliber?
If you need to unscrew a nut, say, 36 mm, it is not a fact that such a large wrench will be available. Especially if the “action” is one-time. But there are no hopeless situations.
A small bench vise is quite suitable for our purposes. Their advantage is that they can grip even a fairly thin (4 mm or less) nut.
If there is no vice, but there is a small clamp, this will also do just fine. Of course, it is more difficult for her to grasp a thin nut due to the “floating” plate. But as a lever, a clamp is much more convenient than a vice.
And also, don’t forget about lubrication! It’s true what they say: “If you don’t grease it, you won’t go.” And, for starters, the best way to unscrew the nut is not to be lazy, find and use the appropriate wrench.
Notes and Tips
To reduce the likelihood of clamping the working disk on the angle grinder, you should load the tool smoothly to prevent the disk from braking when it comes into contact with the material being processed.
The disk should be installed on the spindle with the pattern (marking) facing outwards (towards the clamping nut), since it is on this side that there is a wide metal washer on the disk. If a disk jams or breaks, the movable clamp will be easier to handle because it will slide on a metal washer rather than on the rough surface of the disk.
It helps to place a washer made of cardboard or other not too hard material under the nut. But this method is not specified by the tool manufacturer, since this may disrupt the balancing and does not guarantee the reliability of fastening the disk to the spindle.
You can heat the locking nut using a blowtorch or gas torch. The heat source in this case does not matter. The main thing is not to overdo it with heating, so as not to damage the spindle bearing.
Effective ways to unscrew a rusty bolt or nut?
If we consider more effective ways to combat rust, it is worth highlighting the following methods.
Heat.
From the physics course we know that metal tends to expand as temperature increases. This feature can be used to solve the problem.
To unscrew a rusty nut, warm it up thoroughly, and then immediately try to unscrew it.
It is important to act quickly here so that the metal product does not have time to cool down. The essence of the manipulation is that due to uneven heating, the rust is deformed and has less restraining force
Heating can be carried out in any available way. This could be a gas burner, a candle, a lighter, or even a soldering iron.
You can also use a blowtorch or other device.
When using this technique, be careful and remember the contraindications. In particular, heating is not recommended if wood or paintwork products are located in the joint area.
In this case, the part will be damaged and you will have to spend money on replacing it.
Tapping.
You can unscrew a rusty nut or bolt using the traditional method - by tapping around the perimeter of the part.
Mechanical impact on each side allows for greater deformation, which contributes to the scattering of rust.
While tapping, be careful not to damage the edges of the nut. Otherwise, the task of unscrewing will become more difficult.
Twist.
You can also go the other way. First, tighten the nut (bolt) with maximum force, and then try to rock the connection and dislodge the rust layer in this way.
If the manipulation is successful, unscrewing the nut or bolt will not be difficult.
Wax cup (difficult, not practical, but possible).
This technique cannot be called popular, but in terms of effectiveness it is in no way behind its “competitors”.
The algorithm of actions is simple. Make a cup-shaped shape from plasticine or wax so that its sides are above the level of the nut (about 2-3 mm).
Then dilute the sulfuric acid, pour the liquid into the prepared cup and add a little zinc. This chemical combination provides a galvanic effect and the ability to unscrew the part.
Destruction.
If none of the above methods produces results, and the upper part is broken or severely deformed, there is another solution - breaking the bolt and drilling it out of the vehicle part.
Here, to complete the work you will need a hand or electric tool, as well as a set of drills of a suitable diameter.
Before drilling, place the drill bit in the center of the bolt and hit it with a hammer. This is necessary to deepen the product in the central part to a certain depth.
First, work in small increments and make sure that the drill enters exactly in the central part (tilts to the left and right are prohibited).
Start with a small diameter drill and then move on to a larger piece.
When choosing a drill, pay attention to two criteria - price and country of origin. Please note that high quality products cannot be cheap, because they are made from hardened steel and sharpened in a certain way.
Please note that high quality products cannot be cheap, because they are made from hardened steel and sharpened in a certain way.
At the same time, special drills do an excellent job with aluminum, cast iron and other materials (including brittle ones).
To ensure correct drilling, use special lubricants, which can solve several problems at once - protect the drill from strong heat, cool the metal and lubricate the drilling elements. As a result, the whole process becomes easier.
What else can you do?
If the above methods do not work, then the nut will have to be heated with a gas burner. Under the influence of high temperature, the nut will expand and begin to rotate. You can also use a rather barbaric method, namely sawing the nut with a hacksaw. Then you will have to buy a new one. Some technicians use WD-40 penetrating lubricant. It is used for processing threaded connections. Judging by the reviews, after just a few minutes the nut can be turned.