Features of working with a drill and cutter
Milling involves processing the material with a cutter installed in a stationary housing of the power device.
In this case, it is assumed that the speed and depth of penetration into the processed material are regulated on the tool. But the array on which the action is performed must move. Such machines are called milling machines. You can use a drill as a router only in certain cases. The reason is the special precision of work and the high force on the drive. Drill cutters are specially designed taking into account the power and methods of regulating the device. The shape of the drill and its center of gravity are of great importance for the work.
Features of using a cutter for a drill:
- a change in the load vector can damage the gearbox if additional pressure is applied to the workpiece;
- the motor overheats, frequent rest is required;
- the load on the plastic body can lead to armature misalignment and deformation;
- fastening in a chuck with a horizontal axis of operation is unreliable.
All this suggests that the drill as a milling cutter operates in an unusual position and with unusual directions of resistance forces. You need to work slowly and carefully with the milling attachment for a drill.
How to choose a milling cutter for metal
Choosing a cutter for a drill is quite simple. To do this, during its selection, you need to pay attention to the following characteristics:
- The material that was used during the manufacture of the cutting part.
- Level of sharpening of teeth. It is worth noting that there should be no cracks or microscopic chips on the teeth.
- Diameter.
- Shank type. Some cutters are not always suitable for working with a power tool such as a drill.
To work with an electric drill, it is not recommended to purchase cutters that are designed for machine tools. In this case, if there is a need to process hard material, it is best to purchase cutters whose cutting parts were made using solid fuel plates.
Woodwork
The tool consists of a shank for fastening in a chuck and a cutter, which is made of special steel. Initially, the cutter is sharpened for a specific operation. The equipment is made with strict precision to eliminate backlash. Sharpening and steel hardness are selected according to the characteristics of the material being processed.
It is better to select the profile and depth of cut using a sample of material of similar hardness. In this case, the drill is installed in the clamps at the required distance and the speed is selected corresponding to the work being performed.
For attachment to a drill, only end mills with a shank are used. For long-term work without sharpening, it is better to choose cutters for plywood. You cannot sharpen them yourself.
Wood cutters for drills vary according to the type of processing:
- kalevki - round corners;
- V-shaped - make a selection in the body of the workpiece;
- disk and folded - create grooves;
- fillet – internal groove on the edge;
- dovetail - connecting nodes for tongue and groove;
- edge - process the edges of the planes.
Wood cutters are distinguished by their gentle effect on the material in order to prevent chipping and hardening of the edge to the point of brittleness.
DIY making
A master can make a milling machine from an electric drill with his own hands. In addition to it, you can make homemade cutters. The machine will help you use the drill more conveniently and perform the job more accurately, and the cutter will save money. Homemade tools are cheaper than purchased ones, but when using them you need to carefully monitor the integrity of the structure.
Electric drill
Materials and tools
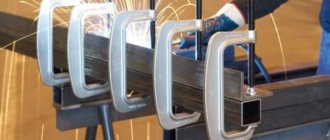
To make a homemade milling device with an electric drill, you need to prepare tools and materials in advance. To assemble the frame, you will need plywood with a thickness of at least 15 mm. The connecting elements can be wood screws. We must not forget about the guides along which the power tool will move. It is advisable to equip the working surface with clamps for fixing the workpiece. Clamps can play their role. You can make a homemade milling machine from a drill. It is advisable to study the drawings and watch training videos in advance.
Tool design
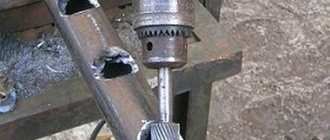
Making a milling machine from a drill begins with assembling the structure (bed and work table). When the plywood frame is ready, you need to attach the guides to it and adjust them according to the size of the homemade machine and the dimensions of the drill. Next, the power tool is fixed on the guides and adjusted for convenient operation. It is advisable to cover the surface of the desktop with a sheet of steel. It will increase the life of the machine and prevent the wood from being damaged during operation. If the drill is powerful, then it is necessary to make the structure heavier to avoid vibrations during operation. To do this, any load is located at the bottom of the frame so that its weight presses on the frame.
You can make three types of cutters with your own hands.
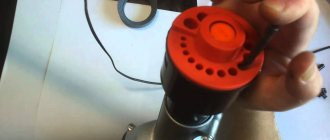
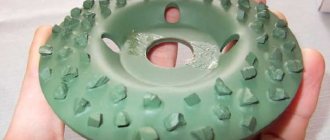
The first type includes a silicon drum from a lighter, mounted on an axis of a suitable diameter. The second type is a wooden cylinder with sandpaper attached to the edges. The third type includes a correctly ground dowel, which is used as a cutting attachment. Milling attachments for drills are popular for carrying out one-time repair work at home. With their help, you can make a homemade machine that will be useful for your own workshop. It is necessary to remember the rules for using power tools so as not to damage them.
Features of cutters with shanks for metal processing
Metal is a solid material with a uniform crystal lattice. It is processed rigidly, the main indicator is the speed of work.
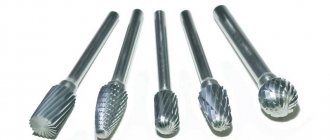
Depending on the desired result, metal cutters of various configurations are used for drilling:
- end;
- corner;
- cylindrical;
- disk;
- terminal
Face cutters are used for vertical metal processing. More often they process a plane.
If the teeth are placed on the end and side edge of a flat disk, you can drill a recessed profile on the plane. This is how grooves and grooves are made. If you use not a disk, but a cylinder with smoothly curved grooves, you can process a horizontal surface, remove a layer, and smooth out irregularities. For each operation, a special metal cutter for the drill is selected. In this case, you should remember the load on the motor and bearings, avoiding overheating of the tool.
The requirements for the manufacture of cutters are strict. The tool must work efficiently, maintaining the sharpness of the cutting surface for a long time. Often, in order to save expensive carbide steel, cutters are made prefabricated, the body is made of ordinary steel, and the teeth are made of alloys.
Milling cutters should only be purchased from well-known manufacturers. At the same time, check the quality of sharpening, the uniformity of the structure, and pay attention to the material of the cutting edge. Particularly check the tight fit of the prefabricated cutters.
A cutter, like any cutting tool, requires careful handling. The cutting edge does not tolerate heat, vibration, or improper use.
Varieties of cutter shapes
Milling cutters assist in the following procedures:
- removing gel polish from nails;
- nail polishing;
- processing of side rollers;
- removing cuticles;
- foot restoration;
- giving a beautiful shape to the nail.
Based on their shape, nozzles are divided into types:
Classification of cutters by purpose
The nozzles differ in size, which determines their functionality and scope of application:
- large – for rough and wide areas on the skin;
- medium - in the areas around the nails;
- miniature – for working with brittle nails and sensitive areas of the skin.
Lifting the cuticle
This is the initial stage of work, for which the best choice would be a nozzle with a rounded or slightly blunt end. Experienced craftsmen recommend a cone (can be truncated) and a cylinder as the ideal shapes to perform the function.
Cuticle opening
To open and lift it, a fissure diamond attachment, which has a rounded end, is suitable. Bullet, lentil and flame attachments are also useful in this case.
Cuticle removal
A ball attachment is ideal for this task. To start working with it, you need to first open the cuticle. As a result, the cutter will go under it and come up, and with a little pressure the cuticle will be cut off.
All movements must be directed from the inside out, taking into account that in no case should you rub in one place for too long: this will lead to the appearance of a wound or an unpleasant burning sensation. When the work of the diamond ball is completed, it is the turn of the corundum ball, which will allow you to polish not only the cuticle, but also the side rollers.
Sometimes the cuticle is removed with a diamond cylindrical nozzle, which has a rounded end.
For removing gel polish
The best use in this case is a ceramic nozzle, which has a blue mark or a carbide nozzle with a red mark. The shape doesn’t really matter, the main thing is that it is convenient for the master to use. Choosing the right tool will make hardware gel polish removal a reliable and effective process.
To shape nails
For this purpose, it is best to use a ceramic cutter shaped like a truncated cone.
It is important to choose the degree of grain
For polishing and grinding nails
This process involves special cone-shaped polishing attachments. They are made from cotton and felt materials, as well as silicone. Due to their soft texture, they allow you to polish the surface of your nails to a shine.
Silicone nozzles are considered the most durable, which are usually used until the surface is completely abraded. They are easy to sterilize. You cannot polish a nail with the same nozzle: masters arrange them according to the degree of hardness: from hardest to softest. The polymer coating allows you to make the nail glossy.
Classification by hardness and color
Types of cutters for manicure usually do not have a specific color: it is insignificant, unlike the ring, which is located at the base of the nozzle - it is always painted in a certain color and indicates the degree of hardness:
Processing plastic with a drill and cutter
A special feature of plastic processing is its viscosity. When exposed to a cutter at high speed, the plastic first begins to wrap around the cutter and then liquefies. Therefore, the selection of drills and the processing speed of each polymer causes certain difficulties. A plastic cutter for a drill is selected depending on the type of material:
- thermoplastics;
- thermosets.
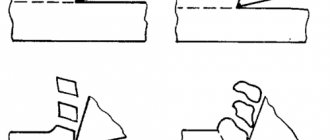
From the name it is clear that thermoplastics become fluid under the influence of temperature, the chips of such materials are draining, with melted edges. Thermoset plastics are not subject to softening when heated. Often this material is produced with reinforcement. Based on the properties of the polymer, cutters and processing modes are selected.
Thermoset plastics are processed with multi-flute cutters, while maintaining smooth processing. The depth of one cut should not exceed 2.5 mm. Otherwise, the surface being treated can be destroyed. Taking into account the artificiality of the material, it is necessary to organize the suction of microparticles so that dust does not enter the respiratory system of the worker.
Soft material must be cut with two-flute cutters at low speed so that the material does not “drip.” For sheet plastic, it is better to use compression cutters for edge processing.
Milling concrete with a drill
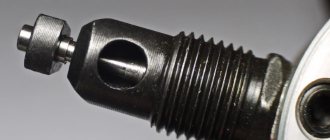
If there is a need to process the structure with a concrete cutter for a drill, diamond core bits with external cutters are used. The cutter is unscrewed from the base, shank. The pobedite layer cleans the hole well, provided the powerful drill operates in non-impact mode. These crowns are used for removing ceramic tiles from the wall for finishing cleaning.
Using pobedit bits for drilling is fraught with danger. The drill must be held firmly, expecting a jerk, since the density of the material in the wall may change, and the force of the impact will create a blow.
Why do you need a drill on a magnetic bed?
When developing a drill on a magnetic bed, we were guided by the problem of creating holes in multi-ton metal structures that cannot be moved. Such trusses, like a large magnet, attract a pair with an opposite charge. Creating a charged frame for a drill solved the problem of securing a tool for drilling holes with high precision.
Drilling large cross-section holes in metal is carried out using different attachments, including using a milling cutter for a drill on a magnetic bed. Typically, this attachment is used in the form of a hollow crown. Drilling with a magnetic drill according to the markings is guaranteed to be accurate. As long as voltage is applied to the frame, the drill is held on the plane with a force of several tons per square centimeter. After turning off the current, the installation is easily moved to a new location; its weight does not exceed 25 kg.
A hole saw can be used to drill a hole in a structure up to 130 mm in diameter.