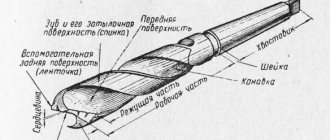
Design and principle of operation
Structurally, the flexible shaft consists of a soft body and a multi-fiber cable placed in it, for the manufacture of which alloy steel is used.
The cable is fastened in the housing thanks to a system of bearings or bushings located at the ends of the shaft. However, not all shafts are based on a cable and can be made of wire. Such models are equipped with several layers of braid, the fibers of which alternate clockwise and counterclockwise, thus forming a strong but flexible armor. One of the sides of both the cable and wire shafts is secured to the drill using a shank, and at the end of the other there is a cartridge or collet clamp for a tool (drill, cutter or bur). Under the outer shell there is a lubricant that reduces friction and helps prevent corrosion and moisture from getting inside. The materials used to make the body are nylon, plastics, conical bushings and twisted spiral tapes.
The flexible shaft has a very high safety margin and is designed for a fairly high rotation speed. Modern samples are able to work efficiently, transmitting torque up to one and a half thousand revolutions per minute. The length of the nozzles available on the modern market varies from 95 to 125 cm, which greatly simplifies the choice and allows you to purchase a product to perform technical tasks of any complexity.
Flexible shafts
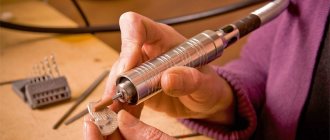
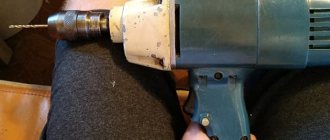
In everyday life, the convenience of a flexible shaft is used when working with drills and cutters in places where it is impossible or difficult to reach with a conventional drill. In dentistry, a flexible shaft is installed on all drills. Ant lovers make labyrinths for them, creating thin and complex passages in gypsum slabs. Craftsmen decorate houses by cutting and polishing small elements of wood and stone carvings using sets of tools mounted on a flexible shaft.
In addition to the drill, you can use a screwdriver, grinder and engraver. One side of the flexible shaft is secured in a collet clamp. At the second end there is a device for fixing the tool. The flexible shaft, located away from the massive body, allows you to do delicate work that requires little effort. You can manually drill millimeter-sized holes, clean parts in hard-to-reach places, and tighten screws where a regular power tool cannot reach.
During operation, the flexible shaft for the engraver reduces the load on the hand, and vibration is completely absent. The engine is located away from the working area, and the noise from its operation is less.
Homemade engraver with flexible shaft
In a home workshop, cases periodically arise when, during the manufacture of a part, it becomes necessary to process or modify a surface that cannot be reached with universal equipment. So the part may turn out to be bulky, fragile or not rigid, there is no way to secure the part or the surfaces need to be modified in place.
For this case, a hand-held device with a flexible shaft and mechanical rotation of the cutting tool is used. The device is called differently - an engraver with a flexible shaft, a mini-drill, a drill, etc.
Why do you need a flexible shaft?
The flexible drive consists of components such as an armored cable and a soft body. One side of such a device is equipped with a tip for fixing in the tool chuck, and the second has a similar (or collet) chuck for installing the corresponding work products: drills, cutters and others. Such equipment is used in such exceptional cases when it is impossible or inconvenient to work with a stationary drill.
On an ongoing basis, a flexible shaft is used in medicine, in particular in dentistry, since almost all drills function through such a device. In construction, such a device is used extremely rarely, but if there is a need to drill a hole or polish a surface in a hard-to-reach place, then only a flexible shaft on a drill will help solve the problem.
The flexible shaft can be used not only to connect to a drill, but also to a screwdriver or mini-drill. Thanks to this shaft, the working attachment is removed from the body of the main tool, which allows for various types of fine work that requires little effort. Using such equipment, you can drill holes from 1 mm, as well as strip, grind, screw in and out screws and other fasteners.
Design Features
The flexible shaft for the drill can bend in any direction, which is its main advantage. This shaft capability was achieved through the use of the following parts:
- Steel cable acting as a rotating core.
- A wire in the form of a spiral located outside the device.
The outside of the shaft is covered with a special shell, which prevents lubricant leakage. This lubricant helps reduce friction and also protects the core from mechanical stress (abrasion), damage and moisture.
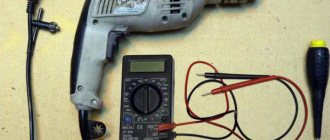
The design of the flexible shaft involves the use of bearings to which the cable is attached. It is thanks to the bearings that the rotation of the cable is ensured, which is attached to the shank on one side and to the chuck on the other. A high-quality drill attachment costs about 2,000 rubles. There are cheaper models, but it all depends on the manufacturer and the quality of the product.
How to make it yourself
To equip an electric drill with a flexible shaft design, you do not have to purchase it, especially if you do not plan to use the device for long-term work. You can make the device yourself from available materials, saving not only money, but also time spent searching.
To make a flexible shaft for a drill or screwdriver, you should use any braided wire in your arsenal. If you don't have one, you can purchase it. At the same time, the length of such wire can be chosen absolutely any, depending on the technological tasks.
As an alternative, you can use a speedometer cable from a car or a throttle or clutch cable from a motorcycle to make a flexible shaft. Once you have the finished braided wire in stock, you will need to connect one end of it to the shank. As such, you can use the shank from a damaged drill. To connect the steel cable to the shank you will need a steel nut and a welding machine. The second end of the steel cable must be connected to any existing drill chuck
It is important to understand that when performing work using such a device, you should hold your hand not on the cartridge, but on the braid or outer layer of the wire
A homemade shaft design will not only save money, but also get a product of the required length. Standard products produced by the manufacturer have a length of no more than 50 cm. Sometimes this is not enough, so you have to resort to making your own drill equipment.
In conclusion, it is worth noting that the drill, due to its improvement, is becoming an increasingly universal type of tool. The flexible shaft is a very convenient and effective attachment for a drill, with which you can solve any difficult tasks.
Will need
- Two bearings from old roller skates (or similar in size).
- Steel cable in a protective sleeve, from a motorcycle (or bicycle).
- A metal tube with a diameter suitable for the outer diameter of the bearings.
- Wooden handle from an old soldering iron (or similar wooden tube).
- A steel rod for the shaft on which the cartridge will later be installed.
- Collet chuck, with an internal hole, for the shaft rod of your choice.
- A metal tube with a diameter equal to the inner diameter of the bearings.
Don't miss: Homemade sharpening machine for planing knives: how to make it yourself
Tools and consumables required for work:
- Soldering iron, tin and flux.
- Bor machine or engraver, with a saw blade and a 3 mm drill.
- Pliers.
- Secondary glue with soda.
- Insulating tape.
- Knife.
- Scissors.
- Solid oil and machine oil.
Preparing parts for the future drill
You should start by making a tube from a long screw. To do this, you need to clamp the drill in a vice (this must be done by the handle; under no circumstances should you clamp it by the body). A bolt without a head is fixed in the chuck, and a Mayevsky tap is screwed onto its threaded side - it will be used as a guide. Afterwards, a drill is selected that fits the tap hole, the drill is turned on and the screw is drilled exactly in the center to the maximum possible length.
The screw must be drilled in the center for the entire length PHOTO: youtube.com
Further work requires extreme care. Using two needle files, between which the screw clamped in the drill chuck will rotate, you need to remove the thread so that bearings can be mounted on the resulting sleeve
At the same time, about 6-8 cm of undamaged thread should remain on the side closest to the chuck - this is very important
Using needle files, the screw is ground to the required diameter PHOTO: youtube.com
How to make it yourself at home with your own hands
When making a flexible shaft yourself, first you need to properly prepare the cable. First, it is pulled out of a special protective sleeve. In this case, you need to ensure that the cable does not unravel during removal. To do this, after removing the restrictive seal, it must be soldered using tin. The procedure for performing such work is as follows:
Then the cable must be pulled out of the sleeve. It is necessary to cut off the thread from the rod, which is located on the cable to adjust the traction. This must be done in such a way that after removing the thread, a segment 1.5-2 cm long remains.
It is necessary to solder a pipe to this section on which bearings will be installed in the future. The pipe needs to be put on a length and a little tin placed in it. After this, the tube is heated with a soldering iron until the tin placed in it melts and spreads over the entire inner surface.
At the next stage, it is necessary to prepare a special rod for installing the cartridge. You can take such a rod from an old CD or DVD drive. However, you can use another rod of a suitable size. Then the rod must be adjusted so that it fits the inner diameter of the pipe. To do this, you need to wrap electrical tape around it until the diameter of the rod matches the diameter of the tube. Then you need to coat the rod with glue and put it in the tube.
Then you should make a case in which the holder will be placed. In this case, you can use a metal tube of small diameter (so that the diameter of the tube matches the outer diameter of the bearings), into which a cable with bearings installed on it is placed. As an alternative, you can use a wooden block.
However, in this case, using a drill, you will have to make a cavity in its inner part for installing bearings and a cable. When installing bearings into the shaft housing, you can apply a little oil to them. The outer part of the bearings can be lubricated with glue (you must be careful that the glue does not get into the bearing mechanism, otherwise it will jam).
At the final stage of manufacturing, you need to make a handle with a cable sleeve installed in it. In this case, you can use a wooden handle from an old or broken soldering iron. You need to place the sleeve in it and secure it inside using glue. Then the cable needs to be lubricated with grease.
Flexible shaft manufacturing work
Here you must first free the cable from the sheath, but you cannot throw it away - it will be useful later. The assembled internal part of the rotation mechanism is clamped in a vice, after which one edge of the cable is inserted into a sleeve made from a bolt. Now you need to heat the resulting connection and fill the internal void with molten tin. A blowtorch will help with this work.
The sleeve with the cable warms up, after which molten solder begins to seep into it PHOTO: youtube.com
All that remains is to tighten the bearings, make sure that the connection is good, after which you can continue assembly.
The connection is checked, and the bearings are pressed as tightly as possible PHOTO: youtube.com
Next, a piece of tube cut from a spray foam gun is placed over both bearings. In fact, the rotation mechanism itself can be considered complete. All that remains is to protect the operator.
The tube is placed over the bearings almost close to the tip PHOTO: youtube.com
Protection of the master when working with a drill
Now you need to put the cable housing back in place, but this is not easy to do. After the tips are cut off, the cable begins to unravel. Here the same solder and blowtorch will come to the rescue. The casing is put on the cable and pulled until it stops. Due to the fact that the outer tube is slightly longer than the inner one, the protection goes inside. The reverse side of the cable is placed in the brake pipe and pressed in with a hammer.
Crimping the reverse edge, which will be clamped into the drill chuck PHOTO: youtube.com
The final touch: groove for a wrench
In order to tighten a cutter or drill in a collet chuck, you will need to ensure that the wrench can work with both the shaft and the tip. If there were already edges on Mayevsky’s tap (they remained on the edge), then they need to be made on the bushing. This issue is easily resolved with a flat needle file.
Grooving edges for a wrench on a bushing PHOTO: youtube.com
Design Features
The main design feature and at the same time the main advantage in application is the ability to bend it anywhere in any direction. This is achieved by using the following components:
- flexible and durable steel braided cable that transmits torque;
- armor braid or spiral-wound spring wire that acts as a flexible drive housing.
The outside of the wire is covered with a corrugated plastic sheath, inside of which there is a grease. It reduces friction, prevents abrasion of the core cable and protects it from moisture and dust.
The design of the flexible drill drive also includes bearings to which the cable is attached. They keep it spinning. At one end the cable is fixed in a socket, at the other it is provided with a mount for a tool.
Extension shaft with collet clamp
Such a drive is intended for light and delicate work; you should not count on using it to unscrew a soured bolt or screw in a 130 mm self-tapping screw at full speed; you must remember that the torque transmitted by the flexible shaft is limited.
How to make it yourself
Those who like to make tools with their own hands can easily make a flexible drive for a drill on their own.
Important! You won’t be able to make armor braiding yourself; this requires industrial equipment. It is also important to understand that a homemade flexible shaft for a drill will be inferior to a factory one, first of all, in terms of working life. And it’s better to use it occasionally - then it won’t let you down at a crucial moment. For professional work in large volumes, it is better to invest in a purchased extension cord.
As an option, you can take a cable from a car speedometer, as well as a motorcycle gas or clutch control drive as a starting material.
Drill attachment
The flexible shaft for the drill is made of wire to transmit rotation with several layers of braid. It has an increased safety margin, since it is designed for high speeds up to 1500 rpm. The length of the nozzles offered in stores ranges from 950–1250 mm. Other sizes are possible, but are less common or made to order.
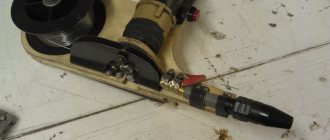
Before starting work, unscrew the mounting sleeve on the drill and insert the end of the shaft into the hole for the tool. The locking ring is clamped, as when installing a drill, directly into the tool chuck. Now you need to fix the drill so that it does not move due to the vibration of the engine and does not fall.
In a store that sells a flexible shaft for a drill, you can also purchase a portable stand for hanging the tool. This simple device can be easily assembled with your own hands. When working in a permanent place, a clamp on a table or wall is sufficient. The flexible shaft cannot be used with high speed or impact drills. A tool with adjustable speed and reverse is best suited for performing work at a distance from the body.
Instructions for making a drill
When making small things, decorative and other products, a compact drill, engraver and similar hand tools are very convenient, and therefore remain indispensable in the home workshop. Using such equipment, you can drill and process products made of wood, plastic, textolite and other durable materials. You will also need a micro drill when drilling printed circuit boards.
- Engraver - what is it, device, principle of operation, what is it for, main types
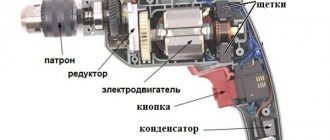
To manufacture drilling equipment, select a suitable chuck and a body of suitable dimensions (plastic container). To rotate the work surfaces, you need to select an electric motor and a power supply, for which you can disassemble an old hair dryer or other electrical equipment.
To learn how to make a mini-drill, just read the following list of recommendations:
- You first need to secure the cartridge to the electric motor shaft, for which you will need adhesive materials (“cold welding”), which ensure a reliable connection between the metals.
- You will have to work very carefully, since the adhesive materials set quickly, which eliminates the possibility of eliminating errors and correcting the connection.
- After fixing the cartridge, it is better to cover its surface with a special heat-resistant glue, which will ensure the density and strength of the connection.
- On the case you need to make a hole in advance for the switch (preferably a push-button one).
- The drill will be more functional with a reverse mechanism, which is implemented using a six-pin switch.
- When connecting to the power supply, you will need a 12 V power supply or a battery (2-3 pieces) with a similar voltage.
Having assembled a mini-drill into a single structure from individual parts with your own hands, you can turn on the power and do test drilling.
Varieties
Despite the fact that a flexible shaft is a fairly simple device, it still has some varieties.
The loose side of the attachment can be equipped with a fixed working head, end cap, engraver extension or screwdriver attachment.
- In the first case, it is assumed that there is a classic chuck designed exclusively for drills, in which the drill can only be used for its intended purpose.
- The second option assumes the presence of a splined end on which various attachments are put on. Such models are designed for high forces and high rotation speeds, and have practically no restrictions on work. Their length, as a rule, does not exceed one meter. The power of the drill when working with limit switches must be at least 650 W.
- The next type is a highly flexible shaft designed for engraving work. In this case, the motor is a drill, the speed of which is quite enough to perform complex patterns when working with carbide metals or stone. The advantage of using a flexible shaft over an engraving machine is the fact that the master’s hand practically does not get tired when working with the shaft. This is explained by the ease of use of the thin tip, which works reminiscent of writing with an automatic pen. In addition, it is possible to engrave products of non-standard shapes.
In the next video you will find an overview and comparison of a flexible shaft with a chuck and a stand for a drill.
Recommendations for choosing nozzles
The tree is processed with an appropriate drill with 2 main parameters:
- power;
- number of revolutions of the main rotating spindle.
Note! It is more convenient to work with a drill equipped with a power switch (should not be less than 250 W). Otherwise, you will have to frequently turn off the engraver to cool down and interrupt work.
The choice of attachments depends on the type of work.
Along with the drill, the kit includes the necessary attachments:
- Do-it-yourself miracle shovel: dimensions, drawings, video instructions on how to make a miracle shovel for digging earth
- cutters, cutters;
- drill;
- felt for polishing;
- cutting wheels, grinding;
- collets.
Drill manufacturers have different sets of attachments, but, as a rule, they have everything necessary for novice wood engravers to work as a wood engraver.
If the carver is not a beginner and knows how to work as an engraver, he may need diamond bits (with diamond coating). They are not always included with the drill, so you will have to buy them.
For ease of use with a bur, especially for inexperienced carvers, it is advisable to purchase a flexible shaft.
You will also need a tripod on which to hang the bur.
Note! The flexible shaft affects the power of the engraver engine, reducing it by almost half.
Flexible shaft drill
Chinese wood carving kits are cheaper than those from other manufacturers. But users note that Chinese burs are too noisy, and the included cutters are poorly sharpened and quickly become dull.
Experienced carvers always purchase additional attachments, and for those starting to master the basics of artistic carving, a Chinese engraver with attachments included will be enough.
The main thing is to pay attention to the fact that the attachments are intended for processing wood. For example, metal cutters will not be able to cut wood due to the sharpening angles.
Briefly about the manufacture of cutting cutters
It is quite simple to make such consumables, and therefore it will be more convenient to show it exclusively with photographic examples.
On an old cutting disc from an angle grinder, a circle is drawn with a compass PHOTO: youtube.com The circle is cut out with metal scissors, and a hole is made in the center with an awl PHOTO: youtube.com A thin long screw is inserted into the hole, which is secured on the reverse side with two nuts PHOTO: youtube.com Clamping the cutting cutter into a drill, it is centered using a sharpening stone PHOTO: youtube.com When the cutter is ready, it can be installed in the engraver by tightening the collet chuck with keys PHOTO: youtube.com
Shafts for lawn mowers
The grass trimmer has flexible and rigid shafts. The choice is made based on the intensity of the load on the scythe and the hardness of the grass that you will cut. The solid shaft is suitable for heavy loads in the form of thin branches of bushes, hard stems and possible hummocks, uneven soil, and debris. They are designed for professional use throughout the work shift every day. Such tools have increased strength and heavy weight.
The flexible shaft of the lawn mower is installed on lightweight models of trimmers designed for work on lawns and gardens. Lines, drums and lightweight knives are used as cutting tools. When overload occurs, the flexible shaft twists. It most often breaks off at the top, near the engine. You should select spare parts in the direction of the upper braid, since they can only transmit rotation in one direction.
There is no outer housing on the shaft. It is replaced by a cavity in the handle of the scythe, which goes from the engine in the shoulder part to the mounting of the knives. At the beginning of the season and in case of replacing the shaft, the cavity in which it is located should be thoroughly rinsed. Then fill it with fresh grease, the brand of which is indicated in the product data sheet. You can add once every 3 months.
Speedometer flexible shaft
The flexible shaft transmits torque from the car or motorcycle transmission to the magnetic speedometer sensor. If the speedometer needle, when driving at a constant speed, begins to twitch or goes to the extreme position, it means the cable is faulty. You can replace it yourself. The flexible shaft is selected according to the parts catalog for your car brand. It must match in terms of attachment points and length. If the cable is too long or too short, there is a risk of bending it at too small a radius. This leads to extraneous noise (similar to howling), increased wear and premature failure of the unit.
Why do you need a flexible shaft and where is it used?
Using a flexible shaft is very convenient when you need to tighten or unscrew fasteners in narrow places with difficult access, where you cannot insert a screwdriver in the working position
Flexible shafts are also used to drive hand tools for fine and precise work. Placing a heavy, high-speed electric motor in the tool itself would lead to rapid operator fatigue and loss of precision in operations. An example is a dentist's or engraver's drill.
As a result, the user gets the opportunity to work for a long time with a comfortable, light and small-sized device, and the level of vibration from the electric motor transmitted to the hand is reduced.
Flexible shaft for screwdriver
A feature of the use of a flexible shaft is the limitation of the maximum torque that it is capable of transmitting. If this limit is exceeded, the cable becomes twisted and the shaft fails.
Speedometer flexible shaft
Light cables transmit torque from the wheel axle to the speedometer magnetic coil. When driving, you need to know the speed. When the flexible shaft fails, the arrow on the device lies in the extreme position or jumps sharply if the car hits an obstacle. You can repair the speedometer yourself.
The flexible shaft is selected according to the make of the car. You can check compliance by attachment points and length. It should fit easily into the gearbox and speedometer sockets. If installed incorrectly, the speed readings will be incorrect. If the shaft is long or has a small bend radius under the torpedo, a characteristic knock will appear. The service life of the speedometer drive will be short.
The force transmitted by the flexible shaft to the reel is small. Therefore, they mainly use a multi-strand cable and a tube body. It is impossible to make it yourself without special equipment and parts. You can buy a ready-made one in the store, or replace the shaft at a car dealership.
Features of use
Using a flexible shaft is quite simple: before starting work on the drill, unscrew the fastening coupling and insert the end of the shaft into the hole formed. The nozzle is then secured using a locking ring. The fixation process exactly repeats the fixation of a drill bit in a drill and does not cause any difficulties
Then they proceed to a rather important event - securing the drill itself. If this is not done and the tool is left unsecured, then the following may happen: according to the physical law, which states that the action and reaction forces are equal, when working with a surface that is too hard, the shaft shell, together with the drill itself, will rotate in the direction opposite to the rotation of the cable
In this regard, the unit will vibrate strongly and may fall from the surface on which it is placed.
If the nozzle holder is not equipped, then you can make it yourself. To do this, it will be enough to attach a special clamp to the wall or table, which will fix the drill in one position. But this method of fastening is suitable only in cases where the drill is used in one place. For other cases, it is recommended to buy a portable holder.
However, not all types of power tools can be used with a flexible shaft. For example, its use with a high-speed or impact drill is prohibited. And the best option for working with a flexible shaft is a tool equipped with a function for regulating the rotation speed and reverse. By the way, all models of flexible shafts are designed to rotate in both directions, which allows you to use attachments for working in specific conditions and performing particularly complex technical tasks.
How does the device work?
The main task is to transmit torque from the electric motor (in our case it is not stationary, but located in the drill) to the remote working tip. Such devices have been used before, for example:
- a flexible shaft for a drill in a dental office, which replaced the pulley drive;
- stationary engraving machine, with a fixed motor and a flexible drive with a tip.
Don't miss: Homemade laser engraver: DIY creation from a printer or DVD
A prerequisite for any design is the presence of a shell within which the drive rotates. Otherwise, the device will be unsafe: something will constantly be wound around the shaft, including the clothes or hair of the master.
Another important design element is the spindle end holder. He has two tasks:
- The outer casing must be stationary; the shaft with working tips must not touch the operator’s hand. Otherwise, it will be difficult to work at high speeds.
- The flexible shell must be rigidly fixed both to the handpiece body and to the source of rotation (drill). Otherwise, it will be impossible to hold the shaft in your hands. Why? According to the laws of physics, the action force is equal to the reaction force. In our case, this means that with sufficient resistance from the workpiece, the shell together with the drill will tend to rotate in the opposite direction.
- In continuation of the previous point: the motor (drill) must be secured. Therefore, a drill holder is required to be supplied with a flexible shaft.
With its help, the same force of opposite rotation of the outer shell is compensated. If it is not included in the kit, you need to take care of the method of fixing the power tool.
- All friction units must have minimal resistance to reduce power losses. If necessary, special lubricant is used.
- The most commonly used is a cable drive. As you know, cables consist of turns of wire twisted in one direction. If you turn the drive in the opposite direction to the curl, the cable will unravel and jam, especially under load. Flexible shafts use a special weaving method that does not unfold in any direction of rotation.
Shafts for lawn mowers
Mechanical scythes with electric and gasoline drives use both flexible and rigid shafts.
Powerful brush cutters, capable of cutting tall, hard and dense grass and even small bushes, use all-metal rigid drives. Such devices are designed for long-term operation and have high torque. They are also large in size and weight and are worn on shoulder straps. The working tool is thick, rigid fishing line or powerful steel knives - two, three or four - bladed.
The flexible drive is used in lightweight, low-power and small-sized trimmers designed for mowing corners after a lawn mower or trimming grass on small lawns. These trimmers are held with one hand, and the flexible shaft is used to mow in the most comfortable position. The cutting element of such devices is a fishing line of small or medium thickness or a lightweight two-bladed knife. If the device is overloaded, the flexible shaft may become twisted. In this case, the rupture usually occurs near the shaft-to-engine attachment point. If you cannot buy a “original shaft”, then you need to select a suitable length from drives in the direction of the braid. Such drives can only rotate in one direction.
Before starting seasonal work and after changing the drive, remove any remaining old lubricant, rinse with gasoline or other solvent, and fill the cavity in the handle with new lubricant. The type of lubricant is specified in the user manual.