Advantages and disadvantages
Of course, factory-made units are more practical, reliable, and allow you to drill material not only strictly vertically, but also at a certain angle. In addition, industrial products are distinguished by precise fitting of parts and the presence of an additional set of tools.
Unfortunately, there is also a significant disadvantage - such devices are in some cases quite expensive and it makes no sense to buy them for use, so to speak, “from time to time.”
Regarding the homemade drill device for vertical drilling, the following can be noted:
- this device is quite simple in design;
- made, as a rule, from scrap materials;
- it's cheap;
- adjusted to a specific drill model;
- convenient to store and use (quickly assembled and disassembled, does not require
additional settings).
Among the disadvantages are:
- limited functionality (difficult to drill at an angle);
- during manufacturing it is necessary to perform welding, turning and milling work, which
- Requires good skill in operating specific equipment or ordering parts.
Homemade drill stand - fantasy or reality?
If you have suitable blanks, such a device is quite easy to make with your own hands. It is better when you can choose a suitable support, as well as use well-prepared drawings. The following are often considered acceptable options.
In the practice of metallographic research, the device for measuring microhardness PMT-3 designed by Khrushchov-Berkovich was often used (and is used). The optical part of such a microhardness tester sometimes fails, and since the production of this measuring equipment has already been discontinued (the modernized version of the PMT-3M is produced by the LOMO association, and it is not suitable for processing into a stand for a drill), the base of the device can be used to make a stand.
Let's consider the sequence of necessary actions.
Microhardness tester PMT-3 (see figure) includes the following components:
- Massive base.
- Handle for adjusting the stage in the direction of the OX axis.
- Handle for adjusting the stage in the direction of the OY axis.
- Screw with cut thrust thread.
- Clamp ring.
- Tripod head.
- Micrometric screw for tube fixation.
- Micrometric screw for moving the tube.
- Rotary rod.
- Meter.
- Diamond tip.
- Eyepiece.
- Tripod.
General view of the hardness measuring device model PMT-3
Other positions indicated in the figure are not important for alteration. To make a stand, the tube is removed from the tripod, and, using the mounting surface of the tube, a hole is made in it for an electric drill. Based on the standardized dimensions of industrial racks, the diameter of such a hole should be 43 mm. A massive guide ring with a height equal to at least two diameters of the supporting part of the drill body is provided in the screw terminal. Instead of small holes in the tripod, two holes are made for M10...M12 threads. To make it easier to adjust the movement of the tripod, a metal scale can be installed and secured in the keyway of the screw.
After removing the entire optical part of the device (including the stage), it can be used as a stand for a drill. To clamp the workpiece, you can use mounting holes drilled to a larger diameter, which are available in the base of the microhardness tester.
There are other options for making a homemade drill stand. In particular, for heavy duty power tools, you can use the base of a portable drill press.
Making a homemade stand using other methods has a number of disadvantages:
- Insufficient structural rigidity.
- Increased gaps in the joints, which can cause backlash in the drill during operation.
- Difficulties in dampening tool vibrations.
- Reduced manufacturing accuracy of some parts.
When deciding to make a stand for a drill with your own hands, you should clearly determine the practical capabilities of the device and correlate them with the parameters of the existing power tool.
Types of racks
As already noted, drilling stands can be either industrial or homemade.
Factory-made products are metal structures on one or two guides of round, square or rectangular cross-section. The cost of such structures varies from approximately several thousand to tens of thousands of rubles.
Among the cheap racks there are products of dubious quality. Expensive copies are produced by manufacturers of power tools (in particular, BOSCH) and are intended for use in conjunction with certain models of drills with specified characteristics. The reliability of well-known brands is beyond doubt.
Devices for vertical drilling, made at home, can be either metal or wood. The former are structurally similar to simple factory analogues, while the latter are built from boards, chipboards, and bars of suitable sizes.
Before purchasing and installing this unit yourself, you need to clearly understand the tasks it will perform.
Sparky SP-43 holder review
Sparky SP-43 is designed for drills with a neck size of 4.3 cm. The base plate is cast from cast iron, which makes work more convenient and safe, and also increases the service life of the holder. In addition, the greater weight reduces the likelihood of the stand moving during use. The legs of the stove are covered with rubber, so the holder can be installed on a smooth surface. There are holes for clamping vices. All parts of the holder are perfectly adjusted, so that the appearance of backlash is completely eliminated.
Technical characteristics of the Sparky SP-43 stand:
- height – 55 cm;
- working stroke – 7 cm;
- dimensions – 16x16 cm;
- maximum weight of the tool used is 3 kg;
- distance from the stand to the drill axis – 12.5 cm;
- holder weight – 6 kg;
- country of origin: China.
The lowering drive is made in the form of a large rubberized handle, which makes the work more accurate. The Sparky SP-43 drill stand can be used for processing metal, wood, ceramics and so on.
It is best to securely fasten the holder of any model to a stationary surface; this will not only make drilling accurate, but also safe.
How to make a stand with your own hands?
The dimensions of the device are determined based on the presence of a drill (its size and weight), as well as the expected range of work performed.
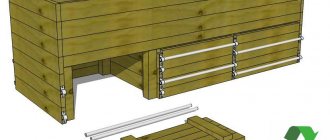
Wooden stand
The first option is a wooden structure. In this case, the drill stand for the drill is made of hard wood. It consists of a bed, a vertical frame made of wooden blocks, a spring, guides and a power tool holder.
The first stage is the bed. It can be cut out of chipboard or assembled from boards in the form of a box, connecting all the parts with screws.
After this, a frame is made from the bars along which the holder will move, and it is secured in the rear part of the frame.
Next, we attach metal skids to the vertical parts of the frame, along which the moving part of the structure will actually move.
The most important point is the carriage. It consists of a rectangular base that matches or slightly exceeds the width of the frame. On one side, a drill holder with a hole exceeding the diameter of the tool gearbox by 0.5 millimeters is attached to this base. On the other, rear side, runners are mounted. The thickness of the holder should be slightly less than the length of the cylindrical part of the gearbox.
An important point: to securely fix the tool in the carriage, a groove several millimeters wide must be cut from the hole in the holder to its front edge.
After this, at the ends of the front part of the holder you need to drill a through hole for a bolt, which should be of such length that a nut can be screwed freely onto its thread protruding from the opposite side of the part. When tightening the threads with wrenches, the edges of the clamp will converge and fix the drill.
Then, hooks for attaching the spring are installed on the back side of the base and on the rear end of the frame. It is necessary in order to return the tool to its original position upon completion of work.
After this, a holder is mounted on the base of the carriage and secured with screws. They also connect all the fixed parts. For strength, it is recommended to reinforce the structure with steel corners and additionally coat the joints between the fixed parts with glue.
There are many options for such products, one of them is presented below.
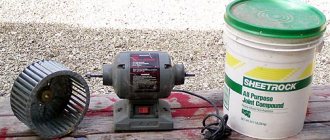
Metal stand
As for metal structures, anything will do: cast iron or steel plates, angles, profile pipes, various automotive parts (flywheels, shock absorber rods, springs, connecting rods, steering racks with gears) and so on.
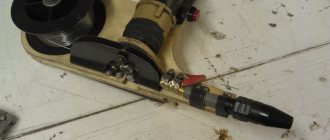
As an example, we will give a simple design, the manufacture of which can be done without welding. All connections are threaded.
Materials:
- pipe cuttings;
- steel sheet;
- shock absorber rods;
- sheet metal clamps;
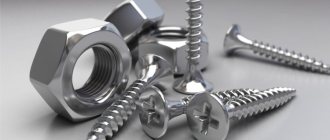
- bolts;
- nuts;
- swivel mechanism;
- cable;
- two cotter pins;
- washers and brackets.
We will not describe the assembly sequence, as it is shown in detail in the video below.
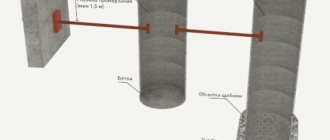
When you need something more durable, it is advisable to use a square pipe of 40x40 millimeters as a guide, with a wall thickness of at least 3
millimeters. But to attach it to the frame, you will have to weld a box of the appropriate size and install clamps in it (for example, 2 bolts with at least M10 threads in the side and rear walls). Then the carriage will also have to be welded, adjusting it to the size of the guide.
In the process of manufacturing drill stands for drills, regardless of the materials used in the structures, it is strongly recommended to maintain a right angle when connecting parts. You can check this parameter using a regular corner.
Before final securing the power tool in the holder, it is necessary to perform alignment, otherwise the required accuracy when performing work will not be achieved.
Important advice: when making the system, do not use soft wood and soft metal, as they will not provide adequate structural rigidity with all the ensuing negative consequences.
Popular items from different price categories
There is no point in getting attached to brands; almost every manufacturer has both cheap and high-quality offers in its model range.
The simplest lever mechanism
Lightweight aluminum support that cannot be used without a tabletop. There are holes for fastening on the surface of the workbench. The support itself has diagonal grooves for installing a special vice. However, it is not rational to use them, due to the low accuracy of the frame mechanism.
The guide is made of a thin-walled pipe, which is quite firmly fixed in the base. The lowering mechanism is attached to the pipe using a clamp; it is possible to adjust the height of the drill position. In addition, there is a calibration ruler with a stop, with which you can adjust the depth of the hole.
Since the guide is single-rod (pipe), such models always have an axial play of up to 5 mm, which cannot be eliminated. Therefore, when working, you should control the position of the drill relative to the workpiece.
The lowering mechanism is lever, accuracy leaves much to be desired. However, the force can be applied quite high.
Considering the cost, the listed shortcomings can be ignored. For household tasks, the device looks decent. The main advantage (besides the price) is that the stand can be easily disassembled and takes up very little space in the transport position.
Such models are in steady demand among home craftsmen. There is also a more advanced option: with a rotating mechanism.
You can drill holes at an angle, or use a drill as a router.
Rack and pinion mechanism
It works on the principle of a car steering rack: a gear and a toothed plate.
The rotary levers are like those of a professional machine - therefore there is no axial play, like a class. On such a model it already makes sense to use a coordinate vice - the accuracy is at the level. Otherwise, the design is simple: a support heel with holes for mounting on a table, a tubular guide.
The cost of this option is significantly higher, but users are willing to overpay for high quality.
Semi-professional drill stand
And finally, a semi-professional unit - slider guides with a rack and pinion mechanism.
The movement mechanism is still rack and pinion, but the carriage slides along rail guides installed on both sides. This fastening eliminates not only axial, but also transverse play. You can work with both 1 mm and powerful diameter drills.
The force on the handle is serious. Since such racks belong to an expensive segment, service equipment is usually added to them. For example, the coolant reservoir and pipe.
Purchased racks
If, for a number of reasons, you don’t want to bother with manufacturing or don’t have the time, but your budget allows you to purchase a factory-made product, you should take a closer look at products in the mid-price category. For example, ENCOR 20090.
Its cost is 3,040 rubles, weight – 6.8 kilograms, height – 0.55 meters, holder diameter – 43 millimeters, which is quite enough to operate most household electric drills.
What to choose in the end is up to you to decide, based on your own capabilities, both practical and financial.