A drill is an indispensable tool for repairs and construction. A variety of attachments helps you perform a large number of jobs. This includes drilling technical holes, assembling furniture, and mixing mortars. The versatility of the electric drill allows you to save on the purchase of a fairly wide range of various additional tools.
One interesting application is drill grinding. Moreover, the attachments available on the market will allow you to work with concrete, wood, metal, and plastered surfaces. This topic should be considered in detail.
Electric drill. Kinds
If you remember the old tool, the cartridge in it was changed only with the help of a key.
Modern models are already equipped with quick-release heads.
There are several main options for such a tool:
- Drums. Mechanical impact process. Designed to work with materials with good strength properties.
- Unstressed. Used for drilling holes in less durable substrates.
- Angular. Used in confined spaces.
- Mixers. They are equipped with additional handles, which provides additional convenience when mixing mortars.
- For diamond drilling.
When choosing a drill, you should pay attention to the main characteristics:
- Power. For household purposes, 1500 W is suitable.
- Rotation speed (up to 3000 W is typical for electric drills for household use).
- Drilling diameter. For home use, no major settings are required.
The larger the range for each value, the more versatile the tool becomes. Everyone selects a drill based on their needs. Some people need professional ones, others need universal household ones. But one thing is indisputable: when it is possible to shift the mechanical process onto the “shoulders” of a power tool, no one will refuse to do it. And at the same time, you can also save a significant amount on the purchase of additional equipment.
Types of grinding work
The versatility of the drill and the variety of attachments allow it to be used for:
- polishing metal, wood products, glass, paint and varnish coatings;
- stripping metal from corrosion and old paint (preparing the base);
- grinding metal, wood products, glass edges;
- cleaning scale, burrs, sagging on metal, wood, concrete.
This is just a small list of jobs for which you can use an electric drill and specialized components.
In fact, if any difficulties arise, this tool is simply necessary.
Classification of grinding attachments
There are a number of modifications of such devices: plate, cup, end, drum, disk, soft, abrasive, fan.
The grinding attachment for a drill looks similar to replaceable blocks for specialized machines, with the only difference that instead of a threaded connection, there is a pin for fastening in the chuck of an electric drill. The quality of grinding or polishing depends on the size of the tool, power, rotation speed, and dexterity of the worker. Some craftsmen come up with additional devices for securing the drill in working condition, which greatly facilitates the process of processing parts.
Each of the above-mentioned grinding attachments for a drill has a number of other modifications.
All types and areas of their application should be considered.
Advantages and disadvantages of nozzles
Figure 3. Pros and cons of the drill
Sanding attachments have advantages that, unfortunately, could not exist without some disadvantages. The advantages include:
- increasing the functionality of the drill;
- accessibility of nozzles;
- a huge number of varieties that allow you to perform any work;
- most attachments do not require specialist skills to use;
- Ease of use;
- the ability to process parts in hard-to-reach places, which a large grinding machine does not provide
Flaws:
- performance is lower than that of specialized tools;
- Some attachments require skill and experience;
- in some situations, the use of attachments can cause a number of inconveniences;
- you have to hold a heavy drill suspended;
- is an auxiliary tool.
Using sanding attachments will allow you to achieve almost production-quality results at home. The quality of work will be worse, and much more time will have to be spent. But the cost of such work is much lower, which makes it accessible to anyone.
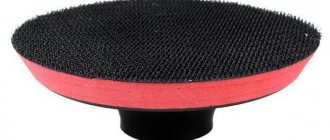
Plate
This grinding attachment comes in two versions – plastic and rubber. The second base option is considered more popular. With its help, parts are processed more gently. Consequently, damage due to excessive pressure will be minimized.
The polishing base of such attachments is covered with sanding paper, which is attached due to its sticky layer.
The main difficulty of the work is the inability to hold the tool strictly perpendicular to the surface, which leads to defects on the plane being processed.
For such cases, manufacturers provide a grinding attachment for a drill with an adjustable angle of the mounting pin. True, the cost of such a device is quite high. When choosing a nozzle, you should pay attention to the presence of a soft layer between the sanding layer and the base. This helps to avoid large defects when sanding.
The scope of application of this device will depend on the grain size and hardness of the sandpaper.
This can be both rough and finishing processing of a wooden or metal surface. Another interesting use is sanding walls after plastering or puttying. The process is quite dusty; the use of respiratory and visual protective equipment will be required during the work.
Making your own nozzle
Homemade devices allow you to save money, but this is not the main reason that makes people make things with their own hands. It often happens that you don’t have a nozzle of the required shape and rigidity at hand, and you can’t find a similar thing in the nearest stores. In such cases, you can make the instrument at home.
Based on Automotive Valve
To build a nozzle for sanding wood, you need several valves from the machine, or at least one. Their bottom should be flat. If you need a large product, use a release valve from a truck.
Manufacturing is carried out in several steps:
Automotive valve
- the valve surface is degreased;
- take a head of the required size - it can be rubber, foam, wood, or other dense material;
- parts are glued together with epoxy or polyurethane glue;
- a circle is cut out of sandpaper with a diameter equal to the width of the base together with the roundings;
- cuts are made along the entire circumference from the edge to the center, but not reaching it;
- the resulting petals are superimposed on each other along the direction of movement of the attachment in the drill and secured;
- the resulting sandpaper cup is glued to the base, and the edges are secured with staples.
For the most productive work, it is worth making several attachments of different sizes and degrees of paper grain.
A simple screw device
To make it you will need a long screw, sandpaper, a nut and two washers.
The algorithm of actions is as follows:
- put a washer on the screw;
- cut the sandpaper into square pieces;
- Make a hole in the center of all the pieces and thread them onto a screw;
- put the second washer on top;
- secure the entire structure with a nut.
The device can process cavities of wooden products. The disadvantage of this method is that when secured in the drill chuck, the thread becomes jammed, which makes replacing the sanding paper problematic.
Cup
The devices are made in the form of a bowl. These can be brushes with metal bristles, or soft filling, for example, foam rubber. It all depends on the planned work.
Metal brushes are used to clean products from old paint, rust and for sanding wood. For example, for the texture extraction process. The brush ruffles the wood fibers, after which the surface is carefully sanded with a plate attachment.
And then stain and varnish are applied. Such items, after finishing, have a clear wood pattern and texture. Soft fillings of cup devices are used for fine polishing and cleaning.
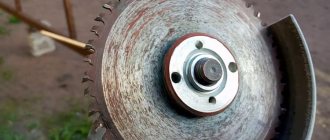
Drums
The devices are produced in the form of cylinders. The working area is located on the side surface, onto which sanding paper is placed. It can be infinite and with an end element. Fastening is done using inflation (rubber and pneumatic blocks) or a fastening bolt.
This grinding attachment for a drill is used for processing metal, wood, and glass.
The most relevant application is sanding radius holes and end elements.
Reviews
Stas Kireev: “I use Zubr tips.” The quality is good, the brushes do not crumble, they clean the coating well and grind holes in the metal.” Vladimir Lyakhov: “Dremel attachments are of high quality, can be quickly removed from the chuck and installed back, and are tightly fixed. Convenient for sharpening cutting devices and drills, durable.” Maxim Afanasyev: “I prefer Hammer equipment. It is affordable, copes well with various tasks, and is conveniently placed on a drill. There is a wide range of different options on sale from grinding wheels to cutting tips.”Fan (petal)
They are a grinding disc onto which many petals made of sandpaper or other abrasive material are glued in a circle. Such devices are used more often for processing wooden surfaces.
There is another option when the petals are fixed in the form of a cylinder. Thanks to their mobility, the wood sanding attachment is used for geometrically complex parts.
Drill attachment for sanding wood
Figure 8. For wood
Sanding attachments are quite suitable for processing wood. The main thing is to choose materials that will not spoil the wooden surface. This is where medium-level abrasives and soft fibers will come to the rescue. They will help clean the surface for subsequent application of paint or varnish.
Sanding wood with a drill is done using attachments made from the following materials:
- textile;
- foam;
- plastic;
- medium and fine grain sandpaper.
Types of grinding bases
Depending on the material, a grinding disc is selected. There are several main types:
- Sandpaper. This material has a wide range of hardness and grain size. The larger the abrasive, the rougher the surface will be sanded. There is also closed and open paper. The first option is used for metal processing, and the second for wood. In the open version, the distance between the crumbs is greater, this allows wood shavings and sawdust not to accumulate on the plane.
- Soft materials. As already mentioned, it can be foam rubber, felt, twisted rope surface, leather. Nozzles with this material allow you to perform fine polishing work.
- Grinding stone. Another type of abrasive coating that allows you to remove more complex defects from the plane. This device can process metal and concrete.
Options for materials for attachments and the sheer variety of devices allow the drill to be used for grinding and polishing various materials, even for use in jewelry.
What are the nozzles made of?
Equipment for grinding and polishing according to the type of material is classified into three main types:
- Emery cloth is the most popular type of abrasive substance for sanding and cleaning. Wooden parts can be polished with cloths. Sandpapers have different degrees of roughness and grain size for roughing and finishing parts
- Soft materials - these include substances such as vinyl, felt, foam rubber and others. The use of such materials allows you to clean the surface from corrosion, rust, as well as remove primer from the car body and even remove putty from the wall
- Grinding stones - the use of attachments made from special abrasive stones allows not only to clean surfaces, but also to eliminate various types of defects. They are used for processing metal structures, concrete structures, ceramics, glass, etc.
To polish a car body, you will need a felt attachment, which can quickly and effectively bring the car’s paintwork to a shine. The use of the units in question also allows you to polish and clean the surface of various jewelry, such as gold, silver, etc.
Features of work
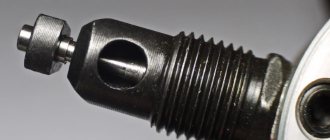
As mentioned earlier, an electric drill is a multifunctional tool that can replace a number of other devices. And if the very necessary attachment for a drill is not on sale, you can take a similar one for an angle grinder and attach it using an adapter. It is made in the form of a threaded rod.
The main difficulty when grinding with an electric drill is holding the device correctly relative to the surface being polished. If you carry out work using a 150 mm grinding wheel without observing a clear horizontal direction, then radius marks may appear on the plane. In any case, you should first practice on a rough surface.
There are two methods of grinding with an electric drill:
- Hold the tool suspended. The disadvantages of this method have already been voiced. The advantage is the ability to grind hard-to-reach places and products with complex geometry.
- Using a mounted drill on a woodworking table. This method is good because now the quality of grinding is improved by fixing the tool, and in some cases, the part itself. The disadvantages include the lack of mobility of the electric drill. You will need to remove it from the fasteners to clean hard-to-reach places.
During operation, the start button controls the rotation speed, and therefore the intensity of grinding or polishing surfaces.
It is recommended to ensure that the instrument does not overheat. Give it time to cool down.
When grinding and polishing, it is necessary to use personal protective equipment: goggles, respirator, gloves. All these PPE will be able to qualitatively protect the respiratory, hearing, and vision organs from dust that will be formed during the sanding process of products. This must be done especially when processing glass, stone, metal, and wood. Do not ignore the use of personal protective equipment.
Grinding accessories
The vast majority of grinding operations in everyday life are carried out manually or using a drill. This is understandable. Buying expensive specialized equipment for use at home, where grinding operations, as a rule, vary greatly in type, is not always advisable. There are various devices for manual and mechanized grinding. All of them can be divided into two main types.
- Tools that directly perform the processing of the part are hand-held devices, which include sanding blocks (pads, whetstones) and grinding attachments for a drill or grinder, which are all kinds of support plates and drums.
- Devices that ensure the required position of the grinding tool relative to the part - guides, supporting surfaces, etc.
A separate type includes devices for dust removal, which, due to the abundance and harmfulness of grinding dust, should also not be neglected.
Hand sanding tools
When working manually, to ensure the necessary processing parameters, a variety of grinding devices are used.
The simplest hand-held devices include sanding pads, which may be called sanding blocks, sanding bars, etc. Depending on their shape, they can be used to process both flat and shaped surfaces.
The sanding block consists of three main elements - a body with a working surface on which the sandpaper is stretched, a clamping mechanism that secures the sandpaper to the sandpaper, and a handle to which force is applied when sanding. The latter may be absent as an independent element; in this case, its role is played by the body. The clamping mechanism can also be replaced with other elements that perform its function, for example, Velcro.
Sanding block
There are many types of branded pads available, differing from each other in shape and method of attaching the sandpaper. The body is most often made of plastic, the working surface of which is covered with a soft material that helps smooth out irregularities.
Grinding accessories
The simplest pads for grinding are easy to make yourself. Wood is best suited for this. It is advisable to paste over or cover the working surface with a soft material, such as felt.
The simplest design of a block consists of two pieces of board or chipboard, tightened together with screws - so that the skin covers the bottom piece, and its ends are clamped between the parts.
Homemade sanding block
If you put in a little more effort, you can make a more functional block in which the skin will be clamped with a wing nut, which is much faster and more convenient than using screws for this.
For processing large surfaces, if for some reason a power tool is not suitable, it is best to make your own grinding “plane”. Its possible design is shown in the figure below. It is so simple that it does not need explanation. The dimensions of the device are determined by specific working conditions - the parameters of the plane being processed and the physical data of the worker.
Sanding plane
For grinding edges located at an angle of strictly 90° to the adjacent surface, a device that allows you to ensure the required right angle will be useful. It is shown schematically; the specific implementation can be anything.
Device for sanding edges (end view): 1 - base, 2 - handle, 3 - side stop, 4 - stiffener, 5 - sanding paper, 6 - strip of felt.
One of the main tasks when making homemade bars is to securely attach the skin to them. In addition to mechanical clamps (using screws, nuts, etc.), you can use other methods of attaching sandpaper to homemade sanding blocks.
You can simply nail it at the ends with small nails. The method is easy to implement, but inconvenient if you have to change the skin frequently.
An acceptable way to secure sandpaper is by gluing it. Glues are suitable for this, making it relatively easy to separate the skin from the base when replacing it.
Sometimes they use wedges to secure the skins. Cuts are made in the block, into which the edges of the skin are tucked and wooden wedges are driven. Cuts and wedges can be of different sizes.
Sanding block with wedge groove
Accessories for drills and grinders
Manual grinding requires a lot of effort and time. For significant volumes of grinding work, it is advisable to use a power tool - a drill or grinder, in particular. To turn the latter into a grinding tool, they must be equipped with a suitable grinding attachment - a support plate or drum.
Attachments for drill and grinder for grinding
Sanding pads
. These attachments are a disk made of plastic or rubber to which a circle of sandpaper is attached. Plastic plates have a soft or not very soft layer between the base and Velcro, for better adhesion of the skin to the surface being treated. Drill plates have a shank in the form of a rod; for angle grinders, they have a thread for screwing them onto the output shaft of the angle grinder. The grinding attachment for an angle grinder can be converted into a drill attachment by screwing an adapter with a shank into it.
Sanding attachment and drill adapter
But due to the rigidity of the grinder attachment, a strictly vertical position of the drill relative to the plane when grinding is practically impossible. When using a rigid plate (it’s easier to work with a flexible one), any slight tilt leads to the edge of the plate biting into the workpiece and the drill trying to escape from your hands, which leads to an increase in tilt and a deeper bite into the edge of the circle. This leads to clearly visible depressions on the treated surface. Therefore, only grinding attachments that can compensate for the tilt of the drill are suitable for the drill: either rubber, or with a thick soft layer between the plastic base and Velcro, or with a movable pin attachment.
Rubber Sanding Attachment for Drill
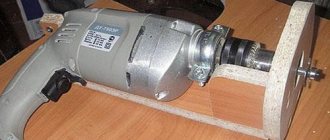
Hard plates are only suitable for use with a fixed drill, such as the one shown below.
Drill grinding tool
If you can’t find a suitable drill attachment for grinding on sale, and you have a hard attachment, then you can make a thick soft layer between the plastic base and the Velcro with your own hands.
Homemade drill attachment for grinding
Homemade drill attachment for grinding
The Velcro is carefully cut off with a stationery (construction) knife, and a large round sponge for washing the body is glued as a soft layer. When the sponge is compressed during the grinding process, the symmetry may be broken (the Velcro with the sandpaper moves in one direction), but at drill speeds (3000 rpm) this is not critical; it will not work with an angle grinder.
Combined attachments for grinding on a drill are produced, in which the shank can be in two positions relative to the working surface - be rigidly locked with it or have a degree of freedom (unlocked). In the latter case, the working surface of the tool has the ability to adapt to the inclination of the drill, resulting in processing without the formation of indentations. But the price of such devices is close to the price of orbital sanders.
Grinding attachment for drill with movable shank
To make the shank movable, a cone nut is twisted (in the photo below with a similar device, it is twisted to the chuck).
Drill attachment for grinding with movable shank
Drill attachment for grinding with movable shank
The skin is attached to the plates using Velcro. This method of fastening requires special sandpaper, on which a reciprocal layer of Velcro is applied.
Attaching the sandpaper to the sanding attachments
Sanding drums
. Sanding drums for a drill are a cylinder with a shank; sanding paper in the form of an endless belt (a strip of sandpaper glued together at the ends) or a strip of sandpaper with free ends is attached to the cylinder. Unlike the support plate, in which the working surface is located perpendicular to the axis of rotation, in drums it is located parallel to it.
To ensure that the skin sits tightly on the drums, the latter have different tension mechanisms. According to the principle of operation, there are two of them - increasing the outer diameter of the drum (used for an endless belt) and tensioning the abrasive belt using a special mechanism (used for open belts). Increasing the diameter of drums is realized in different ways - by pumping them up (for pneumatic models), by compressing them in the axial direction (for drums with rubber elements). The tension of an open tape can be done in different ways. This is most often done by using a rotating screw that tightens the ends of the sandpaper. Below are several options for drums with different types of skin tension.
Sanding attachment with open sandpaper attachment
Sanding attachment with endless belt inflating attachment
Sanding attachment with attachment of an endless belt by compressing and flattening the rubber
A drum for endless sanding belts can be made by placing rubber pads between wooden discs. When the axle bolt is tightened, the rubber is crushed, expanding in the radial direction and securely fixing the sanding paper placed on the drum.
Homemade attachment for attaching endless tape
Grinding attachments using a drill
. Grinding parts with a plate or drum while holding a drill in your hands is not as easy as it might seem to someone who has never done it himself. In many cases, a better surface quality can be achieved by holding the tool stationary. Especially when processing small parts that are easy to manipulate by holding them in your hands. There are grinding attachments that allow you to secure a power tool, making it completely or partially stationary.
You can use branded drill guides, which are designed primarily for drilling, but can also be successfully used for grinding - mainly with a drum. You can work with them in two ways. By fixing the drill in the guide motionless and moving the workpiece relative to the tool (photo A below), or by moving the guides together with the drill relative to the workpiece, pressing the supporting surface of the guides against the latter (photo B below). In both cases, the tilt of the drum is eliminated, which ensures surface treatment at the desired angle.
Using drill guides when sanding
You can independently make a simple sanding device from two boards, which allows you to ensure that the angle of the sanded edge in relation to the main surface is exactly 90°.
Homemade edge sanding device
Removing dust
. When sanding wood, a lot of dust is generated, which not only creates inconvenience, but is also harmful to health if inhaled. Dust must be dealt with. The easiest way to do this is to suck it out with a vacuum cleaner, placing the hose closer to the sanding area.
When using the content of this site, you need to put active links to this site, visible to users and search robots.
Literature