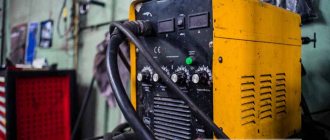
When the owner of an estate has a car, he cannot do without a gate. If you decide to make them yourself, it is better to choose welded swing gates. They are easy to make from available materials if you have the ability to weld metal at an amateur level. Therefore, welding a gate onto a fence from a profile pipe with your own hands will cost much less than buying or ordering one.
Swing gate design
Depending on the size of the area and the free space in front of the swing gates, they are welded:
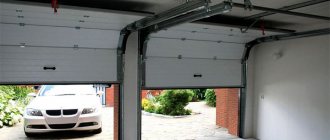
- Single-leaf, if there is enough space to open. For normal operation, you will have to install a powerful support, weld a reinforced frame and strengthen the hinges. Such welded gates are rarely installed on personal plots, more often in private garages.
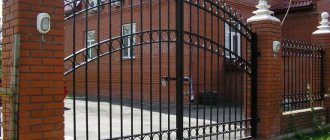
- Double doors, which are more convenient to use, require less space to open. The design of such welded swing gates consists of two leaves of equal size.
- With a gate, if the width of the area does not allow installing it separately. Swing gates with a wicket are welded in the same way as regular ones, making an opening with an additional beam and support in the right place on the leaf. However, it is inconvenient to use due to the high threshold, which is difficult to overcome for small children and carrying a stroller with a baby.
We decide on the dimensions, make a drawing
You can take a sketch found on the Internet as a basis and rework it to suit your conditions. The drawing indicates the size of the frames and supports, the location of the cross members, and the location of the locking device. The height of welded gates is made flush with the fence. When making calculations, it is necessary to take into account the technical clearance between the doors and the ground. It is needed to reduce wind load. If the road to the site is asphalt or concrete, the clearance size is 3 - 5 cm, the dirt one - 10 cm. When drawing up the drawing, you need to provide gaps of several millimeters between the doors to compensate for distortion during soil movements and at supports for canopies. For free passage of cars and trucks, swing gates are welded to a width of at least 3 m. If you have to enter at an angle, the size is increased to 3.6 m.
A drawing from the Internet is taken as a basis and modified to suit your parameters.
Selecting materials for production
The best option in terms of quality/price ratio would be swing gates welded from profile pipes. A cross section of 40×20×2 mm is selected for the frame. If you plan to install automation 60x40x2mm. The cross-section of the support pillars depends on how much the swing welded gates weigh:
- less than 150 kg - 80x80x4mm;
- 150 – 300 kg – 100×100×5mm;
- more than 300 kg - 100x140x5mm.
Swing gates for a dacha, if people only relax there in the summer, can be welded from old water pipes 1/2 - 1 inch or a 40x40 corner piece. Sheet material for cladding is selected depending on preferences and financial capabilities. For example, you can make a gate with transparent inserts. So that even a child can open them, the frames are hung on ball hinges. Metal paint is usually chosen to match the color of the fence.
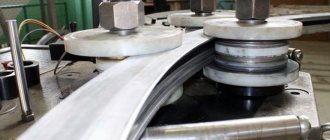
How to choose the right profile pipe
Profile pipe of rectangular cross-section
The type of metal and the concentration of alloying components affect the strength of rolled products and resistance to destruction from corrosion. The load-bearing elements are made of high-strength iron with a high percentage of alloying. Strength depends on the thickness of the metal, therefore, for entrance structures and fences, pipes with an outer shell thickness in the range of 1.5 - 3 mm are used.
There are round pipes, oval ones, rectangular products, square and triangular profiles are used. To organize passage, the second and third options are used, since a flat plane is required for ease of assembly.
Recommendations for choosing profiles:
- for dug-in pillars, a square of 100 x 100 mm is used, rectangles are taken of 120 x 60, the wall thickness is 3 mm;
- the frame is made from pipes 40 x 40, 40 x 20, 50 x 50 mm with a shell thickness of 2 mm;
- for stiffeners and struts, a section of 20 x 20 x 1.5 mm is used.
You can use pipe scraps left over from the manufacture of other structures, if they are suitable so that they do not need to be welded to length. Such joints weaken the strength of the gate frame. Seamless pipes produced by the hot-rolled method are rarely used for gates, because they have increased load-bearing capacity and are expensive.
Installing pillars
Installation of supports will be performed in the following sequence:
- Pits are dug or drilled to the depth of soil freezing, but not less than 1 m. The transverse dimensions should be twice the cross-section of the pillar.
- To prevent the posts from sinking into the ground, the bottom of the holes is covered with a sand-gravel mixture 15-20 cm thick.
- Sections of reinforcement or metal strips are welded onto the buried ends of the supports, and plates 2-3 mm thick are welded onto the opposite ends. Instead of them, you can put curly heads.
- The lower part of the pillars is cleaned of rust and coated with bitumen, after which it is lowered into the pits.
- Using broken bricks or stones, the racks are set strictly vertically at a building level or plumb and filled with sand-cement mixture.
- To prevent the supports from skewing when the soil moves, dig a shallow trench between them, lay a corner and weld it. Then they are buried or concreted.
Installing hinges
To ensure that the gate opens well, you should choose hinges on a bearing or ball. The hinges are marked no closer than 30–40 cm to the edges of the frame, after which the hinges are welded to its surface. To ensure reliability of the welding connection, the hinges are first welded onto metal plates (4mm thick), and then these plates are welded to the gate and post.
Once the hinges are installed, you can begin installing the deadbolt. Vertical pins are used as a deadbolt. The manufacture of such a design is not so difficult; in addition, this design itself is highly reliable.
We weld swing gate leaves
Since a properly welded gate should not have distortions, the frame is assembled on a welding table. If it is not there, you need to prepare a flat place on the ground. The work is carried out in stages:
- The ends of pipes prepared for the outer frame are cut at an angle of 45⁰. The welding areas are cleaned down to metal.
- The pipes are folded into a rectangle on a flat surface where the gate will be welded. The correctness of external and internal corners is checked with a square and by measuring the diagonals. The permissible discrepancy is no more than 2 mm. The horizontal position is checked with a level. For reliability, the structure is fastened with corner clamps before welding.
- They grab the corners, re-check their correctness, and weld with continuous seams.
- A horizontal cross member is welded into the middle of the frame. Diagonal spacers are inserted into the resulting two parts. With this design, high strength is achieved with minimal material consumption, which is important if the gate is welded using your own hands.
- The slag is knocked off the seams and cleaned with a grinder. Welded joints must be checked for leaks, since water that gets inside will accelerate the corrosion process, and in winter, if it freezes, it can rupture the pipes.
The gate is welded in the same way from the same profile as the gate or of a smaller cross-section. If you plan to cut it into the sash to save space, you can use one of the frame pipes as a support.
A horizontal cross member and two diagonal struts from it are welded into the middle of the frame - a durable structure at minimal cost
Additional Information
Corner gates, despite their apparent simplicity, can be made in different ways. The presence of a stationary outer frame will significantly strengthen the structure, but there will be height restrictions - tall cars or special equipment will not be able to pass through the gate. In this case, more metal will be needed during production.
When making a stationary frame, you can equip the latter with a removable strip, which is screwed with self-tapping screws to the bottom of the structure. In winter, when the snow cover is thick, this bar is dismantled and installed back in the spring.
There is an option when the frame is welded and hung on hinges as a whole and only then sawed into two parts.
We weld the hinges and install the gate
In order to hang profile swing gates without distortion, the leaves are temporarily welded together with narrow metal strips with a gap of 3 - 5 mm. Then, using bricks or wooden blocks, they are inserted into the opening to the height of the technical clearance. The position is checked horizontally and vertically with a plumb line and level, after which it is fixed with wedges or welded to the posts with steel strips.
To evenly distribute the load on the pipes of the racks and frame, steel strips (ears) are welded to the cylindrical hinges. In this way, canopies can be welded on both sides. The lower part of the hinges is attached to the post, the upper part with the ball is attached to the sash. If it is solid, you need to drill a hole for lubrication. To prevent the movable connection of the canopies from sintering during welding, it is first generously lubricated with grease.
The initial stage is framing the opening
At this stage, it is important to correctly cut and weld the corners into a single structure - a frame, which will support the outward opening doors. Framing work begins at the threshold of the garage and is carried out in the following order:
- Cut 2 corners the width of the opening and lay them along the threshold on both sides. Weld them with steel strips (ties).
- Cut off 4 more side corners with your own hands, whose length is equal to the height of the opening plus 2 widths of their shelves. The resulting racks must be cut at both ends so that they clearly fit into the corners of the threshold.
- Attach the racks to the side ends of the walls and connect them together using ties. The latter must be placed opposite the joint welding points.
- Weld the frame of the threshold and walls together.
- Repeat the action described in step 1, only install the corners on the upper end of the wall. Weld them to the side posts.
During the work, it is necessary to ensure that the framing elements fit as tightly as possible to the walls. Steel tie strips must be laid between the corner flanges and the wall, and then welded.
The first stage is making the frame
We sheathe the gate
If a material is selected for the cladding (corrugated sheet, polycarbonate, etc.), which is secured with screws or rivets, the frames must first be cleaned of dirt and rust. After treatment with an anti-corrosion compound, priming and painting are carried out. The finishing of the sheathing, if it is made of sheet or roofing iron, is carried out after welding.
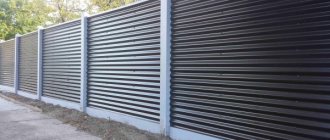
For popular swing gates made of corrugated sheets and polycarbonate, they try to select sheets so that there is no seam on the gate. If it is not possible to obtain material of this size, the first strip is leveled and secured with a pair of screws. After checking the position, they are screwed into all waves adjacent to the elements of the welded frame. The next sheet is attached overlapping the wave of the previous one.
Sheathing is also made from other materials:
- Tree. An affordable, beautiful option with easy replacement. However, regular maintenance is required. Please note that wood may crack when drying.
- Metal sheet. The lining is strong but heavy.
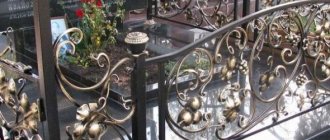
- Forged. It is possible to create original designs, but only specialists can weld such gates.
- Metal mesh. Low price, ease of work, light weight. However, the aesthetics are poor, and few people will like the accessibility of the area adjacent to the house to be viewed by strangers.
- Combined options are welded from forged elements, so swing gates can have any shape. To protect against curious people, the doors on the courtyard side are sheathed with metal, profile or polycarbonate sheets. Installation is usually carried out by specialists, since welding gates of this type is beyond the capabilities of a beginner.
Before covering the gate, it is necessary to protect it from corrosion, prime it and paint it.
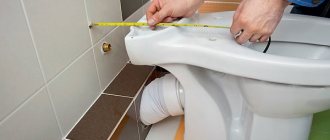
Installing the lock
If the installation of automation is not provided, hinges for a padlock are welded to the outside of the doors. A rotary latch or valve is installed on the inside. It can be made from two sections of 20 mm pipe welded to the horizontal cross members of the flaps. When closing, a steel rod with a diameter of 14 - 16 mm is inserted into them.
To rigidly fix swing gates in the closed and open position, vertical latch-type stoppers are installed at the bottom of the leaves. If the pillars had to be welded together with a crossbar, another pair is installed at the top. The clamps are purchased or welded from sections of half-inch pipe 20 cm long, into which steel pins with bent ends are inserted. They will go into pipes driven or concreted into the ground.
The welding of gates made of profile pipes is completed by installing a mortise or surface lock on the gate. When cutting grooves for the body on the sash and the crossbar in the post, you should try not to leave gaps. Otherwise the gate will rattle in the wind. For reliable fixation, install a stopper like on a gate.
After completing the installation of swing gates, you should think about automation, since running, especially in the rain, when entering and leaving will quickly get boring. The necessary components can be found in stores, and you can do the work yourself if you have experience connecting electrical equipment. With proper care, the automation will provide comfortable travel for a long time.