Purpose
A do-it-yourself drill lathe can be used to process simple wooden and metal parts. An ordinary household electric drill is used as a drive.
Waves of doubt will be dispelled after studying the drawings of a lathe from a drill. It will not be difficult for a savvy home craftsman to select the necessary components in his home workshop.
Using a homemade lathe for its intended purpose, you can to some extent quench the thirst of your desires and make simple products. These can be handles for plumbing tools, elements of country furniture, all kinds of decorative crafts.
How to quickly make a wood lathe
It will not be possible to make a full-fledged lathe from an electric drill, because powerful equipment requires an equally powerful electric drive. Making a miniature lathe from a drill is not difficult and does not require a lot of cost or effort. As a bed, i.e. basics, grab a workbench to place your electric drill on. The woodworking machine is almost ready, and all that remains is to make a rear support to secure the workpiece, and complete the process of arranging the support. The rear support must be movable, and for this reason, guides should be provided in the frame.
You should start making a home lathe by preparing drawings. This is what will help you calculate the exact dimensions of the device, as well as select the required materials. You won’t even need to make the front support, because its role will be played by the chuck of an electric drill with a fixed element (trident). To secure the drill and make it stationary, you will need to use clamps and clamps. Attach the cylindrical part with a clamp, and use a clamp to secure the handle, which will prevent the tool from turning.
The principle of creating homemade equipment implies that you follow these steps:
- Before you attach the drill to the workbench, you should install spacers that will regulate the distance from the table top to the chuck, and this is what will characterize the size of the workpiece being processed. As a spacer, use boards of appropriate length and width that will be installed under the electric tool.
To create a rear support, use wooden beams, and an adjustable screw should be attached to their structure, and it should have a cone-shaped tip.- To make a tool rest, you will need to use blocks of wood to which the rail will be attached. The length of the latter should be equal to the distance between the rear and front support.
- Provide for connecting a button to put the device into operation. To do this, we suggest connecting the contacts to a new button or blocking the standard press in the power-on mode, and starting the device by inserting the plug into the socket.
DIY drill lathe plans are very important. Also, when creating a machine, pay special attention to fixing the wood workpiece. On the front support, a trident will be used as a fastening, and it can even be made from old drills. To do this, weld two cylindrical ends to the drill, and they should be located at the same distance from each other. Moreover, the protrusions must be located in one row. In order not to make a trident yourself, you can use a pike for a hammer drill and simply cut off the shank from it. The protrusions on the nozzle are required so that the chuck, which moves, sets the workpiece in motion.
Also pay attention to the rear support, because the safety of the installation will depend on how high-quality your second clamp is. A drill/screwdriver chuck is suitable as a support at the back, into which you need to insert and secure a conical shaped attachment. It is not worth using a trident in the design of the rear support, because it is only needed to fix the material.
Please note that the tailstock must be stationary, and therefore such a moment should be provided for during the design and preparation of the drawing. The mobility of the rear support is required in order to regulate the pressing force of the workpiece, as well as the ability to insert workpieces of different sizes.
Lathe device
The design of a homemade lathe from a drill is based on components that are important for their intended purpose. We will analyze the function of each node in detail in the following sections of the article.
Base
The frame of the processing device accommodates all the components and ensures the stability of the structure.
The stationary design requires a more massive base, unlike tabletop lathes.
Headstock
This unit is involved in fixing the workpiece and transmitting torque from the drive to it. The part is firmly fixed in the spindle assembly chuck. The design may be movable in some homemade products.
The stationary design involves rigidly securing the base of the machine and the headstock.
Tailstock
This movable unit of turning equipment ensures reliable fastening of the part. The tailstock can move freely along the guide rails, providing the necessary pressure to the chuck and centering the part.
The mobility of this unit requires precise location relative to the fixed part of the base. Thanks to this unit, it is possible to process parts of various lengths.
Caliper
This knot is also called a handy knot. The cutting tool has a support as a stop, which moves along the longitudinal and transverse axis of the machine. The transverse movement of the caliper reduces the working arm of the cutter.
After installing the support platform in the working position, it is fixed with bolts in the right place. However, the cutter itself is held and pressed against the part by hand.
How to make a lathe with your own hands
Making a small lathe with your own hands will be greatly simplified if your workshop has a workbench with a flat and durable working surface. In this case, you will not have to waste time and effort searching for a bed for your turning tool. An electric drill, which will simultaneously serve as a headstock and a rotation drive, is secured to such a surface using a clamp and a clamp fixed to the neck of the tool.
Version of the machine with a wooden bed
Now you need to make a stop that will act as a tailstock. Such a stop, installed opposite the fixed tool, can be made from a pair of wooden blocks and an adjusting screw, the end of which is sharpened to a cone. If you plan to process not very massive wood workpieces using your homemade drill machine, then you can fix such an emphasis on the surface of the work table using a clamp.
You can also use a wooden block as a support, against the supporting surface of which you will press the cutting tool. It is secured to the surface of the workbench using a clamp.
Obviously, using available and inexpensive materials, you can make a simple lathe with your own hands, on which various woodworking operations can be successfully performed. Using such a simple device, made on the basis of a drill, you can turn various parts from wood: handles for doors and tools, structural elements of stairs, decorative items.
Scheme and drawing of a machine on a channel base
The design of such drill-based machines and their execution options may be different. In order not to understand the process from scratch, you can find on the Internet a photo of the device that best suits you and make it yourself. However, no matter what scheme you use to make a turning device from a drill, it is very important to ensure the most accurate alignment of the axis of rotation of the spindle assembly and the conical adjusting screw located on the tailstock.
If you are going to make a machine on which you can perform turning operations on metal, and not just on wood, then it is better to make it according to all the rules. First of all, focusing on the design of the existing drill and the dimensions of the workpieces that will be processed on such a device, it is necessary to make a drawing and select a specific shape and type of fastener for the assembly. As a basis for the drawing, you can take a photo of similar units that many home craftsmen make for themselves.
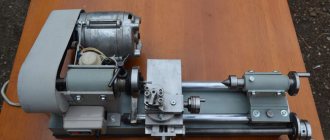
A fairly simple version of a lathe with a wooden bed. This kind of design is unlikely to allow working with metal, but it is quite suitable for processing wood.
Complete machine
bed
Attaching the drill to the bed
Tailstock design
Clamp for wood workpieces
Support platform
A homemade lathe, made according to all the rules, is a rigid structure on which the mutual alignment of the front and tailstocks does not change. All moving elements of such a device, installed on a reliable frame, move along its guides. If you purchase or make your own faceplate, which will be fixed in the drill chuck, such a unit will be able to process workpieces of even large diameter.
On a homemade lathe made from a drill, all elements of which are fixed on a rigid frame, you can perform work on metal, but only on soft metal (this includes alloys based on aluminum and copper). On such a machine, workpieces are processed using a needle file, a file and sandpaper wrapped around a block. In this case, the tool rest used to hold the tool will be quite sufficient. If you plan to work with turning tools, then you cannot do without a support, the movement of which in the longitudinal and transverse directions is ensured by a screw mechanism.
A factory turning device for a drill, like the one shown in the photo GRIZZLY H2669, will cost about 5,000 rubles without delivery
Design features of a lathe for working with metal
If, according to the master’s plan, metal parts are supposed to be processed on a lathe, you need to approach the task thoroughly. You should take into account the design of the drill and the size of the parts that you plan to process.
The design of a homemade lathe must be stable and rigid. The guides must be made of steel square pipes. The base is framed with a steel angle to give rigidity.
It should be borne in mind that a metal lathe from a drill can only process extremely soft metal. These include aluminum, copper, bronze and their alloys.
Selecting the material to create a turning unit
Often among home craftsmen there are those who strive to make a lathe with their own hands from a drill. The creation process is not at all difficult, and to achieve a positive result, you will need to take the necessary materials. To create a homemade wood lathe you will need the following tools and consumables:
- Electric drill - serves as a drive mechanism. It is attached to the wall of the headstock. To secure the workpiece in the drill chuck, you will need to make a special fastener in the form of a trident
- To produce the frame, you should use chipboard, a board or a workbench on which the device is assembled. The frame can be made of steel, which will have a positive effect on the reliability of the homemade device, but this complicates the manufacturing process of the device
- The headstock and tailstock are made from beams, boards or iron corners. The strength and reliability of a homemade device depends on the materials used.
- The support can also be constructed from a block and a board, making a “T” shaped structure from them. If the bed is metal, then it is also advisable to make the support from a similar material. In this case, the main requirement must be taken into account - the mobility of the mechanism in all directions
This is interesting!
It is not recommended to use plastic as a basis for creating a lathe, since such a homemade product will not be reliable, and at any moment the workpiece may fly out of the holders during processing.
Woodworking materials can be used in the production of a machine, but it must be understood that only small-sized workpieces and parts can be processed on such units, for example, the production of handles for knives, handles for furniture, etc. If you need a reliable machine that you plan to use often, then it is better to make it from metal structures.
Basic recommendations
To summarize, it is worth noting that the possibilities of a homemade machine from a drill can delight the imagination of a home craftsman. The choice of lathe design should be approached responsibly. It is advisable to obtain the blessing of a specialized specialist.
You will get a fairly stable and reliable design of a homemade lathe if the guides are made of square steel pipes.
It should be recalled that only high-quality components will allow you to get pleasure from the work and, ultimately, the expected result.
The finished turning device, which is made by the caring hands of hardworking Chinese workers, has a starting price of 6,000 rubles.
Good results in your work.
Types of machines
The lathe itself belongs to specialized equipment, which can be heavy and household. The former are characterized by a large size, which allow you to work with parts of significant dimensions. Such devices are needed more in professional activities and in the wood processing industry.
The second type of installation is characterized by the fulfillment of small household needs - cutting and processing legs for a stool, or partitions for railings. This does not require any special power of the device, nor does it require any size.
You may have seen a photo of a lathe made from a drill - there is a ready-made platform to which the drill is attached on one side, and the part is clamped on the other. You can buy such a stand in a store, because the use of a drill is not typical only for folk recipes.
Only the price tag for such a platform can reach tens of thousands of rubles, which in itself is not very justified. The average price tag on the market will be half the mentioned amount, which is still a bit much, taking into account the complexity of the design. That’s why creating such a machine with your own hands is not a bad idea at all.
Photos of lathes from a drill
Useful tips
When working on a home machine, assembled with your own hands and with an electric drive from a conventional drill, it is recommended that you familiarize yourself with several useful tips:
- For better workpiece machinability, the electric drill should operate at low speeds.
- The cutter should be positioned in relation to the wooden block at an angle of 25 to 30 degrees.
- The final processing of the product is carried out in several approaches.
- Grinding and polishing of products is carried out with a drill operating in maximum mode. turnover. For grinding, sandpaper with a grit of more than 60 is used, and the parts are polished with sanding paper with a grit of 120 units or more.
- The polished finished product is painted or varnished directly on a lathe. After the applied paint layer has dried, the finished part is removed.
Compared to powerful industrial woodworking equipment, a homemade do-it-yourself wood lathe from a drill seems like just a toy. However, its functionality is quite sufficient for household processing of wooden products.
Step-by-step instruction
There are many options for making a lathe with your own hands from a drill. However, fundamentally they are not much different from each other. Essentially, it is an electric drill adapted to work in conjunction with the structural elements of a lathe.
- When choosing a frame design, it is necessary to take into account the possibility of placing it on a home craftsman’s desktop (workbench). It can be attached to it using clamps or threaded connections, depending on the magnitude of the load during processing. The bed allows you to easily move the lathe from the drill with all the components installed on it if the location changes as necessary.
The dimensions of the bed must be selected in accordance with the dimensions of the workpieces being processed. If you have 40x40 mm corners or a square pipe of this cross-section, welding a frame from this metal would be a good option. Be sure to provide a groove along which the tailstock and tool rest move. If there is no corner and square pipes, you can make a frame from wooden blocks.
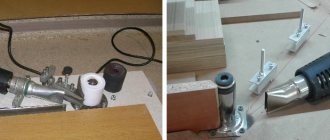
- Depending on the model of the selected electric drill, a stand for it is developed. A structure is made from three plywood plates knocked together and a base with a cradle for the drill body. The stand is attached to the bed, while the supporting part of the drill is pressed against the cradle using a clamp. You can also try securing the drill to the bed with an iron clamp. Both options are shown in the pictures below. The method of attaching the drill is not limited to these options. You can experiment and invent your own. It is important to attach the drill so that it rests on the bed without movement or play during operation.
- For the tailstock we assemble a corner from two wooden blocks. It is attached through a groove to the frame. In one of the bars there is a hole for a furniture hinge with an internal thread. A tip with a tapered end is screwed into it. The entire assembly is clamped with a nut located on the side of the working area. This location prevents the tailstock assembly from unwinding.
Important : the axis of the tip must coincide with the axis of rotation of the drill chuck. This will reduce the workpiece runout during processing and make the processing of the workpieces better.
- A tool rest is used as a substitute for a support on a drill lathe. It moves freely along the guide groove of the bed, providing a minimum gap between the support of the tool rest and the rotating workpiece. This is due to the fact that the tool is held manually on the tool rest. The distance between the workpiece and the support should not increase the moment of force, reducing the physical effort of the machine operator. The fastening ensures reliable fixation in the working position.
The correct arrangement of all the listed components on the bed will allow turning of workpieces. If you develop additional equipment for a homemade machine from a drill, then you can move on from processing simple cylindrical bodies of rotation to more complex ones. A set of various clamping cones, flanges and mandrels will expand the range of processed parts.
Drawings with dimensions
Below you can see the drawings of a homemade lathe. All dimensions are in mm:
Option for manufacturing a mini-lathe:
What can you do with a lathe?
Even at the design stage of the machine, you can provide turning attachments for the drill.
One of them could be a copier. It is used to repeat exactly according to the model all the figured cuts on a wooden cylinder. Rewinding motors can be a problem, and the drill attachment can cope with this task. You can use a drill mounted on the bed for grinding; place a polishing pad on it. Use rotation of the workpiece to apply paint. When the decorative layer centrifugally spreads over the surface, an unpredictable color mosaic is created. The first machine will awaken interest in creativity and your imagination.
Using inexpensive materials at hand, you can create an assistant with whom you can sculpt exclusive things for your home. At all times, artistic crafts made with one's own hands have been valued.
Rules of care and use
Having made efforts to create homemade equipment, you will probably want it to serve in good condition for as long as possible and be pleased with the result of its work. To do this, you must follow a number of rules for care and operation:
- timely removal of waste that falls on the surface of the machine during operation;
- periodically tightening all connections, as they become loose during vibration;
- storing the lathe after work in a dry place, since if the machine has wooden parts, then they can swell over time due to moisture, and if they are metal, they can rust;
- replacement of all parts if they fail before starting new turning work.
Thus, this article clearly shows that any craftsman, even with minor assembly skills, can handle the task of independently assembling a wood lathe from a drill. At the same time, spending a minimum amount of financial, time resources and space in your garage or workshop to store this unit.
Also, this equipment is unpretentious in care and maintenance, which can rightfully be considered another advantage of a homemade lathe in addition to all those described above.