Do-it-yourself drill repair
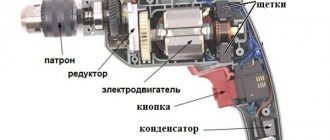
- breakdown of motor parts (stator, armature) - wear of the brushes, as it is also called, burning of them - breakdown of the regulator and reverse switch - wear of the support bearings - poor clamping in the tool chuck.
Some spare parts (switch, rotor, stator, brushes, bearings, etc.) for more popular models are bought here (but it’s better to buy through an online store, because in a regular store of this network you will like the price higher).
Changing brushes
. A common type of breakdown is wear of the motor brushes, which are replaced independently by yourself. From time to time, brushes can be changed without disassembling the drill body. For some models, it is enough to unscrew the plugs from the installation windows and install new brushes. For other models, changing requires disassembling the housing, then you need to carefully remove the brush holders and remove the worn brushes, among them.
Brushes are sold at many general power tool stores, and it's not uncommon for a newer power drill to come with an extra pair of brushes.
Do not wait until the brushes wear down to small size. This is fraught with the fact that the gap between the brush and the collector plates increases. As a natural result, excessive sparking occurs, the collector plates become very hot and there are variations in which they move away from the base of the collector, which will lead to the need to change the armature.
Determine the need to change brushes, of course, by increased sparking, which can be seen in the ventilation slots of the housing. The second method of determination is the random jerking of the drill during operation.
Power cord
. The cord is checked with an ohmmeter, one probe is connected to the contact of the power plug, the other to the core of the cord. Lack of resistance indicates a break. So repairing a drill comes down to replacing the power cord.
Electric motor diagnostics
. In second place, in terms of the number of drill breakdowns, there is an option to put the malfunction of motor parts and, in most cases, the armature. Breakage of the armature, or stator, occurs for two reasons. incorrect operation and poor wiring. Domestic manufacturers with a worldwide reputation use expensive winding wire with double insulation with heat-resistant varnish, which increases the reliability of the engines several times. Accordingly, in cheap models, the quality of insulation of the winding wire is still in the development stage. Incorrect operation boils down to frequent overloading of the drill or prolonged operation without breaks to cool the motor. Repairing a drill in makeshift conditions by rewinding the armature or, in other words, the stator, is not feasible without special devices. Only changing the element is quite possible (only experienced repairmen will rewind the armature or, in other words, the stator on their own).
To change the rotor or stator, you need to disassemble the housing, disconnect the wires, brushes, remove the drive gear as necessary, and remove the entire engine along with the support bearings. Replace the faulty element and install the engine in place.
An armature malfunction can be detected by a corresponding smell, an increase in spark formation, and the sparks have a radial movement in the direction of the armature movement. Pronounced burnt windings can be seen during visual inspection. If the engine power has dropped, but there are no signs listed above, then you should contact the measuring devices. ohmmeter and megohmmeter.
The windings (stator and armature) are subject to only three types of damage. interturn electronic breakdown, breakdown to the housing (magnetic circuit) and winding breakage. A breakdown to the housing is determined simply by simply touching any winding output and magnetic circuit with the megger probes. A resistance of more than 500 MΩ indicates the absence of breakdown. It should be noted that measurements should be carried out with a megger, whose measuring voltage is not less than 100 volts. When making measurements with a simple multimeter, it is impossible to find for sure that there is definitely no breakdown, but it is determined that the breakdown is definitely finite.
It is impossible to find an interturn breakdown of the armature unless, of course, it is visible visually. For this purpose, you use a special transformer, which has only a primary winding and a break in the magnetic circuit in the form of a trench to install an armature there. With all this, the armature with a personal core becomes a secondary winding. Rotating the armature so that the windings alternate, we apply a narrow iron plate to the armature core. If the winding is short-circuited, the plate begins to rattle very much, while the winding heats up noticeably.
Possible tool malfunctions - we carry out repairs ourselves
If your tool begins to work worse, or even stops performing its direct duties, it’s time to diagnose the problems and try to deal with them. First, we check the wire for damage and the voltage in the outlet, for which you can plug in any other device - a TV or a kettle.
If you are inspecting battery-powered devices, they should be checked using a tester - in this case, the voltage indicated on the case should have a similar value to the battery voltage.
If the voltage is less, you will have to replace the batteries with new ones. If the battery is working normally, the power supply is normal, look for hardware problems. The most common breakdowns are:
Knowing how the electric drill button is connected, you can quickly solve the problem. In addition, a problem with the operation of the drill can also arise due to the dustiness of the tool, because the drill “takes” wood, brick, and other materials. This means that you should take care to clean the device after each use - this is the only way to reduce the risk of malfunctions due to contamination of the tool. That is why, after you have carried out renovations in your apartment, immediately clean the drill.
Diagnosis of failure
This simple-looking device, during use, gives signals to the user that he will soon need repairs, but not everyone understands them. If the drill begins to work with temporary interruptions, or the button requires pressing harder than before, then these are the first symptoms of incorrect operation of this part.
When you use a cordless drill, the first thing you need to do is measure the battery voltage with a tester - if it is less than the nominal value, then it needs to be charged.
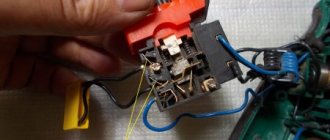
In this case, we are especially interested in the condition and functionality of the product’s on/off button. Let's look at the procedure for checking a key using a classic impact drill as an example. To remove the casing, you will need a Phillips and flathead screwdriver, and for direct diagnostics, a standard tester (multimeter).
Be sure to unplug the power cord from the outlet before disassembling the instrument.
Removing the button:
- Unscrew the bolts on the drill body.
- Loosen the screws holding the network cable.
- Disconnect the reverse.
- Carefully remove the starting block.
Most often, the reverse is attached to ordinary clips: bend them slightly and pull out the element. If it fails, then replacing it should not be a problem. A reverse block for a drill is sold in almost every specialized store.
To check the drill power button you will need a multimeter
Button ringing:
- Turn on the multimeter and set the knob to the sound signal.
- We press one probe to the core, and the other to the screw that holds the power cable.
- We press the button.
- There is a sound signal - the key is working, if not - it is faulty.
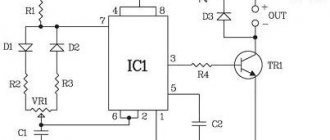
Drill button connection diagram - how to fix the problem?
Unfortunately, to check the functionality of the tool, a tester will not be enough for you, which is due to the fact that most of the device’s buttons are equipped with smooth speed control, and therefore a regular tester may give you incorrect data. In this case, you will need a special connection diagram for the drill button. Often in instruments one wire is connected to a terminal, and therefore pressing the button simultaneously leads to ringing of the terminals. If the light comes on, everything is fine with the button, but if you notice a malfunction, it’s time to replace the button.
When making a replacement, keep in mind that the circuit can be either simple or with reverse. Due to this, all work on replacing the button must be carried out exclusively according to the diagram, without adding anything “on your own”. So, the part must be suitable in size and match the power of the tool. At the same time, calculating power is a fairly simple task. We use the formula P=U*I (taking into account that the drill power is 650 W), I = 2.94 A (650/220), which means the button should be at 2.95 A.
Checking the electric motor
Breakage of the stator or armature of a drill can happen for various reasons. Most likely, this was caused by non-compliance with the operating rules of the device. For example, in many cases the tool is simply overloaded, working without breaks. In this case, the engine wears out much faster.
The second reason is usually the low quality of the winding wire, which is often used in budget products. Cheap drills break much more often than more expensive ones. Repair is carried out in this case using special tools.
As you can see, if you have an exact diagram of the device, you can repair a drill yourself. This type of work will not take much time if done carefully.
Good day to all! A button flew off the Interskol DU-13/650ER electric drill. I bought a new one in the Interskol store, they sold it as specially for this model, I paid 400 rubles, I came, disassembled the drill, but I couldn’t connect it. I connect the wires into the same holes as in the old one, but apparently the circuit is slightly different, and the drill does not turn on. The tester determined that the holes for the short circuit-open wires are in a different place than on the previous button. then where should the other 4 be connected? Maybe someone has encountered this, please tell me. Thank you!
An electric drill is an indispensable assistant in all types of home repairs: it can be used to perform a number of tasks from mixing paints, wallpaper glue to its main purpose - drilling various holes. The product's power button wears out quickly and has to be repaired or replaced with a new one quite often. To carry out this rather simple operation, the user needs a drill button connection diagram and knowledge of the most common malfunctions of this important part.
How to connect the drill button yourself?
Despite the fact that this process is quite complicated, you can do all the work yourself, following some important rules. For example, remember that opening the case may cause all parts and loose parts to simply fall out of the case. Naturally, this should be avoided, because then it will be quite difficult to assemble the device together. To do this, you can smoothly lift the cover, noting the exact location of the spare parts on paper.
The button is repaired as follows:
Many people are interested in where to get such a scheme? First of all, it should come with the instrument when you purchase it, but if there is no diagram or you have lost it, you will have to look on the Internet. After all, only with its help will you be able to carry out repairs competently, without errors. By the way, the speed control button and the reverse control button are located in different places, and therefore you will have to check them separately.
Checking the electric motor: causes of breakdowns and repairs
There are several reasons for damage to the armature or stator of a drill. First of all, this is illiterate operation of the device. For example, many users simply overload the tool, working without interruption. This leads to the fact that the drill motor does not have time to “rest”. The second reason lies in poor coil wire, which is often found in cheap models. That is why breakdowns of cheap tools are much more common. In this case, repairs must be carried out using specialized tools. And it will be better if you entrust this work to professional specialists.
How to replace brushes: work in a couple of minutes
But the drill may not work due to trivial faults - for example, due to brushes inside the motor. This means that you can’t do without repairing brushes, and this work is quite simple - you don’t even need to have special knowledge and tools. To do this, we disassemble the device, remove the brush holders from it and replace parts that are broken. By the way, there are models whose body does not need to be disassembled - you just need to remove special plugs through the installation window, after which we change the brushes .
You can purchase these parts at any hardware store; there are also some models that are sold along with a set of additional brushes. It is important that you do not wait until the brushes are completely worn out - check them from time to time. And all due to the fact that there is a risk of a gap forming between the bristles and the collector. As a result, this part will begin to overheat and eventually fall off - which means you will have to change the entire anchor, which will be much more expensive and more difficult, and it is not a fact that you will be able to solve this issue yourself.
As you can see, there are a variety of breakdowns, many of which will be within your control, others will only be possible for specialists in service centers. And to reduce the risk of such breakdowns, you need to take care of your tool, clean it after work, check the condition of the parts and brushes in order to replace them with new ones in time. However, if you see that you can’t handle it yourself, take the device to a workshop.
Source
How to select spare parts for replacement
There are many cases when the parameters of the buttons match, but when installed in the drill case they simply do not fit.
When replacing a button, it should be taken into account that the circuit may have a fairly simple structure, or it may be made in reverse. When these components wear out, the reduction gearbox pair experiences increased loads.
This means that you should take care to clean the device after each use - this is the only way to reduce the risk of malfunctions due to contamination of the tool. Drills are different in type, but in terms of power, by the way, when buying a new drill button, you need to take into account the power of the tool, otherwise the button will not last long.
This article will help eliminate this gap. WEIGHT without power supply cable, socket and additional accessories. What's inside