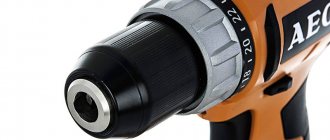
Any, even a very compact drill, has certain overall dimensions. This limits its use: it is not always possible to “crawl” into a secluded corner. The power tool market offers portable options called “Dremels”, named after the manufacturer.
With the help of such a device you can penetrate into places with limited access, however, it also has disadvantages:
- Still, the Dremel is not compact enough, the dimensions of the electric motor do not allow the tool to be reduced;
- small size means little power.
In addition, in addition to banal drilling, using a drill (of any size) you can perform other methods of processing the material: grinding, engraving, giving the workpiece complex shapes (turning). To do this, you need to hold the working tip with your fingers, like a fountain pen. Of course, even a very compact instrument cannot be used in this way.
Again, with the exception of compact engravers.
How to get out of this situation? Tool manufacturers offer the use of flexible shafts for power transmission.
What is a flexible shaft used for?
- First of all, for drilling in hard-to-reach places. The drill in the micro spindle turns the shaft into a mini drill with high torque. The compact instrument does not have such parameters.
- When working with a screwdriver, you can tighten (unscrew) fasteners that cannot be reached with standard tools.
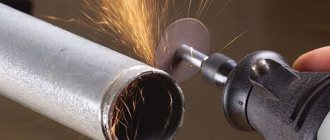
- Grinding and polishing at angles of contact with the working surface that are unattainable when working with a drill.
- Cleaning the nooks and crannies of complex shaped parts using steel brush attachments.
- Processing of ends in places with limited access using small diameter abrasive wheels.
- Milling with little effort that the operator's hand can withstand.
- Engraving (traditional use of flexible shaft).
Application area
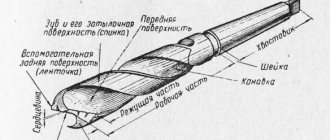
Flexible shafts have high torsional rigidity and low bending rigidity. The flexible shaft is used for internal vibrators, grinding machines and shafts that are used in speed meters of railway locomotives. They transmit torque between parts that change their position during operation. Shafts for internal vibrators are distinguished by connecting dimensions, which depend on the diameter of the tip, and by length. In their design, the shafts contain a core and several layers of steel wire, the winding direction of which alternates in each layer. produces not only standard product sizes - it is also possible to produce custom shafts and cores, based on the customer’s technical requirements. Compared to rigid hinged analogues, this product has a number of advantages. Firstly, it is easier to install and easy to replace. In addition, the flexible shaft can perfectly transmit rotation in both directions. At the ends of the products there are cartridges with which you can easily attach them. The outside of the device is covered with a protective shell that protects the shaft structure from mechanical damage and corrosion.
Flexible shaft for engraver
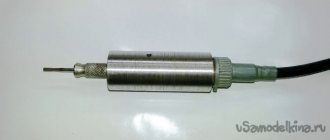
Greetings to all. I offer you a review of an attachment for an engraver, namely a flexible shaft. The engraver itself was purchased thanks to one of the reviews on Muska, but in a cheaper package. I don’t use the engraver often, but those cases when it is needed cause a little discomfort due to its size. To solve this problem there is a so-called flexible shaft. More details under the cut. So, a flexible shaft is a structure that transmits torque between axes that significantly change their orientation relative to each other. In our case, this is an engraver and often some kind of cutter or bur. By analogy, you can imagine a dentist's chair with a drilling unit. Or a plumbing cable for cleaning pipes. But personally, I have an association with the speedometer drive of a car:
The flexible shaft is a cable that is located inside the protective shell and transmits rotation from, in our case, the engraver to the cutter, at a certain distance. Let's get back to the purchase:
Delivery is almost free, the price of the track number is 19 cents, so I didn’t save money: The order was placed on July 19 and on August 11 I received my parcel in my hands. One of the most common packaging options is a paper bag reinforced with polyethylene with bubbles:
There is nothing to break inside, even if they play football with the parcel: The hero of our review:
I picked it up and when I tilted it, a cable suddenly fell out from inside:
The diameter of the cable is 3 mm, the ends are molded into a square 2.5x2.5 mm. I just don’t understand why on both sides? It is very reminiscent of the cable from the car spare part picture.
There are springs along the edges of the protective casing to prevent excessive bending.
On one side there is a glass with a thread for screwing onto the engraver and there are no bearings. However, their function is performed by the bearings of the engraver itself: The handle fits quite comfortably in the hand, the body is plastic. There are two sealed bearings inside. I haven’t been able to figure it out yet - the bearing model is 688zz. You will need to think about the issue of lubrication. In my case, the load is assumed to be axial, that is, work with burs and cutters. Since radial load and collet clamping are not entirely compatible in my opinion, you will occasionally have to drill holes and even less often mill in depth.
A collet clamp was included, diameter 3 mm:
A hole for fixing the shaft when installing the tool and a chamfer on the chuck for clamping with a key. Key and wrench not included. The key was taken from the engraver. The function of the crank is performed by the chrome plated shaft from the CD-ROM: We try to fix the first cutter we come across:
We have a Defort DDG-140 engraver in stock, there were doubts that the thread would not fit, I had no experience, but I decided to order it anyway. It came up. It turns without problems:
Let's try to put it together. Clamp the square
cable into a round collet. There will definitely be beats! Screw the glass onto the engraver and you're done. We try to turn it on: At first speed the engraver hums and does not spin! I increase the speed and it starts to rotate.
2nd speed - I try to load it - engraver - the speed drops. At 3rd speed it is already acceptable. Minor vibration is present only in the nose of the engraver and this is very bad. The solution to the problem is to pull the cable out of the shaft by 1-1.5 cm and the cylindrical part will fall into the engraver chuck. The vibrations are gone. The connection of the cartridge in the handle with the cable is not broken, there is probably a large reserve in depth. You can also sand it down with sandpaper and lick off the edges a little. In general, these are all half measures... No axial play was noticed in the handle, probably a tight fit in the bearings. Radial play is also not observed.
Comparison photo of engraver, flexible shaft and thick marker:
There is no heating in the house yet, the cat didn’t want a selfie with a hose and sits under the blanket all day long
Possible modifications and maintenance: Lubricate the bearings and shaft. I don’t plan to buy anything specific, I only have Litol 24:
A few drops on the shaft - a few reciprocating movements, ready. The shaft began to rotate more easily and noticeably. However, I’m not sure that lithol is a good solution. The speeds are high, but liquid lubricant will not work. Suggest options: After lubrication at speed 1, the engraver started working. Current measurements were not made, although they were planned. The device became damp and began to lie mercilessly.
All that remains is to make a tripod to hang the engraver and the tool will be functionally complete.
Conclusions:
The kit is budget, collet chuck, there is no possibility of disassembly and the main drawback is the square molding of the cable ends on both sides. By the way, the flexible shaft arrived without lubrication. At least there were no traces of oil on my hands. There is no vibration, beating or play. The load on the flexible shaft cartridge is transferred well after lubrication. At high speeds, the shaft shell is warm, the handle does not heat up. It’s definitely more convenient to work with a flexible shaft than with an engraver in your hands. Access to small cavities. Better control of the cutting tool due to its closer position to the hand. Perfect for use in modeling and working with small parts. At the moment I am assembling a model of an airplane, but there the need to use an engraver has been reduced to almost zero.
The solution to the main problem is vibration - we do not insert the shaft into the handle completely, so the working part of the collet has not a square, but a round part of the cable, but this is inconvenient, you have to remember every time when assembling the flexible shaft. I’ll write to the store about this and if the problem is not fixed, I don’t recommend using it without modifying the cable itself.
With regular use, do not forget to lubricate at least the cable. ps I did not indicate “products for professional use”, since the difference in design with professional shafts is obvious. Regarding the price. A flexible shaft was purchased at a price of 6.94 + 0.19 track number. 5 USD was used from the wallet in the store, which was formed there as compensation for the previous order. I won’t tell you about coupons and points; everyone knows how to save money when purchasing.
Design Features
The main design feature and at the same time the main advantage in application is the ability to bend it anywhere in any direction. This is achieved by using the following components:
- flexible and durable steel braided cable that transmits torque;
- armor braid or spiral-wound spring wire that acts as a flexible drive housing.
The outside of the wire is covered with a corrugated plastic sheath, inside of which there is a grease. It reduces friction, prevents abrasion of the core cable and protects it from moisture and dust.
The design of the flexible drill drive also includes bearings to which the cable is attached. They keep it spinning. At one end the cable is fixed in a socket, at the other it is provided with a mount for a tool.
Extension shaft with collet clamp
Such a drive is intended for light and delicate work; you should not count on using it to unscrew a soured bolt or screw in a 130 mm self-tapping screw at full speed; you must remember that the torque transmitted by the flexible shaft is limited.
How to make it yourself
Those who like to make tools with their own hands can easily make a flexible drive for a drill on their own.
Important! You won’t be able to make armor braiding yourself; this requires industrial equipment. It is also important to understand that a homemade flexible shaft for a drill will be inferior to a factory one, first of all, in terms of working life. And it’s better to use it occasionally - then it won’t let you down at a crucial moment. For professional work in large volumes, it is better to invest in a purchased extension cord.
You will have to buy a braided cable in a store and ask them to cut it to the length you need. All that remains for Samodelkin is to cut the ends, mount the outer protection, filling it with lubricants. The shank from a broken drill of a suitable diameter will work as a blank for the mounting unit in the chuck.
As an option, you can take a cable from a car speedometer, as well as a motorcycle gas or clutch control drive as a starting material.
One end of the armored braided wire will need to be welded to the shank of the broken drill using a nut of the appropriate diameter and a welding machine. A drill chuck or a hex adapter is welded to the second end of the cable for quick tool change. Remember that when operating such a drive, you need to hold it not by the rotating cartridge, but by the stationary braid. Such a do-it-yourself device will not only allow you to save money, but also make the drive exactly the length you require. Most factory drives are 25cm or 50cm long.
What operations are performed using an engraver with a flexible drive?
Special attachments help turn an engraver with a flexible shaft installed on it into a truly universal device, which include:
- grinding and polishing wheels, allowing you to bring the surface of the workpiece to a perfectly smooth state;
- brushes used for cleaning the surface of the product and polishing it in hard-to-reach places;
- cutting wheels for cutting products and processing their torn edges;
- drills, with the help of which the device turns into a miniature drill;
- cutters and abrasive wheels that allow processing of products in hard-to-reach places;
- pen-shaped attachments used for engraving work.
To ensure ease of operation with such a device equipped with a flexible drive shaft, you can purchase additional accessories - rubber grips on the handle, a power button lock, etc.
All kinds of holders are very useful, in which, in addition to the shaft and the engraver, you can attach various attachments
Engravers on which a flexible drive shaft is installed also include a drill used in dentistry, a manicure machine, equipment for processing natural stone and applying inscriptions and drawings to the surface of products made from it.
You can also use a flexible shaft for a drill or purchase a flexible shaft for a screwdriver. With this improvement to conventional power tools, a screwdriver attachment or drill can be successfully used to perform work even in the most difficult to reach places.
Will need
- Two bearings from old roller skates (or similar in size).
- Steel cable in a protective sleeve, from a motorcycle (or bicycle).
- A metal tube with a diameter suitable for the outer diameter of the bearings.
- Wooden handle from an old soldering iron (or similar wooden tube).
- A steel rod for the shaft on which the cartridge will later be installed.
- Collet chuck, with an internal hole, for the shaft rod of your choice.
- A metal tube with a diameter equal to the inner diameter of the bearings.
Don't miss: Electric chisel: types and characteristics of electric chisel
Tools and consumables required for work:
- Soldering iron, tin and flux.
- Bor machine or engraver, with a saw blade and a 3 mm drill.
- Pliers.
- Secondary glue with soda.
- Insulating tape.
- Knife.
- Scissors.
- Solid oil and machine oil.
Appearance and specification
I can’t say that it’s really chromium vanadium, but it looks similar. In general, it gives the impression of a tool, and not a stray device, like the previous flexible shaft.
On the edges of the mother there are grooves for the ball so that it does not jump off. Couldn't catch it in the photo, but in the hole on the mother you can see that the shaft is made of wire of the same diameter as the outer wire.
The ball on dad is spring-loaded - everything is like people’s.
Manufacturing of flexible shaft
First of all, let's prepare the cable. It must be pulled out of the protective sleeve. In order for it not to unravel when we cut off the restrictive seal, it must be soldered with tin. They coated it with flux, heated it, impregnated it with tin, and cut it off.
We take it out of the sleeve. On any brake cable, at the other end there is a threaded rod to adjust the traction. We cut off the thread from it, so that a small piece remains, about a centimeter and a half. Next, we solder a metal tube onto this section, onto which we will later put bearings. We also coat the surfaces to be soldered with flux, put the tube on a piece, throw a piece of tin into the tube, and heat it with a soldering iron until the tin melts and spreads over all the lubricated surfaces.
While the tube with the soldered cable is cooling, let's prepare the rod for the cartridge. I took it from the CD drive. But you can use any of the appropriate caliber. We adjust this rod to the inner diameter of the tube by winding electrical tape around it until the desired caliber is achieved.
We insert the rod into the tube, coating it with glue.
When the glue inside sets, the connection will be no worse than from soldering, this can be seen in the video... Next, we will prepare the holder body. I took an aluminum case from a perfume bottle for this purpose - it almost perfectly fit the bearings. We drill a hole in the end of the body for the rod exit for the cartridge.
We put bearings on the tube with the cable. My bearings fit perfectly, but to be sure, I also added a drop of glue, for greater reliability. Next, we also adjust the bearings to the housing using electrical tape.
We drip glue inside the body and insert a tube with bearings on it. We position the bearings in such a way that there are free edges of the housing. About a centimeter.
Don't forget to put a drop of oil on the bearings. We carefully ensure that the glue does not get into the bearing mechanism, otherwise all the work done will go down the drain! I used Cosmo CA-500.200 glue - it’s extremely difficult to tear off something glued with it, that’s why I preferred it to soldering... So, the shaft housing is ready. All that remains is to attach the wooden part of the handle with the cable sleeve.
We thread the sleeve into the wooden handle and secure it with glue inside the handle. Next, generously lubricate the cable with grease.
We thread it through the handle with the sleeve and fasten, again with glue, the wooden handle to the aluminum body.
Install the chuck collet.
If the resulting flexible shaft is planned to be used only for a drill or screwdriver, then the work is finished - we fix the protruding end of the cable into the drill chuck, and use it with pleasure!
And if you made a shaft for the engraver from a thin bicycle cable, then you also need to make a rigid protection for the cartridge so that the elastic cable does not loosen it. Each engraver has a threaded cap below the cartridge. This cover is removed and, if necessary, a plastic cartridge with a flexible shaft cable is screwed onto this place. We will need a thread like the one on the lid, a piece of plastic pipe into which the thread will fit, and a tapered end into which we will thread the cable sleeve. There is nothing complicated here; glue all the parts together, put it on the cable sleeve, clamp the end of the cable in the collet chuck, and screw the resulting cap onto the engraver body. It will prevent the rotating steel cable from loosening the brass collet cartridge. I made a flexible shaft for a drill, but in order to clearly show how to use it with an engraver, I also made a protective cap.
Such a shaft will not take up much storage space - it can be easily twisted into rings and hung on a nail in a shed or pantry, and at the right time it will help you make a hole in a hard-to-reach place, or screw in a screw there.
Flexible shaft for drill for grinding and cutting work
Have a good time everyone. Today the author of the YouTube channel “cemaL AÇAR” will show us how he made a flexible shaft for a drill. With the help of this device, the master increased the capabilities of the drill: from simple drilling to grinding and cutting work. To make this homemade product, the author needed.
Tools:
Angle grinder Cutting wheel for metal Flap wheel Rags A little gasoline Knife Pliers Technical aerosol for universal use, in other words: WD-40 Vernier calipers Marker Electric drill Cup cutter Drills Circular saw Wood glue Square Tape measure Electric jigsaw Screwdriver Vise.
Materials:
An old speedometer cable from a pickup truck.
Not a working screwdriver, or rather a cartridge from it.
Plywood.
A piece of wooden block. Screws. First of all, the author removed all unnecessary rubber bands from the cable.
Then, using a rag soaked in gasoline, I removed all the dirt from the surface.
The author cut off the tip from the other edge of the cable using an angle grinder.
Then I washed and at the same time lubricated the cable with WD-40 aerosol.
After applying the aerosol, the master clamped one edge of the cable into the drill chuck and twisted the cable a little to distribute the lubricant evenly.
Afterwards, the author took up an old screwdriver. I disassembled and removed the cartridge from it.
Then the author removed everything unnecessary from the cartridge.
Like this. After measuring and removing the shank.
It turned out something like this. The thread in the cartridge matches the thread on the cable.
Temporary installation of the cartridge.
Then, the master will make a handle for a comfortable grip when working with the tool. To do this, the author took a block and placed on it the edge of the cable where the cartridge was installed, so that the cartridge extended beyond the edge of the block. Afterwards, I marked the place for the bearing.
And with a cup cutter I made a recess in the marked place.
That's how it happened. Afterwards, the author decided on a long handle and sawed off the excess part of the block.
Then I made through holes on the end sides of the block. As shown in the photo.
Then I sawed the block lengthwise into two halves.
Then, I applied glue to the inside of one half of the block. Then I laid the cable.
Again I coated the edges well with glue. After which, I glued the other half.
And he clamped this part well in a vice until the glue dried completely. After some time, when the glue has dried. The author rounded his pen.
He then proceeded to make a holder for the drill itself. The author will make it from plywood. First, the master will make the base. Having decided on the sizes.
And making the markings. The craftsman cut out a rectangular piece from plywood.
Afterwards he cut out a couple more blanks of suitable size. Then I connected these two blanks to each other using glue and screws.
Like this. Fitting.
Then I made a recess with a milling cutter for the bearing.
Then I made the markings as in the photo.
Then I cut off the excess according to the markings.
And from the top side, I made a cut lengthwise, until there was a recess. Then I glued the finished part to the base.
And for reliability, I also fastened it with screws.
Fitting.
Next, the author cut out a couple more parts from plywood. Which will hold the drill from the sides. And marking the places where they are attached. Just like the previous part, I attached them to the base using glue and screws. In all parts, before screwing in the screws, the author first made holes with a diameter slightly smaller than the diameter of the screws. This was done so that the parts would not break while screwing in the screws. Installing the drill in its place.
Installing the cartridge.
Examination.
And now a test of the finished tool. Metal brush "piranha".
Metal cutting wheel.
Grinding wheel.
Result: the tool works perfectly with all attachments. The author made this useful homemade product today. I think this homemade product will be useful to many. Thank you very much Master.
And that's all for me. Thank you all, and see you soon. Source
Become the author of the site, publish your own articles, descriptions of homemade products and pay for the text. Read more here.
How does the device work?
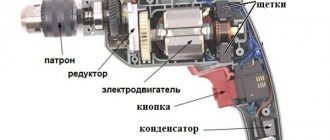
The main task is to transmit torque from the electric motor (in our case it is not stationary, but located in the drill) to the remote working tip. Such devices have been used before, for example:
- a flexible shaft for a drill in a dental office, which replaced the pulley drive;
- stationary engraving machine, with a fixed motor and a flexible drive with a tip.
Don't miss: How to choose and glue grinder tape
A prerequisite for any design is the presence of a shell within which the drive rotates. Otherwise, the device will be unsafe: something will constantly be wound around the shaft, including the clothes or hair of the master.
Another important design element is the spindle end holder. He has two tasks:
- The outer casing must be stationary; the shaft with working tips must not touch the operator’s hand. Otherwise, it will be difficult to work at high speeds.
- The flexible shell must be rigidly fixed both to the handpiece body and to the source of rotation (drill). Otherwise, it will be impossible to hold the shaft in your hands. Why? According to the laws of physics, the action force is equal to the reaction force. In our case, this means that with sufficient resistance from the workpiece, the shell together with the drill will tend to rotate in the opposite direction.
- In continuation of the previous point: the motor (drill) must be secured. Therefore, a drill holder is required to be supplied with a flexible shaft.
With its help, the same force of opposite rotation of the outer shell is compensated. If it is not included in the kit, you need to take care of the method of fixing the power tool.
- All friction units must have minimal resistance to reduce power losses. If necessary, special lubricant is used.
- The most commonly used is a cable drive. As you know, cables consist of turns of wire twisted in one direction. If you turn the drive in the opposite direction to the curl, the cable will unravel and jam, especially under load. Flexible shafts use a special weaving method that does not unfold in any direction of rotation.
Products
FLEXIBLE SHAFT IS DESIGNED TO TRANSMISS ROTATION OVER A DISTANCE.Flexible shafts make the grinding process much easier, because... the drive (motor) is located to the side, and the worker holds only the attachment with the tool in his hands. The torque is transmitted by a flexible shaft.
Can be used in conjunction with a drill.
ADVANTAGES:
Transfer of torque over distance
Length up to 5 meters
Possibility of processing hard-to-reach places
A large range of replaceable attachments (straight, angled, grinders, belt, pipe polishing)
Allows you to use the entire range of attachments on one grinder
Light weight
Virtually no vibration
Easy to maintain
Great resource
The flexible shaft consists of an internal shaft (cable) with connecting elements and an elastic, protective, reinforced sheath with connecting elements.
Two connection types: G type and DIN type
CONNECTION DIAGRAM:
STANDARD SIZES AND TYPES OF FLEXIBLE SHAFT CONNECTIONS:
connections | Flexible shaft | Diameter xlength, mm | Max.speed | Weight | Inner shaft | Outer shell | ||||
To the engine | To the nozzle | Order no. | internal shaft | rpm | kg | Order no. | kg | Order no. | kg | |
| NA 4 X 1250 | G 28 | G 16 | 30 001 02 | 4 X 1250 | 40 000 | 0.500 | 30 034 01 | 0.120 | 30 036 02 | 0.330 |
| NA 4 X 1250 | DIN 10 | G 16 | 30 002 02 | 4 X 1250 | 40 000 | 0.450 | 30 038 01 | 0.120 | 30 039 02 | 0.330 |
| NA 7 X 1500 | G28 | G 22 | 30 009 02 | 7 X 1500 | 20 000 | 1.250 | 30 041 01 | 0.400 | 30 040 02 | 0.850 |
| NA 7 X 1500 | DIN 10 | G 22 | 30 007 02 | 7 X 1500 | 20 000 | 1.250 | 30 043 01 | 0.400 | 30 042 02 | 0.850 |
| NA 7 X 2000 | DIN 10 | G 22 | 49 790 01 | 7 X 2000 | 25 000 | 1.700 | 49 791 01 | 0.600 | 49 792 01 | 1.100 |
| NA 10 X 1500 | G28 | G 28 | 30 015 02 | 10 X 1500 | 15 000 | 2.100 | 30 045 01 | 0.700 | 30 046 02 | 1.400 |
| NA 10 X 1500 | DIN 10 | G 28 | 30 026 02 | 10 X 1500 | 15 000 | 2.050 | 30 048 01 | 0.650 | 30 049 02 | 1.400 |
| NA 10 X 1500 | DIN 15 | G 28 | 30 027 02 | 10 X 1500 | 15 000 | 2.100 | 30 051 01 | 0.700 | 30 052 02 | 1.400 |
| NA 10 X 2000 | G 28 | G 28 | 30 015 03 | 10 X 2000 | 15 000 | 2.500 | 30 045 02 | 0.950 | 30 046 03 | 1.550 |
| NA 10 X 2000 | DIN 10 | G 28 | 30 026 03 | 10 X 2000 | 15 000 | 2.500 | 30 048 02 | 0.950 | 30 049 03 | 1.550 |
| NA 10 X 2000 | DIN 15 | G 28 | 30 027 03 | 10 X 2000 | 15 000 | 2.500 | 30 051 02 | 0.950 | 30 052 03 | 1.550 |
| NA 12 X 2000 | G 28 | G 28 | 30 028 02 | 12 X 2000 | 12 000 | 3.850 | 30 054 01 | 1.300 | 30 055 02 | 2.550 |
| NA 12 X 2000 | DIN 10 | G 28 | 30 029 02 | 12 X 2000 | 12 000 | 3.750 | 30 057 01 | 1.300 | 30 056 02 | 2.450 |
| NA 12 X 2000 | DIN 15 | G 28 | 30 030 02 | 12 X 2000 | 12 000 | 3.800 | 30 059 01 | 1.300 | 30 060 02 | 2.500 |
| NA 12 X 2000 | DIN 15 | G 35 | 30 031 02 | 12 X 2000 | 12 000 | 3.850 | 30 062 01 | 1.350 | 30 063 02 | 2.500 |
| NA 12 X 2500 | DIN 10 | G 28 | 49 952 01 | 12 X 2500 | 12 000 | 4.000 | 49 953 01 | 1.600 | 49 954 01 | 2.900 |
| NA 15 X 2000 | DIN 15 | G 35 | 30 032 02 | 15 X 2000 | 8 000 | 5.250 | 30 065 01 | 2.000 | 30 066 02 | 3.750 |
| NA 20 X 2500 | DIN15 | G 35 | 30 025 01 | 20 X 2500 | 8 000 | 9.450 | 30 070 01 | 4.000 | 30 069 01 | 5.450 |
ADDITIONAL ACCESSORIES FOR FLEXIBLE SHAFT:
Varieties of flexible shaft
According to the equipment, the shaft can be with or without a fixed working head. In the first case, it will be a collet clamp, a classic drill chuck, or a hexagon for holding bits.
The second option involves an end switch (slotted or square). You can put different types of attachments on it.
As a rule, such devices are designed for high force and speed. In fact, you are holding in your hands an exact copy of the drill spindle, from which torque is transmitted. There are virtually no restrictions on the work to be done. The main thing is that the master’s hands have enough physical strength.
The length of such attachments reaches up to 100 cm. For work, it is advisable to use a drill with a power of at least 650 W.
The next category is intended for delicate work with light load. This is an engraver extension, or the engraver itself (only instead of a motor there is a drill).
It is not designed for high loads, so the thin cable bends easily and the tip can penetrate into hard-to-reach places. When working as an engraving machine, the master’s hand does not get tired.
The flexible shaft for the screwdriver does not have an outer shell. Due to the low revs, it is simply not needed. But the cable is quite strong and can withstand high torque. The bit attachment can be simply held by hand.
This shaft is not very flexible.
The next option consists of many hinges. It also rotates without an outer shell and operates at low speeds. There are restrictions on torque, but the freedom of bending is almost absolute.
Screwdriver shafts do not have the ability to use attachments. They are immediately provided with limit switches for hex bits.
Flexible shaft for engraver
The engraver, or drill, develops high speeds - up to 30 thousand rpm. The device is small-sized and fits comfortably in the hand and is used for operations:
- polishing;
- milling;
- drilling holes of small diameter;
- grinding, etc.
Working as an engraver requires high precision of the master's movements. The effort involved is small, compared to, say, tightening self-tapping screws. The torque is also low. Such devices are used by jewelers and artists who create works that are not inferior to the best examples of wood, stone, and embossing carvers. Engraving is performed on materials such as:
- metal;
- tree;
- stone;
- glass;
- plastics.
Flexible Shaft Engraver
The flexible shaft for the engraver allows the user's manual efforts to be reduced to a minimum, turning many hours of work into an exciting activity.
Flexible shaft design
A flexible shaft for an engraver or any other equipment whose torsional rigidity has higher requirements than bending rigidity, as mentioned above, is used to transmit torque to elements that change their spatial position during operation.
The main part of the flexible shaft, which is responsible for the main function of such a device, can be a wire rod or a special cable. This element is made of materials with high torsional rigidity. Additional layers of twisted wire are wound onto the main core of the flexible wire shaft to give it higher rigidity. To ensure safe use of the flexible drive shaft, as well as to protect its surface from damage and retain lubricant on it, this device is placed in a flexible protective shell, which is stationary in relation to the rotating core.
This flexible shaft is equipped with a bit holder on one side and a union nut on the other to secure it to the engraver.
Depending on the design, flexible shafts can be of right or left rotation, which should be taken into account when selecting and using them. Not only the design of flexible shafts can be different, but also their length, sometimes reaching five meters.
The design of the fastener for such a device also depends on where the flexible shaft is installed - on a drill, engraver or screwdriver. Thus, fastening nuts or other types of fastening fittings can be placed at the ends of the shaft.
Don't miss: The best 125 mm angle grinders with speed control and soft start for home
The tip of this shaft can be removed for cleaning and lubrication, for which there is a hole on the side
Various mechanisms and equipment are driven by flexible shafts of different designs. In addition to engravers, drills and screwdrivers, internal vibrators, brush cutters and many other types of technical devices are equipped with such shafts. The simplest and most familiar option for using a flexible shaft is to clear sewer pipes from internal blockages.
Mechanical car speedometers are also driven by a flexible shaft. Making a flexible shaft with your own hands is, of course, possible, but given the loads under which such a device operates, it is better not to experiment and purchase serial products from trusted manufacturers. You can only be puzzled by the issue of making a flexible shaft yourself if it will be used to drive low-power equipment operating at low speeds.
Flexible shafts
Details Category:
FLEXIBLE SHAFT
are used to transmit rotational motion to a tool during mechanical processing of products that, due to their shape, weight or volume, are difficult to process on stationary machines, as well as to drive auxiliary devices, for example, tachometers. A wide variety of tools can be attached to flexible shafts, which can be brought to hard-to-reach work surfaces and, due to the low weight of flexible shafts, can be easily supported at any height and in any position.
According to the design, they are distinguished: articulated shafts, articulated chains and flexible shafts themselves.
Joint shafts are used for speeds below 500 rpm. and for transmitting more or less significant forces, for example, for heavy work on straightening or cleaning boilers. They consist of individual links equipped with ball joints at both ends. The greatest deviation of the link is about 45° (Fig. 1). The joint shafts must be built very solidly.
Chain shafts are used to drive tools, apparatus and tachometers and consist of many individual links protected by a metal sleeve.
Flexible shafts in their own right are particularly advantageous for high speeds. They consist of a core, a safety sleeve and cartridges - connecting and manual. The core is made of steel wires, bent spirally so that there are no gaps between the turns (Fig. 2).
When choosing a flexible shaft, it is necessary to set the direction of rotation for each case to avoid spinning of the core. There are, however, curling methods suitable for both directions, but in this case the efficiency of flexible shafts decreases accordingly.
The transmitted torque Md for each individual wire of diameter d approximately corresponds to the moment that the same wire would be capable of transmitting in untwisted form. The following formulas are used to determine these quantities:
where N denotes the transmitted work in HP, n is the number of revolutions per minute, Kd is the permissible voltage - equal to from 300 to 1400 kg/cm2, depending on the method of loading and the material of the wires (according to K. Bach and Hutte).
To determine the entire core diameter dtot. you need to multiply d by the total number of wires; since, however, the number of wires is in most cases unknown, it is recommended to determine dtot. immediately for the entire diameter of the core and for reliability, increase the value obtained from the above formula by 20-30%.
The impeccable quality of the wire steel is essential for the efficiency of flexible shafts.
Common shaft lengths: 1.5; 1.8; 2.0; 2.5: 3.0 m. Shafts for transmission up to 1/3 HP usually have 1.5 or 1.8 m; for transmission of more than 1/3 HP, take 1.8 or 2.0 m. The largest diameters of the flexible shafts used are 100 mm, the largest number of revolutions is 3,500.
The smallest radius of curvature of a curved flexible shaft at rest is 6-7 dtot., but during operation the radius of curvature should not be allowed below 12-15 dtot. (depending on the quality of the protective sleeve). When bent, the stress to which the shaft is subjected increases significantly and the efficiency decreases accordingly.
The safety sleeve is made of metal and serves to protect and guide the core (Fig. 3). In some cases (for example, in medical devices, in damp rooms), the sleeve is additionally equipped with a leather or fabric sheath. A flat spiral is often inserted between the safety sleeve and the core for better protection and guidance; There must always be a lubricant between the safety sleeve and the wire core.
Chuck for strengthening the shaft to the motor d. b. solid structure, due to the very significant tensile and bending stresses that arise. The core is equipped with a thick connecting pin, which should. soldered to it with soft solder; all other joining methods do not achieve the goal, and brazing or welding are not applicable because when heated, the elasticity of the hardened steel core weakens significantly. The journal is connected to the motor shaft using a wedge, screw or coupling. In fig. Figure 4 shows a connection using a sliding coupling.
The end of the safety sleeve is screwed to the corresponding attachment of the motor casing. To protect the shaft from bending too much, the connecting cartridge is often equipped with a special sleeve (especially with outboard motors) (Fig. 5).
The hand chuck is used to connect to the tool. Here the end of the core also has a strong pin, which, due to rapid rotation and difficulty of lubrication, is equipped with a ball bearing; For very thin shafts, such as in dental drills, sliding bearings are used. The outer end of the hand chuck is usually equipped with a conical hole. In small-diameter shafts, the journal can also have a conical shape for putting on a bur or a thin thread with a clamping coupling.
Flexible shafts are usually driven directly by electric motors, although sometimes using a belt drive. In these cases, electric motors are used, equipped with a rotary switch on the motor itself or a traction switch for hanging motors; with small shafts the switch can be located at the hand chuck. In this case, there are three connection methods: 1) The flexible shaft is mounted directly on the motor shaft (motors on trolleys or outboard); 2) The flexible shaft is mounted on the free end of the counter drive; 3) The flexible shaft is driven by a stepped pulley to change speeds. The first two types also include those designs in which a flexible shaft is attached to the free end of the shafts of other machines, such as hand drills, saws, polishing, milling and other machines.
For various types of tools and cases of their use with flexible shafts, see table.
Source: Martens. Technical encyclopedia. Volume 5 - 1929
- < Back
- Forward >