Peculiarities
Using a hammer drill you can make a hole in almost any material. In most cases, the device is used when working with concrete, brick and metal, less often with wood.
The variety of materials provides several operating modes and a large number of attachments:
- Boers;
- Drill;
- Crowns;
- Chisels.
The main difference. Their purpose.
Drilling nozzles are designed for drilling perforations in durable materials. In this case, the hammer drill not only does drilling, but also shocks or vibration. Drills are used to make careful holes of suitable depth and diameter in surfaces. Crowns are used to drill large holes. For example, a socket. Installing a chisel or blade means that the tool works like a jackhammer.
A significant difference is the type of fastening, which for all fastenings, not counting drills, is only suitable for a hammer drill, since it has a landing tail and is attached in the form of grooves for this tool.
But you can also fix an ordinary drill from a drill in a hammer drill. To do this, you need an adapter, which is called a removable cartridge. The device has two types:
- Cam;
- Quickly squeezing.
The name of the type determines the type of drill clamping mechanism. The cam clamp is driven by a special wrench, which is inserted into the thread along the outer perimeter and turned back. In this case, the collet mechanism installed inside the chuck is compressed or unclenched, depending on the direction of movement of the key.
The rapid clamping type is controlled by small hand force. When the chuck is pressed down, the drill hole opens.
Tools
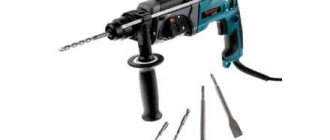
It is difficult to imagine carrying out construction or repair work without the use of a specialized tool - a hammer drill. Rotary hammers are produced in three classes: light, medium and heavy. All of them are equipped with a chuck with the ability to quickly change tools using the SDS system. The Germans say Steck-Dreh-Sitzt in the English version - Special Direct System - whichever is more convenient for you. A standard developed by Bosch in the mid-70s of the last century.
Table of contents
SDS shank - what, how, where
For convenient work, quick change of working tools, as well as to increase the contact area of the drill shank with the chuck, the SDS standard was introduced.
How to insert a drill
The impact drill itself is also a quick release mechanism. Reliable fastening of the drill in it is ensured by fixation using special balls, which, when closed, fit tightly into the grooves on the bottom of the drill.
In order to fix the necessary attachment, be it a drill or a crown, you must:
- Lower the bottom of the cartridge down (towards the punch)
- Holding it in this position, insert a suitable nozzle;
- Release the cartridge.
And to insert a drill into a hammer drill using an adapter, first fix the removable pipe, which has a fastening at the base with grooves for the tool. Then the drill is installed specifically. To remove the drill or bit, you must perform all the above steps again.
Here I would like to note that any manipulations with installation and removal of a drill or other attachments are preceded by checking the working condition of the hammer drill mechanism. To do this, you need to connect the device to the network and, having set the desired operating mode, press the start button. If the device does not produce unusual sounds and at the same time there are no foreign odors of burning or burned plastic, then the instrument is ready for use.
What to do if the drill does not budge
It is not always possible to quickly remove a working tool from a hammer drill. If the gimlet is stuck in the chuck, repeat these steps:
- Clamp the free remainder of the nozzle in a vice, tap with a hammer on the jaws of the chuck, placing a nozzle made of wood.
- Stop tapping when the tail of the stuck gimlet emerges from the quick-release chuck.
- If this manipulation does not have a positive effect, remove the cartridge and put it in gasoline. Automotive oil is dripped into the key cartridge.
A common situation is when a drill gets stuck in a wall during construction work. This occurs when the part is clamped with concrete and reinforcement. Do not pull the trigger. It is also impossible to loosen the hammer drill - the tool may break. Experts advise what to do:
- Remove the gimlet from the chuck.
- Replace with a new one.
- Knock out any concrete that has accumulated around the drill bit.
- Be careful not to let the tool touch the stuck gimlet.
If the nozzle gets stuck
Like any tool, even a high-quality hammer drill can jam. When doing work, this becomes a problem that has several variations and causes.
Firstly, when the drill gets stuck in the removable chuck, and secondly, if the chisel gets stuck in the hammer drill itself.
When the problem lies in the clamping of the tool itself or in the removable head, all you have to do is pour a little water like WD-40 into the chuck and wait a little. The composition will relax the ecstasy of the clamping device, and the drill can be obtained without problems.
The cause of the malfunction also lies in the poor quality of the drill itself. If a cheaper and softer iron alloy was used in manufacturing, the drill may destroy the drill during operation.
There are several methods to correct this problem. The first thing you need to experience. Hold the drill in a vice and, holding the tool in your hands, loosen the chisel and pull it towards you. If the deformation is not very severe, then the nozzle can be pulled out.
The second option involves double fixation using a vice . Hammer drill on one side and drill on the other. Then they take a small hammer and hit the drill until it comes out of the clamp. You can use WD-40 with this operation.
When none of the methods work, you can try removing the chuck pieces and turning the drill back around ninety degrees. But such a technique can completely damage the clamp parts.
But if this function does not work, it is better not to try to disassemble the device. It is better to give such a hammer drill to a workshop of competent specialists.
The nozzle can get stuck not only in the mechanism of the unit, but also in the wall during operation. In this case, you can try to release the drill or drill by turning on the reverse stroke on the device.
If this method does not work, then the nozzle is released from the clamp, another one is inserted and, by drilling through the wall around the stuck tip, it is removed. If the drill breaks during operation, then its remains are removed from the clamp, and the piece is stuck in the wall, drilled out or simply cut off with a grinding machine at the same level with the working surface.
Detailed notes on securing the drill in rotary hammers are below.
READ How to lengthen a hammer drill
Attachments used
The list of works performed by a hammer drill is long:
- drilling;
- cutting large diameter holes;
- chiselling;
- gating.
To perform these tasks, various attachments made of durable materials are used.
For drilling holes in concrete or brick, there are drills made of high-strength steel with Pobedit tips. There are several types of shanks for fixing them in the chuck:
- SDS plus. This variety is the most common. It is used for drills with a diameter of 4-26 mm.
- SDS max. This type of shank has a longer groove. They are used in heavy, high-power tools. The diameter of these drills is over 26 mm. The length of such drills is from 25 cm to 1.2 m.
- SDS quick. This is a rare type of shank. They are used in Bosch rotary hammers. How to insert a drill with a similar shank into a regular tool? To do this you need to change the cartridge.
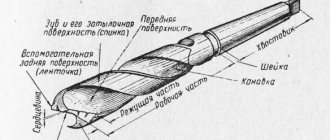
In the tail section, all attachments are identical. The working part differs depending on the function:
How to insert a drill
The impact drill itself is also a quick release mechanism. Reliable fastening of the drill in it is ensured by fixation using special balls, which, when closed, fit tightly into the grooves on the bottom of the drill.
In order to fix the necessary attachment, be it a drill or a crown, you must:
- Lower the bottom of the cartridge down (towards the punch)
- Holding it in this position, insert a suitable nozzle;
- Release the cartridge.
And to insert a drill into a hammer drill using an adapter, first fix the removable pipe, which has a fastening at the base with grooves for the tool. Then the drill is installed specifically. To remove the drill or bit, you must perform all the above steps again.
Here I would like to note that any manipulations with installation and removal of a drill or other attachments are preceded by checking the working condition of the hammer drill mechanism. To do this, you need to connect the device to the network and, having set the desired operating mode, press the start button. If the device does not produce unusual sounds and at the same time there are no foreign odors of burning or burned plastic, then the instrument is ready for use.
Choosing a drill for a hammer drill
Nowadays drills are made from carbon steel, high-speed steel and alloy steel. If you have to work with tough materials, the drill can be equipped with heavy hard soldering. Drill. Chopping, central, with straight flutes and spiral (for deepest drilling).
You can also purchase a drill designed for wood, metal, stone, concrete, glass, ceramics, diamond, or a universal version. Before fixing the drill in the hammer drill, you need to decide on the type and whether you want the work to be done correctly. The color of the drill indicates the occurrence of the final result.
If the drill is painted dark, this means that it was treated with superheated steam, but this does not affect the quality, despite the popular belief that dark drills are stronger. If the drill has a brown or slightly golden color, it is most likely a stress relief. Drills treated with titanium nitrile have a catchy golden color; such options are expensive and long-lasting.
Typically, excellent companies indicate on the drill boxes such properties as the grade of steel and the material with which it is necessary to work. If the drill gets very hot during operation, this means that it is dull or was sharpened incorrectly.
Possible cartridge malfunctions and their elimination
A common malfunction of the cartridge is the inability to fix the nozzle. The inserted drill flies back during operation. There is a simple reason for this, and everyone can fix it themselves. To do this you need to disassemble the cartridge:
- Remove the rubber boot by prying it off the end with a small flathead screwdriver.
- Using the same screwdriver, remove the retaining ring.
- Remove the plastic boot.
After this, the entire mechanism becomes visible. Most often, such a malfunction is caused by wear of the steel ring that secures the balls of the SDS mechanism. Constant shock loads wear out the walls of the ring, rendering it unusable.
To eliminate the cause, you need to replace the retaining ring with a new one. Then put everything back together in reverse order.
Read also: Homemade wood splitters and their designs video
Single drill chucks are not designed for impact loads. What to do if it fails? First, determine the nature of the breakdown. If the key slips when tightened, you just need to replace it. If the internal mechanism malfunctions, the cartridge itself must be replaced on the shank. To do this you should:
- Clamp the shank in a vice.
- Extend the collet mechanism to its maximum diameter.
- Unscrew the screw that is inside. Please note: The screw has a non-standard left-hand thread. This means you need to unscrew it clockwise.
- Remove the chuck from the shank and install a new one.
- Tighten the screw.
Before inserting a drill into a hammer drill with a new chuck, you should check its functionality.
How to insert a drill into a hammer drill quickly and easily
The ability to work with a drill or drill is the basis now. Below we describe how to correctly insert them into a hammer drill.
The tool currently uses an SDS cartridge. Its peculiarity is that it does not need a key. Unlike a jaw chuck, removing and installing the drill takes a few minutes. You need to do the following one by one:
- Lower the chuck down while holding the base
- Insert the bottom end of the drill into the hole
- Release the chuck, the spring will fix it at the starting point, the fastening balls will firmly fix the cutter
- Make sure the drill is secure in the chuck by pulling it down. There should be no backlash. The very permissible distance that the drill should come out of the chuck should not exceed 1 centimeter
- If a slotted chuck is installed, the drill is secured by rotating the chuck, while the thread is tightened.
The drill is removed as follows:
- We are waiting for the cartridge to completely stop rotating
- Bring it down
- We remove the drill without the help of others
- We release the cartridge, the spring returns it to its place.
Attention! Due to friction against the working surface, the metal of the drill gets very hot; gloves should be used to prevent burns to the surface of the skin.
Functionality check
Before you start changing the drill or working with the equipment, you need to make sure that it is working properly. To do this, plug the plug into the socket and without a fight, put the hammer drill in drilling mode (very left position). Then the start button is pressed. If you hear a smooth sound, free of glitches and jolts, you can start working.
Be sure to inspect walls and other surfaces for water supply or wiring before work. The handle must be firmly fixed and not hang up during operation. A timely inspection or review will help avoid injury and damage to the device.
Please note: never touch the rotating parts of the tool, otherwise it can be fatal. For the same reason, you only need to install a pipe and a drill bit for a Bosch impact drill with a plug.
What is a hammer drill
With the widespread use of hammer drills, construction and repair work have become significantly easier. Indeed, in cases where brick and asphalt are required, this device is indispensable. Wherever impact drilling is required. Additionally, it is used to perform tasks typical of a drill, although the hammer chuck is different.
This tool has three standard functions:
- drilling without impact;
- drilling using a special drill with impact;
- punching holes with chisels, peaks or spades.
Another difference between a hammer drill and a drill is that it has more power. It starts at 700 W and goes up to 3 kW.
How to insert a drill into a hammer drill quickly and easily
The ability to work with a drill or drill is the basis now. Below we describe how to correctly insert them into a hammer drill .
The tool currently uses an SDS cartridge. Its peculiarity is that it does not need a key. Unlike a jaw chuck, removing and installing the drill takes a few minutes. You need to do the following one by one:
- Lower the chuck down while holding the base
- Insert the bottom end of the drill into the hole
- Release the chuck, the spring will fix it at the starting point, the fastening balls will firmly fix the cutter
- Make sure the drill is secure in the chuck by pulling it down. There should be no backlash. The very permissible distance that the drill should come out of the chuck should not exceed 1 centimeter
- If a slotted chuck is installed, the drill is secured by rotating the chuck, while the thread is tightened.
The drill is removed as follows:
- We are waiting for the cartridge to completely stop rotating
- Bring it down
- We remove the drill without the help of others
- We release the cartridge, the spring returns it to its place.
Rotary hammer equipment
To work with this equipment you need different devices. Drills, concrete drills for rotary hammers, chisels, blades and bits. Drills and crowns are used for drilling holes, drills are used for concrete and stone, chisels are used for cutting through work, and blades are needed for fluffing up plaster or old tiles. All drill bits are shaped like a shank, which allows for quick and reliable fixation in the chuck.
READ Makita hammer drill stopped working reasons
The hammer drill can be used with special corner fasteners, a dust collection system, stirrers for mixing mixtures or paints, chisels and different types of fastenings (sharpening drills, water pump, fastenings for cutting metal in sheets). Before you begin any work with a rotating hammer, make sure that it is properly equipped and suitable for the work to be done. A very small tool may not be able to bear a huge load.
Sequence of removing a drill from a hammer drill
To insert a new gimlet into the tool, you need to remove the worn one. You can do this by following the step-by-step guide:
- Look at what cartridge is installed in the equipment.
- If a drill equipped with a double-clutch quick-clamping element is fixed, the unit is switched to reverse mode.
- Secure the lower coupling with one hand and unscrew the upper coupling with the other.
- If the cartridge is designed for one coupling, the nozzle is changed with one hand. The cartridge is installed in an automatic shaft blocker.
How to insert a drill into a hammer drill
Just like with a drill, before you stick the drill into the hammer drill, you need to make sure it's working properly. With the tool in silent drilling mode (left position), press the start button. If the sound of the motor is smooth and without shaking, you can adjust the drill.
First, the drill shank must be properly lubricated and inserted into the chuck. It is better to use branded products that protect iron parts from corrosion as a lubricant. Place the hammer drill with the handle on the floor or on a hard surface, pull the back of the clamp back and insert the drill all the way.
Reminder! A hammer drill is better for drilling into a concrete wall than a hammer drill.
When replacing drilling tools, pay attention to the shank to see if there is any old grease or dust in it. Drills should be clean and not stick out. If excessive friction appears when the drill is immersed in the pipe, it is better not to rush to work, but to lubricate the mechanism with fresh lubricant in time, removing the old one that has ended up in the trash. The drill should work smoothly and simply.
Chisels, mixers and other tools can be used with a hammer drill. Regardless of whether you are going to do the work with a drill or other fastening, consider the power of the motor, whether it can carry a huge load.
Beginning of work
Before you start working, you need to make sure what mode the tool is in. It should idle for one minute. Be sure to check the operation of the box so that vibrations, excessive noise or sounds do not come from it. There should also be no smoke or odor, reminiscent of fire insulation.
To drill, you need to place the drill in the place where the hole will be made and only then press the power button. When working with a hammer drill, do not press too hard on the surface. Modern mountain drills have an on/off function. This property of the tool can provide basic work with reduced speed. Thanks to this mode, the hole will be made in a precisely defined location and the drill will not go to the side.
When drilling metal or wood, do not turn on the hammer mode, this may destroy the device. There are drills for the mountain, they have an automatic shutdown mechanism when the wrong option is selected. During construction work, the shock mode can be used to drill concrete. To free the hole from dust, you need to remove part of the drill from time to time and return it to its place.
Types of drills for hammer drills
It should be immediately noted that a drill is an accessory for a drill, and a drill is used in rotary hammers. The difference is explained by the fact that the hammer drill makes holes, but does it with simultaneous chiselling, that is, drilling is obtained.
Tips come in the following types:
- chisel;
- drill;
- lance or chisel lance;
- channel drill;
- crown.
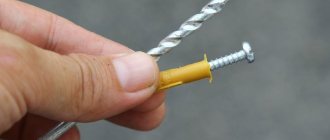
A drill, similar to an ordinary twist drill, is used to make round holes, usually for a dowel or dowel-nail. In construction stores it is often defined as a drill bit for a hammer drill.
The chisel is designed for removing plaster, tiles, tiles or any other worn-out coating. It is convenient for them to carry out dismantling by simply prying up the material to be removed.
The lance is convenient to use when scoring or punching holes in concrete or other hard surfaces. The tool has a noticeably larger diameter than a drill and is characterized by increased “bounceability”. This tip is used when it is necessary to make larger holes, which can be achieved using a drill.
A channel drill is indispensable when you need to make grooves for wiring or installing interior items: guides for plasterboard structures, fastening sliding or false walls.
The crown is used to make holes for placing switches and sockets. Modern drills for rotary hammers are available in any size, among other things, for installing these electrical devices.
Drills are made from steel grades:
- alloyed;
- high-speed;
- carbonaceous.
For processing hard materials, drills are equipped with heavy-duty soldering.
Even particularly strong metal drills for rotary hammers are ineffective when processing thick material. Their scope of application is limited to thin sheet metal.
Based on the type of working tip, drills are classified into the following types:
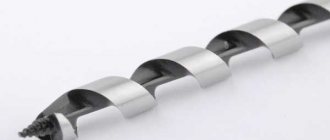
- Screw type, designed for making deep holes. Thanks to the spiral design and significant torque, crumbs and dust are removed, the load on the hammer is reduced, and the work time is reduced.
- Drill with a slight slope of working chutes. Used for work that requires little force, for example for making many shallow holes in relatively soft materials.
- A drill with a significant inclination of grooves, characterized by high drilling speed. The load on the hammer drill from such drills is higher than when using auger drills. Designed for making deep holes.
- Drills with one or more spiral grooves or grooves of a special shape. This tip ensures high drill stability, balanced rotation, and reduced vibration load on the hammer drill.
No less important is the shape of the rear part of the drill, clamped in the chuck - the shank.
The most commonly used:
- SDSplus. Used for low and medium power hammer drills. The depth into the cartridge is 4 mm, the size of the “tail” is 10 mm.
- SDS is a special guide system. The drill is held in the chuck by clamps. The diameter of the tail part is 10 mm.
- SDSmax. Format used in a powerful professional tool. The diameter of the shank is not 10, but 18 mm, the recess into the chuck is 9 mm.
- SDStop. Used primarily in BOSH rotary hammers. The tail size is 14 mm.
- SDSquick. It is also a development and is used in instruments of this brand only.
For a certain type of cartridge, only use drill bits of the same type. Otherwise, the “tail” is not fixed and wobbles under load, which can cause injury.
Peculiarities
Using a hammer drill you can make a hole in almost any material. In most cases, the device is used when working with concrete, brick and metal, less often with wood.
The variety of materials provides several operating modes and a large number of attachments:
The main difference. Their purpose.
Drilling nozzles are designed for drilling perforations in durable materials. In this case, the hammer drill not only does drilling, but also shocks or vibration. Drills are used to make careful holes of suitable depth and diameter in surfaces. Crowns are used to drill large holes. For example, a socket. Installing a chisel or blade means that the tool works like a jackhammer.
A significant difference is the type of fastening, which for all fastenings, not counting drills, is only suitable for a hammer drill, since it has a landing tail and is attached in the form of grooves for this tool.
But you can also fix an ordinary drill from a drill in a hammer drill. To do this, you need an adapter, which is called a removable cartridge. The device has two types:
The name of the type determines the type of drill clamping mechanism. The cam clamp is driven by a special wrench, which is inserted into the thread along the outer perimeter and turned back. In this case, the collet mechanism installed inside the chuck is compressed or unclenched, depending on the direction of movement of the key.
The rapid clamping type is controlled by small hand force. When the chuck is pressed down, the drill hole opens.
Drill selection
This point can rightfully be considered the main one, since the quality of work and the safety of the drill itself, as well as the accuracy of the work, depend on the correctly selected drill. Today there is a huge variety of drills on the market: for working on wood, metal, concrete. The latter are distinguished by a triangular tip. For a concrete surface, it is best to use a carbide drill, such as a Pobedit one. This type of drill crushes the material without tearing it, which is ideal for concrete floors.
If, when drilling a wall, the drill does not go forward when it encounters a dense area, it is recommended to use a punch. Having inserted the punch into the hole, hit it with a hammer until it begins to move forward and softens the problem area. After this you can continue drilling.
It should be noted that without a punch, a hammer drill can easily cope with this kind of difficulty, but it makes holes that exceed 13 mm in diameter. If you want to use universal drills when drilling, you need to remember that they require cooling, vibration is turned off and are only suitable for a regular drill.
How to correctly insert and remove a drill bit into a hammer drill, screwdriver and drill
The popularity of the question of how to insert a drill into an impact drill or an electronic drill can be explained quite easily: such devices are intensively used both in industrial and domestic settings.
The cartridges are different, as are the attachments attached to them.
An incorrectly installed drill can lead to a number of problematic situations:
- Inability to work with a hammer drill or drill;
- Receiving neural foramina with a broken inner surface;
- The drill will fly out, which can cause serious injury.
Despite the fact that inserting a drill into a hammer drill or drill is not so difficult, this issue should be approached with care.
How to use a hammer drill correctly and safely
Hammer
was invented in 1851 as a tool for the mining industry.
In 1932, Bosch presented in Germany the first electromechanical hammer drill designed for construction work.
Since that time, Bosch Hummers have been mass-produced, and other companies have acquired licenses to create them. The main functions of a rotary hammer: drilling, drilling and impact. How to use a hammer drill correctly when performing different types of work? READ How to Disassemble a Bosch Rotary Hammer
Correct installation of the drill in the drill chuck
Before you learn how to correctly install a drill in a hammer drill, it is better to figure out how to insert a drill into a drill. Cartridge. An element of its design in which the drill shank is secured. Most models of modern drills are equipped with jaw-type chucks, consisting of:
- Cylindrical bodies
- Rings or sleeves that wrap around the outer skin
- Cams installed in the inside of the housing.
Chuck jaw design
When the sleeve rotates clockwise, the cams immediately move closer to each other, thereby tightly clamping the drill shank and installing it. Accordingly, the question of how to remove the drill from the drill is not difficult to solve: just start twisting the sleeve counterclockwise. This will cause the jaws to open, making it easier to remove the bit from the drill bit. It should be understood that before installing the drill, the jaws must be released from the supply, and in this case the tool can simply be stuck in.
READ How the Drill Speed Controller Works
The convenience of using cam-type chucks lies not only in the efficiency and highest reliability of tool installation, but also in the fact that drills of almost any diameter can be inserted into them. When using such chucks, there are usually no problems with the configuration of the drill bit in the drill. When inserted correctly, the tool stays firmly in these chucks and allows you to drill a clear hole.
If you begin to notice teeth slipping when tightening the chuck, replace the worn key with a new one.
Jaw chucks are used in both industrial and household drilling tools. Clamping devices for household drills are available for two drill diameters from 0.8 to 10 and from 1.5 to thirteen mm.
In the first case, the bushing is driven by a special key, the conical working part of which has teeth. The key to activate the clamping mechanism must be inserted into the holes on the side of the chuck body and returned. Some models may even have three such holes. Accordingly, in order to loosen or tighten the cams, the key must be inserted into each of them and begin to turn counterclockwise or along it.
After unscrewing the cams with a wrench, you should return the cartridge itself counterclockwise, increasing the distance between the cams to the required value. The inserted tool is fixed in reverse order: first the chuck itself is clamped (if it is returned clockwise), and then the sockets are clamped with a key.
Removing and installing drills is even easier and faster when using a keyless chuck. In it, the sleeve is set in motion when the arm rotates. To limit the force of retraction of the cams, they are often equipped with locking elements.
Before inserting the drill, first make sure that the drill is in working order and turn off the power source. Only then can you begin installing the drill.
Types of keyless cartridges
A little about the structure of the drill and installation of the drill
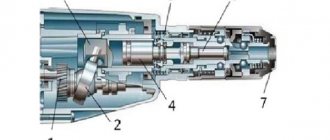
A classic drill consists of a power cable, a button, a capacitor wire, a reverse, brushes and springs, an armature, a stator, a gearbox and a chuck, bearings, a key and mounting screws. A correctly inserted drill improves the quality of drilling and can make it safer.
The first thing you should check when starting to work with a drill is whether there is any contamination on the drill itself. A rag will be an excellent assistant in cleaning drills. If the drill is loosely secured, there is a risk that it will fly out and injure the technician. Accordingly, it is necessary to immerse the drill as much as possible into the chuck (all the way!).
Under no circumstances try to “extend” the drill by incompletely immersing it in the chuck!
It is important to ensure that the drill in the tool is secured strictly along the axis. If this rule is not followed, drilling in concrete will be performed poorly, the shape of the hole may be unpredictable, and the cause of all these misunderstandings will be the elementary effect of drill beating.
Installing a working tool on a hammer drill
As mentioned above, the hammer drill should be checked for serviceability before installing the drill. To carry out this test, the operating mode of the rotary hammer is set to drilling without knocking. If, after pressing the start button of the device, you hear and feel that its engine runs smoothly and without jolts, then the impact drill can be used for its intended purpose by inserting a drill or drill.
To install a drill with a cylindrical shank in a hammer drill, use an adapter with a jaw chuck
Before inserting the drill into the hammer drill, you should treat the shank of the working tool with a special lubricant that will protect it from corrosion. The procedure for installing a drill in a hammer drill is as follows:
- The rotary hammer is installed with its back on the floor or other hard surface.
- The moving part of the clamping device is pulled back.
- The tool is inserted into the hammer drill until it stops. In this case, the drill or drill that needs to be inserted into the hammer drill must be held vertically. If you ignore this requirement, you may end up with the tool flying out or even breaking, and this can lead to failure of the impact drill.
Press until it presses, then pull the drill out, if you don't remove it, everything is fine
Taking into account the fact that the chucks on modern drill bits have a fairly common operating mechanism, there are usually no questions about how to get a drill
from a hammer drill.
Having removed the used tool from the hammer drill in order to replace it with another one, immediately clean its shank from grease and construction dust. But the shank of the drill that you are going to stick in must also be cleaned and previously lubricated. Replaced in this way, the tool will not damage the clamping mechanism of the impact drill and will last much longer.
Lubrication extends the service life of both the drill itself and the drill
Using a hammer drill, you can not only drill a structural element, but also perform processing using a special chisel. You can also install the mixer as a working element of such a device.
DIYers also often ask questions about how to insert a drill into a screwdriver or how to change the chuck to an impact drill. Solving the first question is quite easy, since the design of the screwdriver uses cartridges of the same design as the drill and hammer drill. But the question of how to correctly change the cartridge on a hammer drill should be approached well: it is difficult to perform such a procedure without certain knowledge and abilities.
Types of cartridges for drills, screwdrivers
Often, when carrying out drilling operations, hand drills and screwdrivers are used. When working with them, drills are used that have a cylindrical shank. The tail part of the drill is clamped using a collet mechanism.
Fixing the shank of a drill for a screwdriver or a drill of cylindrical and prismatic shape occurs by wrapping it around the chuck with its cams. Typically the mechanism has three cams and, accordingly, is called a three-cam mechanism.
To understand how to insert a drill into a drill, you need to determine the type of chuck installed.
There are two most common types of chucks for drills and screwdrivers:
Key tooth chuck
Key chucks allow you to secure the drill in the clamps using a suitable key. The key is a rod with a lever with a small gear mounted on the rod. The chuck has a hole for fixing the key shaft and a circular toothed crown corresponding to the key profile.
In order to compress or unclench the cams, you need to insert the rod into the groove, place the gear on the teeth of the crown and rotate the key in the appropriate direction.
Usually all keys are identical and fit different tools, but there are exceptions. For example, some expensive brands make unique keys with individual sizes and profiles.
In any case, the key, due to its small size, is very easy to lose, and without it, inserting and removing the drill will be very difficult. Therefore, many craftsmen tie a key to the handle of the tool.
Keyless chuck
Drills and screwdrivers with quick-release chucks are convenient because they allow you to change drills without using keys. You can tighten and loosen the drill bit in the chuck jaws manually. The drill is simply inserted into the open clamping jaws, and then the chuck sleeve is rotated by hand in the appropriate direction to tighten.
There are single-coupling and double-coupling chucks.
To clamp two clutch chucks, you should hold the clutch closest to the tool body with one hand and rotate with the other.
With a single coupling chuck, all operations are carried out using only one hand. Knowing these subtleties of the chuck design, you should understand how to insert a drill into a screwdriver.
Some tips for using drilling tools
To avoid the possibility that a flying tool or concrete shavings will harm your health, drilling work must be carried out in compliance with all safety measures. To ensure this safety, you should use safety glasses, gloves, ear plugs or ear plugs. Naturally, all work must be carried out in special clothing, in which there should be no attached parts that can blow around the drill.
To prevent overheating of the electronic tool used for drilling, you need to rest it frequently. It is very important to insert the drill correctly (this must be done until the tool stops).
Two methods to fix
a small drill in the chuck if the jaw is too small from the shank
If the drill gets stuck in the wall while drilling, it should be removed without removing the tool from its own surface. To do this, remove the drill from the hammer drill and insert another one, with the help of which you need to begin to destroy the wall around the drill that was killed in it.
Sources:
https://thestroika.com/perforator/kak-zakrepit-sverlo-v-perforatore.html https://met-all.Org/oborudovanie/kak-pravilno-vstavit-vytashhit-sverlo-perforator-shurupovert-drel.html
Some useful tips
Working with a hammer drill and its features
The term hammer literally refers to a drilling hammer, as it was originally used by miners to extract stone. It was conceived as a shock-type action model.
With the help of a flywheel and transmission mechanisms, a rod connected to a pusher was raised. The spring pushed it down, the blow was delivered due to the forces of inertia and compression of the spring. Mainly used for hard rocks.
The pneumatic hammer drill was invented in 1857 by French engineer Sommelier. In 1932, the first model with electric drive was introduced.
Rotary hammer attachments
Attachments for hammer drills are distinguished by their purpose and method of fastening in the chuck.
According to their purpose, attachments are divided into tools for:
- drilling (drill);
- drilling (drills, crowns);
- chiselling (chisels, peaks).
Rotary hammer equipment: drilling, drilling and chiselling
Chucks used by the tool
How to insert a drill into a hammer drill? The SDS cartridge was invented for quick nozzle installation and changeovers. This mechanism was developed in the 30s of the last century. To secure the drill in the device, you just need to insert
twist it slightly to feel the grooves and lock it in place. The SDS mechanism aligns the balls with the slots in the shank and locks them securely. In order to remove the attachment back, you need to press the pipe against the body of the hammer drill and remove the drill. In order for the shank to fit easily into the chuck, it must be lubricated with graphite lubricant. This will also improve the sliding of the balls into the grooves. Repeat the procedure as the fat dries.
Drill insert
The drill is inserted into the hammer drill, following the instructions:
- Lubricate the equipment with special lubricant. Helps prevent corrosion of parts.
- Place the hammer with its handle on the floor. Lower the rear of the equipment.
- Insert the cartridge cartridge.
- Bring the bottom of your head back.
- Place the drill bit into the chuck.
- Turn the top of the chuck clockwise until it stops.
- The drill should snap into place.
- Before continuing, turn on the start button and wait until the lubricant wets the parts.
Sources:
https://ingener-pto.ru/2019/12/12/kak-vstavit-sverlo-v-perforator-makita/ https://morflot.Su/kak-vstavit-sverlo-v-perforator-makita/ https: //specinstrumenta.ru/elektroinstrument/perforator/kak-pravilno-v-perforator-vstavit-sverlo.html