Welding machine from a computer power supply - a cheap solution for an electrician
Very often, welding work requires an inverter, thanks to which you can get high-quality seams and not take risks when working with gas welding. But purchasing such a device is associated with significant costs, so you can try making a welding machine from a computer power supply. For this you need not only spare parts, wires and a soldering iron. But also skills in electrical engineering, without which you can burn electrical wiring or get an electric shock.
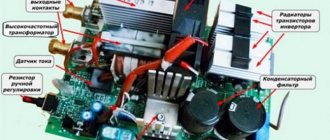
The main components of the welding machine design.
Assembly, installation and subsequent testing can only be carried out if you have experience in rewinding transformers, assembling circuits and creating electrical devices with your own hands. If such knowledge is absent, then it is best to purchase a ready-made inverter and not expose yourself or others to danger.
Basic installation tools
Classification of welding transformers.
If you have experience and knowledge in the field of electrical engineering, then you can explore several options on how to make a welding machine from a computer unit. Basic tools that will be needed for all types of assembly:
- soldering iron or soldering station;
- tester;
- multimeter;
- electrical insulating tape;
- solder;
- screwdrivers with different tips;
- pliers;
- screws;
- screwdriver or drill;
- crocodiles;
- wires of the required cross-section.
To recreate the circuit of the welding machine, you will need all the spare parts indicated in the circuit, getinaks and solutions for transferring the printed circuit board to the workpiece.
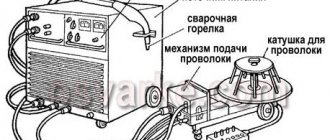
To make your work easier, you can purchase an electrode holder and welding cables at the store. You can do it yourself by selecting wires of the appropriate cross-section and soldering crocodiles to them, remembering to observe the polarity.
Welding inverter circuit.
If you have a non-working computer system unit, then you need to remove the main battery from it and prepare it for dismantling. Sometimes, to create a powerful welding machine, they even use the system unit itself, installing wheels on it at the bottom and increasing the number of ventilation holes. The advantage of computer cases is that they are lightweight, easy to cool and already have ventilation.
The welding machine will require disassembling the power supply.
The main things that can be used from it are the fan, the housing itself and some spare parts. But it all depends on the modes in which the cooling operates. The fan must be checked for functionality and tested in several modes. It is advisable to install another one of the same or more powerful so that the welding machine does not overheat. To monitor the temperature of the inverter, you need to install a thermocouple.
But first you need to take care of the handle, which will make the welding machine from a computer power supply convenient to use. To do this, you need to remove all the spare parts from the power supply and attach a handle selected for size and convenience to the upper end. You need to drill holes in the power supply and secure it with screws, which must be correctly selected in length (too long ones will interfere with the internal circuit, which is unacceptable).
The welding machine must have very good cooling, so several additional holes need to be drilled in the power supply housing.
The duration of operation of a homemade inverter will depend on the quality of ventilation.
Selecting a transformer for a welding machine
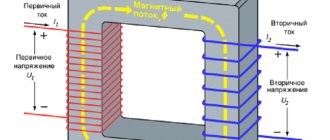
Transformer diagram for a welding machine.
For a circuit that will allow you to make a welding machine from a computer power supply, you will need 3 transformers. They can be purchased based on the names - E20, Kx20x10x5 and ETD 59. But it will be easier to wind them yourself, focusing on the number of turns and other information indicated in the diagram. A current transformer K17x6x5 is also required.
Regarding the manufacture of transformers, you only need an enamel wire, and a new f1.5 or f2. There is no way to do without winding on getinax coils, crimping them with wooden blocks and impregnating them with epoxy resin.
To assemble a device from a computer power supply, you can use a transformer from a microwave oven. Since the voltage on the secondary winding is about 2 kV, it is necessary to reduce the number of turns. To do this, you need to make an additional calculation, which can be done using a special online electrician calculator or find a book on electrical engineering with the corresponding section. But for the sake of such savings, changes will have to be made to the existing scheme.
Recommendations for installing other parts of the circuit
P series connection diagram With current transformer.
Due to the fact that this circuit has already been repeatedly used to assemble a welder that has become a replacement for an inverter, there are some comments about it. It is recommended to replace 15tb60 diodes with 25tv60, and it is best to install 150ebu02 diodes in groups of 2.
To save money on the radiator, you can take the PIV and cut it into 3 parts. It is mandatory to use a converter - a single-cycle forward-flow quasi-bridge. Or, more simply, an “oblique bridge”, without which not a single inverter can be assembled. It’s better not to skimp on this spare part and buy a good quality one, not a used one.
Keys for transistors irg4pc50ud and irg4bac50w, as well as printed circuit boards for the generator and processor must first be downloaded on the Internet in order to easily recreate the circuit.
When working, be sure to use a multimeter and tester so that the circuit can be assembled quickly and without errors. You cannot connect it to the network immediately after assembly without preliminary testing, so as not to burn the main components.
Transistors and output diodes must be installed on radiators without additional gaskets. Overheating protection must be set at a temperature of 70°C, which is carried out using a thermocouple.
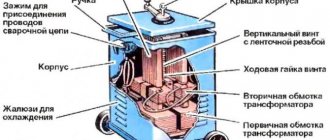
Installing a soldered chip into the case
After all the necessary parts have been manufactured and assembled into a single whole, you need to place them in the housing and make the correct wiring. The power supply on/off switch is used as a switch for the future device. On the front panel you need to provide a current regulator and contact holders for connecting welding wires. The housing must be carefully and firmly secured. The end result should be a product that looks something like this.
Recommendations for installing other parts of the circuit
P series connection diagram With current transformer.
Due to the fact that this circuit has already been repeatedly used to assemble a welder that has become a replacement for an inverter, there are some comments about it. It is recommended to replace 15tb60 diodes with 25tv60, and it is best to install 150ebu02 diodes in groups of 2.
To save money on the radiator, you can take the PIV and cut it into 3 parts. It is mandatory to use a converter - a single-cycle forward-flow quasi-bridge. Or, more simply, an “oblique bridge”, without which not a single inverter can be assembled. It’s better not to skimp on this spare part and buy a good quality one, not a used one.
Keys for transistors irg4pc50ud and irg4bac50w, as well as printed circuit boards for the generator and processor must first be downloaded on the Internet in order to easily recreate the circuit.
When working, be sure to use a multimeter and tester so that the circuit can be assembled quickly and without errors. You cannot connect it to the network immediately after assembly without preliminary testing, so as not to burn the main components.
Transistors and output diodes must be installed on radiators without additional gaskets. Overheating protection must be set at a temperature of 70°C, which is carried out using a thermocouple.
Welding inverter from a computer power supply
Very often, welding work requires an inverter, thanks to which you can get high-quality seams and not take risks when working with gas welding. But purchasing such a device is associated with significant costs, so you can try making a welding machine from a computer power supply. For this you need not only spare parts, wires and a soldering iron. But also skills in electrical engineering, without which you can burn electrical wiring or get an electric shock.
The main components of the welding machine design.
Assembly, installation and subsequent testing can only be carried out if you have experience in rewinding transformers, assembling circuits and creating electrical devices with your own hands. If such knowledge is absent, then it is best to purchase a ready-made inverter and not expose yourself or others to danger.
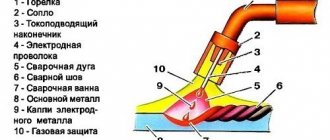
Operating principle of inverter welding
Schematic diagram of the inverter.
The welding inverter consists of a power transformer that reduces the network voltage, stabilizer chokes that reduce current ripple, and an electrical circuit block. MOSFET or IGBT transistors can be used for the circuits.
The principle of operation of the inverter is as follows: alternating current from the network is sent to the rectifier, after which the power module converts direct current into alternating current with increasing frequency. Next, the current enters the high-frequency transformer, and the output from it is the welding arc current.
Micro welding from power supply
A homemade welding machine, when assembled correctly, will perform its job no worse than a factory-made unit.
A welding machine is a technical device designed to connect various types of parts by heating them.
Existing schemes make it possible to assemble devices even from old computer units and televisions. But it is recommended to start such work if you have at least basic skills in working with electrical appliances.
Preparing to assemble the device from a computer power supply
A simple and very effective welding machine can be assembled using an old computer power supply. To assemble such a homemade device you will need the following:
During the assembly of the welding machine, a multimeter will be needed.
- Soldering iron.
- Electrical insulating tape.
- Multimeter.
- Tester.
- Pliers.
- Several screwdrivers (flathead, Phillips).
- Solder.
- A screwdriver or a drill with a screwdriver function.
- Screws.
- Alligator clips.
- Wires of suitable cross-section.
Such a homemade device will be assembled using a case and some spare parts from a computer power supply. Cooling is very important. Test the fan in several modes. It must be of sufficiently high power. A thermocouple must be installed.
The most convenient handle for the operator is attached to the upper end of the power supply. For fastening, use screws of sufficient length. It is important that they do not reach the internal circuit.
Drill several additional holes in the case for more efficient cooling of the device. The quality of ventilation directly affects how long the future welding machine can operate.
Figure 1. Transformer diagram.
The scheme involves the use of three transformers. The transformer diagram can be found in Figure 1. Transformers of the ETD 59, E20 and Kx20x10x5 series are suitable. You can wind them yourself. Additionally, you will need a current transformer. Usually the product of the K17x6x5 series is used.
To make your own transformer, use a new enamel wire f1.5 or f2. Winding is carried out on getinax coils, crimping with wooden blocks, and impregnation with epoxy resin.
A transformer from a microwave oven is also suitable, but you need to reduce the number of turns of the secondary winding. This requires additional calculations to be performed in advance. This is a more economical option, but it requires significantly more effort and time. In practice, it is much easier to buy a ready-made transformer.
Step-by-step instructions for assembling the welding unit
When assembling the welding machine, it is recommended to install 150ebu02 diodes.
The circuit based on a computer power supply has been tested by more than a dozen welders. Such homemade welding machines require replacing 15tb60 diodes with 25tb60 diodes. In practice, it has been found that this improves the performance of the unit. Diodes 150ebu02 need to be installed in groups of 2.
For additional savings, you can cut the PIV into 3 parts and use this design instead of a radiator. The design necessarily includes a forward-flow single-ended quasi-bridge converter. It is also known as the “oblique bridge”. It is recommended not to skimp on this element. It is better to buy a new high quality part.
During the process, you will need a tester and a multimeter. They will allow you to assemble the circuit as accurately as possible and in the shortest possible time. A homemade device can be connected to the network only after preliminary testing.
Output diodes and transistors are installed on radiators without the use of additional gaskets. Overheat protection should be set to 70 degrees. You can do this using a thermocouple.
After connecting all the parts into one structure, place them inside the housing and perform the correct wiring. The toggle switch for turning on the unit will serve as a switch for the future welding unit. The contact holders and current regulator should be placed on the front panel. The housing must be secured as firmly and carefully as possible.
The manufacture of such a welding machine does not require a lot of money, but it does require effort and time. If you wish and have the necessary skills, you can make individual changes to the circuit and get a welding machine with the characteristics you need.
Homemade resistance welding machine
Figure 2. Diagram of the electronic unit for resistance welding.
A welding machine of this type will help you connect a wide variety of metal products. Current passes through the junction, which leads to its deformation. There are spot, butt and seam methods of such welding.
Before starting to manufacture such a unit, choose the type that suits you best. The contact welding machine can be made stationary, suspended or mobile. Most often, such units are used for welding wires and various pipes. But you can adapt it to connect almost any product. The circuit diagram of the electronic unit of such a device is shown in Figure 2.
Take into account the fact that such a welding machine consumes a lot of electricity when operating. It can be used for welding parts with a thickness of 0.09-0.9 mm. It consists of 2 main elements: a power supply unit, which includes a transformer and a relay, and a gun.
An electrode is connected to the first winding via a cable. During welding, the second terminal must be connected to the product being welded. The welding gun consists of 2 elements of the same size and shape. You can use getinax, textolite and other insulators. To assemble such a welding machine, you will need:
Transformer design.
- Transformer.
- Tester.
- Several screwdrivers.
- Power unit.
- Adapter.
- Lamp.
- Cable.
- Lock nut.
A small switch, lamp holder and adapter are attached to the front. You need to place a backlight switch at the back. The cover is connected with screws. The welding cable is connected to the adapter.
During the assembly process, you need to take into account the dimensions of the selected power supply and transformer. An important characteristic of a transformer is the cross-sectional area of the magnetic core. It must exceed 60 cm².
The primary winding is made with 160-165 turns. It must be placed on one side of the magnetic circuit. Insulation is carried out using wooden wedges. It is necessary to create a bend on the secondary winding. This is done using loops. The bend will make it possible to fix the welding cable using special bolts.
Inverter assembly sequence
When preparing for the final assembly of the inverter, you need to take care of the presence of a temperature sensor designed to operate when heated from 70 to 75 o C. In addition, you need to take care of the sockets for the power cable and the electrode holder with wires with a cross-section of 35 mm 2, for efficient supply of current to the welding machine. arcs. Then, having prepared all the necessary elements, we begin installation in the following sequence:
- we position the fan and cooling radiators so as to ensure the most efficient air flow, and provide reliable fastening;
- securely fasten the transformer and capacitor board;
- install the control circuit board and related parts;
- we install an anti-stick and hot start device;
- we check for short circuits the contacts through which the circuit components are powered;
- We carry out final wiring and installation of fuses and thermoelements;
- We carry out the final adjustment using a multimeter and an oscilloscope, taking into account the calculated parameters;
- We set the required welding current and carry out trial work.
Advantages and disadvantages
A self-made device can be used both at home and in small industries. At first glance, the design consists of many elements; the circuit seems difficult to implement with your own hands. By following a sequence of steps and using quality materials, it is possible to achieve long-term performance at low cost. A simple welding inverter is quite expensive on the market and is not of high quality.
Simple DIY inverter
The disadvantages are the short service life of a homemade inverter. For large volumes, it is recommended to make a three-phase inverter device with your own hands, but it is difficult to find a power source of this type.
Homemade resistance welding machine
Figure 2. Diagram of the electronic unit for resistance welding.
A welding machine of this type will help you connect a wide variety of metal products. Current passes through the junction, which leads to its deformation. There are spot, butt and seam methods of such welding.
Before starting to manufacture such a unit, choose the type that suits you best. The contact welding machine can be made stationary, suspended or mobile. Most often, such units are used for welding wires and various pipes. But you can adapt it to connect almost any product. The circuit diagram of the electronic unit of such a device is shown in Figure 2.
Take into account the fact that such a welding machine consumes a lot of electricity when operating. It can be used for welding parts with a thickness of 0.09-0.9 mm. It consists of 2 main elements: a power supply unit, which includes a transformer and a relay, and a gun.
An electrode is connected to the first winding via a cable. During welding, the second terminal must be connected to the product being welded. The welding gun consists of 2 elements of the same size and shape. You can use getinax, textolite and other insulators. To assemble such a welding machine, you will need:
The final stage of inverter assembly
It is important to configure the power supply correctly. You must select a resistance such that the voltage supplying the relay would be 20-25 V. Make input rectifiers using high-quality, powerful radiator elements. For this task, you can use models from old computers from the Pentium 4 era. You can purchase the necessary parts on the radio market for a few dollars.
A thermal sensor must be installed in the interior of the case. This element will heat up the most. The control unit itself must be equipped with a TL494 PWM controller. It works with one control channel and is responsible for stabilizing the current in the arc. The PWM voltage is controlled by capacitor C1. Together, these elements influence the amount of welding current. This is just one of many options that exist. If necessary and if you have the appropriate knowledge, you can make your own adjustments.
Thus, there are no super-complicated steps in assembling a welding machine yourself. Even an old computer power supply or microwave oven can be used for this. You just need to do everything according to the instructions, strictly following each step of the manual. Good luck!