How to determine the correct sharpening angle
There is a wide variety of knives. There are more than two dozen types of kitchen cutting tools alone: steak knife, boning knife, chef knife, bread knife, hatchet, santoku and many others.
There are also special knives for hunting, fishing, repair, etc. And they all need to be sharpened according to the rules. The sharpening angle is the main criterion and it must be taken into account, otherwise there is a possibility of bending, distorting the knife and rendering it unusable.
- The optimal angle for straight razors is 10-12°. It's a fairly small angle, but it's enough to cut short, fine hair. If you try to cut something else with it, the razor will quickly become dull.
- fillet knife – 10-15°. This is also a fine sharpening - for convenient slicing of soft meat.
- a knife used to cut other products should be sharpened at an angle of 17-20°.
- 20-25° is the optimal angle for a hunting knife (for bones, wood, tin cans)
- The sharpening limit for machetes and other heavy cutting objects is 50°. Chopping food with them is a difficult task, but they do an excellent job with vines and trunks.
- in order to chop and cut hard materials - bone, bamboo, hard wood, splitting coconut and other manipulations - you need 45-55 degrees.
- if the knife is used as an ax (chopping wood, game, cutting straw, etc.) - 35-40 degrees.
- for using a knife as a scalpel (cutting veins, removing skin) - also 40 degrees.
There are also blades that require different sharpening on different parts of the blade.
Basically, the difficulty of making a sharpener with your own hands lies precisely in the ability to adjust the desired angle. Thoughtful drawings of such a sharpener will help in its design.
Why is the sharpening angle so important?
The angle between the edges of the blade is called the sharpening angle. Exact observance of a given angle is the main requirement when processing a cutting surface with an abrasive tool, and it is its value that affects the sharpness of the blade.
Using a simple marker you can control the turning angle; just paint over the area being sharpened with it. Uniform erasing of paint indicates good quality of the blade.
Stone abrasiveness
Sharpening stones have different gradations of grit. The larger the grain, the less abrasive. If the grain is fine, the numbers will be higher.
- From 200 to 300 grit is rare and is not used for sharpening knives.
- 350 grit is a rough stone (can be referred to as “coarse”). Used for profiling very dull blades. However, such graininess can damage the blade.
- 400-500 grit – medium roughness. Little used abrasiveness. There are no or almost no such stones.
- 600-700 grit – fine grinding. The best option for sharpening many types of cutting devices. This is the most common level of abrasiveness of whetstones.
- 1000-1200 grit—the finest grinding (extra fine). This type of stone is used to bring the work to perfection and acts as a polish. After processing with such a stone, the blade shines like a mirror.
Whetstone material
In addition to the size of the grains, special stones also differ in the material from which they are made.
Note!
- DIY induction heater ♨️ - reviews of the best manufacturing options. Varieties of homemade device designs + step-by-step master class (160 photos)
Do-it-yourself Gauss cannon: TOP-130 photos of the best ways to create it yourself. Design features + master class for beginners
DIY clamps - a step-by-step master class for beginners. Schemes for manufacturing different designs + 170 photos
There are bars:
- natural
- ceramic
- diamond
Which to choose? It's all about taste, ease of use and, again, the purpose of the bar. Natural ones (for example, slate) must be moistened with water before sharpening the knife.
So, during the sharpening process, a certain abrasive mass will be released from the block. It will contribute to better sharpening of the blade. However, natural stones are almost never low-grain and wear out faster than ceramic and diamond.
For ease of use of the latter, instead of an abrasive mass, you can use a soap composition or honing oil (specialized oil).
Whetstones and whetstones
A whetstone is a special abrasive tool that is used for sharpening cutting objects or edges of household appliances. Additionally, using a whetstone you can sharpen metalwork equipment.
There are four types of sharpening stones produced in industry:
- natural. These include novaculite, Japanese water stone. Such bars are expensive and are practically not used;
- diamond Strong, effective bars. A knife sharpening device made in this way is quite popular. The bars have different geometric dimensions and come in unusual shapes. In addition, they have increased strength characteristics and wear resistance;
- ceramic. This type of bars appeared relatively recently and has gained trust among buyers;
- artificial. These include electrorund or carbide. The bars are cheap and are most often used for finishing sharpening.
Fact: The choice of the type of bar and size depends on the preferences of the person who will use it in the future.
Is shape important?
You can get used to and adapt to any sharpening stone. You just need to try several options and choose the most convenient one in a particular case.
As for the shape: the most popular one is an oblong brick. At the same time, it is very good if the length of such a brick is greater than the size of the sharpening blade. This makes the process easier and faster. If the stone is round, oval or square, then you will have to move the blade along it much more often. In this case, there is a high probability of breaking the angle and ruining the knife.
Note!
- Do-it-yourself electric scooter - a master class with step-by-step instructions for doing it yourself. Tips and simple patterns for beginners + the best photo reviews
- DIY rocking chair: TOP-120 photos of the best manufacturing options. Master class on creating a rocking chair at home
- Smokehouse from a gas cylinder - the best master class on making a homemade smokehouse with step-by-step photo diagrams for beginners
It is very convenient to use if one sharpening bar has both coarser and finer grain sides - this is an ideal option for many types of household knives.
Varieties of homemade devices
Homemade knife sharpeners have a number of pros and cons:
A device made of two triangular wooden blocks. These blocks need to be placed parallel and fastened with screws. The sharpening brick is fixed between these two base bars and, if necessary, it can be rotated, changing the sharpening angle.
However, if such a design is used for a long time, the retaining elements will weaken and setting and maintaining the desired degree will become problematic.
The base is made of any convenient material (wood, metal, plastic). Here you need to install a movable element for changing angles and a fixing element for the sharpening stone. The grinder's actions must be vertical. The inconvenience of this structure is that it must be held by hand on the surface, or secured with something.
It can also be a beam attached to an improvised railcar. Sharpening is done by moving back and forth. The angle is controlled by the ratio of the height of the bar and the working base. The entire structure must be secured to a fixed surface.
Note!
- Do-it-yourself compressor: TOP-130 photo reviews of finished compressors. Step-by-step instructions + diagrams and drawings
Do-it-yourself wind generator: TOP-170 photo reviews of finished devices. Detailed DIY instructions for beginners
Do-it-yourself spot welding - the best master class on making homemade spot welding with step-by-step photo diagrams of do-it-yourself work
These are just some of the options for such devices. There are others that require a lot of effort, time and skill.
The simplest knife sharpener at home
As mentioned above, one of the most important qualities of a good sharpener is the ability to set or maintain the desired degree between the cutting plate and the block.
This instruction, which tells how to make a knife sharpener, suggests making a machine with the following principle: a well-fixed knife is sharpened strictly at a set angle with replaceable sharpening stones of the required abrasiveness.
Necessary conditions for a sharpening machine
In order to make a knife sharpening machine with your own hands, you need to carefully plan the stages of work and draw up drawings. If the master has experience, then he can develop them himself or use ready-made drawings that are offered in specialized literature.
For ideal processing of the cutting surface, the machine must meet the following requirements:
- reliable and at the same time not too rigid fixation of the knife in a vice;
- compliance with the angle, during the sharpening process the angle must be constant;
- The design of the machine must provide for the possibility of changing the sharpening angle.
You can read below about how to make your own blade straightening devices that are in no way inferior to purchased mechanisms.
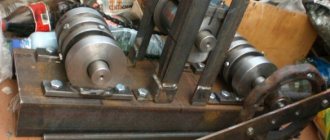
DIY knife sharpener
What will you need?
- Metal rod 5-6 mm in diameter. It will be cut into pieces of varying lengths.
- Electrode for welding. It is needed in the manufacture of corner guides. The element must be freed from flux and cleaned with fine sandpaper.
- Stainless steel sheet. The required thickness is 5 mm. Clamps will be made from it, in which holes need to be drilled through. (To make this easier, you can use machine oil. After the necessary steps, it can be easily removed from the product with a highly concentrated soap solution)
- Metal corners 9x9x0.6 cm.
- All that is usually needed for fastening: a few nuts and screws.
Types of stones for processing blades
Before you start making a knife sharpening machine with your own hands, you need to familiarize yourself with information about its components. Sharpening stones, or they may also be called abrasive stones, are one of the decisive factors in achieving an excellent result, but the skill of the master plays an equally important role.
Types of whetstones
So to get the perfect sharpening you will have to practice a lot.
There are the following types of stones suitable for sharpening cutting surfaces:
- Tools that require water to operate. The advantage of this type of sharpening stone is that it saves material - the surface of the tool is less susceptible to wear.
- Oil stones are similar in structure to water stones, but have an oily surface.
- Natural stones are made from natural materials. Before making a tool, such a stone undergoes industrial processing.
- Artificial stones – artificial materials are used in their production. It is believed that instruments made from non-natural components are inferior in quality to natural materials, but they are also quite cheap.
If desired, you can make a homemade abrasive block. To do this, you need to take flat plexiglass 5 mm thick, rectangular in shape, and stick sandpaper on it using double-sided tape. This is the easiest way to make a knife sharpener; it is convenient because when the sandpaper wears out, it is easy to replace.
Making a sharpener step by step
Step one: It is necessary to correctly measure and cut the metal corners. You can complete this step with a grinder and then clean it with a file and sandpaper.
Step two: You need to drill small holes in the fastening areas and process the edges of the guide rail.
Step Three: The bolt and nut will serve as the stand. The improvised stand must be secured between a vice or on any other convenient unit.
Step Four: Now it’s time to assemble the sharpener. Next, you need to attach a sample for the first sharpening test and the sharpening stone itself.
Step five: Test the device.
It should be noted that many of the parameters here are individual and the dimensions of the sharpener are often set by the manufacturer himself.
Sharpening machine from mounting angles
There is another way to make a knife sharpener. Here is the second master class.
What will you need?
- metal plates measuring 4x11cm
- aluminum corners
- metal rods at least 15 cm in length
- fasteners
- device for marking when cutting threads
- machine for sharpening metal (can be replaced with a file)
- fixing device (for example, a vice)
- small file (needed when working on smaller parts)
Detailed manufacturing instructions
Step one: You need to make marks to drill the holes.
Step two: You need to make a thread in the holes of the taps.
Step three: For the convenience and safety of using the sharpener, you need to smooth out all the irregularities, blunt the corners, and straighten the edges.
Step four: Next you need to drill grooves in the corners
Step Five: Tapping the Holes
Step six: You need to place the metal rods in the outer holes and secure with nuts
Step seven: Support the entire product - there is a hole in the groove of the base. You need to screw a bolt 14 cm long and 8 cm in diameter into it. You must first strengthen the bolt with one wing nut and two simple ones.
Step Nine: Place nuts in the other holes as well. They hold the part of the knife that needs to be sharpened.
Step ten: Thread nuts onto metal rods and install the corner.
Step eleven: The moment of fixing the abrasive. This is done using a metal rod, which should be in the shape of the letter “L”, a pair of clamps, and a wing nut.
Now it’s time to try out the resulting device.
It will be much easier and more convenient if, while working on the sharpener, you have the opportunity to simultaneously watch a video on the topic and work on the process. The convenience is that if something becomes unclear, you can always stop, slow down or watch the video again.
There are still enough options for making a knife sharpener with your own hands: an angle, a rotary sharpener, a double sharpener, with a vertical mechanism, etc.
Assembling a sharpening machine with your own hands
Greetings to all lovers of crafts, I offer for your consideration instructions for making a sharpening machine with your own hands. The author decided to emphasize safety and convenience in the manufacture of the machine. A reliable shield was made for the grinding wheel, which will collect the bulk of dust harmful to the lungs. The author also made an adjustable stop that can be placed at a distance of a few millimeters from the grinding wheel. It is unknown which author used the motor, but someone here already has something. If the project interests you, I suggest you study it in more detail! Materials and tools used by the author:
List of materials:
- engine;
- grinding wheel; — parts for installing the grinding wheel; - Sheet steel; - reliable switch; — wiring in good insulation; - corner; - bolts and nuts. List of tools:
- grinder; - drill; - welding machine; - tape measure, marker; - paint for metal. Homemade manufacturing process:
Step one. Engine
Motors from old washing machines are actively used for sharpening machines.
When searching for a motor, it is important to take into account its power; it must be compared with the diameter of the grinding wheel. The larger the diameter of the circle, the greater the torque the motor shaft must develop, otherwise the circle may stop under load. In purchased versions of machines, a 250W motor rotates the circle by 200 mm, these figures can be approximately adhered to. Of course, it is better for the machine to have a power reserve, but do not forget that the grinding wheel will decrease in diameter as it wears out.
Step two.
Base and circle We prepare a reliable base for the sharpener; the simplest frame can be welded from a corner and sheet steel. We make reliable fasteners for the motor; it needs to be screwed with bolts and nuts. Grovers or nuts with plastic locking rings would be useful. The author also placed a grinding wheel on the motor shaft; here you need to select or make bushings depending on the diameter of the wheel. The circle is usually clamped with large washers on both sides; it would be a good idea to place cardboard spacers under the washers.
Step three.
Shield The author decided to make a protective shield to prevent dirt from flying throughout the workshop. The rim for the shield is bent from a steel plate, then a wall made of sheet steel is welded to it. We weld the shield to the frame where necessary, strengthen the fastening with pipes, rods, and so on.
Step four. Emphasis
To make it comfortable and safe to work on the machine, we put emphasis on it. The stop must be adjustable in at least two positions, vertically and horizontally. The stop will move towards the grinding wheel as it wears out, or for other purposes. We assemble the stop from a corner, plates and sheet steel. For convenient use, the author welded pipes to the nuts, and inserted steel rods into the pipes as handles.
Step five. Cover for shield
We are making a cover for the shield; it must be removable so that the circles can be replaced. We cut out the cover from sheet steel and drill holes in it. We weld bolts or threaded rods to the shield itself; as a result, the cover will be secured with nuts. It would be a good idea to make a window at the bottom of the shield through which debris can pour out.
Step six. Final touches
Finally, the author made a sleeve for the wiring, installed a switch and painted the machine. The homemade product looks great and works flawlessly. There is another axis on the back of the motor; you can put a brush or polishing wheel here.
Become the author of the site, publish your own articles, descriptions of homemade products and pay for the text. Read more here.
Stages of work on knife processing
- You need to start sharpening from the edge of the blade that is located closer to the handle of the blade.
- To make it more convenient to control and not go beyond the desired part, you can paint it over with some bright marker.
- The movement itself during the process is consistent, light, without pressure.
- The tip runs strictly perpendicular to the sharpening element.
So, at home, you can make your own sharpener for your home kitchen or crafts and not spend large sums on purchasing a factory-made product.
The instructions were sent by this source.