Modern manufacturers produce a large number of welding inverters with a wide range of functions. These include semi-automatic machines operating in MIG/MAG mode, which means supplying inert or active gas and welding wire to the joint of the workpieces. Unfortunately, the cost of such units exceeds the financial capabilities of many people. Therefore, the desire to convert welding inverters into semi-automatic machines is finding more and more followers, since it is possible to save significant amounts. We will consider the possibility of such a modification and the necessary details for this.
Semi-automatic device
The structure of a semi-automatic machine is the first thing you need to study if you want to assemble your own machine.
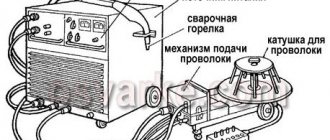
A standard semi-automatic machine consists of two parts (or two blocks): power and feed. The feed part is simply a feed device for semi-automatic welding. But, let's take a closer look at the semi-automatic device.
The power part, also known as the power unit, is essentially an inverter. The inverter acts as a current source. Everything is simple here. But the feeding part is a separate, plug-in feeding mechanism. The feed mechanism is used to feed the wire. The wire is sold in reels and the reel is inserted directly into the feeder. Its end exits through the burner nozzle.
Of course, you don't have to use a feed mechanism to perform semi-automatic welding. The wire can also be fed manually. But this is extremely inconvenient, and in this case the whole essence of semi-automatic technology is lost.
That's all the components. This, of course, is not enough to make a semi-automatic welding machine on your own. You will also have to buy additional parts, but they depend on the type of inverter you have and the method by which you will convert it into a semi-automatic machine. Don’t forget about the components (burner, hose, correctly selected nozzle, etc.).
How to monitor the correct operation of equipment
In order for the semi-automatic welding machine that you assembled with your own hands to serve you for a long time, it is better to constantly monitor the temperature conditions of the inverter. To carry out such control, you need to press two buttons simultaneously, after which the temperature of the hottest inverter radiator will be displayed on the indicator. The normal operating temperature is considered to be one whose value does not exceed 75 degrees Celsius.
If this value is exceeded, then, in addition to the information displayed on the indicator, the inverter will begin to emit an intermittent sound signal, which should be noted immediately. In this case (as well as if the temperature sensor breaks or shorts), the electronic circuit of the device will automatically reduce the operating current to 20A, and a sound signal will be emitted until the equipment returns to normal. In addition, a malfunction of self-made equipment may be indicated by an error code (Err) displayed on the inverter indicator.
Setting the welding mode on the Resanta inverter
Principle of operation
The operating principle of the semi-automatic device is simple. It will be clear even to a beginner, so study this information carefully. It will be useful for assembling a homemade device.
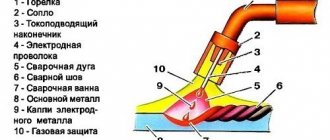
So, it all starts with feeding the torch into the welding zone. The torch combines two devices: from its nozzle it supplies protective gas and wire simultaneously. The welder regulates the amount of gas manually, but the wire is fed in a semi-automatic mode (hence the name “semi-automatic”). That is why the welder always has only one hand occupied during the process. The one holding the burner.
As we have already said, gas is supplied to the welding zone simultaneously with the wire. An electric discharge is formed in the mixture of gases between the end of the wire and the metal surface, due to which the workpiece and the wire itself melt. Molten metal is mixed with molten wire. Next, you can form the seam.
In this case, wire is necessary and without it welding is simply impossible. Gas is also needed; it protects the weld pool from oxygen coming from outside. But if you do not have the opportunity to use gas, you can take a special cored wire and cook only with it.
In what cases is a semi-automatic welding machine used?
Practice shows that it is better to use a semi-automatic machine in cases where it is necessary to obtain precise and accurate connections of parts made of steel. With the help of such equipment, which, if desired, can be made by hand, welded joints of thin metal are made, which is very important when repairing the body of a vehicle.
Learning how to operate such a device is also not difficult: lessons taken from qualified specialists or a training video will help you with this.
Semiautomatic from inverter
There are several ways to make a working semi-automatic device from an inverter. We will list the most interesting, in our opinion. You can implement them at home with basic knowledge of electrical engineering.
Method No. 1
To make an inverter semi-automatic welding machine with your own hands, you will need a “donor”. Without it, it’s simply not possible to make a semi-automatic machine. As a “donor”, take not the weakest inverter for MMA welding. It must be operational and perform normal welding operations without any problems.
You need to change the current-voltage characteristics of the inverter you have chosen so that it can operate in semi-automatic welding mode. You can use a PWM controller for this. However, this option is very labor-intensive and is not suitable for those who are not strong in electrical engineering.
Therefore, in order to assemble a semi-automatic welding machine from an inverter with your own hands, we recommend making a choke. A choke from a fluorescent lamp is suitable for this. And after the throttle you need to take the feedback voltage. Watch the video below, which explains the essence of this method in detail. There is also a clear diagram in the video.
Method No. 2
The second method is extremely simple and is suitable for those who have a certain inverter welding. The fact is that there are inverters on sale that can switch to a mode with a rigid change in the current-voltage characteristic. If you are the owner of just such an inverter, then you can only be happy for yourself. To turn such a device into a semi-automatic machine, you just need to purchase an external feed mechanism.
The mechanism must include all the necessary cables and connectors. You just need to easily connect the welding wire feeder to the welding inverter and you can start welding. We can assume that in this case the feed mechanism works as an attachment to the inverter for semi-automatic welding. Watch the video below, where the author talks about his inverter, to which he connected the feeder.
Method No. 3
The last method of converting from a welding inverter into a semi-automatic machine with your own hands will require some knowledge and skills. In this case, you will also need a donor inverter. Please note that not every device will work. You need an inverter with ZX-7 layout. It must have a shunt at the output, and there must be a current transformer at the “primary”. It’s even better if the device doesn’t have any additional functions like hot start or arc force.
You also need to change the current-voltage characteristics, and also set the current rise setting. Further actions directly depend on the circuit of your inverter. So don’t be lazy to find topics on various forums dedicated to converting an inverter into a semi-automatic machine. Watch the video below with a test of such a homemade device.
Setting up an inverter used for semi-automatic welding
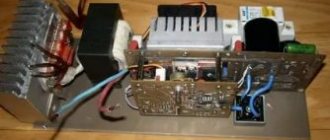
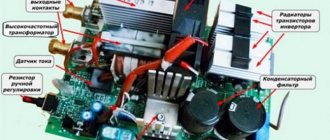
If you decide to make a semi-automatic welding machine with your own hands using an inverter, you must first turn off the power to this equipment. To prevent such a device from overheating, its rectifiers (input and output) and power switches should be placed on radiators.
Power diodes on additional radiators
In addition, in the part of the inverter housing where the radiator is located, which heats up more, it is best to mount a temperature sensor, which will be responsible for turning off the device if it overheats.
After all of the above procedures have been completed, you can connect the power part of the device to its control unit and connect it to the electrical network. When the network connection indicator lights up, an oscilloscope should be connected to the inverter outputs. Using this device, you need to find electrical pulses with a frequency of 40–50 kHz. The time between the formation of such pulses should be 1.5 μs, which is regulated by changing the voltage value supplied to the device input.
Oscillogram of welding voltage and current: on the left with reverse polarity, on the right with direct polarity
It is also necessary to check that the pulses reflected on the oscilloscope screen are rectangular in shape, and their front is no more than 500 ns. If all the checked parameters correspond to the required values, then you can connect the inverter to the electrical network. The current coming from the output of the semi-automatic device must have a force of at least 120 A. If the current value is less, this may mean that voltage is supplied to the equipment wires, the value of which does not exceed 100 V. If such a situation occurs, you must do the following: test the equipment by changing the current (in this case, it is necessary to constantly monitor the voltage on the capacitor). In addition, the temperature inside the device should be constantly monitored.
After the semi-automatic machine has been tested, it is necessary to test it under load. To make such a check, a rheostat is connected to the welding wires, the resistance of which is at least 0.5 Ohm. Such a rheostat must withstand a current of 60 A. The strength of the current that in such a situation flows to the welding torch is controlled using an ammeter. If the current strength when using a load rheostat does not meet the required parameters, then the resistance value of this device is selected empirically.
Basic requirements for welding inverters
The steepness of this section depends on the delay time of the controller's response to load changes. For resonant inverters, this section of the current-voltage characteristic has a flatter slope; its value depends only on the quality factor of the resonant LC circuit, and the higher it is, the steeper this angle.
As you can see, if the device is configured correctly, then you can do without the current OS! Power limitation will occur automatically. This is why it is believed that resonant converters are not afraid of short circuit mode!
And it is true! Now the third main requirement has emerged - limiting the maximum current of power switches!
Assembly of the unit
Before making a semi-automatic machine with your own hands, be sure to check all the necessary parts of the old inverter. In addition, in order to improve the thermal conditions of the future device, it is necessary to provide additional radiators on which rectifiers and power diode switches are mounted (photo below).
Additional Information. In the spaces where radiator units are to be located, it is necessary to provide thermal sensors that record the temperature in this part of the device.
After completing all of the above procedures, you should begin mating the power module with the electronic control unit, after which you can try to connect it to the network and check its operation.
Difference from manual cooking
The semi-automatic welding machine is initially designed to work with filler wire in a protective gas environment (inert or active). Its difference from a conventional manual arc welding machine is the presence of a wire feed mechanism, a gas cylinder, a special torch and a gas and additive control unit.
The power source itself in the form of an inverter is no different. If the feed mechanism is built into the inverter housing, there is an additional wire connector.
Therefore, many owners of manual arc welding machines eventually have a desire to expand their capabilities and make a homemade semi-automatic machine. It can be implemented very easily. There are several implementation options; which one to choose depends on the availability of funds, time and desire.