Details and nuances
It is important to understand that the coulter installed on walk-behind tractors and motor-cultivators is not capable of performing the same work as similar devices on “large” tractors. It makes no sense to expect them to:
- pruning;
- loosening the earth;
- groove formation.
There are only two functions available: adjusting the depth and pace of tillage, as well as an additional support point for storage. That is why there may be different names for this part:
- stop-limiter;
- plowing depth regulator;
- spur (in the lines of a number of European companies).
Coulters installed on certain models of walk-behind tractors (cultivators) can have only 2 adjustment positions. There are even those in which the depth of the sharp end is not adjustable. An example is the branded Caiman Eco Max 50S C2 coulter. But it is possible to change the speed of movement of the cultivator by manipulating the handles. Please note: on powerful cultivators and walk-behind tractors, the coulter must move freely to the right and left.
The correct organization of work when using a coulter is as follows:
- pressing handles;
- stopping the cultivator;
- waiting until the soil around the cutters is loosened;
- repeat on the next section.
When it is planned to plow virgin soil, the depth of the cutters is usually made relatively small in order to evaluate the result. Only after processing a trial portion of the area can we say whether the depth needs to be changed or not. If the motor starts to accelerate when reducing the processing depth, you have to deepen the coulter a little more. On walk-behind tractors of the "Neva" type, the regulator is initially installed in the middle position. Then, focusing on the density of the earth and the ease of overcoming it, the final adjustment is made.
To learn what coulters for a walk-behind tractor are and how to install them correctly, see the video below.
DIY iron wheels on a walk-behind tractor
Essentially, these are metal wheels with welded spikes that cultivate the soil layer and provide traction. First of all, you need to decide on the diameter and size of the studs and draw up a drawing of the future wheels. In addition, you need to decide on the weight of the future wheels, taking into account that for traction with the soil it must be large, and a motor cultivator may simply not have enough of it.
Homemade lugs
You can use rims from car wheels as a basis. An axle shaft is welded to them, onto which the bearings are placed. Square-shaped metal plates are attached to the disks by welding. It is necessary that they touch the edges of the rim. Next, the plates are bolted to the rim. Then teeth are made - hooks that will go into the soil. They can be made from corners. They are welded to the wheel rim approximately 15 cm apart.
How to assemble wheels on a walk-behind tractor at home
It is impossible to create pneumatic or cast models on your own (without the use of special equipment). And in principle, there is no point in doing this, because car wheels can be used to equip the chassis - Zhiguli wheels or Niva tires can easily be installed on a walk-behind tractor.
At home, lugs are most often collected. Factory models are expensive, so purchasing them for processing small areas is unprofitable. The way out of the situation is to make it yourself. All you need is a rim from old car wheels, metal plates, bolts and patience. The algorithm for assembling lugs is as follows:
- Old car wheels of the required diameter are selected based on the power of the walk-behind tractor, since the weight of the finished structure will be impressive (it is made entirely of metal).
- Plates are welded along the entire outer radius of the rim. In order to increase the strength of the structure, they can be additionally secured with bolts.
- Teeth are welded to the metal plates. They are made from angle steel, which is pre-cut into pieces of the required length. There should be a distance between the teeth of at least 15–20 cm.
- Axle shafts are welded into the disk, the structure is supplemented with bearings and mounted on the chassis of the walk-behind tractor.
The teeth ensure reliable wheel grip on clay soil when working in all weather conditions. To reduce slipping and simplify control of equipment in difficult operating conditions by increasing the missing mass of the unit, weights are attached to the outside of the lugs (on the inside of the wheels or on the walk-behind tractor bracket) using hub bolts. By using this attachment, the weighting is increased by 20%.
Wheels from a Zhiguli on a walk-behind tractor
You can also install Zhiguli wheels on walk-behind tractors with your own hands. The diameter of the Zhiguli wheels exactly matches the original wheels. Using Zhiguli wheels is more profitable, since original products, as a rule, are much more expensive. In addition, VAZ wheels are wider, heavier, have better cross-country ability and less slippage.
When replacing factory wheels with car wheels, the structure becomes heavier. An axle shaft is installed inside, onto which metal plates with holes are mounted, acting as weighting agents. Caps are installed on the outside to protect against external damage. The camera moves away. For greater traction between the wheels and the soil, it is possible to tighten a chain on them.
The installation process occurs in the following sequence:
- Installing the axle shaft.
- Removing a tire from a wheel.
- Installation of spikes.
- Attaching the structure to the rim with bolts.
- Replacing disks.
- The structure is screwed to the hubs installed on the walk-behind tractor.
You can make wheels for garden motorcycles yourself, improving the design to suit your needs, the tasks assigned to the equipment, and any desired type of soil and terrain. There are quite a lot of options for independent modifications; every gardener and farmer can easily make what he needs for comfortable work.
Wheels for hilling on a walk-behind tractor
When setting a task such as hilling for a walk-behind tractor, a special type of wheels will be required. Hilling wheels, also popularly known as hillers, are used for both planting and hilling various crops, such as potatoes, carrots, beets, rutabaga, radishes, turnips. The most commonly used are four types of hilling wheel models:
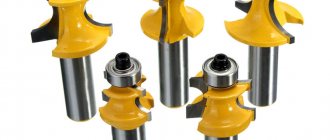
- Lister - you can easily make them with your own hands. They have a number of varieties, including a non-adjustable type, consisting of two plates arranged mirror-like and diverging at an angle with a common stiffener. And also an adjustable type, with which it is possible to change both the width and depth of tillage;
- disk - the principle of their operation is based on the fact that the disks capture the soil and then fill the plant growth areas with it;
- propeller - are a type of propeller. They are valuable because, due to the serrated shape of the blades, they are aggressive towards weeds and are excellent at combing them out of the soil, making them ideal for weeding. It is also possible to make this type of hiller with your own hands, individually for the strictly assigned tasks;
As you can see, there are a sufficient number of options for walk-behind tractors, designed for a wide variety of tasks, types of work and types of soil. Some of them can be bought, some can be installed from other cars and motorcycles, and some can be done with your own hands. To everyone who chooses and selects the wheels they need for a walk-behind tractor - good choice, easy work and high yield!
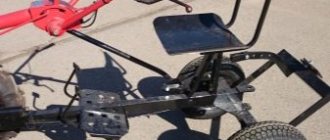
Structure
The basic components used to create a 4x4 all-terrain vehicle, in addition to the walk-behind tractor itself, are represented by the following components:
- frame, which will be the basis of the unit;
- rear axle, for installing a second pair of wheels;
- driver's seat;
- lighting fixtures that enable safe movement at night.
Such units are vehicles intended for one person. The average load-bearing capacity of motor vehicles is approximately 200 kilograms. The width of the chassis is determined by the required stability before turning over, but it is advisable to make it at least 1.1 meters. Among walk-behind tractors with an engine, it is advisable to use units such as Neva, perhaps others, with a capacity of 10 horsepower or more. Such power characteristics are enough to travel faster than 10 km/h. When moving through muddy roads on viscous or slippery soil, it drops to 2-3 km/h.
Functions of a creeper for a mini-cultivator
The main task of the creeper is to reduce the operating speed of the agricultural unit. Most often, this is required in cases where the operator needs to direct the rotational force created by the motor not to the speed of its movement, but to increase the efficiency of the moving working parts installed on it. This allows you to improve the quality of plowing hard and rocky soils, as well as completely remove large stems of weeds.
In most cases, a creeper for a cultivator is used in cases where the agricultural machine is equipped with pneumatic wheels. A little less often, the device is mounted on a motor cultivator with lugs. This allows the operator to improve the traction of the equipment on soft, loose soil and increase the efficiency of processing areas with wet, marshy soil.
How to make and install wheels on a cultivator?
Modernization of a walk-behind tractor is necessary in the following cases:
- to improve the quality of plowing at low pressure on the wheels;
- Rubber tires, which wear out quickly, are not suitable for plowing;
- increase in chassis;
- creation of a new modification.
To make your own transport elements for a motor cultivator, two or four wheels from popular Soviet cars are suitable.
The manufacturing process includes the following steps:
- we fasten the axle shaft inside the transport element;
- in order for it to be removable, we weld a tube with a diameter of 30 mm to a metal plate;
- we make holes in the plate (no more than 10 mm) for the guides on car rims;
- Using a drill, we make a through hole in the tube (for a cotter pin);
- We place the tube perpendicular to the plate and fasten it to the side parts, welding it;
- then we screw the axle shaft to the wheel, securing it with a cotter pin.
Thus, installing wheels on a motor cultivator will not be difficult, as well as removing them. To do this, you simply need to unscrew a few fasteners. The last step requires the presence of a special set of tools (screwdriver, wrench and jack).
In the cold season we use a set of winter tires. In winter, the cultivator can be equipped with lugs. They can be purchased in (specialized) stores and made with your own hands. You will need the following items:
- unnecessary car wheels;
- “corner” made of steel for making “hooks”;
- dense squares of steel;
- bolts;
- Traction or metal wheels are perfect for creating lugs.
So let's get started:
- We take old car wheels without tires as a basis;
- We attach the axle shafts to them using a welding machine;
- let's start making “hooks”;
- we take steel corners and adjust their size using a grinder (their size prevails over the disk rim);
- fasten to the rim (at a distance of 15 cm each);
- in the final stage we fix them with the help of “teeth”.
How to make wheels for a walk-behind tractor with your own hands
Some DIYers try, for reasons best known to them, to make wheels for a walk-behind tractor with their own hands, rather than buy them in a store. How to make rubber wheels for a walk-behind tractor? No way. They are taken from other equipment, where the wheels are sized for use with a walk-behind tractor. You can take wheels from old Zhiguli cars; for a walk-behind tractor, they are also suitable from a motorized stroller.
Choose the right hub and go!
If you want to make your own homemade lugs, you will have to tinker more. First you will need to take rims from car wheels, weld on them an axle shaft, rim and teeth-tooths of the required height and at the required distance from each other. Here you will do all the work on the wheels yourself, using an angle grinder and a welding machine.
It’s just important not to overdo it and make the distance between the lug teeth no more than 20 cm, otherwise all the wear on these wheels will be lost. They will not go into the ground firmly enough.
Peculiarities
Wheels, just like mechanical units, are available in several types
Today, the market is represented by a huge assortment of these products, so in order to make a choice in favor of one model or another, it is important to take into account its technical characteristics. For power units, three types of wheels can be used:
- pneumatic. The designs have tubes and rubber tires;
- rubber. These are solid tires consisting of durable rubber and rims;
- lugs. They are metal elements that are used to increase the cross-country ability of a walk-behind tractor.
In addition, you can also find universal samples on sale that are suitable for equipment of any brands and models. They come with a camera, disks, and mounting hardware and are considered an excellent choice for those who don’t like to pay twice. Manufacturers often produce special wheels that are designed only for a specific modification of the walk-behind tractor. These types are sold at different prices, and you can only purchase them if the walk-behind tractor has a popular model. For mid- and high-class units, you can buy tube wheels with a diameter of 5 to 13 inches; they have high-quality rubber and durable iron tires.
Wheels for walk-behind tractor: how to choose and how much they cost
Well, let's say you have a walk-behind tractor. By itself it is just a pile of useless metal. In order for it to be useful to you, you also need to purchase a canopy for it, which you can look for in a store, or you can make it yourself. On our website you will find any information about such homemade products.
Attachments will not work properly if your unit has bad wheels - they must fit your walk-behind tractor. Basically, there are two main types of wheels for walk-behind tractors. These are rubber wheels that are equipped with deep treads for driving on dirt roads, as well as metal wheels with lugs for high-quality work in field conditions.
Rubber wheels usually come with the purchase of the walk-behind tractor itself. Problems may arise if you want to change them to others and buy wheels that are not suitable for your unit. You should probably know that not all types of wheels are suitable for field use.
You buy a walk-behind tractor to get the most out of it. This is not a cultivator that you will only use to loosen the soil. The walk-behind tractor must plow the land, plant a crop in it, cultivate what was planted until a certain time, and then harvest the crop. Where a regular wheel cannot handle, a wheel with hooks can easily go.
How to choose rubber wheels
But more about them later. First, if you decide to choose additional tires in the store, consider what purposes they will serve. Always buy wide wheels for tilling the soil. The same ones are needed when digging up planted potatoes. Choose wheels with a diameter of 400 mm and no less. They should be 200 mm wide. Wheels are important when planting potatoes or vegetables in the ground.
It is important to maintain distance between rows here. It should be from 50 to 70 cm so as not to interfere with the passage of the walk-behind tractor, taking into account the standard arrangement of the wheels. To process the sown crop, narrower wheels are needed that do not jam the planting when driving. You want to get rid of the weeds, not the planting. Nowadays, pneumatic tires are in fashion, costing somewhere between 100-130 dollars.
Let's show you some options.
For example, universal wheels, which can be mounted on walk-behind tractors of all brands and models, can also be mounted on motor cultivators and trailers. It’s better to buy these, because you don’t want to pay twice if you get another unit and these tires won’t fit there. There are tube-type wheels with sizes 4.0-10 inches. You can buy them for an average of $90 and get free bolts for attaching them to a walk-behind tractor, tubes for them, rims and tires.
Self-production
Of course, it is impossible to completely assemble these parts with your own hands. In any case, you will have to purchase an axle. All parts are hung on a ready-made base, which is purchased in the store.
You can use car or motorcycle pairs as a base. You can only make lug parts with your own hands, since weighting agents are used extremely rarely, and it makes no sense to buy products at a high cost.
To make a walk-behind tractor convenient for work, you need to properly debug all its parts, including making the wheel axle of the required length. For this, special extension cords are used. You can also assemble paired parts from iron, inside of which there is an internal cavity. It is in it that the weighting material is placed.
Naturally, they are not suitable for a trailer, but they can be used in the unit itself for mounting wheels from a car.
Advantages of paired parts:
- Reduced slippage time and increased product performance.
- Possibility to quickly remove and change products.
- Easy to assemble on your own.
- Excellent grip.
It is thanks to these properties that double wheels are becoming increasingly popular among farmers. You can also make them yourself
Of course, the parts turn out to be rough, but they work efficiently and for a long time, which is important for difficult agricultural conditions. The process is as follows:
- At the first stage, wheels and tires are selected.
- Next, the protectors are made more prominent by creating a pattern on them.
- Then a weight is inserted into the rim. To do this, the steel strip is cut into squares and the blanks are welded into a single structure.
- The second rim is secured to ensure the greatest strength of the mechanism.
- At the end, tires are put on and the structure is ready for work.
In general, it is not difficult to make such devices; you just need to choose the right parts and adjust them to size.
Recently, pneumatic wheels, which are perfect for walk-behind tractors, have been in great demand among buyers. They are made from medium-hard rubber, and they are quite expensive. Therefore, it is worth thinking about assembling the unit yourself.
Making homemade lugs
Sometimes pneumatic tires can slip (soft ground, slush after rain, ice) and your work can go down the drain. For better adhesion to the soil, reliable devices are needed. These are ordinary lugs.
You can, of course, buy them in a store, but not everyone wants to spend money on something that is easy to make yourself, and from “waste” materials. Moreover, there are only two requirements for them, and both are necessary to ensure reliable grip:
- Weight 20-30 kg.
- Digging into the ground.
There are many options for DIY lug wheels. We will focus on two of them. For their manufacture, the main tools are:
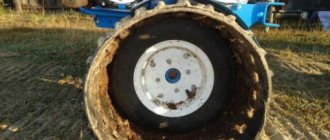
To complete the first option, you will need metal strips (about 5 mm thick) and car rims. Their diameter depends on the size of the cultivator blades. Many people take Lada wheels as the best option. Picture 1.
Figure 2. Homemade lugs for a walk-behind tractor.
Types of wheels
A unit such as a walk-behind tractor is used in a variety of types of work, so the wheels installed on it must also be different. Let's look at the modifications offered by manufacturers:
- Pneumatic type.
- Traction.
- Solid rubber products.
- Metal parts with couplings.
Pneumatic
Necessary for plowing the soil or plowing up beds. For high-quality work, the wheels must have a width of more than twenty centimeters with a diameter of 40 centimeters or more. A pronounced tread is welcome.
This unit is more stable, and all defects will be visible on the surface of the tires. As a rule, Neva walk-behind tractors are equipped with such parts.
Traction
In common parlance, these products are called herringbone - for the unique pattern on the tread. Their working width is universal. This option is used for transporting goods or hanging special equipment.
With traction wheels, your unit will be able to navigate off-road conditions and even loose snow. The rubber installed on it is highly durable and wear-resistant.
Solid cast
Such parts are characterized by increased tire power. They are usually used on diesel-type units, more similar to small tractors, such as MTZ.
Metal with lugs
These are heavy parts that provide the walk-behind tractor with additional power during operation. Special teeth allow the equipment to move even on very difficult and viscous soil
The heaviest load falls on the support wheel, so it is not its choice that you should pay close attention to
When choosing a trailer, you need to ensure that the wheels in it have a similar structure. Then, when transporting a heavy load, the pressure on the walk-behind tractor and trailer will be compensated.
On 4 wheels
The 4 wheels can be installed in different ways on the device. The first option is to transform the equipment into a mini-tractor and equip it with a seat. The second option is more common when making homemade equipment. In this case, and the use of unsuitable machine or motorcycle parts, two identical pairs are paired with each other.
Standard conversion of equipment into a mini-tractor is a common procedure if the unit has sufficient power. For this process, a free axis is created, which is installed on an elongated body. Paired equipment is placed on this axis.
When using the paired version, two sibling pairs are broken up and paired with the second wheel. It is also possible to install weighting agents between adjacent disks, but in homemade work, most often the disks are paired with a small gap using a small rectangular window, which then serves as a weighting agent.
When fully created, each part will be a double element, which is created from equal parts. It turns out that the elements must be the same in shape and size.
Among the advantages of this design:
- higher level of productivity;
- quick removal of external parts;
- ease of creation;
- high level of contact with the surface.
The main advantages are increased maneuverability and increased speed.
A walk-behind tractor with 4 wheels is considered the most practical for creating at home.
Do it yourself
Now let's talk about how to make wheels for a walk-behind tractor yourself. Let us immediately clarify that creating pneumatic and cast wheels at home is in principle impossible.
And why reinvent the wheel if you can equip garden equipment with tires from a car or motorcycle. You just need to install a suitable hub and you can get to work.
It's a different matter when it comes to lugs. You can actually make such homemade wheels for a walk-behind tractor yourself. Here is a basic assembly diagram:
- We take old wheels from the car. Please note that only the rim is needed. The diameter of the wheels depends on the power of the walk-behind tractor, given that the design will be all-metal, the weight will be considerable.
- We weld metal plates to the disks. The edges of the plates should touch the edge of the rim. This is an important structural element, so the plates are welded along the entire outer radius; they can be secured with bolts to increase reliability.
- We weld the teeth to the metal plate. They can be made from a corner, after cutting it into pieces of the required length. Please note that the distance between the teeth should not exceed 15-20 centimeters. Otherwise, the effectiveness of such wheels will be reduced to zero.
- We weld the axle shafts into the disk, supplement the structure with bearings and install the chassis on the walk-behind tractor.
How to make an all-terrain vehicle from a walk-behind tractor: description and photo
As already mentioned, you should clearly imagine what exactly the all-terrain vehicle will be used for, and only then begin to create it. Tracked mechanisms require experience in handling them. If you have problems with this, it is recommended to start with ordinary “pneumatics”.
When it is already clear how the all-terrain vehicle will be used, it remains to determine its capacity and carrying capacity. Next, drawings are created according to which it will be made. On the drawings you need to draw components and assemblies. Figure out how best to arrange them.
The engine selected is one that has forced cooling. For example, you can use water- or air-cooled walk-behind tractor engines.
The maximum motor power is calculated by the formula: nmotor max.=10-3Nud.mp.
neng.max here denotes the maximum power, and Nsp is the specific power per 1 ton of weight. The limits of the latter indicator are 20-35 hp.
If the all-terrain vehicle is intended to be used year-round, it is recommended to equip it with a four-stroke engine.
Types of wheels for motor cultivators. How to choose them?
The motor cultivator itself is a mechanical structure used in household plots to facilitate agricultural work. In order for special equipment to perform its tasks 100%, all parts must be in good working order, especially the movement elements. The latter are divided into the following types:
- supporting;
- rubber;
- traction;
- metal with lugs;
- paired.
When choosing wheels for your inter-row cultivator, consider the following information.
- Traction and pneumatic wheels are known for their versatility and the presence of an original tread pattern. They are often called “Christmas trees” in everyday life. They are large in size (width exceeds 20 cm and diameter - 40 cm). The wheels allow the walk-behind tractor to easily move both on the road and on sticky soil. The impressive size of the wheels makes it possible to use the unit for plowing over large areas. Traction wheels are also great for a snow blower or cart. The amazing strength of rubber is popular due to its durability.
- Transport elements made of metal with lugs are weighted. Steel “teeth” push the cultivator forward and prevent it from “drowning” in the viscous clay.
- Rubber (solid) ones are installed not only on cultivators, but also on small tractors. They have a “rolling” property and are widely used in wooded (difficult) areas.
- Paired ones consist of 2 elements of the same size and shape. This design significantly increases the power of the unit and increases its speed. They have excellent contact with the surface and are easy to create at home. They also imply the possibility of quickly removing external elements.