Almost every master has at least once thought about how to make a choke for a welding machine with his own hands. Today, a fairly large number of different devices are sold that can be used in small-scale production. This can be a device that operates on temporary or continuous current, a semi-automatic welding machine, or a product using electrodes. However, a high-quality device is very expensive, and budget analogues quickly become unusable.
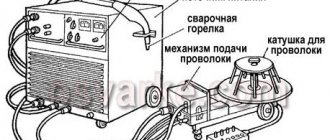
Diagram of an AC welding machine with a separate choke: 1 – primary winding, 2 – core, 3 – secondary winding, 4 – choke winding, 5 – fixed part of the choke core, 6 – moving part of the choke core, 7 – screw pair, Dr – regulator current.
To assemble a homemade welding fixture, you will need to select and build all the necessary elements, including the throttle.
Principle of operation
The main property of an inductor, which is a magnetic circuit wound under certain conditions around a ferromagnetic core, is the stabilization of current strength over time.
Simply put, voltage applied to the coil causes a smooth increase in current output. Changing the polarity leads to the same smooth decrease in current.
The main factor is the condition that the current passing through the inductor cannot sharply increase or decrease. This is precisely what determines the value of using a choke for welding - resistance compensation allows you to avoid sudden jumps in amperage.
This allows you to protect against accidental burning of the workpieces being welded, reduce spattering of the melting metal and accurately select the current parameters for welding for a given metal thickness. The chances of getting a good weld using a welding choke are much higher.
The parameter that determines the current change coefficient is inductance. It is measured in H (henry) - in 1 second at a voltage of 1 V, only 1 A can pass through a choke with an inductance of 1 H.
The number of turns on the coil directly affects the amount of inductance. It is directly proportional to the number of turns squared. But if you need to make a welding choke with your own hands, then it is not necessary to calculate the exact number of turns.
Since the parameters of welding machines for household use are mostly standard and well-known, a welder will only need to use the instructions below to make a choke with his own hands.
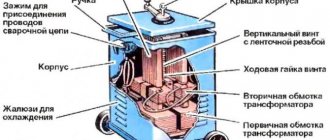
Welding choke
Purchasing a welding machine (inverter) is always associated with a dilemma: quality or price. And, as often happens, the price wins. By purchasing an inexpensive welding inverter, its owner receives a slight reduction in the quality of work with the unit. More precisely: difficulty with igniting the electrode and the rigidity of the welding process. But a small modification (and inexpensive) makes it possible to change the characteristics of the device. The easiest option is to install a throttle. What is it and what is the throttle for?
Its main purpose is current stabilization. The thing is that in an alternating current device, the consumables must be ignited at a certain voltage, which must correspond to the sinusoid of the electric current. The welding choke included in the inverter circuit allows you to shift the phases between voltage and electric current. And this, in turn, affects the ease of ignition of the electrode, plus a more even burning of the electric arc. In the compartment, the final result is an even and high-quality weld. This is what is required to confirm the quality of the final result.
Purpose
In an inverter for welding, a choke is needed to create an electric arc on the electrode. Ignition occurs when a certain voltage level is reached.
The welding choke increases the resistance, which shifts the phases between current and voltage and allows for smoother ignition. This fact in itself often allows one to avoid burning through the workpiece, especially if parts made of thin sheet metal are welded.
A smooth change in current makes it possible to avoid damaging the workpiece by abruptly applying too much power, to optimally set the arc temperature and, accordingly, to prevent metal spattering while maintaining the required processing depth.
Another valuable property is its partial protection against unstable voltage in the network.
A choke for a welding inverter greatly facilitates ignition of the electrode, which should light up at a higher voltage than the inverter produces.
An example is the MP-3 electrode, which must have a voltage of 70 V to ignite. An output choke for welding can make working with this electrode much easier for an inverter, which produces only 48 V at idle.
This occurs due to the phenomenon of self-induction. The device induces EMF (electromotive force), which causes air breakdown and flashing of the welding arc, as soon as you bring the additive a few millimeters from the metal surface.
The choke for welding is connected to the secondary winding of the transformer in the machine. It can be used in devices of any type - both home-made and factory-made, operating on any principle - inverter, with a step-down transformer, and the like.
How to make a choke for a DC welding machine
Welding with direct electric current is widely used not only in large-scale industries, but also in home workshops. The modern market offers dozens (if not hundreds) of machines for welding using an electric arc, ranging from compact low-power welders to industrial high-performance units. Regardless of the type of equipment used for electric welding, they all have one problem in common - an uncontrolled voltage drop, which makes igniting the arc and forming a seam difficult.
To solve this problem, craftsmen came up with a choke, which is introduced into the circuit with welding equipment. Beginner welders will immediately have many questions: “What is this part and how does it function? How to make a throttle for your device yourself? How to calculate the throttle correctly? In this article we will try to answer these and many other questions.
Materials for production
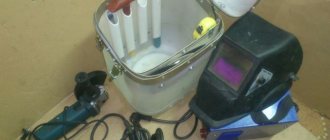
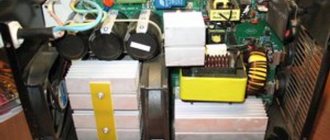
The choke for retrofitting a semi-automatic device or inverter can be assembled with your own hands, using structural elements from old equipment - tube TVs, old street lamps and other devices that have a transformer.
Structurally, it consists of a core made of a material that conducts a magnetic field, but does not conduct electric current, or is reliably insulated, and three layers of windings separated by a dielectric.
As a basis for the core, either a special material is suitable - ferrite, which has these properties, or a yoke (horseshoe) from an old transformer. Winding of the device for welding is done with aluminum or copper wire with a cross-section of 20-40 mm.
If aluminum is used, the wire cross-section must be at least 36 mm; copper wire can be thinner. A flat copper busbar with a cross-section of 8 mm is suitable.
The dimensions of the core should allow winding approximately 30 turns of a busbar of a given section, taking into account dielectric spacers. A core from the step-up transformer of the Soviet TV TCA 270-1 is recommended.
Using the throttle
Welding transformers are the best basis for creating a choke at home. This has been proven in practice more than once.
It easily, but smoothly heats our arc, at any current, so it is suitable for ordinary summer residents, as well as for working in factories and concerns with voltage surges.
You can also take a choke for a welding machine along with a rectifier. A pair of inductor and rectifier has the ability to increase the electromotive force of self-induction.
For example, if we are talking about semi-automatic devices, then this pair can strike an arc even at a large distance from the metal.
Sequencing
When the necessary tools and materials are prepared, you can begin to manufacture the throttle for welding. The algorithm of actions is as follows:
- disassemble the transformer, clean the coils from traces of old windings;
- make gaskets from fiberglass, cardboard impregnated with bakelite varnish, or other suitable dielectrics, which will subsequently play the role of an inductive (air) gap. They can simply be glued to the corresponding surfaces of the coils. The thickness of the gasket should be 0.8-1.0 mm;
- wind a thick copper or aluminum wire onto each coil. You should focus on a round wire made of aluminum with a cross-section of 36 mm or copper with a similar ohmic resistance. Each “horseshoe” is covered with 3 layers of 24 turns each;
- lay a dielectric material between the layers - fiberglass, cardboard impregnated with bakelite varnish or another dielectric. The gaskets must be reliable, since a choke of this design is prone to self-breakdown between windings. If the resistance between the windings is lower than the air resistance between the electrode and the additive, then a breakdown will occur between the windings, and the welding device will be irreversibly damaged.
Winding must be done evenly, without overlaps, strictly in the same direction, so that the “bridge” between the coils is on one side of the future inductor, and the input and output contacts are on the other.
In case of an error, the jumper can also be installed askew. It is important that its installation turns coils with different winding directions into coils with the same direction in fact.
DIY choke
Now let's figure out how to wind a choke for welding with your own hands and how to calculate the choke. To wind the choke correctly, you need to thoroughly know its structure and understand the principle of operation. In the “General Information” section we briefly described the design and operating principle of this device. We have compiled a small step-by-step instruction, following which you can assemble the throttle. The part you assembled is suitable for use in small production or home welding. So let's get started:
- First you need to find an old transformer, it will be our basis. Experienced craftsmen advise taking a booster element from a tube TV model “TSA 270-1”; it will act as a core. Similar models can be easily found at flea markets or searched online on online message boards.
- Then you need to disassemble the transformer. This is done simply: you need to cut the bolts or turn the heads at the top of the unit, then remove the coils.
- The resulting “horseshoes” (as craftsmen call them) install special gaskets. They are made of thin cardboard and glued to the base of the “horseshoe”. Gaskets are needed to form an inductive gap.
- Now you need to wind the wire around the horseshoe. To do this, we take aluminum wires with a cross-section of 36 millimeters. Wind 22-24 turns on each side. If you managed to find a core from a tube TV, then you can wind 8 turns in two layers on each side. Don't forget to insulate between the turns using paper and bakelite varnish.
- The wire should be wound in one direction on each of the coils. This is necessary so that at the end the wires are located in the same direction and at the top there is a jumper between the taps connecting the coils, and at the bottom there is an input and an output.
- If you wind the wires incorrectly and they are located in different directions, then install a diagonal jumper between the upper and lower leads. The second pair of taps will play the role of input and output.
- It is recommended to install the choke in the welding machine only after the diodes. Connect the diode bridge cable to the input.
If the current strength of the choke, on the contrary, continues to fall during use, then you need to remove several turns on each of the coils.
Power on and check
The choke for welding is connected to the system between the diode bridge and ground - a contact that connects to the material being welded. The output of the diode bridge is connected to the input of the inductor, to the output of the assembled inductor - respectively, a ground contact.
The entire assembly for welding must be tested on a piece of metal of the same chemical composition and thickness with which it is planned to carry out most of the welding work in the future. Quality indicators are:
- easy electric ignition;
- arc stability;
- relatively weak crackling sound;
- smooth combustion without strong splashes of melt.
Please note that the introduction of this element into the design of the welding machine leads not only to stabilization of operation, but also to a slight drop in current strength . If the inverter or semiautomatic device begins to cook worse, it means that the current strength has dropped.
The choke needs to be disconnected and a few turns removed from each coil. The exact number of turns in each specific case is selected empirically.
Current adjustment
And how can we make our seam neat and, most importantly, durable? That's right, we need to regulate the current well.
There are several methods for this:
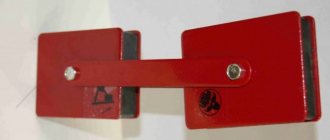
- Stabilization, in which we increase and decrease the distance between the elements and the welding machine. This is the best known method. That is, that the current strength was less, we must separate the cut transformer core. The induction will drop, and the current will creep down behind it. If your device is large, then this is a plus since it is easier to control the current on it, since the control interval depends on the scale of the available size in the body of the device.
- Control of current on the transformer winding. This method simply ignores part of the coil, which increases the voltage, because the path that the current overcomes becomes smaller. Well, that is, if this very path becomes larger, then the path needs to be extended.
- But it can also be controlled using a steel spring to which we attach the terminal in series. This method could be good because it doesn't adjust the current much, but there is a caveat. This method is extremely unsafe, since the overcooked spring ends up at the master’s feet. If you value your health and don’t want to get fried, this method is not for you.
Such a coil will solve almost all your problems with voltage stabilization. In fact, it is always ready to make up for the lack of this voltage, or to take away the excess so that it can be used again later.
The main thing is that the unsafe hot spring will no longer lie at your feet, because safety should come first, especially with such difficult work, the adjustment will be made by the throttle on the welding machine, and the master may not think about it.