§ 3. Tools for cutting
Bench chisel .
A mechanic's chisel is a metal rod made of tool carbon steel U7A, sometimes from steel U7 and U8A. The chisel consists of three parts: working, middle and impact (Fig. 90, a). The working part 2 of the chisel is a rod with a wedge-shaped cutting part 1 at the end, sharpened at a certain angle. The striking part 4 is made tapering upward, its apex is rounded. The sharpening angle (the angle between the side edges) is selected depending on the hardness of the metal being processed. The middle part 3 of the chisel is held when chopping.
Rice. 90. Bench chisels: a - chisel, b - crossmeisel, c - groover
Recommended chisel angles for certain materials
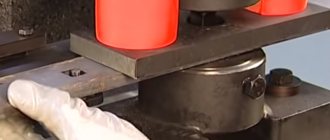
The working part of the chisel at a length of 0.3–0.5 mm L is hardened and tempered to a hardness of HRC 52–57, and the striking part at a length of 15–25 mm is hardened to a hardness of HRC 32–40.
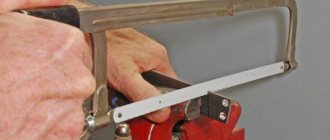
When testing a chisel for strength and durability, a steel strip of grade St. grade clamped in a vice is cut off with it. 6 3 mm thick and 50 mm wide. After the test, the chisel blade should be free of dents, chipped areas and noticeable signs of dullness.
The degree of hardening of the chisel can be determined by using a personal file, which is passed along the hardened part of the chisel. If the file does not remove chips from the hardened part of the chisel (only barely noticeable marks remain on it), the hardening of the chisel is done well.
Kreuzmeisel . The crossmeisel differs from a chisel in having a narrower cutting edge; it is intended for cutting out narrow grooves and keyways, cutting down rivets, etc. However, quite often it is used to cut off the surface layer from a wide cast-iron plate: first, the grooves are cut with the crossmeisel, and the remaining protrusions are cut off with a chisel. The materials for making the crosspiece and the sharpening angles, the hardness of the working and impact parts are the same as for the chisel.
To cut out profile grooves—semicircular, dihedral, etc., special cross-cutting tools are used, called groovers (Fig. 90, e), which differ from the cross-cutting tool only in the shape of the cutting edge. The groovers are made of U8A steel with a length of 80; 100; 120; 150; 200; 300 and 350 mm.
Sharpening of chisels and crosspieces is carried out on a conventional sharpening machine (Fig. 91). To sharpen, a chisel or crosspiece is placed on the tool rest 7 and, with light pressure, slowly moved across the entire width of the abrasive wheel, periodically turning the tool first on one side or the other. You should not allow strong pressure on the tool being sharpened, as this leads to overheating of the cutting edge, as a result of which the blade loses its original hardness.
Rice. 91. Sharpening the chisel (a), the gap between the tool rest and the wheel (b)
Sharpening is best done with cooling with water to which 5% soda has been added, or on a wet wheel. Failure to comply with this condition causes increased heating, tempering and a decrease in the hardness of the tool, and consequently, durability. The side edges after sharpening should be flat, the same width and with the same angles. The value of the sharpening angle is checked with a template, which is a plate with 70 angle cuts; 60; 45°.
It is prohibited to sharpen a tool on the machine without a tool rest and with the casing 3 open. When sharpening, the protective screen 2 must be lowered.
Sometimes the chisel is double sharpened, i.e. one edge is sharpened at an angle of 35°, and the second at an angle of 70°. With this sharpening you can chop soft and hard metal.
Hardening of chisels and crossbars made of U7A steel is carried out by heating to 780-800 ° C and cooling in water or oil; followed by tempering at a temperature of 160-180°C.
Locksmith's hammers . A hammer is a striking tool for striking during chopping, straightening, bending and other metalworking operations.
Bench hammers are manufactured (GOST 2310-54) of two types: type A - with a square striker (Fig. 92, a) and type B - with a round striker (Fig. 92, b).
Rice. 92. Hammers: a - with a square striker, b - with a round striker, c - with soft metal inserts, d - wooden (knyanka), d - wedging of hammer handles; 1 - striking part (striker), 2 - wedge. 3 - toe, 4 - handle
The main characteristic of a hammer is its weight. Type A hammers are made weighing 200; 400; 500; 600; 800 and 1000 g, and type B hammers weigh 50; 100; 200; 500; 600; 800 and 1000 g.
With inaccurate blows, a square-faced hammer leaves dents on the surface of the material being processed, but their manufacture is simpler than hammers with a round head.
Hammers are made from steel grades 50 and 40X and tool carbon steel grades U7 and U8. In the middle part of the hammer there is an oval-shaped hole that serves to attach the handle.
The working parts of the hammer - a square or round head and a wedge-shaped toe - are thermally treated to a hardness of HRC 49-56.
Square hammers 50; 100; 200 g are used for marking and instrumental work, 400 and 500 g - for plumbing work and 600; 800; 1000 g - for repair work. For heavy work, hammers weighing from 4 to 16 kg, called sledgehammers, are used.
Hammer handles in accordance with GOST 2309-54 are made from the hardest and most resilient types of wood (birch, beech, dogwood, rowan, oak, maple, hornbeam, etc.). The handles should be free of knots and cracks, and the surface of the handle should be smooth, without bumps or irregularities.
The handle has an oval cross-section, the ratio of small to large section is 1: 1.5, i.e. the free end is 1.5 times thicker than the end on which the hammer is mounted.
Depending on the weight of the hammer, the following handle lengths are recommended:
- for light hammers up to 400 g: 200; 250; 300 mm.
- for medium hammers 500-600 g; 320; 360 mm.
- for heavy hammers 800-1000 g; 360; 400; 500 mm.
The end on which the hammer is mounted is wedged with a wooden wedge coated with wood glue, or with a metal wedge on which notches (ruffs) are made. The thickness of the wedges is 2-6 mm. If the hammer hole has only a lateral expansion, one longitudinal wedge is driven in, but if the expansion goes along the hole, then two wedges are driven in (Fig. 92, e) and, finally, if the hole expansion is directed in all directions, three steel or three wooden wedges are driven in , placing two parallel and the third perpendicular to them. A hammer whose handle forms a right angle with the axis of the hammer is considered to be correctly mounted.
To mainCHAPTER III
WORKSHOP
Metal chopping has the goal of separating pieces of the required size from large sheets or strips or removing some of the excess part from the surface of the metal. When chopping, clamp the workpiece tightly in a vice and, holding the chisel with your left hand, strike its head with a hammer with your right hand so that the chisel blade cuts into the metal (Fig. 7).
The following tools are used for chopping: 1) chisel, 2) crossmeisel, 3) hammer.
CHISEL AND KREUTZMEISSEL
A mechanic's chisel is made from a special type of carbon steel called “chisel”, which is distinguished by its toughness and stability with sufficient strength. The length of the chisel is determined by the width of the worker’s palm; it is mostly about 200 mm. For greater stability in the operator's hand, the steel has an oval cross-section. The chisel has one flat end, up to 25 mm wide, called the “blade,” and the other in the form of a truncated cone with a flat head, called the “pube.” The reduced area of the pubis gives it greater stability and directs the hammer blows more centrally.
The cutting part of the chisel is sharpened depending on the hardness of the metal: the harder the metal, the greater the sharpening angle. The accepted sharpening angles are: for cutting cast iron - 75°, iron - 60°, copper - 45°. The edges of the chisel have an inclination of about 10° and the distance between them in the lower part is about 2-3 mm. A correctly chosen sharpening angle affects the speed and quality of work: a dull one makes it difficult to move the chisel, and a too sharp one speeds up chipping of the blade; The correct sharpening is checked with a template (Fig. 8). The Kreutzmeisel is similar to a chisel; It differs from it in that the blade is made narrower (approximately 6 - 10 mm); sharpening angles are the same. The chisel is used for cutting off planes, the crossmeisel is used for cutting grooves and for cutting sheet iron. The process of making a chisel and a crosspiece consists of cutting or sawing off a piece of about 200 mm long from a strip of steel, heating it to red heat and drawing the blade on an anvil, and then proceeding to harden the blade to increase its hardness. Hardening consists of heating the blade a second time to a light cherry or red color (the steel should never be overheated), then quickly cooling it by immersing the chisel vertically in water at room temperature. The chisel is given a slow rotational movement around the axis at different depths to come into contact with different layers of water, which prevents the chisel from overheating and the appearance of cracks on its surface. If you take the chisel to work immediately after hardening, it will break or quickly crumble. To avoid this, after hardening they resort to tempering, which slightly reduces the hardness, but significantly increases durability and elasticity. Tempering consists of not allowing the blade to complete cooling, and quickly removing it from the water, clean the hardened part until it shines on dry ground or brick, observing the discolored colors on the blade. At the moment a purple or dark blue discoloration appears, the chisel is quickly lowered into water for final cooling.
The chisel's pubis and shaft are not hardened. To heat steel, ordinary charcoal is used; They do not use stone, because due to the sulfur it contains, it has a very harmful effect on steel: the chisel becomes brittle and brittle. In cases of repairing a damaged cutting part of a chisel or crosspiece, they must first be released, i.e., annealed. To do this, the cutting part is placed in a furnace and, having been heated to a dark red color, is left to cool slowly in the ash, turning off the fan blowing. After annealing, the blade is again forged and hardened. Sharpening of the chisel is carried out using an emery or sand sharpener while constantly wetting the latter with water to eliminate the harmful effects of sand and metal dust on the respiratory organs of the worker. When sharpening, you should hold the chisel slightly inclined, gradually moving it from one edge of the sharpener to another and back; After sharpening the chamfer, the chisels must be the same width and have the required sharpening angle. Grinding wheels are equipped with safety casings made of iron in case of stone rupture, as well as a glass shield against flying sparks and dust (Fig. 9).
HAMMERS
The hammer is made of carbon steel. Both ends are hardened and polished. The middle part is not hardened and remains frozen. The front part is called the “strike”, the narrower rear part is called the “tail”, and the middle part is called the “eye”. Hammers come in shape with square or round heads. The latter, thanks to the widened middle part, have a stronger attachment to the handle. For metalworking work, hammers weighing from 0.25 to 0.8 kg are usually used, the most common ones weighing 0.5 kg. When making products from thin iron, a light hammer, called a “roofing hammer,” or a wooden one, called a “mall”, is used (Fig. 10).
The mallet is made of strong wood (birch, beech) of a quadrangular shape measuring 130 X 130 X 45 mm. It does not break the iron and does not leave impact marks on it, and the large striker area speeds up the work process. The handle of a plumber's hammer is made of hardwood (rowan, oak, maple) without knots or cracks, and has a smooth surface. The shape of the handle is oval (for greater stability in the operator’s hand). The length of the handle is taken depending on the weight of the hammer: the heavier the hammer, the longer the handle should be. The hammer is placed on the handle at a right angle (Fig. 11) and secured to it by wedging using steel wedges 2 - 3 mm thick (Fig. 12). If over time the nozzle becomes weaker, then add additional wedges or change the handle. Please remember that a hammer with a loose handle is dangerous.
The head of the hammer and the head of the chisel must be flat, clean and free of burrs, so that the hammer does not slip upon impact, and the burrs do not cause injury to the hand. To eliminate a blow to the hand, instead of a chisel (especially during the apprenticeship period), a rubber guard in the form of a ring with a diameter of 76 - 80 mm and a thickness of 6 - 8 mm is put on the left hand.
CUTTING TECHNIQUES
Chiseling takes place in a durable chair vice. While chopping, hold the chisel with your left hand by the middle in the girth, and with your right hand hold the hammer closer to the end of the handle. The legs should be apart, and the stronger the blow, the more stable the position of the body should be and the wider the legs should be. The hammer movement should be made exclusively with the hand, with the elbow and shoulder bending slightly. In addition to the correct positioning of the body, legs and grip of the instrument, accuracy and impact force are of great importance. The accuracy of the blow is that the center of the striker always accurately hits the chisel's pubis, and you need to look not at the hammer, but at the blade of the chisel. Having acquired such a skill, the worker develops confidence in his movements and operates the hammer automatically. The force of the blow depends on the swing, the speed of movement of the hammer when lowering it, the weight of the hammer and the physical strength of the worker. To increase the impact force, it is recommended to hold the hammer by the end of the handle (Fig. 13).
At first you need to work slowly, trying to acquire sufficient accuracy, and then speed up the pace of work, reaching the normal 60 beats per minute. Chopping should not be done with a continuous feed, but by taking breaks after 2-3 blows: in this case, the hand gets less tired and the work turns out cleaner. When chopping, give the chisel an inclination of 25-30°; otherwise - if the position is steep - the chisel will crash into the product, and if it is too inclined, it will jump off the intended line (Fig. 14). Incorrect position of the chisel results in an uneven surface. You need to chop towards the stationary jaw of the vice, somewhat obliquely. When chopping heavy products in a vice, a wooden lining is placed under them, resting on the vice nut.
Chopping cast iron products must be done from the edges to the middle, since otherwise, with a strong blow, the edges of the products can be broken off. When cutting off wide planes, initially a series of grooves are cut with a cross-section, and then the spaces between them are cut off using a chisel (Fig. 15).
Narrow surfaces such as keyways are cut out with a crossmeisel, the width of which is taken to be less than the groove. Thick layers of metal are cut down several times. A margin of about 1 mm is left for finishing chips. When chopping cleanly, you need to apply less strong blows than with rough chopping. Felling is assessed by the cleanliness of the resulting surface and the volume of chips removed per unit of time. Iron is cut approximately twice as hard as cast iron, so the depth of the chips for iron is taken to be half as deep. The thickness of the chips is taken from 1 to 2 mm and no more than 3 mm, and cutting off a 2 mm layer of metal at once takes more time than removing two layers of 1 mm each. To protect against rebounding metal chips (especially when cutting cast iron), safety glasses with white lenses should be used. Sheet iron is cut depending on its size in a vice, on a workbench or on the floor. In a vice, small pieces or strips are cut off in the form of a strip, while the iron is clamped in a vice along the cutting line (Fig. 16 a).
When cutting sheet iron, a forge chisel and a heavier hammer are used. The iron is placed along the cutting line on a rail or I-beam, and the chisel is placed vertically along the cutting line and the chisel is struck with a hammer. Thick sheets are scored on both sides, and then the spaces between them are separated (Fig. 16). To maintain the edge of the chisel when cutting iron, it is occasionally lubricated with machine oil during operation. To do this, place a rag soaked in oil in a metal box and touch it with the tip of a chisel. Cast iron is cut dry.
QUESTIONS FOR SELF-CONTROL
1. How should you hold the hammer and chisel while working? 2. Flat chisel and crosspiece. Their shape and size. 3. Chisel sharpening angles for copper, cast iron and iron. 4. Advantages of a correctly chosen sharpening angle. 5. What is hardening and tempering and how are they done? 6. Techniques for sharpening chisels. 7. Which parts of the chisel are hardened and why? 8. Bench hammers, their shape and attachment to the handle? 9. Why is a “mallet” used instead of a plumber’s hammer when doing roofing and tin work? 10. Which hammers and chisels are dangerous to work with? 11. How should the chisel be installed and how should the blows be struck when chopping? 12. When cutting which metals and why is chisel lubricant used? 13. How should you hold the hammer handle when chopping and why? 14. Why and what kind of gaskets are used when clamping products in a vice? 15. What determines the force of impact? 16. At what angle should the chisel be held to the surface being processed? 17. What techniques are used for cutting wide and thick planes? 18. How is sheet iron cut? 19. What safety measures are taken when cutting?
Previous page
| table of contents | Next page |
Chisel. Types and work. Application and sharpening. Peculiarities
A chisel is a percussion-cutting tool designed for chopping or chipping metal and stone. It is a steel rod with double-sided sharpening and a flat butt designed for striking with a hammer. The design of the chisel can position it as a hand tool or as an attachment for mounting in a hammer drill. The cross-section of the rod can be in the shape of a circle, rectangle, oval or polyhedron. To reduce the risk of injury, an expanding mushroom made of rubber or other metal can be installed on the striking part of the tool, providing a more comfortable hammer hit and dampening recoil.
Scope of application
The tool is designed for mechanical impact with destructive force. The scope of its use is quite extensive, but in most cases it is limited to:
- By chipping stones.
- Metal chopping.
- Knocking down ceramic tiles.
- By beating off the rivet heads.
- Unscrewing bolts and nuts with torn edges.
To work, you need to lean the sharp part of the chisel against the surface that needs to be knocked off, chipped or cut, and then apply a strong blow to the butt of the tool with a hammer. If it is necessary to unscrew a bolt or nut with torn edges, then the sharp edge is leaned at an angle, after which several light taps are applied to obtain a notch. After a groove is formed on the surface of the metal, several powerful blows are made to the butt of the chisel. In this case, the direction of the push force must correspond to the movement of the thread for unwinding. After using a chisel, the nut or bolt becomes completely unusable.
Types of chisels and their purpose
Despite the fact that the tool has a simple design, there are several varieties designed to perform specific tasks.
The following types of chisels exist:
- Metalworking.
- Kreuzmeisel.
- Ditcher.
- Pike.
- Kuznechnoye.
- Boaster.
The bench chisel is designed for cutting unhardened metals. It is quite sharp and can be used both for marking sheet material and for unscrewing bolted joints, knocking down rivets and other impromptu tasks. The cutting tip of the tool is slightly wider than the rod. The two-sided slopes gradually taper. Sometimes you can find a microchamfer on a chisel.
The Kreutzmeisel is a fairly recognizable tool with a narrowed cutting edge, which allows cutting out grooves and various grooves. Such a tool is more highly specialized than a metalworking tool, and therefore is not found as often. However, they can be completely used when knocking down ceramic tiles or rivet heads if there is no more suitable tool at hand.
A groover is an even more narrowly targeted tool designed for cutting out shaped channels. It is usually used when it is necessary to manually cut cylinder head gaskets from rigid sheet material, as well as other specific tasks when it is impossible to get by with another tool. The shape of the cutting edge can be wavy, semicircular, oval and U-shaped.
The pike is almost an ordinary chisel, the tail part of which is narrowed. In its design, instead of a striking cap, the rod is ground to a smaller diameter, which allows it to be fastened into the clamping chuck of a hammer drill. The shape of the cutting edge can be point, narrow or wide, like a chisel.
A forging chisel can have a wide variety of cutting part shapes. Its main difference is the presence of a special groove in the tail section for the possibility of attachment to a wooden or metal handle. When assembled, it looks a bit like a sharp hammer. The tool is used for chopping or punching holes in red-hot metal. The presence of an elongated side handle allows you to protect the blacksmith’s hands from heat and flying sparks. There are also tools whose handles are welded using electric welding.
A scarpel is a sharper tool designed for working with stone. Often its working part resembles a spatula. The tool is designed for smooth processing of stone and in most cases is used by sculptors. Typically, a wide rubber mushroom is provided in the striking part of the tool, which is not only designed to protect the hand holding the rod, but also to block the scattering of small pebbles.
How to distinguish a chisel for metal from a tool for stone
Individual designs of tools for different purposes can be very similar, so it can be difficult to figure out which one is intended for metal and which for stone. If the cutting edge is very wide in the shape of a spatula, then this is undoubtedly a tool for working with stone. Tools for metal are always solid cast from one material. It undergoes special hardening, as a result of which the cutting edge is harder than the rod at the shank, which is struck with a hammer. This prevents cracking in case of strong impact. Most stone chisels have carbide tips instead of a cutting edge, which can be easily seen. They provide easier chipping, but are completely unsuitable for metal where chopping is needed.
Tool sharpening
The sharpening angle of the chisel is usually 35, 45, 60 and 70 degrees, depending on its purpose. In most cases, the cutting edge of the tool does not have a microbevel, so it is not razor sharp. To prevent the blade from chipping, it is always slightly dull, but such precaution still cannot completely protect the tool from complete loss of cutting properties. Over time, the cutting edge may deteriorate greatly and will require sharpening. This can be done using sandpaper.
Before starting work, you should prepare a small container with clean water into which you will need to dip the heated tool to prevent softening of its factory hardening. Sharpening of the tool is carried out along the end part of the emery wheel. The chisel blade is set against the direction of rotation of the emery machine. As a result, sparks should go to the floor. Turning the striking part away from you is not allowed. Depending on the power of the emery, as well as the ambient temperature, cooling the tool in water should be carried out at intervals of 30 seconds to 1 minute. If you overexpose the edge, it will heat up excessively and lose its hardness, after which it will not be able to cut hard metals.
DIY spring chisel
Hello to all DIY lovers. In this article I will tell you how to make a chisel from a spring with your own hands. This tool is useful for those who often work with metal; it can be used to chop metal parts such as rods, sheets, and so on. Assembling the tool does not require any special skills or materials, so every beginner can handle its production.
Before reading the article, I suggest watching a video that shows in detail the entire assembly process, as well as a short test of the finished tool.
In order to make a chisel from a spring with your own hands, you will need:
* Spring from Kraz * Leg from an old broken chair * Angle grinder * Cutting, grinding disc for angle grinder * Metal drill with a diameter of 4.5 mm * Drilling machine * Bench vice * Core * Felt circle for a drilling machine * GOI paste * Pencil, ruler * Phillips screwdriver * Safety glasses, gloves, respirator * Two M4 screws with nuts * Sharpening machine with stone * Clamps * Jigsaw
Step one.
The first step is to process the Kraz spring.
We mark a pre-cut section of a spring 200 mm long so that we get two identical parts 50 mm wide.
It is most convenient to make marks with a sharp metal object, such as a core.
Next, we clamp the marked workpiece on the workbench using two clamps and begin sawing it into two parts. To do this, take an angle grinder with a cutting disc installed; you will have to cut quite a lot, so be patient. Be careful when operating an angle grinder and use safety glasses and gloves for safety.
Step two.
Then we take one of the 50 mm wide sections from the spring and mark it using a core as shown in the photo.
Next, using an angle grinder, we cut out the excess parts according to the markings, while firmly fixing the workpiece on the workbench with clamps. After one side is ready, turn the part over and do the same. The result should be a spring blank like this.
Step three.
Now you need to make a handle for the tool from a leg from a broken chair.
We secure the chair leg with clamps to the workbench and, using a jigsaw, saw it crosswise into two parts of equal thickness.
When working with a jigsaw, be careful and also use personal protective equipment, gloves, safety glasses and a respirator.
Next, we saw off two wooden blanks along the length of the handle on the metal part.
In the resulting parts, we drill holes with a diameter of 4.5 mm on a drilling machine; when drilling metal, we add a little technical oil to the cutting edge of the drill, so the cutting tool will last longer and will not jam.
We also make two holes of the same diameter in wooden blanks.
Step four.
We assemble all the parts together, secure the two wooden parts with two M4 screws and nuts.
We give the handle its final shape on a sharpening machine, rounding off sharp corners and removing burrs.
When working on a sharpening machine, the workpiece must be firmly fixed, and safety glasses, a respirator and gloves must be used.
Next, unscrew the screws with a Phillips screwdriver and proceed to processing the metal part.
We fix the spring part in a bench vice and begin to grind the sharp edges and remove irregularities using an angle grinder and a grinding disc.
We remove two chamfers from the end of the plate on a sharpening machine.
In the end it should look something like this.
Then we remove traces of rust and minor defects from the part using an angle grinder and a flap disc.
We polish the part on a drilling machine, installing a felt circle in its chuck, onto which you need to apply a little GOI paste in advance.
The result was an excellent tool called a chisel.
And since the tool is completely ready, it can be tested. To do this, take a metal wire with a diameter of 6 mm and an anvil, place the hammer on the wire and cut the wire with a hammer on its upper part.
This handmade tool coped with the test perfectly, and its tip remained just as sharp and without visible damage.
Therefore, if you often deal with metal and cutting it, then such a chisel will definitely come in handy, and the experience gained in the process of its manufacture will only be beneficial.
That's all for me, thank you all for your attention and creative success. Source
Become the author of the site, publish your own articles, descriptions of homemade products and pay for the text. Read more here.
The sharpening angle of the working part of chisels for steel, cast iron and non-ferrous metals.
This tool is a metal rod, one end of which (the striker) has the shape of a truncated cone with a semicircular base, and the other (the blade) has the shape of a wedge. Both ends are quenched and tempered. The chisel is used for metal processing. Its length is approximately 100–200 mm, blade width is 5–52 mm. The blade of the tool must be well sharpened, since the force of the impact depends on this (the sharper the blade, the less force is applied during impact).
The sharpening angle of the chisel blade is different. A blade with an obtuse sharpening angle works with hard metals. It should be taken into account that medium-hard steel is processed with a blade with a sharpening angle of at least 60°; cast iron, bronze, hard steel – 70°.
A smaller sharpening angle for the chisel blade is required when working with soft metals, such as copper and brass. The sharpening angle of the blade should be approximately 45°. Zinc and aluminum are processed with a chisel, the sharpening angle of which is 35°. The tool blade is sharpened on a sharpening machine. The grit size of the electrocorundum wheels should be 40, 50 or 63.
To control the sharpening angle of the chisel, a special template is used, which is a metal block on which 4 grooves with angles of different sizes are cut.
The main types and causes of defects during bending.
When studying various bending techniques, the reasons for the possible appearance of defects in forgings were considered. The main defects that arise during the bending process include: sink marks at the bend, cracks, folds, inaccuracies in size and shape.
The formation of tension, discussed in detail earlier, leads not only to distortion of the forging shape, but also to a decrease in the strength of the part. The sinkhole is eliminated both by preliminary collection of metal at the bend site and by planting the workpiece during the bending process.
The appearance of cracks on the outer surface of the workpiece at the bending site is most often possible if metal with low ductility is bent, i.e. in a cold or frozen state. Bending, for example, duralumin blanks in a cold state is accompanied not only by the formation of cracks, but also by the complete destruction of the metal. High demands on the bending mode are imposed when processing high-carbon and alloy steels and other alloys. The choice of a rational bending mode consists in the correct choice of processing temperature, bending scheme, optimal minimum bending radius, sequence of transitions, etc.
When bending workpieces at large angles, it is necessary that folds do not form on the inside of the forging corner, since they are stress concentrators and reduce the strength of the part.
A defect in the form of dimensional inaccuracy appears most often when the length (volume) of the original workpiece is inaccurately determined. If an error is made during the calculation, the forging turns out to be either longer than required or shorter.
Shape inaccuracy is a consequence of incorrectly selected bending transitions, poor preparation of the initial workpiece, incorrect selection of the necessary tool or bending method, as well as insufficient experience of the blacksmith.
Cutting. Purpose and types of cutting. The device of manual and lever scissors for cutting sheet metal, hand saws. Methods of cutting metal with a hacksaw, scissors. Drive shears; lever, eccentric, roller, vibration, their scope, device and principle of operation.
Cutting is the operation of dividing a material (object) into two separate parts using hand scissors, a chisel or special mechanical shears. Sawing is the operation of separating a material (object) using a manual or mechanical hacksaw or circular saw.
Purpose and types of cutting.
The quality of metal products in various sectors of the economy (industrial production, construction, light industry, etc.) directly affects the degree of safety of the final use of the product (construction fasteners, hangar ceiling, metal door, pipeline). Thus, the task of ensuring high quality metal structures is key, one solution to which is reliable production equipment. Guillotines and other metal cutting machines are designed for cutting or chopping sheet metal, as well as metal blanks. Currently, such equipment is used in various areas of industrial activity of enterprises. The machines have become widespread due to their high efficiency, which helps optimize the production process, improves the quality of products and minimizes costs.
In accordance with the various needs of processes and production purposes, the following types of equipment are distinguished, presented in the catalog of our company: laser and plasma cutting machines, guillotines, shear presses, coordinate punching presses. Modern production plants allow cutting metal with the high precision required by the client.
The main characteristic of any equipment for cutting metal is the accuracy of the operations.
There are several classes of equipment for metal cutting:
– A – especially high precision equipment;
– B – high-precision equipment;
– C – conventional machines for cutting metal;
– P – machines for cutting with increased precision;
– N – machines of normal accuracy.
The most basic cutting equipment is used in metal transportation, while laser cutting machines are used in the production of non-standard parts. Guillotine equipment and various presses are used for cutting pipes of various diameters and rolled metal, thereby ensuring their high-quality cutting (no burrs, sagging, or crushing of edges). Thus, depending on the needs and tasks of the production cycle, there are different types of metal cutting machines depending on the purpose.
Mechanical retention of earth masses: Mechanical retention of earth masses on a slope is provided by buttress structures of various designs.
Transverse profiles of embankments and coastal strips: In urban areas, bank protection is designed taking into account technical and economic requirements, but special importance is given to aesthetic ones.
Features of chisel warranty repair
Warranty repairs are carried out during the period of warranty service obligation and last, as a rule, for one year. In case of a malfunction that occurs during this period, you must contact the seller of the chisel or the seller’s authorized service center.
Warranty cases for chisel repair
The main criterion for warranty service is the nature of the product failure. The coverage includes breakdowns that occurred due to the fault of the product manufacturer, or a detected manufacturing defect.
Warranty repair conditions exclude the following actions with the product:
- operating conditions were violated, for example, the chisel was left in the hot sun, or immersed under water for models not suitable for this;
- the chisel was subjected to external mechanical influences: impacts, strong pressure or simply falling;
- the product was independently disassembled - if you, having discovered a breakdown, decided to independently figure out the reasons and eliminate them, disassembled the item or replaced any of its spare parts (one removed part may become a refusal to accept the product under warranty);
- untidy appearance of the product - if the product has chips, numerous scratches and other damage - this may also affect the decision to provide warranty service.
How to properly return a chisel for warranty repairs
When contacting the service center or directly to the seller, you must:
Accept claims and get free legal advice today! Call:
- Moscow
- St. Petersburg +7 812 309-16-31
- Hotline in the Russian Federation 8 800 511-69-34 (free)
return money
We recommend solving the problem now - a correct and justified claim is the key to success!
- fill out an application;
- provide a receipt for the purchase (if available);
- provide a warranty card filled out by the seller,
- provide original packaging.
Many sellers also require “native” accessories: charger, cable, etc.
When transferring the goods to the service center, the center specialist can evaluate the quality of the chisel, which will reflect the appearance of the goods and the possibility of acceptance under warranty. The owner of the chisel should insist on personal presence during the quality assessment, without losing sight of the product.
It is mandatory to document the transfer of the chisel, namely filling out a warranty repair coupon, which must contain the following items:
- name of the repair service;
- model and characteristics of the item being transferred;
- date of transfer of goods;
- period of repair work;
- seal and signature of the performer.
A sample of a simple warranty card for chisel repair can be seen below.
Chisel warranty repair rules
The main guidance for the consumer of services, including this type, is the Law “On the Protection of Consumer Rights”. The main rule here is that the service is provided free of charge, and possible demands from the service for additional payment for diagnostics are not justified.
How long does the warranty repair of a chisel last?
How many days can you expect when submitting a chisel for warranty repair? Art. 20 of the Law “On Protection of Consumer Rights” regulates the following terms:
- if the period for eliminating defects in the goods is not determined in writing by agreement of the parties, these defects must be eliminated immediately, that is, within the minimum objective period;
- the period for eliminating defects in the goods, determined in writing by agreement of the parties, cannot exceed forty-five days.
Important!
The absence of parts to be replaced by law cannot be a reason for extending the deadline, and does not relieve the contractor from sanctions for delay.
If 45 days of warranty repair of the chisel have passed, and the goods are not returned for any reason, you should refer to Art. 23 of the Law “On the Protection of Consumer Rights” and remind the service employee that each day of delay will cost the center 1% of the cost of the chisel in the form of a penalty (penalty).
The question often arises whether the chisel warranty is extended after warranty repairs. The obligation is extended for the entire period of time during which the chisel was submitted for warranty repair to a service center and the consumer did not have the opportunity to use it.
You can almost always return an item!
The main thing is to know the procedure and use the law correctly. Get information for free from lawyers via chat (bottom right ↘️) or via this link. return the goods
Consumer rights during warranty repairs
Important!
The service center is not qualified to conduct an examination; it can only assess the quality of the goods provided. The examination is carried out by an authorized person (expert) at the request of the parties. If the examination establishes that the breakage of the chisel was due to the fault of the consumer, the latter will have to pay for the expert work.
If a product is found to be defective, you have the following rights:
- actually exercise the right to free repairs during warranty service;
- require an examination of the malfunction;
- be personally present during the examination and quality control of the device;
- wait no more than 45 days for repairs;
- in case of repairs lasting more than 45 days, demand the accrual of a penalty (penalty);
- demand immediate execution of work;
- extend the contract for the provision of repair work if the period of 45 days is exceeded;
- require replacement of the chisel during repairs.
Important!
If the contractor has not fulfilled his obligations within the established period, then the next day you can demand that the repaired product be returned immediately. in case of refusal, a written claim should be sent to the contractor, calculating the amount of the penalty (penalty) for late execution.
Providing a similar chisel during warranty repairs
in Art. 20 of the Law “On Protection of Consumer Rights” contains the obligation of the contractor to issue the applicant with another product during the warranty repair:
“in relation to durable goods, the manufacturer, seller or authorized organization or authorized individual entrepreneur is obliged, upon presentation by the consumer of the specified requirement, within three days, to provide the consumer free of charge for the period of repair with the same basic consumer properties, ensuring delivery at his own expense.
The list of durable goods to which this requirement does not apply is established by the Government of the Russian Federation.”
Important!
Fortunately, the chisel is not included in the list specified in the article, i.e. During the warranty repair, it must be replaced from a special fund with similar characteristics and functions at the written request of the consumer.
Return of a chisel after warranty repair
Based on the results of the work, the contractor draws up a work completion certificate, which describes:
- nature of the breakdown;
- troubleshooting methods;
- replacement of parts;
- the result of the work performed;
- date and signature of the performer.
An act of acceptance and transfer of the thing is also drawn up. The consumer should, in the presence of a service representative, verify that the chisel is in good working order and familiarize itself with the results of the work done.
Reasons for refusal of warranty repair of chisels
The service center may refuse to service the product under warranty for the reasons listed in the “warranty cases” section. What to do if the item is not accepted or is stamped “refused”?
Accept claims and get free legal advice today! Call:
- Moscow
- St. Petersburg +7 812 309-16-31
- Hotline in the Russian Federation 8 800 511-69-34 (free)
return money
We recommend solving the problem now - a correct and justified claim is the key to success!
If you see no reason for the refusal, did not violate the operating rules and did not try to repair the product yourself, then you have the right to make a written claim directly to the seller or service center for refusing warranty repair of the chisel, or directly file a complaint with Rospotrebnadzor in your region, where they will help file a claim and conduct an inspection. If the seller refuses the claim received, you should go to court.
What to do if the warranty repair turned out to be of poor quality and the chisel does not work again
If the chisel breaks again after the warranty repair, then we can conclude that the work was done poorly. According to the Law “On the Protection of Consumer Rights”, warranty repair of goods is a service, that is, on the basis of Art. 29 of the law, you have the right to demand the following at your choice:
- free elimination of work defects;
- repeat performance of the service;
- reimbursement of expenses for troubleshooting on your own or by other specialists;
- refusal to fulfill the contract.
The above rights can be exercised during the execution of the work or as a result of it:
- if the product warranty is 1 year (typical for most products), then repair claims can be made during this period;
- If the warranty period has expired and defects in the work are identified, claims must be made within two years. However, the consumer must prove that the breakdown was caused by the fault of the contractor.
how to get money back for a chisel after warranty repair
Such a product does not belong to technically complex products and a refund for it is possible if there is any defect that arises after repair.
Claims to the seller and contractor
A claim for poor quality repair services, violation of its deadlines, return of goods must be made in writing and sent to the service center outlining your stated requirements.
It is necessary to draw up a claim in two copies, and on your own copy, obtain a note from the service representative about acceptance of the claim for consideration, indicating the date and signature (seal).
Important!
When filing a claim, indicate one of the listed requirements, for example, Refund of money for a faulty chisel or replacement of it with a product of proper quality. The presence of several points in a claim may be a reason for refusal.
Refunds must be made within 10 days from the date of application | Art. 22 PDO.
Where to complain about poor-quality chisel repairs
A complaint about poor-quality service provided, as well as a lack of response to the complaint, must be sent to Rospotrebnadzor. If these measures do not lead to the desired result, you should go to court with a claim for poor-quality repair of the chisel.
You can almost always return an item!
The main thing is to know the procedure and use the law correctly. Get information for free from lawyers via chat (bottom right ↘️) or via this link. return the goods
Important!
In the statement of claim, in addition to the main requirement, calculation of the payment of a penalty (penalty) and reimbursement of legal expenses, compensation for moral damage due to the violation of the contractor’s own obligations is possible.
A sample claim for poor quality repairs can be found below.
Judicial practice in relation to cases regarding poor-quality chisel repairs shows that establishing the causes of a malfunction with the involvement of an independent expert is the main factor in the court’s decision-making. If you did not violate the rules for using the chisel, and this circumstance is confirmed by an expert, the decision in favor of the plaintiff is beyond doubt.
Chisels for metalworking, forging and cutting
Home page » For blacksmiths » Chisels for metalworking, forging and cutting
Forging chisel PICARD. Photo ForgingPRO
A chisel (a cleaver with a handle) is one of the oldest tools for processing cold or hot metal . Scientific and technological progress has made very minor improvements to this tool, offering high-strength materials for use and formalizing the sharpening angles of the blade. However, the appearance and methods of working with a chisel have not changed for many centuries. This article provides complete information about blacksmith tools for chopping metal, types, the possibility of making it yourself or purchasing a factory-made cleaver.
Bench chisels
The blade and head of a bench chisel are hardened and tempered . The length is usually 10-20 cm, and the width of the blade is 5-5.2 mm. The sharpening angle of the blade depends on the metal for which this chisel will be used - the harder or more brittle the metal, the more obtuse the sharpening angle should be. Standard sharpening angles for cutting various metals are as follows:
- hard steel, bronze, cast iron – 70 degrees;
- medium hard steel – 60 degrees;
- copper, brass – 45 degrees;
- zinc, aluminum alloys – 35 degrees.
The tool is also widely used for more specialized tasks, such as cutting grooves and narrow grooves. This instrument is called a crossmeisel .
Blacksmith chisels
The main design difference between a blacksmith's chisel and a mechanic's chisel is the hole in its middle part for mounting on a wooden handle. The cutting part of a forging chisel is called a knife, its length is from 30 to 50 mm. The length of the entire tool for cutting cold metal is 16-19 cm, for cutting hot metal - 18-24 cm.
Cold cutting forge chisel
What types are there: intrinsically safe with a wooden handle and others, photo
There are several types of blacksmith chisels:
- Non-sparking tools are designed for use in potentially explosive areas. The head of such chisels is made of bronze alloys, which ensures antimagnetic properties and a high level of corrosion resistance, and the handle is made of wood.
Blacksmith chisel. Photo ForgingPRO
- Chisels with a thin blade are designed for chopping hot metal, while those with a thicker blade are designed for separating cold workpieces.
- The shape of the working part can be straight or round.
Sharpening chisels, angle
Sharpening is performed on a special sharpening machine. The chisel is placed on the tool rest and, pressing slightly, slowly moved along the entire width of the rotating abrasive wheel, alternately sharpening one or the other edge. In this case, the blade should be often immersed in cold water to prevent overheating of the metal, during which it loses the necessary hardness.
After sharpening is completed on the grinding wheel, the burrs are removed from the chisel, and then the cutting edge is threaded on the abrasive wheel.
Hot forging chisel with a sharpening angle of 70-80 degrees
The sharpening angle of the chisel knife for hot cutting is no more than 50 degrees, and for cold cutting - at least 60 degrees.
Finally, the correct sharpening angles of the blade are checked with a special template . As such a template, a metal block is used, in which grooves are cut. The angles in these grooves have the required values, therefore, by inserting a sharpened chisel blade into this groove, you can visually determine the correct sharpening.
Sharpening
Since the working part of the tool gradually becomes dull (the harder the metal, the faster it becomes dull), it must be periodically sharpened. Chisel sharpening can be done using a special machine with a diamond wheel.
It is important to position the working part of the tool opposite to the direction of movement of the circle. When sharpening, it is necessary to regularly cool the chisel in a container of cold water to prevent overheating. Cooling duration is more than 1 minute. When sharpening, it is important to change the processing sides of the working part of the tool in order to make identical descents on both sides.
During operation, it is important to consider the angle for the working part of the hand tool. The harder the metal workpiece, the larger it should be. The suitable chisel sharpening angle for hard metals is 70°. For soft alloys, such as aluminum - from 35° to 40°.
Aluminum (Photo: pixabay.com)
Requirements
The main requirement for a blacksmith chisel is its serviceability . Safety of using the tool includes several characteristics that the chisel and its individual parts must have:
- The strikers must have a smooth surface , without chips, cracks, burrs, or deformation.
- The handle, necessarily made of hardwood or synthetic materials, must have an oval shape with a thickening towards the free end and a smooth surface, without cracks. Metal handles are also used, which also do not fit tightly, and rope handles.
- The length of the chisel should not be less than 150 mm.
- When working with a chisel, individual parts of the metal may fly off to the sides, so it is necessary to wear safety glasses.
Safety precautions when working with the tool
To prevent injury, it is important to follow simple rules when working:
- Before using the tool, you must inspect it and make sure it is in good condition.
- During operation, chips, gouges, cracks and hardening, as well as curvature, are not allowed to appear on the tool.
- Periodic sharpening of the working part of the tool helps reduce the effort during operation and also increases its service life.
- When working with a chisel using sledgehammers, wedge holders should be used. The length of the handle of the wedge holders must be at least 70 cm.
- When working with hand tools, wear eye and hand protection.
Malfunctions
Among the most common breakdowns of a forging chisel are:
- break;
- dullness;
- the appearance of notches;
- deformation, curvature of the striker;
- cold hardening on the striker, which is fraught with chips and flying fragments.
Chisel striker broken
Malfunctions arise in the event of incorrect cutting, during prolonged use of the tool, or in the presence of manufacturing defects. Periodically (at least once a quarter) it is necessary to inspect the chisel for any damage to the striker or handle. Faulty tools that have defects must be removed from service.
Sample documents for chisel repair
Below you can find standard forms and document forms that are used in relations related to warranty and routine chisel repairs.
Sample warranty card for a chisel
Warranty card for chisel No.
Accept claims and get free legal advice today! Call:
- Moscow +7 499 350-84-27
- St. Petersburg +7 812 309-16-31
- Hotline in the Russian Federation 8 800 511-69-34 (free)
return money
We recommend solving the problem now - a correct and justified claim is the key to success!
| № | product | quantity | serial number | warranty period, months |
| 1 |
| date of issue of equipment: __. __.20__ | salesman: /____________________/ |
Warranty obligations:
1. The warranty period is calculated from the date of delivery of the goods to the buyer.
2. If the above-mentioned product fails through no fault of the buyer, during the warranty period, the supplier undertakes to repair or replace the defective product without additional payment.
3. Warranty repairs and maintenance are carried out within __________ days at the service center of the seller of the product, only upon presentation of this warranty card. The warranty period is extended for the duration of the repair.
4. The supplier disclaims warranty obligations in the following cases:
- in the presence of mechanical, chemical, thermal and other damage to the product - failure due to non-compliance with the rules for installing and operating the chisel. - opening, repair or modification of the product by unauthorized persons.
5. The warranty does not apply to consumables and other components that have a naturally limited service life
6. The seller is not responsible for the malfunction of unlicensed software and does not provide free advice on these issues.
You can almost always return an item!
The main thing is to know the procedure and use the law correctly. Get information for free from lawyers via chat (bottom right ↘️) or via this link. return the goods
7. When making claims regarding the operation of the Purchased Item caused by the incompetence of the buyer, the seller has the right to charge a consultation fee.
8. During the period of warranty repair of the chisel, similar serviceable equipment will not be issued.
9. Lost profits due to a malfunction and other indirect expenses are not subject to reimbursement.
10. The warranty does not cover damage caused to other equipment.
11. All shipping costs are at the buyer's expense and are not refundable.
buyer's representative: /____________ /____________ / _______________________/ (date) (signature) (decryption)
Accept claims and get free legal advice today! Call:
- Moscow
- St. Petersburg +7 812 309-16-31
- Hotline in the Russian Federation 8 800 511-69-34 (free)
return money
We recommend solving the problem now - a correct and justified claim is the key to success!
Sample claim for poor quality chisel repair
to the head of the organization: address: from _____________________________________ (full name of the Applicant)
address:
Claim for poor quality chisel repair
“___”____________ _______ I entered into an agreement with your organization for the repair of the following chisel:
brand, model):________________;
color: _________________.
confirmation of the conclusion of this agreement is receipt No. ________ dated “___”____________ ______.
You can almost always return an item!
The main thing is to know the procedure and use the law correctly. Get information for free from lawyers via chat (bottom right ↘️) or via this link. return the goods
in accordance with the terms of the agreement, I paid the cost of repair work in the amount of _________________ (_______________________) rubles.
your organization has undertaken to repair (indicate which parts the organization had to replace and which to repair).
however, at the time of receipt/after turning on the goods/under other circumstances ________________________________, I discovered that the repairs were performed poorly, namely (indicate the detected problems and other facts of non-fulfillment of obligations under the contract).
in accordance with Art. 4 of the Law of the Russian Federation “On the Protection of Consumer Rights”, the contractor is obliged to perform high-quality work under the contract.
in accordance with Art. 29 of the above law, when discovering deficiencies in the work performed, the consumer has the right, at his choice, to demand:
- free elimination of deficiencies in the work performed; a corresponding reduction in the price of the work performed;
- free re-performance of work;
- reimbursement of expenses incurred by him to eliminate deficiencies in the work performed on his own or by third parties.
based on the above and in accordance with Art. Art. 4, 29 of the Law of the Russian Federation “On the Protection of Consumer Rights” I demand:
(please specify one of the requirements)
within ________ days from the receipt of this claim.
Accept claims and get free legal advice today! Call:
- Moscow +7 499 350-84-27
- St. Petersburg +7 812 309-16-31
- Hotline in the Russian Federation 8 800 511-69-34 (free)
return money
We recommend solving the problem now - a correct and justified claim is the key to success!
If the claim is not satisfied voluntarily, I will be forced to seek protection of my rights in court. in this case, in addition to the requirement specified in this claim, I will file a claim for compensation for moral damage caused by the violation of my rights, in accordance with Art. 15 of the Law “On Protection of Consumer Rights”.
Please provide a response to the claim within ______ days from the date of receipt of this claim.
_______________________________/_______________/ (signature) (full name)
"___"_____________ _______ G.
Tools for hot metal forging
Blacksmith hammer-smoother. Photo ForgingPRO
Each master creates a set of necessary equipment independently, depending on the level of skills and assigned tasks. The blacksmith's kit includes a different list of tools: basic and auxiliary:
Using the listed tools, various operations for processing metal workpieces are performed: chopping, bending, giving the desired shape through deformation.
Hand tools for artistic forging have a simple design, so they are easy to make with your own hands.