close ×
A forge is equipment that allows you to heat metal to a temperature of 1200 degrees. Its dimensions vary widely. Some are large and stationary, others are small and portable.
You can make a forge with your own hands of any design, which will work on both solid and gaseous fuel.
Device and principle of operation
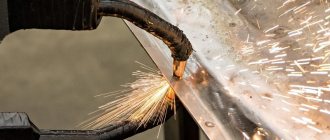
In order to understand how to make a forge with your own hands, you need to understand its design. Physical processes are based on the combination of carbon and oxygen. In other words, the process of carbon combustion occurs, releasing heat.
To prevent complete combustion of the metal, the amount of oxygen is not supplied in full. This is regulated by air blowing. You shouldn’t overcook the workpiece in the forge either. The metal will dry out and become hard but brittle. The classic example is cast iron.
A homemade forge for forging consists of the following parts:
- Table made of refractories.
- A firebox or hearth with a grate.
- Air chamber.
- Air drainage.
- Supply air duct.
- Air valve.
- Camera.
- Window through which workpieces are fed.
- Umbrella.
- Chimney.
- Crucible.
- Quenching bath.
- Gas-air chamber.
Figure 1: Drawing of a forge
For lining a table with your own hands, use refractory bricks.
The hearth is based on a form that includes a firebox, grate bars and an air chamber. With the help of air drainage, the blowing is adjusted. The chimney is designed to remove accumulated gases. A hardening chamber is not always necessary. It is required in the case of forging damask steel so that the product undergoes the necessary heat treatment. The crucible is the place where the maximum temperature is maintained. At home, it is made of fireclay bricks.
Gas
Making such a forge with your own hands is quite difficult, but possible. The homemade version, like the purchased one, traditionally has a camera and bellows. Operates on propane-butane. The gas is supplied to the mixing reducer, after which it goes to the gas burner. The latter in some cases may be located on the side. This format is quite often used in homemade versions used in forges.
You can make a gas furnace yourself to heat the ends of small-sized products. Can be used to create decorative solutions in artistic forging.
Fuel
The following can be used as fuel:
- Small coke. Pre-kindling is done with firewood, on which coal is placed. The ignition temperature of coke is up to 600 degrees, so it is placed last.
- Charcoal burns better because it has a microporous structure.
- Coal. When burned, it should reach the carbon stage. It burns worse than coke, so it is used for forging less critical products.
- Firewood. They are burned in the shell so that harmful impurities do not reach the metal.
- Working with waste oil.
Solid fuel forges
To figure out how to make a forge that runs on solid fuel, you need to study the instructions and decide on the type. A closed-type forge furnace is better suited for working on coal or wood. It is made at home from scrap materials. A charcoal forge does not require special equipment.
Necessary materials:
- Availability of refractory bricks.
- Injection burner.
- Hood.
Manufacturing procedure:
- At the preparatory stage, drawings for the forge are developed.
- A cube is being made from bricks. There remains a cavity with a hole inside.
- Using reinforcement, the frame is secured.
- A burner is installed in one of the side bricks.
- There is a hood on top, which creates safe working conditions.
Figure 2: Drawing of a forge using solid fuel
Making a forge for heating metal with your own hands makes it possible to adjust it to the necessary conditions. The material used must only be of high quality to ensure fire safety is maintained.
Classification of forges
Before making a forge, you need to familiarize yourself with their classification in order to select the most suitable design option. Classification is carried out according to the following criteria:
- by type of fuel used;
- by type of construction;
- according to hearth size.
Types of forges by type of fuel used
According to the type of fuel used, forges are divided into the following types:
- gas;
- solid fuel;
- on liquid fuel.
Solid fuel forge
Gas forges have the simplest design and are cheap to repair and maintain. They are characterized by minimal weight, which allows them to be made portable or compact.
Solid fuel furnaces are distinguished by the ability to obtain the highest possible heating temperatures, the relatively low cost of building materials for construction and ease of operation. For their kindling, it is permissible to use the following types of fuel:
- carbon or coke, characterized by high cost and increased efficiency (consumption is up to 5 times less than coal), it does not contain foreign impurities, ignites at temperatures above +450°C;
- Coal, the most common and efficient fuel, emits coke gas when burned, so when lighting it is necessary to wait until it has completely evaporated; it is suitable for forging various decorative elements or parts of medium quality;
- charcoal has a minimum ignition temperature compared to other types of fuel, but it burns out quickly and is characterized by increased consumption, so it is effectively used for kindling.
It is permissible to use diesel fuel, fuel oil or waste oil as liquid fuel. At the same time, it is important to pre-clean it, since the presence of impurities will cause an unstable flame and release of harmful compounds into the atmosphere.
This also makes it difficult to maintain equipment due to frequent blockages.
Classification by design features
A homemade forge can be classified according to its design features as follows:
- by installation method: portable or stationary;
- according to the design of the combustion chamber: closed or open type;
- according to the placement of the boost: with a side or central nozzle.
Types of forges by hearth size
There are different sizes of hearth forges: small, medium and large. They are determined by the operating efficiency of the installation and completely depend on the intensity of fuel consumption and operating modes of the fuel chamber. The optimal efficiency of fuel flow rate is from 1 to 1.5 m/s.
The productivity of the forge is directly proportional to the amount of tension and hearth area. In this case, the minimum tension is considered to be in the range from 100 to 150 kg/m 2 h. Values outside this range are not economically viable.
Gas horn
A DIY gas forge should be practical. Its walls are made of fireclay bricks.
The manufacturing procedure is as follows:
- Refractory bricks are being prepared.
- The walls of the forge are folded. The amount of material varies depending on the complexity and size of the case.
- Surfaces are processed using a hacksaw.
- All elements fit tightly. The presence of cracks is not allowed.
- A threshold is installed in the front part.
- A rectangular hole is cut at the back. It serves both for ventilation and for working with long workpieces.
- A hole of the appropriate diameter is cut out on the side for the gas burner.
- The gas burner is made of stainless steel. This is a pipe welded at one end and with a metal mesh at the other.
Such a forge has its advantages:
- The furnace is structurally simpler than a coal forge.
- Simple fuel supply and simple temperature adjustment.
- Light weight.
- Low cost.
There are other types of gas forges made of metal. There are no fundamental differences between them.
Figure 3: Burner drawing for a gas forge
How to build a forge yourself?
Independent production of decorative forged products will require a special room for forging and welding. Traditionally, this room is called a forge or blacksmith's workshop.
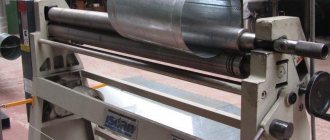
Placement of equipment in the forge: 1—emery machine; 2 - forging machine; 3. pipe bender; 4 — cabinets for tools; 6 — vice; 6 - workbench; 7 - fan; 8 - water tank; 9 - forge; 10 — hangers for tools; 11- table for tools; 12—anvil; 13 - boxes with coal.
Work in a forge involves working metal parts, usually while they are hot. Welding using an electric or gas machine also involves working with an open flame and metal heated to a high temperature.
This places special demands on setting up a forge at home.
How to build a blacksmith shop with your own hands?
It is best to build a forge from materials that are not susceptible to easy fire:
Layout of equipment in a rural forge.
- bricks;
- cinder block;
- asbestos cement sheets.
If the forge is forced to be located in a building with wooden walls, they must be plastered.
The floor in the forge is paved with brick, poured with concrete, or made from a mixture of clay and sand, wetting it and thoroughly compacting it. A garage, shed or utility room in the house is suitable for a locksmith workshop.
Cold forging machines can also be placed there, since this method of metal processing does not require the use of open fire.
The area of the room for forging decorative elements can be relatively small and dictated only by the convenience and freedom of movement of the blacksmith.
For the production of small-sized products, the optimal forge area can be considered 16 sq.m.
Tools in the forge: hammers, vices, tongs, sharpening.
Such a workshop makes it possible to place all the necessary equipment under one roof. Welding work should only be carried out outdoors.
When carrying out forging work indoors, it is necessary to ensure sufficient ventilation. A supply and exhaust type forced ventilation device would be ideal.
In this case, exhaust equipment is placed above the furnace. The ceiling height should not be less than 2.5 m.
A forge under a canopy does not require ventilation, but working in it in winter will be quite uncomfortable.
Internal arrangement of the forge, main fixtures
The specifics of a blacksmith’s work involve the placement of characteristic devices in the workshop:
Construction of a blacksmith's forge.
- blacksmith's forge;
- anvils and speraks;
- correct slab;
- bending plate;
- vice;
- hammers, handbrake, sledgehammer;
- tools for cutting, sharpening, drilling, chopping;
- locksmith's workbench.
In addition, it is imperative to equip the forge with a container of water to cool the forging, which will always be at hand, and a fuel box with a poker and scoop. Ensuring fire safety dictates the placement of a fire extinguisher in an accessible place.
The most necessary tools
Heating metal blanks to a high temperature before processing requires the presence of a forge in the workshop.
This is a type of open-type furnace, on the hearth of which high-temperature fuel is burned - charcoal or coal. The forge is usually located on the wall farthest from the entrance so that the blacksmith can have access to it from 3 sides.
This allows you to heat both long workpieces and small parts for the manufacture of decorative metal elements.
Anvil with a device for clamping workpieces.
For a small workshop or for making small parts, a portable forge is well suited, which can be made from sheet metal or from a cut-off gas cylinder.
Processing larger workpieces (parts of railings, fences, etc.) will require the installation of stationary equipment. Traditionally, such a furnace is made of brick: the base is laid out from brick or cinder block, leaving space in the center for an ash pan and air flow to the grates.
You can also weld the base from a steel corner by making an ash pan from sheet metal. For forced blasting in order to increase the combustion temperature of the fuel, a pipe is laid. You can use a vacuum cleaner to pump air.
A grate is installed on top of the ash pit, and the walls around it are laid out from refractory bricks, forming a furnace nest where the burning fuel is located.
The hot workpiece is processed on an anvil. For this purpose, you can adapt a piece of rail, one end of which is ground into the shape of a cone. If possible, it is better to purchase a professional anvil, but a piece of thick (2-3 cm) steel plate with a smooth surface is also suitable for making decorative parts.
You can install the anvil:
- on a wooden block (“chair”);
- on a monolithic concrete base;
- in a barrel of sand.
With any installation method, the height above the floor of the working surface of the anvil (platband) is determined individually and should approximately correspond to the level of the thumb on the hand of the blacksmith standing next to it.
https://moyakoa.ru/youtu.be/L100hBoKE5s
Accessories (bending and leveling plates, vices, clamps) are used to secure and process workpieces.
The bending plate has holes into which, if necessary, pieces of rod are inserted according to the pattern; between them, identical elements are bent in large numbers (curls, snails, etc.). On the right plate, long workpieces can be bent at right angles or straightened.
Shperaks are mini-anvils for small elements. In a vice, the ends of the part are clamped when twisting, bending, or some tools (shperaks, lowers) for processing workpieces.
Impact tools should be represented by a set of hammers and sledgehammers of various weights (4-16 kg) for striking when forging large products.
For final processing of the workpiece, handbrake tools weighing 800-2000 g with a handle length of about 35 cm are used. The handbrake is used to deliver precise blows and correct the shape of the product.
Hammers with shaped strikers are used for forgings of a special configuration. These hammers are usually purchased or made for a specific task.
Various power tools for metal working must have cables with a cross-section appropriate for the load.
https://moyakoa.ru/youtu.be/G9s3dT_pad0?list=PLalk8mNX9wXQ16qyhOcisNE7l7YAgrZKn
A mechanic's workbench is a table at a convenient height for the owner, on which you can install power tools, lay out blanks and finished parts, and perform cold operations on processing products: sharpening, grinding, cutting, etc.
All forge equipment must be placed taking into account the individual requirements of the master for ease of work and unhindered access to the main workplaces: forge, anvil, workbench. Making a forge at home is quite affordable, and working in it will bring pleasure and allow you to independently make various things from metal.
Waste oil furnace
Considering that petroleum products are expensive, it is beneficial to use a forge using waste oil. To make the forge during mining, parts that have served their useful life are used. After processing the furnaces, a significant drawback emerged - the spent mixture did not ignite well. To eliminate this problem, an additional compartment was built into the mining forge. Here the oil is preheated with coal or wood. To improve combustion, waste fuel passes through filters and diesel fuel or gasoline is added to it.
As a result, the mining forge has the advantages of a yellow flame and stable temperature.
You can make it yourself:
- It is made from fireclay bricks, dimensions: 85×48×40 cm.
- The vault is made in the form of an arch to maintain temperature.
- The body is completely covered with sheets of iron. A thickness of 1.5 mm is used on the sides, and the top and bottom are lined with 2 mm sheets.
- The supports are made from angles based on the weight of the structure.
Air is pumped into the chamber by a fan. A waste tank is installed on a hill. From it, the oil enters the chamber through a pipeline, where it is picked up by air, which moves under a pressure of 2 atm. The waste is broken up and fed into the nozzle.
To reduce the ignition time, a heating element is installed in the forge during testing. Ignition time may take up to 30 minutes. But the hot mixture burns well. Now you need to make sure that the fireclay does not melt.
Scheme of the furnace during development:
Self-production
Before making a forge, you need to decide on the type of device. Homemade forges can be of two types:
Closed. Its design is equipped with a special chamber in which the workpiece is heated to the required temperature
It should be noted that in closed-type forges you can work with workpieces whose size does not exceed the size of the chamber itself. Open. Fuel is poured onto the grate from its top part.
Air is supplied from the bottom. The workpiece is placed directly on the surface of the fuel to heat it. Thanks to this, you can use workpieces of quite large sizes.
Read also: How to make a chain-link mesh video
First you need to take a steel plate and drill holes in it. After this, it can be inserted into the central part of the table, which acts as the base of the forge.
In order to make a table, it is recommended to take a metal plate, the thickness of which ranges from 3-5 mm. The dimensions of the table should be taken into account: 700 mm is the height of the table. The tabletop measures 80 x 100 cm.
It is possible that a frame is being welded from the corner into which the grate and refractory bricks are placed. To make the grate, you can use a regular old cast iron frying pan with holes drilled in the bottom. It should be taken into account that when determining the height of the table, it is necessary to focus on the height of the blacksmith.
Now you can begin installing the air supply mechanism. It is possible to create such a mechanism powered by a foot drive.
The best option for creating a mechanism is to use an electric fan from an unnecessary vacuum cleaner. Its power is enough to supply the required air flow. It would be useful to equip the design with a power regulator.
It is possible to use a manual siren drive instead of a vacuum cleaner.
After this, all parts of the structure are assembled into one whole device. Now you can begin your first test run. A homemade forge for forging can be supplemented with various types of additional devices that increase the ease of working with it.
Aluminum smelting
Aluminum, which has a high degree of ductility, is a low-melting non-ferrous metal. A forge for melting aluminum is easy to make with your own hands. There are many designs that use furnace smelting. They have no fundamental differences between themselves.
Step-by-step instructions for creating a forge for melting aluminum:
- The body is made of brick. The material is selected without cracks to avoid heat loss.
- By selecting scraps of steel pipes, shelves for grate bars are made from them. Low-melting material cannot be used here.
- Steel strips up to 6 mm thick are selected and used as grates.
- The grate bars are screwed on.
- Both coke and coal can be used as fuel.
- Ignition is carried out using a blowtorch or gas torch.
Such a homemade blacksmith's forge can only be used in open space, due to the absence of a chimney. During operation, a lot of gases are released that should not accumulate in a confined space.
Internal arrangement of the forge: main devices
Blacksmithing technology requires placing the following basic pieces of equipment in the garage compartment allocated for the forge:
- Forge with combustion equipment (scoop, poker, etc.).
- Locker with fuel.
- Fan.
- Anvil.
- Barrel for hardening.
- Vise.
Hand tools - hammers, pliers, notches, etc. will require a shelf, or better yet, a full-fledged, durable workbench.
The forge and anvil are positioned so that they can be accessed from all sides. Lighting is best done with incandescent lamps or LED “warm light” lamps (with a color temperature of 2700 K) - they do not distort the color of the workpiece.
Setting up a forge with your own hands
If possible, the door (or gate) of the forge should be directed away from the house.
Mini horn
A small, portable forge is often useful on the farm. It can be used not only in the forge, but also in the garage or at the dacha.
To make a mini-forge with your own hands, you need to have 2 refractory bricks, a hacksaw, a drill with a diameter of 8 cm and a length of 15 cm. It is advisable to have a pobedite tip at the end. To fasten the structure, 2 pins with a diameter of 8 cm and a length of 21 cm are prepared. During the work, you will need 2 hole saws, 63 and 26 mm in diameter.
The operating procedure is as follows:
- 2 bricks, 250 mm long, are sawn in half.
- Two halves of one brick are laid on top of each other and 2 through holes with a diameter of 63 mm are drilled using a hole saw.
- Placing the third half under them, through holes for the studs are drilled in two corners, diagonally.
- Using pins, a block of three bricks is assembled and pulled together. First, washers are put on the ends of the studs and nuts are screwed on.
- A hole for the burner is drilled between the first two bricks using a 26 mm ring drill. It connects to the main passage, but does not touch the second wall.
The burner is inserted into this hole and ignited. Any metal is fed into the main passage, which falls under the flame and heats up in a few seconds.
How to make a forge with your own hands at home
It is possible to create a forge with your own hands. This work will take a minimum of time, money and effort. We will reveal the subtleties of manufacturing, based on different price categories.
Forging is an activity chosen by hardworking and creative men. Such a workshop can become a place of work that brings serious income. A forge with your own hands is a dream that can easily be realized, and today we will tell you how to do it.
Basic Rules
There are many men who equipped a small room in a residential building as a forge. Most often they used the bathroom for this, which is completely wrong! A forge is a place where basic fire safety rules must be observed.
Before you start talking about how to make a forge yourself, you should determine a place for it. To do this, the following conditions must be met:
- Premises: separate, located away from a residential building.
- Room area: from 15 m2 and above, depending on the purpose of the work.
- Forge walls: built of wood or brick, covered with plaster.
- Forge floor: any non-combustible material.
- Door opening: outward.
- Additionally: good lighting with insulated electrical wiring, ventilation.
A forge located at home may interfere with the sleep of household members, which should be taken into account before constructing or allocating premises. If the work is planned to be carried out only in the warm season, you should think about equipping a canopy. All the recommendations described above are followed regardless of the type of forge.
Necessary equipment
Building your own forge at home requires certain knowledge. The heart of the workshop is the equipment; without it, the master cannot work. Below is a list of required equipment.
- The forge is the most important element. It is in it that the fire burns, and the metal reaches a certain temperature. Place it opposite the front door against the wall.
- Racks for metal workpieces and tools are installed on the right or left wall. Their size depends on the owner’s requirements.
- Containers in the form of metal barrels are installed next to the forge. They are designed for storing coal, slag, oils and water.
- A welding station that won't take up much space.
- A metal cutting machine is one of the main elements of the workshop.
- An anvil that is placed closer to the forge.
- A workbench with a steel vice is equipment without which it is difficult to imagine a forge.
- The molding machine is indispensable in work.
If it is possible to install a mechanical hammer, this will speed up the work process.
Fuel for the forge
The main difference between forge hearths and each other is the use of different fuels. It happens:
- gaseous;
- liquid;
- hard.
The most common option is solid fuel in the form of coal. Professional blacksmiths use shiny charcoal in the shape of a walnut. Charcoal is the most expensive type of fuel. It is in short supply in some areas. We recommend using pulverized coal, the temperature and duration of combustion of which are optimal for forging work.
The optimal liquid fuel, corresponding in price and quality, is fuel oil. A gas forge should be equipped only where this type of fuel has a low cost. Compliance with fire safety rules is a top priority.
Required materials and tools
A homemade forge is equipped with tools that are available to its owner. Gradually, the old tools are being replaced with professional ones. The list of required devices includes:
- hammer or mallet;
- sledgehammer;
- pliers with long handles;
- fan for blowing;
- cast iron grate;
- flexible aluminum sheet;
- steel rulers of three types (30, 50, 100 cm);
- poker;
- metal scoop;
- broom;
- peak.
The materials you will need are brick (preferably heat-resistant), sand, cement, a large stump, and a pallet. Now you can start construction. Let's take a mini-forge on a small budget as an example.
Mini forge device
A mini forge with your own hands is an excellent option for a novice creator. Having tried yourself in business, after a year you can expand the space, purchase additional equipment and shelving.
We'll tell you step by step how to build a forge yourself.
- Away from home, directly in the open air, a cement mortar is prepared by mixing cement, sand and water. It should have a creamy consistency. Mortar is required for brickwork of the furnace.
- The forge is assembled in the simplest way, based on the principles of its operation: the blowing comes from below, as a result of which the coals flare up. The brickwork is fastened in the form of a rectangle with ready-made cement mortar. The result should be three brick walls in the shape of the letter “P”. Provide space for cast iron grates.
- Having laid out 4-5 layers of brick, you need to install cast iron gratings, and then raise three more layers of masonry. They will protect the coal from the wind during operation.
- An old pipe with a diameter of 15 cm, but without mechanical damage, is placed down under the grilles. This is an element of the blowing system.
- Away from the finished furnace, on a pallet, a structure from an aluminum pipe and a fan is assembled. This system will be connected to an air supply pipe. Many homemade products of this type are assembled from a pipe and a vacuum cleaner; everyone chooses the best option for themselves.
- The stump is installed next to the forge. If it wobbles, it is fixed and an anvil is placed on top of it. If it is not possible to purchase it, use a channel, part of a rail or other device.
Note that this mini design is suitable for forging small-sized products, for example, knives and decorative elements.
If you have a separate room, and also a desire to build a professional workshop, you should take the matter more seriously. The forge is the main, central element of the forge, it consists of:
- air supply tuyeres;
- cast iron grates.
Previously, bellows were used to supply air; today, almost any device can be used for this. Car blowers are a great option. The walls of the forge are raised from any material available to the master (brick, concrete, metal).
An umbrella is provided above the forge, in a closed room, to remove smoke. It is made of metal, 0.5 cm thick, in the shape of a pyramidal hood.
When purchasing an anvil, make sure it is made of carbon steel. The form that is considered universal is with two horns.
Making a forge with your own hands is quite simple. It is available to every master, and the progress of work depends on the final goal. A professional approach involves significant costs, but a mini forge in the open air will be an ideal solution for men who value their hobby.
Making a forge from a potbelly stove
Essentially, this is the same potbelly stove, only without the grate. The appearance of blacksmiths can be in the form of a cube, parallelepiped and cylinder. After cleaning the grate, the air does not come from the space below, but is blown through a side channel, which can be adjusted. As a result, the oven heats up better. It retains gases longer, which also increases the heat.
The manufacturing procedure is as follows:
- From a pipe with a diameter of up to 300 mm, a ring 100 mm wide is cut. This part is called a collar.
- A sheet 4 mm thick is taken and a circle equal to the diameter of the collar is cut out of it. This will be the door.
- A piece of pipe for air supply is cut off. It can be from 76 to 102 mm.
- The damper is inserted into it using a handle, a spring and a nut.
- A strip 30 mm wide and length equal to the perimeter of the door is cut out of a 3 mm sheet.
- The strip fits around the door and gets scalded.
- A hole is drilled in the side of the door and a pipe for air supply is welded there.
- Using a locking device, the door is attached to the collar.
- This unit is installed on the firebox with a distance of 100 mm from the bottom.
- In the back part, at the top, a hole is cut and a chimney is installed.
The disadvantages of such a stove include the absence of an ash pan. However, longer combustion results in improved combustion of solid waste. Ash removal can be done less frequently.
Making a forge from a bucket
The bucket forge is also designed for melting aluminum. To do this, you need a bucket with a capacity of 10 to 20 liters. In addition, gypsum and sand. This mixture is placed at the bottom of the bucket.
Step-by-step instructions for a forge made from a bucket with your own hands:
- The selected bucket must not be galvanized. This is due to the fact that zinc, when heated, releases harmful gases. The container is made of ordinary metal.
- A mixture of gypsum and sand, 5 cm thick, is placed on the bottom. The ratio is 1:2. First, such a mixture is formed at the bottom. After drying, the inner walls of the bucket are treated with it. Drying time is 15–20 minutes.
- A water squeegee is installed below, through which air is supplied with a hairdryer.
- A crucible is inserted into the bucket.
- The ignition process begins.
- Aluminum is placed in a crucible and melts under heat.
Small items can be cast in this way.
A hand-made blacksmith's forge is a necessary household device. However, first, you need to read the instructions for its use. Purchase the necessary drawings. The risk of fire must be completely eliminated. The right place has been chosen for it. Working with hot metal will bring not only pleasure, but also benefits.