Interest in how to make a knife sharpener with your own hands arises for a reason. The consumer qualities of hand-held cutting tools are enhanced through the use of modern materials and technologies for blade manufacturing and precise factory sharpening. At the same time, the price of the product increases, but it is becoming increasingly easier to ruin a fairly expensive item with primitive sharpening. Therefore, various household devices for sharpening knives are no longer needed only for convenience. To understand why a knife sharpener is still needed and how to make it correctly, you will have to start with the ideology and evolution of the knife.
Why do you need a sharpener?
A living relic of our days is the Finnish hunting knife. Not a gangster Finnish knife, sometimes of a bizarre shape, but a Finnish-type hunting knife, on the left in the figure. Traditional hunting knives (center and left) are similar in shape, but the difference between them is very large.
Finnish knife and classic hunting knives
The blade of a Finnish knife is forged from cast iron, which can be smelted right in your yard from swamp ore in a furnace-furnace, without resorting to the blast furnace process, puddling, and other methods of converting cast iron into iron and steel. The viscosity of crinkly iron is excellent; it is very difficult to break a blade made from it. But the hardness is also low, somewhere around HRS55, the knife becomes dull quite quickly. Finnish hunters did not care about this: a blade of such hardness can be sharpened (sharpened) by beating on many natural stones, and there were always enough smoothed moraine boulders in Fennoscandia.
They sharpen a knife by beating it in much the same way as beating a scythe, only the whetstone is motionless and the blade is moved. First, they pull it along the whetstone with the butt away from you, then they turn it over and pull it with the butt towards you. The position of the cutting edge (CR) on the whetstone is always dragging; quick movements: shirk-shirk! During each movement, you need to keep the contact patch of the blade with the touchstone (see below), but the requirements for maintaining the angle of inclination are not so strict. Learning to sharpen a knife by beating is not very difficult, and with some skill you can create a smoothly running profile on the blade, see below. However, the Finnish knife is, in general, a dead end in the evolution of a cutting tool, surviving in special natural conditions.
A good knife has never been cheap, and in extreme situations, the durability of the blade, combined with the toughness of the blade, became vital factors. Therefore, even in ancient times, they learned to harden knife blades from the surface and cement them: the core remained viscous, not brittle, and a hard, red-hot crust formed on the outside, see next. rice.:
Structure of a knife blade with surface hardening and carburization
It is still possible to sharpen a knife with a cemented blade, but you need a skill that is not given to everyone. And the abrasive is already needed from a special type of stone - lithographic grunstein slate. There is little of it in nature; Grünstein is still considered a strategic raw material. There is no artificial grenstein and it is not expected. It’s as easy as shelling pears to ruin a cemented knife with inept beating - a little somewhere the cementation bark will be stripped down to raw metal (this is not visible to the eye), the knife will only have to be thrown away, the blade will immediately become dull and begin to crumble.
Note: if you have an antique scythe whetstone of a slightly greenish color lying around somewhere, do not throw it away, it is a valuable rarity.
Service knives do not require the same durability and toughness as hunting and hiking knives, and they should cost much less. As a result, special steels and powder metallurgy are widely used in the production of utility knives. The blade of an “eternal” kitchen knife is structured like a rodent’s incisor: in longitudinal layers, the hardness of which decreases from the core outward. In any case, you have to sharpen the knife less often, but chipping is definitely ruled out - the blade immediately becomes discolored.
Hunting knife maintenance and optimal sharpening angle
In the manufacture of all hunting knives, only hard grades of steel are used, so sharpening them correctly is quite difficult. And I would like to note that the modern alloys used for making knives are quite flexible, which allows the blade to maintain the sharpness of the cutting edge for quite a long period of time, especially when the tool is handled correctly. A knowledgeable hunter will never leave his knife sticking in the ground, will not put it in boiling water when cooking, will not open canned food with it, or leave the blade uncleaned after cutting up the prey.
Usually, sharpening a hunting knife is enough to sand and debone one or two large carcasses, but over time the blade loses its sharpness and the tool loses the accuracy and quality of the cut. And in this case, the correct sharpening is of great importance; it is important not to spoil the cutting edge and slopes, to maintain the sharpening angle of the hunting knife, preventing the metal from chipping from the sharp strip of the tool.
It is impossible to properly sharpen a hunting knife without studying the design of the blade. The blade must have bevels on both sides (they are also called chamfers). These chamfers represent a decreasing plane extending from the butt to the blade, as well as a sharp edge of the cutting part, which is sharpened.
The angle of the narrow and even cutting edge determines how sharp the blade is. This sharpening angle for hunting knives should be in the range of 15-30°, and the accuracy and quality of the cut of this tool depends on how accurately it is observed in the process of sharpening the blade. Thus, the first thing to do when sharpening hunting knives is to determine the angle of the cutting edge.
Hunting knives have a certain classification of products in accordance with the existing cutting edge angle, which determines the specification for processing the prey. Hunting knives sharpened at an angle of 30° are suitable for rough chopping and boning work, at 20° - universal knives designed for work of varying complexity, at 15° - for neat thin cuts when sanding prey, as well as separating cartilage and bones.
The angle of the cutting edge is common to both sides. Thus, in order to understand how to sharpen a hunting knife, it is necessary to divide its size in half. The result will decide the question of what the correct sharpening angle for a hunting knife should be, as well as how exactly to position the sharpening device over the tool or place the knife above the abrasive surface.
How to sharpen a knife?
For these reasons, push-pull sharpening technology (push-pull sharpening or push-pull sharpening technique) was invented long ago:
- The blade is pushed along the touchstone away from you with a twist, holding the butt towards you, the position of the RK is advancing (scraping);
- Then, without lifting the blade from the whetstone, they pull it with the butt towards you with a turn in the opposite direction, the position of the RK is dragging;
- The blade is turned over and repeat steps. 1 and 2;
- pp. 1-3 are repeated, reducing the pressure in each cycle, until the burr formed on the RA disappears (does not stick together).
Note: when they say or write “the hangnail will go away”, etc., this is incorrect. Metalheads have a slang word for it: "zausavka"; for electricians - “switch off”. But in Russian, a burr and a switch are masculine.
Push-pull sharpening protects the blade, but requires high skill from the operator, because During the sharpening process, a number of conditions must be continuously and precisely observed, see also fig. below:
- Maintain the angle of inclination of the blade to the whetstone, smoothly changing it in accordance with the curvature of the wheel.
- Make sure that the tangent to the generatrix of the blade and the transverse axis of the contact spot of the wheel with the touchstone coincide.
- Also ensure that the axis of the contact patch is always perpendicular to the longitudinal axis of the touchstone.
- Smoothly change the pressure on the blade as the area of the contact patch changes.
It is very difficult to meet all these conditions at the same time, completely symmetrically on the forward and reverse stroke of the blade along the touchstone, and a modern knife, as mentioned above, can be damaged by improper sharpening. Any household device for sharpening knives is designed to relieve the sharpener from continuous monitoring of at least part of these conditions.
Manual knife sharpening
Note: for successful push-pull sharpening, the length of the whetstone (see below) must be at least 2 times the length of the knife blade from the handle to the tip.
How to properly sharpen a hunting knife
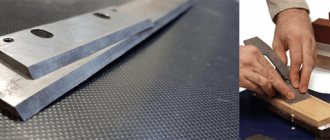
To sharpen the knife, we will use a sharpening stone from a domestic manufacturer.
- We wipe the hunting knife on the stone on both sides.
- We need to achieve a perfect blade edge and sharpen the blade.
- We carry out the actions from the handle to the tip at an angle of 30 degrees.
- To check the sharpness, we run along the edge of the blade. This must be done very carefully so as not to cut yourself. A sharply sharpened product is characterized by the formation of a so-called burr - a slight roughness.
- We smooth out this unevenness using a sanding block, making smooth and measured movements.
There are a few simple ways to determine how sharp your blade is: try cutting a piece of paper or slicing a tomato. A well-sharpened product will easily cope with the task.
Sharpening profiles
The profile of a knife blade is linked to the properties of the material and the structure of the blade, as well as to the properties of the materials for which the tool is intended to process. Sharpening with a simple blunt wedge (item 1 in the figure) gives a stable but rough blade: the cutting resistance is high, and the knife tears quite viscous materials. A sharp wedge (item 2) quickly dulls or chips; on viscous and/or fibrous materials, the cutting resistance may be greater than with a blunt wedge due to the friction of what is being cut against the blade.
Knife blade sharpening profiles
Ideal in all respects is the ogival (smoothly sloping) profile, pos. 3. Experts are still arguing which generator is better - an involute, a hyperbola or an exponential. But one thing is certain - making an ogival blade in production conditions is difficult and expensive, and it is impossible to direct it yourself. Therefore, ogival sharpened knives are used only in special equipment, e.g. microtomes - biological devices for obtaining the thinnest tissue sections.
For disposable blades, e.g. safety razor blades, faceted sharpening is used, pos. 4, i.e. The ogive generatrix, as mathematicians say, is approximated by straight segments. The number of sharpening edges is indicated in the certificate or on the manufacturer’s website. For thick, coarse bristles, 3-4-sided bristles are better; for delicate hair not on the face - 8-sided. The 6-sided one is considered universal.
Angle α
The sharpening angle is always given in half the value α, because Many tools and, for example, bayonet knives are sharpened on one side. For knives for various purposes, the angle α is maintained as follows. within:
- 10-15 degrees – medical scalpels, straight razors, knives for artistic carving.
- 15-20 degrees – pastry knives (for cakes) and vegetable knives.
- 20-25 degrees – bread and fillet knives.
- 25-30 degrees – hunting, hiking, survival knives.
- 30-35 degrees – general purpose household knives.
- 35-40 degrees – carpentry tools, shoe knives, axes.
One and a half
Sharpening knives, except for special ones, is done almost exclusively with a one-and-a-half profile, on the left in Fig. One-and-a-half sharpening is so named because the flat edge of the blade (descent) is formed during the manufacturing process of the blade and cannot be sharpened. In fact, sharpening a knife with one and a half sharpening is no more difficult than sharpening it with a simple wedge. One-and-a-half sharpening is optimal for a knife that works with a variety of materials, and making a knife sharpener with one-and-a-half sharpening is much easier than using a faceted sharpening.
Sharpening the blade of a household or camping knife
In the center and on the right in Fig. The stages of blade sharpening and the numbers of abrasives used on them are shown. The abrasive number corresponds to the number of its grains per 1 square meter. mm surface. The finishing stage has some features:
- Hunting and camping knives are not supplied. This makes it easier for them to cut hard things (for example, bones) with broaching (with filing). In addition, if you accidentally cut yourself, the slightly lacerated wound stops bleeding faster, heals more easily, and there is less danger of infection getting into it.
- After abrading, the blades of straight razors, shoemaker's knives and for artistic carving are brought to mirror smoothness on a leather whetstone with GOI paste.
- Guiding and finishing the blades of kitchen knives can be reduced to one operation with abrasive No. 800-1100.
7-step instructions for sharpening and finishing a kitchen knife
So, in sharpening a knife, one goal is to remove enough metal from the blade so that the cutting edge becomes sharp again. You need to start work with a coarse-grained abrasive and finish with a fine-grained one.
It is important to remember the following principles of sharpening knives:
- The most important thing is to choose the optimal sharpening angle and maintain it along the entire cutting edge while sliding along the block.
- Movements should be smooth, without pressure.
- All bars must be moistened with water, or better yet, with a soap solution: before sharpening (so that the blade glides better and metal dust does not clog the pores), during the process (to remove the resulting suspension) and at the end, to clean the bar.
And one more important tip - the first time it’s better to practice on a knife that you don’t mind ruining. Especially if your main knife is too good and expensive. Well, let's start practicing.
Step 1. Rinse the stone with water, and then run over it, say, with a sponge with a drop of dishwashing liquid.
Step 2. Next, sit down at the table and place the stone on a wooden board, for example, a cutting board. You can place a towel under the stone. For some it is more convenient to place the block perpendicular to themselves, and for others at an angle of approximately 45 degrees. Over time, you will understand how it is more convenient for you to work.
Step 3. Now you need to decide on the sharpening angle and fix the position of the knife. What should the angle be? The general principle is that the smaller it is, the sharper the blade, and the larger it is, the longer the blade retains its sharpness.
- Regular kitchen knives are sharpened to an angle of 40-45 degrees. If you are sharpening a fillet knife (designed for cutting thin pieces of fish, poultry and meat), then you should sharpen it sharper - at an angle of 30-40 degrees. The selected value must be divided by 2, and then we will get the angle that should be between the blade and the surface of the block. That is, to sharpen a blade at 45 degrees, you need to sharpen each side at 22.5 degrees to the sharpening surface.
A simple technique shown in the photo below will help you fix the knife at an angle of 22.5 degrees.
- Remember, you should try to stick to the chosen angle throughout the entire work.
Step 4. Place the knife across the block so that the upper edge of the handle is above the lower edge of the stone. Holding the handle with one hand and the blade with the other, we begin to slide along the block away from ourselves along the trajectory shown in the picture below.
Watch a short and clear video:
- The point is that the cutting edge sliding along the stone should always be perpendicular to the direction of movement.
- At the bend of the blade, the knife handle needs to be slightly raised to maintain the selected angle.
- Remember also that you can’t put pressure on the blade, but you shouldn’t give it any slack either.
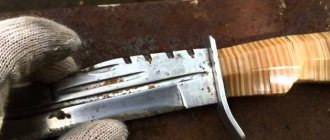
Thus, you need to pass the blade along the stone about 40-50 times, namely until a “burr” (burr, microsaw) appears along the entire length of the cutting edge. Its appearance will tell you that the excess metal has worn out and there is no point in grinding further. Then you need to turn the blade over and repeat the same steps. Clearly in the video:
- A burr is a small roughness that is difficult to see, but can be felt by carefully running your finger along the edge of the blade (but not along the edge, so as not to cut yourself).
Burr of a sharpened knife
During operation, a suspension will appear on the blade - metal dust, which must be periodically washed off with water.
Step 5. So, the burrs have appeared, now we proceed to finishing. To do this, we repeat the same manipulations on a stone with half the grain size. An alternative finishing method is using musat.
- Musat is a steel rod of oval or round cross-section with longitudinal notches. It is only suitable for editing and maintaining sharpness, but not for sharpening a knife. It is recommended to edit the knife with musat every time before and after work.
How to sharpen a kitchen knife with musat can be seen in the following video master class from the respected knifemaker Gennady Prokopenkov, who, by the way, specializes in making kitchen knives.
Step 6. If desired, you can bring your knife to a razor sharpness. To do this, take any leather or leather belt, treat it with GOI, Dialux or any other abrasive paste, and then do the same steps, but only in the direction from the cutting edge.
Step 7. Finally, we check the quality of sharpening. This is done very simply. It is enough to cut a tomato or cut paper. If you wanted to achieve razor sharpness, then you should try to shave the hair on your arm. The sharpest knives can even cut hair, as shown in the photo below, but in the kitchen such sharpness is not required for the most ordinary knife.
Touchstone
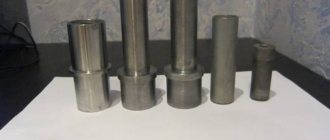
A homemade knife sharpener will be much more convenient and accurate if you do not buy a whetstone for it, but make it from a piece of square corrugated pipe 200-300 mm long (on the left in the figure below) or a wooden block.
Homemade whetstones for knife sharpeners
The edges of the base are covered with sandpaper, respectively. numbers. Glue – stationery adhesive stick. The advantages of a skin-based donkey are obvious:
- Much cheaper than an emery block.
- Can be made with 4 numbers of abrasive, while sanding blocks have a maximum of 2 sides.
- Wear (depletion) of the abrasive is possible no more than the thickness of the abrasive layer of the sandpaper; the waviness of the RK due to the rotation of the whetstone on the sharpener rod (see below) is also no more than this amount.
- As a result, the sharpening angle error due to the development and rotation of the whetstone does not exceed fractions of a degree.
- The chip from the pipe can be put on a threaded rod (in the center in the figure), which makes changing the abrasive faster and easier.
- A touchstone made from a pipe or a wooden block is held in any clamps under an emery block no worse than the last one, on the right in Fig.
Musaty
These are special tools for finishing the cutting edges of knives. It is with their help that the final finishing of the protrusions is carried out after sharpening with abrasives.
They not only come in different designs, but are also made from different materials.
In conclusion, we offer you the easiest way to sharpen knives at home, which can sometimes be used to sharpen a not-so-killed knife:
Dear readers, if you have any questions, please ask them using the form below. We will be glad to communicate with you