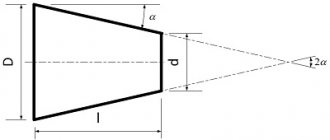
Applying a miter box template
To cut the plinth in the corner of the ceiling as evenly as possible, you can use a paper, cardboard or wooden template instead of a regular miter box. Two parallel mowing lines are applied to it, then the central point is found and any necessary angle is set off from it using a protractor. Before cutting the corner of the ceiling plinth without a miter box, it is worth double-checking the size of the internal or external angles between the walls of the room, using the same protractor.
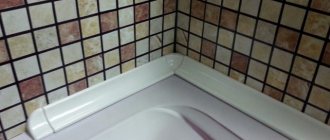
How to join skirting boards
The principle of cutting corners using a template is similar to using a standard miter box. In this case, the workpiece must be pressed against a parallel mowing line and, setting the hacksaw at the desired angle, saw off the workpiece.
How to cut a corner of a ceiling plinth - proven methods and techniques
Ceiling plinths are very often used for decorating rooms. They give the ceiling a complete look and allow you to convey a particular style in the interior. In addition, they serve to mask the joints between walls and ceilings, where two different materials meet. Although such elements are not always present in the premises, they make the interior more complete. In the following material we will describe in detail how to cut the corner of a ceiling plinth, since in such places the joining of individual elements often poses a problem for inexperienced builders.
If the room has a simple shape, then only the internal corners will need to be cut. But in rooms of a more complex configuration, with columns, partitions and niches, there will also be external corners. In order for decorative elements to look beautiful, trimming must be done correctly and carefully, otherwise the appearance of the ceiling will be ruined.
To cut the ceiling plinth in the corners as best as possible, you can use high-quality and sharp tools or other means. The type of tool that will be used to cut skirting boards depends on the type of material they are made from. Thus, ceiling plinths are made from PVC, polystyrene foam, polyurethane and wood.
The cheapest option is PVC skirting boards. They are soft, so it is easy to leave dents and creases on them that cannot be corrected in any way. In addition, this material has the property of attracting dust. A hacksaw or sharp knife is suitable for cutting such skirting boards.
Another fairly cheap type of material is polystyrene foam skirting boards. They crumble easily, so to cut the corners of the ceiling plinth you should only use a sharp knife or a hacksaw. Movements should be soft, without pressure.
Required Cutting Tools
The choice of tool depends on the desired result and the tool used. It determines the characteristics of the cut being formed and the performance of the process. Craftsmen use hand and power tools. Each of them has its own characteristics and imposes certain requirements on the procedure for use and qualifications of the performer. Before you get started, it’s worth getting to know the main varieties. This will help you understand which tool is best to use in a given situation.
Hand tool
Various hand tools can be used to cut plastic skirting boards to size. The most popular are:
- hacksaw for metal. Thanks to the fine teeth, it is possible to form an even cutting line. Allows you to cut products of sufficient width to size. It is very important to use a hacksaw with small teeth. In this case, it is possible to form an almost perfectly straight cut line. If the baseboards have small transverse dimensions, you should avoid using a hacksaw. For thin skirting boards you will need a different tool;
- metal scissors, the use of which must have sufficient qualifications. If you violate the technology and apply significant force, you can crush the material from which the plastic baseboard is made. It will no longer be possible to secure such a segment to the floor. You will have to look for alternative options to get rid of the damaged element.
- sharp knife. Due to the nature of the tool, you must have certain skills to form an even cutting line. Before using such a tool, you should definitely practice on old scraps. There is a high probability of damage to the fragment. To do this you need to use a fairly sharp knife.
Power tools
Hand tools have low productivity. A power tool can significantly increase the productivity of the process, but its operation requires a connection to an electrical network. Most often used to cut skirting boards:
- grinder, which is found in almost every home and is actively used when performing repair work. The high speed of rotation of the disc makes it difficult to form an even cutting line. When cutting the product to size, additional efforts will have to be made to reduce surface roughness. Inserting such a fragment into a fitting will be quite difficult;
- end plates. With the help of such a product it is possible to create a fairly high-quality cut. In this case, the cutting line is located at the angle required by the user. Not everyone has such a tool;
- jigsaw The tool can be used to cut elements at a specified angle in the desired direction. The thin blade allows you to easily cope with the task.
Marking on the ceiling to make a corner on the plinth
There are different ways to properly make a corner on a ceiling plinth. Some are easier to do, others are more difficult. One of these methods is to mark the baseboard on the ceiling. True, cutting skirting boards by weight is not very convenient, but in accuracy this method is not inferior to all others. Before cutting the plinth for the ceiling, it is applied to the surface, while all the imperfections and unevenness of the walls, as well as the size of the corners, are immediately taken into account.
Let's take a closer look at how to correctly make corners on ceiling plinths using this technique:
- First, the two mating plinth strips must be cut at an angle of 90º;
- One of the blanks is pressed against the wall, and its end is pressed against the opposite wall. Then the outline of the workpiece is drawn on the ceiling.
- At the next stage, take the second plank and press its end against the wall in the same way. Outline the fishing line.
- At the intersection of the resulting lines, a point is placed at which further trimming of the skirting boards will be carried out.
- Then each of the planks is applied to the ceiling in turn and the cutting point is transferred to the workpiece.
- From this point, a diagonal cutting line is drawn into the corner of the plinth.
Using the resulting lines, unnecessary sections of the skirting boards are cut off, then the mating sections are joined, checking the correctness and completeness of the fit. “How to cut a corner of a ceiling plinth - simple and correct methods.”
It is worth noting that this method is most often used for internal corners.
Ceiling plinths: cut using manual markings
If it is not possible to use a miter box in your work, you must first properly prepare to work without it. It is best to practice on a dummy ceiling fillet. Scraps of skirting boards left over from previous work will also work.
It is worth noting that the method of cutting plinth without a miter box is more accurate, since you can more accurately and correctly mark the angle for cutting. This method is more convenient for cutting the inner corners of the baseboards. True, there are also disadvantages of manual trimming - a fillet made of wood or polyurethane is difficult to hold in weight during measuring work.
- Let's get to work. First of all, cut two special blanks at an angle of 90 degrees with a pre-prepared tool.
- After this is done, you can apply the plank to the ceiling, resting its end against the wall located perpendicular to the baseboard. We take a pencil and draw lines directly on the ceiling, indicating the contour of the fillet.
- We carry out similar actions with the adjacent plank, we also lean it against the ceiling and draw a pencil line.
- Then we carefully examine the improvised drawing. The point where the lines intersect is where you need to cut the baseboard. But it's better to be safe. Again, place each fillet in turn against your ceiling and mark on them the place according to which the cutting will be done. You need to draw a line from this place to the other edge of the baseboard. Then you need to cut the fillets along all the drawn lines.
- After the cutting process is completed, join the skirting boards together and apply them to the ceiling in the place where you are going to install.
Trimming the corners of the ceiling plinth by marking: 1. Mark the line of the first plinth. 2. Mark the line of the second plinth. 3. Mark the intersection point on the baseboards. 4. Cut skirting boards are joined in the corner.
If, after all the work carried out, you notice that the plinths are installed unevenly, there are gaps, cracks or other errors in the work, do not rush to despair and redo everything again. Putty or other sealant will help you out. With them you can carefully fill the resulting voids without causing damage to the baseboards and their appearance. Fast and convenient, and most importantly – beautiful.
Cutting plinths to decorate the ceiling
Another type of ceiling plinths is made from extruded polystyrene foam. They are much denser than ordinary foam plastic products (therefore they do not crumble), they cost a little more, but they are also somewhat more difficult to cut. For work, you can use the same knife or hacksaw for metal.
The most expensive skirting boards are made from polyurethane. These are elastic, strong and moisture-resistant products that are very easy to cut with a construction knife. True, they cannot be used in all rooms, since polyurethane is sensitive to high temperatures - it deforms, begins to crack or crack.
To work with wooden baseboards, only a hacksaw with fine teeth is suitable; you can use a metal tool.
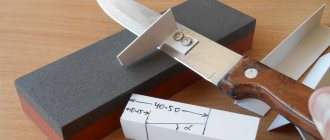
Using a miter box to cut baseboards
In carpentry, a special device made of wood, metal or plastic is often used - a miter box. There are special slots made in it that allow you to make an even cut at 90º, 45º, and in more complex devices – also at 60º. There are also professional miter boxes equipped with a rotating mechanism. In them, the cutting tool can be installed and fixed at any angle to the workpiece. Before you make a ceiling plinth in the corners, you need to understand the details.
To cut the inner corner of a ceiling plinth using a miter box, you must:
- First, you need to attach the baseboard blank to the ceiling surface and mark the length.
- Now the piece of plinth is placed in the miter box in the same position as it should be placed on the ceiling.
- The plinth is pressed tightly against the back wall of the miter box.
- Hold the workpiece with one hand so that it does not move during cutting.
- The hacksaw is installed at an angle of 45º to the workpiece.
- Cut the plinth, controlling the degree of pressure of the hacksaw so as not to damage the product.
- Then they move on to cutting the counter piece of plinth. It is also applied to the far wall of the miter box.
- The workpiece is pressed and held by hand so that it does not move.
- The hacksaw is installed at an angle of 45º to the workpiece so that the cutting direction is opposite to the first element of the plinth.
- Cut off the corner of the plinth.
After trimming the ceiling plinths in the corners, they proceed to joining the resulting elements. If the cutting was done accurately, they will fit tightly together.
Please note that it is recommended to start cutting the inner corner of the baseboard from the front side. Then the cutting line will be more accurate and even. As for the wooden elements, all flaws on them will need to be cleaned with a file. “How to properly cut ceiling plinths in the corners - options and methods for plinths made of different materials.”
Let's look at how to cut the outer corner of a ceiling plinth using a miter box:
- It is best to start marking and measuring the ceiling plinth from the inner corner, and only after completing it, start cutting the outer corner. Otherwise, the plank may be short and not enough to fill the entire length of the ceiling.
- The plinth is applied to the ceiling and its length is marked.
- Then the workpiece is placed in a miter box and pressed against the front wall.
- The hacksaw is placed at an angle of 45º and, holding the workpiece with your hand, the corner is sawed off.
- Similarly, it is necessary to cut off the opposite part of the outer corner.
- The workpiece is pressed to the front of the miter box.
- The hacksaw is placed at an angle of 45º to the baseboard and the workpiece is sawed off.
READ How to Cut Abs Plastic
Upon completion of the work, the pieces of plinth are joined together, checking that everything is done correctly and evenly.
It is worth noting that a miter box can help cut the corner of the ceiling plinth as evenly as possible only if the walls are located strictly perpendicular. If they are uneven and the angles are not precise, this device is unlikely to be useful. “How to correctly cut the corner of a ceiling plinth - rules and methods.”
Cutting methods
The process of forming corners can differ significantly. Each method has its own distinctive features that must be taken into account when performing work. Having decided to use a certain method, it is worth understanding how excess material is cut off in each specific case.
Using a stencil
The method is relevant when designing floor surfaces in rooms with a non-standard configuration. In this case, other methods become an unsuitable option. With their help, it is quite difficult to give the cutting edge the correct direction. You have to constantly adjust the configuration of the plinth until you can get the required shape.
You can avoid mistakes when forming the surface by making a stencil that quite accurately replicates the configuration of a non-standard wall. It is made from thin cardboard or fairly thick paper. Its thickness must fully correspond to the thickness of the floor plinth.
The work is performed in the following sequence:
- prepare material of suitable thickness and length. It must have sufficient rigidity so as not to deform during the work;
- apply the cardboard as tightly as possible to the wall. The final result largely depends on this stage. If the stencil turns out to be of poor quality, you will have to adjust each element in place, which will significantly increase the duration of the work performed;
- using a utility knife, remove excess material, achieving full compliance with the cut line and the wall configuration. Instead of a stationery knife, you can use a jigsaw. However, in this case, you must have sufficient qualifications to perform the work efficiently. Otherwise, it will not be possible to accurately replicate the required configuration. The cutting line must be perpendicular to the mating line of the wall surfaces;
- control the quality of the manufactured template;
- cut off the mating fragments of the skirting boards according to the prepared template;
- check the quality of the work performed;
- carry out installation of skirting boards.
We use a miter box
The miter box is an indispensable device, widely used when performing various types of finishing work. The design of the product allows you to cut the fragment at the correct angle. The U-shaped device has special slots that are used as guides when cutting fragments to size.
To cut a piece of plinth to the required length, the product is placed inside the wort, pressing with the wrong side. When laying with the front side forward, there is a risk of damage to it during the cutting process of the product. In this case, the edge of the panel is positioned so that the edge of the panel remains inside the diagonal slot.
Attention! If the dimensions of the wort exceed the geometric parameters of the plinth, you should make sure that the product is evenly pressed against the groove side of the device. Only after this will it be possible to cut the plinth to size.
Using a pencil and ruler
Not everyone has a special tool. Available funds are required to purchase it. Not everyone can make a high-quality template. Even a slight deviation from the required parameters will significantly worsen the final result. In this case, you can use a piece of paper, a pencil, or a ruler.
The work is performed in the following sequence:
- measurements are taken on the wall surface;
- the obtained values are transferred to a plastic plinth, on which a line for the future cut is formed using a pencil;
- the excess amount is cut off with the selected tool.
Attention! If the floor surface has a complex configuration, it will be necessary to measure the corners of the room with special care, repeatedly checking the obtained values. This will avoid mistakes.
Customized according to location
Even careful preparation and measurement of the geometric parameters of walls does not always provide an accurate cutting line. In this case, you have to adjust the plinth to the location, removing excess material. When cutting the baseboard “in place”, it is worth installing it as closely as possible to the wall surface that interfaces with the floor. Directly on the product we mark a line along which the excess amount of material should be cut off. During the cutting process, the cutting tool is positioned in such a way that the slope of the cutting tool is 45 degrees relative to the center of the profile angle.
How to make a miter box yourself
Often, the only way to evenly cut the corner of a ceiling plinth is to use special devices so that the tool does not move to the side during the cutting process. In this case, you can make a miter box yourself.
Option 1. A box in the shape of the letter P is made from three boards. The required corners are marked on the walls of the box and slots are cut in the appropriate places. The result is a complete device.
Option 2. Sometimes it is quite difficult to make the corners on the skirting boards on the ceiling as even as possible, especially if you have to hold the workpiece in weight. In this case, you can use a homemade device. Take two boards and knock them down into a corner shape. Then a mowing line with the required angles is drawn on a sheet of paper or cardboard, and the template is applied to the corner. Then press the plinth, place the template under the cutting area and saw off the corner along the lines.
Option 3. If you are still in doubt about how to properly cut the corner of the plinth, almost any household item whose shape allows you to form a corner can help with this. This could be a chair or a table, simply placed close to the wall.
To understand how to properly cut a ceiling plinth, you should also familiarize yourself with the rule for measuring workpieces. So, to make an internal corner, the length begins to be measured directly from the beginning of the corner. But to determine the external corner, it is worth considering that it will protrude into the space of the room by the width of the product.
There is no need to rush and fix the workpieces before the mating plinths in the corner have been completed. In order not to redo the work, you must first make sure that the joining surfaces fit tightly to each other and to the ceiling. Small defects can be corrected with a file, thin nail file or knife, depending on the material of the product.
If cutting the skirting boards in the corners did not work out perfectly, small cracks can simply be filled with putty. In general, the process of cutting skirting boards at the corners is not at all difficult. However, for practice, you can take several small pieces of baseboard and practice on them.
How to replace a miter box with improvised means
How to make the corners of a ceiling plinth using improvised means? There are several ways:
First way. It is necessary to prepare three wooden boards of the same thickness and width. Using nails or self-tapping screws, connect them into a U-shaped structure. Mark the 45 and 90 degree angles (you'll need a square or protractor for this) and then make the cuts using a wood saw. The result will be a homemade miter box. How to trim ceiling skirting boards using this tool is indicated above.
Scheme for making a miter box with your own hands
- Second way. In this case, before cutting out the ceiling plinth, you should build a simple structure to hold the fillet. To do this, you need to take two boards and put together a corner from them. Then take paper and draw lines on it going at different angles. Now let's look at how to cut corners using the resulting tool: the fillet is laid on a wooden corner;
- in the marked place - a template with drawn lines is applied to the product and trimming is carried out.
Homemade miter box option
The third method. This method is the simplest, but it requires some experience and a steady hand. In this case, you can use any structure that has a right angle, for example, a table.
The video demonstrates the process of making a miter box at home:
What tools will you need?
For ceiling plinths, the following tools may be useful, depending on the chosen method of work:
- Saw on wood. Useful for working with wooden ceiling plinths.
- Metal cloth. Suitable for other types of skirting boards (foam, plastic, etc.).
- Miter box. The tool is a groove that has the shape of an inverted U, where the mowing line for cutting is marked at angles of 45° and 90°.
- Electric miter saw. Can be used instead of a miter box, helps achieve high precision cuts.
- Jigsaw. Easy to operate, it can be used to cut corners efficiently and correctly without burrs.
- Stationery or construction knife. Suitable for foam baseboards, it is important that it has an excellent cutting blade, and therefore must be well sharpened.
How to make an even angle: methods
The most difficult thing is to cut a corner so as to get a perfectly flat one: the surface of the materials used is not easy to cut, in addition, you need to maintain a good fit, preferably without huge gaps. How to make a corner on a ceiling plinth? You can use several methods: with a miter box, without a miter box, using decorative corners, as well as an alternative method.
How to make corners of a ceiling plinth without tools
- Make the necessary marks on the baseboards.
- Using a ruler, align the edge of the baseboard with the mark. If you just cut along the mowing line, the parts in the corner will still not fit, since the inner part will get in the way. You can trim it later by taking measurements on the ceiling.
- You can place the piece that needs to be cut on the table, with the part that will be located on the ceiling, and cut at an angle of 45 degrees. It will require some adjustment, but not much.
- Repeat steps 2 and 3 for the second plank, making the outer corner.
In this way, you can make ceiling plinth without special tools, using improvised means.
Using fillets
You don’t have to make the fillets yourself, but immediately purchase those that are initially prepared for joining. This is how polystyrene foam fillets are produced, which do not need to be adjusted to each other.
The baguette that will be fixed on the left must have a right cut, and the right baguette must have a left cut. When creating an internal corner, make sure that the lower section rises above the upper; for the external corner, everything should be the other way around.
Attach the baguettes to each other, if necessary, make cuts at the joints of the base. If everything is in order, the skirting boards can be fixed with glue or screwed to the walls with further sealing of the seams.
Cutting the corners of ceiling plinths without a miter box
How to properly cut ceiling plinth without a miter box? To work, you will need a well-sharpened pencil, a small piece of plinth, a stationery knife (for polystyrene or polyurethane) or a metal saw (for other materials), and a ruler.
You need to attach the plinth to the corner and draw the line with a pencil along the outer edge, then attach it to the other side of the corner and also mark it. As a result, you will get a cross on the ceiling, the center of which will mark the place where the ceiling plinth strips should meet. Place a piece of baseboard where you will glue it. Leaning the end against the wall, transfer the desired mark to it. This way you can cut the corners of the ceiling plinth without a miter box.
Skirting for the floor: cutting it correctly
If the room has been renovated according to Euro standards, then the corners must certainly correspond to 90°. Then there is nothing easier than using a miter box. Having laid the plinth inside the device, select a cut angle of 45° and prepare the corners on two plinths.
Angle for corner joining
However, perfectly straight angles are not so common, and there are usually some deviations in one direction or another. In this case, it is necessary to mark the floor with a pencil.
How to cut a plinth according to the markings:
- Two parallel horizontal lines are drawn.
- Approximately in the middle, a dividing line is drawn, which is placed across the marking.
- At the top, by attaching the protractor to the transverse line, we determine the angle of 45 degrees and put a mark on both sides.
- We do the same at the bottom.
- Applying a ruler to the marks, we apply a cross-shaped marking.
The result should be the letter “F”. If you want to get cut angles of 45, 90 or 135o, you can always use this little trick by placing the plinth on the corresponding line.
The finished result
Ceiling plinth, how to cut corners. Using a miter box
Making your own miter box
If you don’t have a tool, and you don’t know how to cut a corner on a ceiling plinth, make a miter box with your own hands:
- you will need 3 planks. They are mounted in the shape of a U-shaped box, on the walls of which the necessary markings are applied. Cuts are made along it for a hacksaw or knife;
- The lightweight version will help you get the job done neatly and without extra effort. Two thin slats are connected with nails in the shape of an angle. Segments are drawn on the sheet in the required proportions. The template is applied to the corner, the plinth is cut according to the markings;
- use of improvised objects. Take everything that has corners - chairs, boxes, tables placed close to the wall.
Advice! Take measurements for blanks for the internal part from the extreme point. When marking the external one, take into account its protrusion into the room, equal to the width.
Floor plinth
A modern floor plinth can hardly be called a plank that closes a gap. This is a structural component that complements the design and emphasizes the overall design. Skirting boards are made from several materials:
Wooden ones can be made from solid wood or veneer. For pruning, flat or circular saws and jigsaws are used.
Plastic skirting boards are “dangerous” competitors to traditional wood. Easy to install and cut with a regular hacksaw.
Aluminum skirting boards are the latest word in interior design. They are usually cut with an electric saw or a hand saw for metal.
Only on wooden baseboards will you have to make corner trims. The rest are cut straight and connected using special corners.
Cutting floor plinths using a miter box
To properly trim the plinth, a special device was invented, which was called a miter box. It is a small block with a recess for the plinth and with gaps located at different angles - for a cutting tool.
READ How to easily cut corners on ceiling skirting boards
Using a miter box you can get neat and even cuts. The plinth is fixed inside the product, then the angle and cutting direction required in a particular case is selected.
On a note! If it is necessary to form a beautiful corner using a miter box, then one piece of plinth is cut at one angle, and the second - in a mirror image.
When working with a miter box, it is important to ensure that the edges of the plinth protrude a short distance beyond the edges of the selected slot. If the cutting tool has a larger width than the plinth itself, then it is recommended to securely fix the product inside the miter box before cutting. Otherwise, the plinth may move inside, the cut angle will constantly change, which is why it (the cut) will turn out incorrect and incorrect.
Making cuts for joining skirting boards using a miter box
Important! During cutting, the pressure on the baseboard should be moderate. Otherwise it may break.
Skirting boards for the ceiling: how to cut corners?
Any repair work is always completed with finishing. In rare cases, the interior of a room does not need a ceiling plinth; its presence helps to hide the joints of the finishing materials used for wall and ceiling surfaces; in addition, one should not forget about the decorative function that this element has. It is not difficult to design the perimeter of the room by simply securing it in a straight line. It is much more difficult to cut it correctly in the corners without spoiling the material and spending a minimum of time and money.
External corner
For the outer corner, the plinth strip is cut at an angle of 45 degrees. First you need to check the evenness of the outer corner. If the surfaces of the walls touch each other exactly at an angle of 90 degrees, then you can use a miter box to trim the baseboard. In order to correctly trim the outer corner strips, it is necessary to correctly position both parts of the plinth.
First you need to mark the length of both halves, and only then cut them at an angle of 45 degrees. In order not to change the position of the saw and not to get confused with the location of the plinth halves, it is necessary to correctly position them in the miter box. The left half is laid face up, with the part adjacent to the ceiling being closer to the center, and the other side adjacent to the wall should be pressed against the side panel with the slots. With the right half, everything is different: it needs to be placed in the miter box face down, and the location of the adjacent parts to the ceiling and wall will be similar here.
inner corner of ceiling plinth
The bar placed in the miter box for an even cut must be pressed against the side, placing it as close as possible to the slot. Holding the workpiece with your left hand, carefully make a cut and put it aside. The second half of the plinth should be cut in the same way, not forgetting to turn it face down.
If you don’t have a miter box, you can make a design of it on paper or cardboard. First, we draw a rectangle, inside of which we draw two more parallel mowing lines along the longer sides. On each side inside the lines, using a protractor, we plot the desired angle in different directions. Preparation and subsequent cutting of workpieces occurs in exactly the same way as using the tool itself.
This method is good because you can set the angle not strictly 45 or 90 degrees, but a little more or less, because the surfaces of the walls in the corners are not always directed towards each other at an angle of 90 degrees, there are errors. Therefore, for a more accurate cut, you can draw any angle on the miter box depicted on paper using a protractor. The degree of the angle is first checked using a protractor, the resulting value is divided by 2. The resulting number will be the exact degree for the correct cut.
If desired, you can build a miter box with your own hands. The easiest way to make a tool is from wood; you just need to take three planks and knock them together in the shape of the letter P. Then make marks on the side parts at different degrees, and use a hacksaw to make slits. You can make a miter box from two boards, having previously made slits in them, or use a drawing with the required angles on paper to accurately determine the slope.
You can even use a table as a handy tool. The main thing is that it has angles by which to navigate.
In order to correctly cut external corners, you can do without any auxiliary tools or drawings on paper, you just need to design the future corner on the spot.
The plinth of the outer corner always protrudes into the room by an amount equal to its width, therefore, to determine the exact cut, it is necessary to make marks on the right and left halves of the plinth. You need to set aside the width on the side adjacent to the wall. Then, from the resulting point, lead the line to the upper corner of the half. The resulting triangle needs to be cut out and the halves joined in place for preview.
How to adjust the corners of the ceiling plinth
Preparatory work
Before proceeding directly to the work of forming corners, it is necessary to carry out some preliminary activities, consisting of organizing the workplace and preparing the necessary tools.
To cut a baguette you may need:
- Ruler, tape measure, square, pencil.
- Goniometer or protractor.
- A stationery or construction knife with replaceable blades.
- Hacksaw with fine teeth.
- Miter box.
- Laser level is desirable, but not required.
The miter box allows you to evenly cut slats, baseboards, and other finishing parts at an angle of 45, 60 or 90 degrees
. The miter box is not an expensive complex device, so it can be purchased even if it is needed for one repair. It will be even good if this tool complements the standard home workshop set. The miter box is a kind of box, in the walls of which guide cuts are made for the cutter, made in both directions at an angle of 45, 60 and 90 degrees. The tool can be made of plastic or wood. In its bottom part, holes are often provided for attaching it to a workbench - to ensure immobility.
Methods for forming corners
As a rule, ceiling plinths have a complex relief surface. It is this that creates difficulties when forming a right angle from two of its segments without leaving slit-like gaps.
In addition, the corners in the premises of apartments and houses quite often differ from straight lines, that is, from 90 degrees, which also makes it difficult to adjust the baseboard. And it must be trimmed so that there are no gaps at the junction, otherwise they will spoil the appearance.
Another nuance that is important to consider when cutting planks is the location of the corners. As you know, there are two types of them - internal and external. Most often, in standard rooms of modern apartments there are only internal corners. External corners are typical for rooms that have one or more turns, such as an entryway or corridor, or that have niches or projections.
Trimming the baguette to decorate external and internal corners is somewhat different.
Diagram of internal and external corners
There are several ways to achieve a perfect or almost perfect corner joint of the baseboard. In one of them you can use a miter box, in another you can use a laser level, in others you can make markings using a square and a ruler. The simplest of them is the first option, but its use is only possible if the adjacent walls of the room form an angle of 90 degrees.
Using a miter box
Before starting work, you will have to check the perpendicularity of the walls in the corners to make sure that it makes sense to cut the plinth along the miter box. Control is carried out using a large square or a special tool - a protractor. A protractor is a professional tool, and not everyone has one, but it is a must to have a protractor in your household.
An inclinometer is a device that allows you to accurately determine the size of an angle.
If it turns out that the angles are straight, or do not differ very much from the desired 90 degrees, then you can safely cut the planks at an angle of 45 degrees, placing them in a miter box. It will be better if the miter box is first secured to the tabletop. If displacement is allowed during work, serious errors may occur in the cut of the plinth, resulting in a sloppy joint.
In order for the baseboards to fit together perfectly at a 90-degree angle, their edges must be cut in a mirror image at a 45-degree angle. They can be cut individually or simultaneously in a package.
- When choosing the second option, the planks must be folded together with their back sides facing each other, and then fixed in this position in several places with strips of masking tape. If the skirting boards are not fastened, then when cutting with a package, their displacement cannot be avoided.
Scheme of laying the left and right planks in a miter box when cutting them separately
- If it is decided to cut each plank separately, then they are laid and cut one by one, but when cutting they are laid in the opposite direction. That is, one baguette is cut along the left guide cuts of the miter box, located at an angle of 45 degrees, and the second - along the right.
Combining two cut strips
- The next step is to combine the two cut strips with each other. First, the test is carried out on the table, and then installation is carried out under the ceiling in the corner being finished. Only by attaching the baguette to the future installation site can you see the real picture. If small errors occur, the ends of the baguette segments should be corrected using a sharp knife.
- Only after the planks have been adjusted as closely as possible can they be fixed with glue.
As for the difference in the execution of cuts made using a miter box for different types of angles (external and internal), it is clearly shown in the diagrams below.
Demonstration of examples of cutting a baguette using a miter box to form the internal and external corner of the ceiling plinth
If you carefully study the diagrams, you can see that the cuts are made from different sides of the edge of the baguette, that is, for the internal corner, the hacksaw is installed at an angle of 45 degrees from the main surface of the plank to its edge (when viewed from top to bottom), and for the external corner - vice versa .
Making a miter box or template
If the corners in the room turn out to be even, but you don’t have a miter box at hand, then you can make such a device or a simplified version - a template yourself. You can do it in several ways.
First option
If you need a miter box for constant work, but for some reason there is no opportunity to purchase it at the moment, then you can make such a tool from plywood or a well-treated board. For this purpose, you will need to prepare three wooden parts. The walls should have dimensions of 500×100×15 and 500×80×15, and the bottom should be 500×200×20 mm. Different wall heights will make cutting down parts more comfortable. The parts will be used to assemble a kind of box without end walls.
Homemade miter box: 1. Side walls. 2. Bottom of the product
The walls are attached to the bottom of the future miter box - it is best to fix them with wooden dowels glued into the drilled holes, but you can also use ordinary self-tapping screws.
Before fixing the walls, it is very important to set them perfectly level, since they must be located at right angles to the bottom board.
Marking a homemade miter box
- Next, you need to find the middle of the length of the walls and mark it using a construction square and immediately file it at the same time, since the cuts must be exactly on the same line. The cutting depth is 60 mm.
- After this, retreating approximately 150 mm in each direction from the middle, two more marks are made on one of the ends of the walls. Then, using a protractor or protractor, set the direction to 45 degrees. Lines are drawn at the ends of the side walls.
- After drawing the lines, their slope should be rechecked again, and then cuts should be made using a beam saw. It is very important that when forming cuts the vertical plane is strictly maintained, otherwise the miter box will be produced with a large error. The cuts should sink 3÷5 mm into the base of the board.
The miter box itself is a simple tool, but making a really high-quality device is not so simple, since there is a high probability of mitering the cuts, at least slightly. Therefore, it is best to immediately take care of purchasing a miter box if you are planning a repair. Fortunately, it is not expensive.
Second option
This method of making a template yourself can be called the simplest, since it does not require special skills or complex tools. To work, you need a sheet of thick paper or cardboard in A4 format, a simple pencil, a ruler and a protractor.
The manufacturing process takes place in the following sequence:
- The first step is to set aside 30÷50 mm on both sides of the sheet from its edge.
- Using these marks, two lines are drawn perpendicular to each other and parallel to the edges of the sheet.
- At the point of their intersection, the vertex of a right angle is formed.
- The next step, using a protractor or simple graphic constructions, is to divide the right angle into two equal halves, which form angles of 45 degrees. The dividing line - the bisector should be located both above and below the lines - it is better to bring it to the middle or even to the edge of the sheet. This will help to more accurately mark the edge of a baguette of any width at the desired angle.
Fitting a baguette using a homemade template
- A whole baguette is attached to the resulting template, for example, on the left side. A cut is marked on it, which should coincide with the bisector line. The top and bottom points are marked on the bar, then they are connected to each other, forming a cutting line. Then, the right plinth is marked and cut off in the same way.
- After this, a right angle is formed using a template of two planks, which is then tried on at the installation site.
- If necessary, the joint is adjusted using a knife.
Third option
This is a modernized previous version, for the manufacture of which you will need a sheet of thick cardboard measuring 300x300 mm, and two even wooden planks measuring 300x30x10 mm.
- A sheet of cardboard must have at least two perfectly smooth edges perpendicular to each other.
- On these sides of the sheet, wooden strips are fixed with glue, which will also form a right angle.
- Then, just as in the previous version, the angle must be divided in half, and it is advisable to draw the intended bisector to the opposite edge of the cardboard sheet. The baguette cuts will be formed along this line.
It is more convenient to work with planks, as there is a good, reliable stop. That is, there is no need to control the alignment of the long side of the plinth with the guide line - just press it against the plank, and then you can mark the cutting line.
Fourth option
Any horizontal plane having a right angle can be adapted to the template. An ordinary rectangular or square workbench or table top is suitable, on which you can also temporarily attach the stop strips, for example, with double-sided tape and mark with a simple pencil a bisector dividing the right angle in half.
The remaining actions are carried out according to the same principle as when using other similar devices.
Using a Laser Level
In modern conditions, many home craftsmen already have a laser level in their tool arsenal, which is excellent for checking the straightness of the corner and marking the baguette when forming both internal and external corners.
How this is done is described step by step in the following instruction table.
| Illustration | Brief description of the operation performed |
| First you need to accurately position the laser level itself. To do this, the same distance is set aside from the corner along the joint lines of the floor and walls, for example, 500 mm. The marked points are connected to each other by a diagonal line. After this, its middle is found and marked. The laser level is installed on the floor, turned on, and then placed so that the vertical plane it sets (its projection in the form of a line) passes through the middle marked on the diagonal and coincides with the corner of the room. The beam should pass vertically along the corner line - this will also show how smoothly the corner of the room is formed. In essence, a plane is specified that cuts the corner of the room exactly in the center. It is in this plane that the junction of the skirting boards should be located. | |
| In this case, the level should be positioned so that the projection of this plane is also displayed on the ceiling. You can fix the resulting bisector line with pencil marks. But it’s even better not to remove the device, as it will help to more accurately display the desired cutting line on the baseboard placed at the place of future fastening. It is probably clear that the next step is to install one baguette at the installation site. The plank must be rested with its end side against the wall. The beam from the laser builder, passing along the surface of the plinth, and even along all its relief protrusions, will accurately show the cut line. | |
| After this, a cut line is drawn along the beam line using a pencil or thin marker. | |
| A corner is cut along the intended line using a knife - it is impossible to make a mistake in this case. Then the cutting line is marked and the second plinth is cut in the same way. | |
| Now that both parts for forming the corner are ready, they need to be connected to each other at the site of future fastening. If the joint is neat, then you can install the baguette with glue. If a small gap has formed between the planks, the ends of the plinth must be adjusted with a knife. | |
| When installing ceiling plinths, the strips that form the corner are glued first, and the flat areas of the finishing are fixed last. | |
| If, during the fitting of the corner side of the baguette, its other end ends up on an already fixed piece of plinth, you should immediately mark the required length in order to cut off its excess. In this case, the smooth edge is simply cut at a right angle. | |
| To correctly cut the baguette for the outer corner, you must also start marking from the floor using a laser level. There is a slight difference in the primary construction here. First, lines are simply drawn along a ruler, which are continuations of the walls. Then an equal distance is laid on them from the corner; these points are connected by a diagonal, on which the center is determined. The beam is directed through this mark to a protruding angle, also with a projection of this plane on the surface of the ceiling. | |
| Next, pieces of baguette are alternately applied to the wall and the protruding corner so that the beam passes through them. Marking is carried out along the projection line, and then the end part of the plinth is cut. Then you need to try on both sections at the installation site, aligning the cuts. If necessary, the ends of the planks are adjusted. If everything is fine, proceed to fixing the fillets on the surface. |
The advantage of using a laser builder is that its beam shows the exact cut line, as it passes along all the relief irregularities of the surface of the baguette. All that remains is to make the correct markings and a neat cut.
Adjustment of ceiling plinth without additional devices
If you have only the simplest tools at hand - a ruler, a square and a pencil, then using them you can also make markings and cut the ends of the baguette for their precise alignment. Next, we will consider two methods that are applicable if the corners in the room are far from 90 degrees, since when marking you have to focus only on the actual alignment of the planks at the place of their installation.
First option
In this case, the work occurs in the following order:
Marking line along the first plinth attached to the corner
- The first step is to place the molding strip on the site of future installation and press it along its entire length with the end resting in the corner.
- Using a pencil, mark its location - draw contours along the upper and lower edges of the plinth.
- After this, the baguette is applied to another wall and the same marking procedure is performed.
The second line will give the intersection point with the first. From this point to the corner point the cutting lines will be drawn.
- As a result of the construction, an angle drawn in pencil is formed on the ceiling. Its vertex can be connected to the vertex of the real angle - using the resulting ray it will be easier to mark cut lines.
- Now you need to again attach both strips to the corner one by one and draw cutting lines from the corner point to the intersection point, directly along the baguette relief.
Trying on the cut plinth at the installation site
- After this, both skirting boards are trimmed along the marking lines. All that remains is to try them on in the corner, as they say, in place. If they match well, then they are installed on a permanent basis.
Combining two trimmed baguettes in the corner
- If necessary, the edges of the baguettes are trimmed or cleaned using sandpaper.
Second option
Another way to form a corner from a baguette using the simplest tools. Its complexity lies in the fact that it is necessary to simultaneously press both baseboards to the walls and mark the future cut.
The work is carried out in the following order:
One of the simplest, but also the most imperfect way of adjusting ceiling skirting boards. Many complex profiles cannot be adjusted in this way.
- One of the two plinths is pressed against one wall of the corner with its back side, and against the other with its end part. It is better to immediately mark its location with a pencil by drawing a line along it on the wall.
- Then, the second baguette is pressed against it with its end. After that, a line is drawn on the first plinth along which both plinths intersect.
- Next, the skirting boards are removed and adjusted on the table. A cut is made along the intended line of the first plinth. Then a second bar is attached to it, a cut is outlined and made, and the accuracy and accuracy of joining the parts is checked.
Transferring the cut line from one fillet to the second
- If after trimming there is no gap between the baguettes, you can glue them in place.
- If a gap forms, it is necessary to make adjustments - cut in the right place with a knife.
It must be said right away that not all skirting board profiles can be adjusted to each other in a similar way. Therefore, when purchasing baguette slats, it makes sense to take one extra so that you can practice on it. But this may not help either - such an adjustment is too primitive.
By the way, if, when forming an angle between the ends of the planks, a small gap nevertheless appears, and you cannot completely get rid of it, then it can be masked by filling it with white sealant or diluted finishing putty. After such a “patch” has dried, it is processed with fine-grained sandpaper.
How to cut?
Two main questions face the installation of ceiling plinths. How to properly cut a plinth without gaps and with perfect fit in the corners, and what tools should you use to end up with a beautifully positioned ceiling element? In order to understand these issues, it is necessary to study all the methods and tools used in trimming skirting boards. Almost all methods and tools can be used to adjust the baseboard in both internal and external corners.
How to join in corners
In rooms, an external corner can be found much less often than an internal one, but it is still advisable to understand how to join a ceiling molding in external corners. It's easy to cut. First of all, mark the beginning of such an angle. To do this, press the baguette against the wall according to the markings, then use a pencil to mark the edge of the corner where you intend to cut the outer corner. After this, you can begin the process of manufacturing the outer corner of the fillet.
The ceiling and walls in a living room are not always exactly level. And therefore, when connecting finishing parts, gaps may form. To dock and glue the ceiling molding in the corners, you need to follow some recommendations:
- Before gluing, the parts of the materials are tried on to make sure that the cutting is correct and that the fragments can be connected.
- Installation always begins with corner elements. When calculating straight parts, it is recommended to leave 10-15 centimeters in reserve so that the cut can be corrected if necessary.
- An adhesive is applied to the outer ends and the inner surface. There is no need to apply the glue in a thick layer, otherwise you will need to remove the excess. Afterwards, the fillet is placed in place and lightly pressed down. After 3-5 seconds, setting occurs.
If excess adhesive does appear, it can be removed with a damp cloth or sponge.
A detailed overview of creating the outer corner of a ceiling plinth without using a miter box is presented in the following video.
Peculiarities
Previously, the ceiling plinth had a different name - fillet. Translated from German it means “notch” or “groove”. The material used to make this decorative element was plaster, poured into a prepared mold. The hardened gypsum element was fixed to the ceiling surface using a solution. Today, gypsum ceiling plinth is very rare, its cost is high, and it is much more difficult to install compared to modern analogues.
Today, ceiling elements are produced from several types of materials in numerous configurations. They cost less than plaster ones, but look no worse. The cheapest specimens are made from polyvinyl chloride (PVC). This material is subject to deformation under slight mechanical stress; the formation of irremovable dents or creases leads to a complete replacement of the element. In addition, all manufactured PVC skirting boards are electrostatic and dust accumulates on them very quickly.
Ceiling plinths made of polyurethane and polystyrene are among the most popular products. They gained their popularity due to their reasonable price, wide range of profile patterns, variety of sizes (their width varies from 5–250 mm), and resistance to moisture. Polyurethane ceiling elements can be found in the design of many rooms; they look great in any interior. But there are also disadvantages: the material does not tolerate temperature changes well and is susceptible to cracking, especially if installed above a stove.
The classic version of the ceiling plinth is a wooden product. Wooden elements, unlike the listed types, are not installed with glue; self-tapping screws are used to fix them. Skirting boards made from this material are used to decorate wooden houses or premises whose style is dictated by the use of wooden elements.
Interior
To join the halves of the plinth in the inner corner, you can use the same methods and tools. The arrangement of the halves in the miter box when cutting for the internal corner is identical to the arrangement of the parts used to join the external corner. But, you don’t have to turn over the right half of the plinth to make the cut, but just change the slope of the cut (use a different slot). In any case, on the left side of the baseboard the line will be inclined to the left from the corner point located on the side adjacent to the wall, and on the right side of the baseboard the line will be inclined to the right from a similarly located point.
READ How to Cut Plywood Without Chips
For perfectly flat corner surfaces, you can use a regular square instead of a miter box. To do this, you need to press half of the plinth against the inner corner of the ruler and cut off the unnecessary part at an angle of 45 degrees. This is not difficult to do, since the side of the ruler and part of the plinth form a total of 90 degrees, the cutting line divides this angle in half, which means that part of the plinth will be cut at an angle of 45 degrees.
For wooden and plastic skirting boards, it is not possible to make a cut on the spot; you can only apply markings to the surface of the skirting board, and then make the cut according to the mark using a hacksaw or saw.
In order to correctly trim and then join the halves of the plinth for the inner corner, you need to take measurements on the spot using a simple pencil. The right workpiece must be applied to the corner from the corresponding side until it stops. On the ceiling surface, run a fishing line along the half and remove the workpiece to the side. We do the same with the other half.
At the intersection of the two lines, a point has been formed with which you need to make marks on each half of the plinth. To make a point, you need to attach the half to the joining place. From the resulting point you need to draw a line to the lower corner of the half, the result is a small triangle, which needs to be cut off.
The halves cut in this way need to be adjusted to each other; if the edges are not cut accurately, the cuts can be aligned with a knife if the material used is polystyrene foam.
To eliminate small flaws in the cut of wooden or polyurethane skirting boards, you will have to use a file. Only after the cuts completely coincide can you begin to fix the halves.
Sometimes it is not possible to achieve a perfect fit, but there is always a way out. To eliminate cracks, you can use putty. The choice of putty depends on the material of the baseboard. In order to eliminate inaccuracies in cutting plinths, you need to practice using small pieces of plinth or cut the strips slightly longer than the intended size. Such a reserve will make it possible to make a new cut if it was made with the wrong slope or the material at the cut site was deformed.
Making corners using a miter box
If the walls and corners of the room are smooth, you can use a miter box for work. To properly cut a corner, you should place a part inside the miter box in which a person will make a cut, then insert a saw into the guides. This will keep the piece in place so it can be cut at the desired angle. For high-quality cutting of the plinth, it must simultaneously adhere to both surfaces, so it should be pressed against the wall of the miter box. The ceiling plinth is pressed against the side that is closest to you.
Using a miter box, you will need to cut a 45 degree angle. First you need to decide how to position the plinth in the miter box. To avoid confusion and cut correctly, place the right strip on the right and the left on the left.
Carry out the work according to the following instructions:
- Put the cut pieces together - you have an internal or external corner.
Attach it to the ceiling and check the geometry. If it is not even enough, you can correct it a little with a knife, and in case of minor defects and wide gaps, you can use putty.
With their help you can easily and quickly obtain the desired angles in skirting boards made of polystyrene or polyurethane. Installation
Cutting Features
Let's take a closer look at how to correctly cut a corner on a ceiling plinth using a miter box using different materials.
Polyurethane
Polyurethane foam (colloquially simply polyurethane) is a very good material for ceiling plinths. Due to its good flexibility, it adheres precisely to the base (the junction of the wall and the ceiling), even if due to construction errors the walls and ceiling are uneven. In addition, polyurethane is easy to clean and therefore can last a long time. Low load resistance is not a problem here: there is almost no load on the ceiling plinth. We also have a separate article that discusses in more detail the question of how to make a plasterboard ceiling and suspended plasterboard ceilings with your own hands.
Material polyurethane for ceiling skirting boards
The polyurethane baseboard should be cut using a miter box as follows:
- Measure the wall and ceiling at the joint.
- Select a suitable template on the miter box for cutting.
- Place the end of the plinth in the miter box and make a cut. It is recommended to use a miter saw, but if you don’t have one, you can take a regular hacksaw or, better yet, a metal file - it has a finer pitch, and therefore the cut will be more accurate.
- The ends of the cuts are placed in place and compared. If necessary, modifications are made using hand tools (in extreme cases, just a knife).
- Correctly cut and fitted ends are sanded with fine-grained sandpaper. This is necessary for better adhesion (sticking) of the glue.
- The finished skirting boards are glued in place. If cracks form, they are sealed with silicone sealant or special putty.
Styrofoam
Polystyrene foam is also often found as a decorative element in rooms. Its characteristic feature is increased fragility, so it must be adjusted to the location very precisely; foam plastic does not tolerate any deformation.
Foam plastic for ceiling plinth
You need to cut it using a miter box as follows:
- The plinth plates are placed in a miter box.
- An incision is made. Unlike polyurethane, polystyrene foam is a soft material, and it can be cut even with a knife or, better yet, a stationery or construction cutter. Here it is better to use a small, but even piece of wood, a metal die or a ruler. As a last resort, you can make marks with a pencil corresponding to the slits of the miter box, connect them with a ruler - and make a cut.
- If desired, you can use any type of saw, but you need to take into account the fragility of the foam. Therefore, it is better to moisten the blade with water in advance.
- After trimming, adjustment is made in the same way as for polyurethane.
Asterisk IMPORTANT: foam is a fragile material, so the cutting tool must be sharpened as best as possible
Polystyrene
Polystyrene has the same properties as polystyrene foam. Therefore, polystyrene skirting boards are cut in the same way as foam skirting boards. The main thing here is to sharpen the cutting edge of the tool as sharply as possible to avoid chipping. In this case, there is no need to sand the ends: their edges are usually already sufficiently textured to ensure good adhesion of the glue.
Cutting polystyrene using a miter box
Tree
Wooden plinths are rare and expensive, so their processing must be approached extremely responsibly. The cutting technology looks something like this:
- The cut end is fixed in the miter box.
- The cut is being made. This can be done with a regular wood hacksaw, but it is better to use a special saw or metal file to avoid cutting too wide.
- The edges are adjusted to fit. If necessary, they are further sanded using a belt machine (or a drill with a sanding attachment), or cut off.
- The plinth is secured in place using glue or self-tapping screws.
Asterisk IMPORTANT: when adjusting you must be extremely careful; it is better to cover the uneven cut with a decorative overlay or wood putty than to gouge out too much wood